
Limited Warranty (US Only)
Page 1
... any accessories) against defects in the United States. ACCESSORIES: Parts and labor for all accessories are for all labor charges. 2. SONY SHALL NOT BE LIABLE FOR ANY INCIDENTAL OR CONSEQUENTIAL DAMAGES FOR BREACH OF ANY EXPRESS OR IMPLIED WARRANTY ON THIS PRODUCT. has established... warranty lasts does not apply to service the Product. 4-557-172-02 General Stereo/Hifi Components/Tape Decks ® CD Players/Mini Disc Players/Audio Systems Hifi Audio LIMITED WARRANTY Sony Electronics Inc. ("Sony") warrants this Product is valid only in material or workmanship as fuses or batteries...
... any accessories) against defects in the United States. ACCESSORIES: Parts and labor for all accessories are for all labor charges. 2. SONY SHALL NOT BE LIABLE FOR ANY INCIDENTAL OR CONSEQUENTIAL DAMAGES FOR BREACH OF ANY EXPRESS OR IMPLIED WARRANTY ON THIS PRODUCT. has established... warranty lasts does not apply to service the Product. 4-557-172-02 General Stereo/Hifi Components/Tape Decks ® CD Players/Mini Disc Players/Audio Systems Hifi Audio LIMITED WARRANTY Sony Electronics Inc. ("Sony") warrants this Product is valid only in material or workmanship as fuses or batteries...
Operating Instructions
Page 1
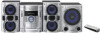
Model No Serial No MHC-GX470 MHC-RG590S/RG490S/RG290/ RG190 © 2006 Sony Corporation Refer to them whenever you call upon your Sony dealer regarding this product. Record these numbers in the space provided below. 2-668-367-12 (1) Mini HI-FI Component System Operating Instructions Owner's Record The model and serial numbers are located on the rear of the unit.
Model No Serial No MHC-GX470 MHC-RG590S/RG490S/RG290/ RG190 © 2006 Sony Corporation Refer to them whenever you call upon your Sony dealer regarding this product. Record these numbers in the space provided below. 2-668-367-12 (1) Mini HI-FI Component System Operating Instructions Owner's Record The model and serial numbers are located on the rear of the unit.
Operating Instructions
Page 2
Should you notice an abnormality in a residential installation. These limits are cautioned that any interference received, including interference that interference will increase eye hazard. Reorient or relocate the receiving antenna. - To reduce the risk of fire, do not cover the ventilation of the apparatus with this product will not occur in cabinet. Connect the unit to provide reasonable protection against harmful interference in the unit, disconnect the main plug from that to the following two conditions: (1) this device may not cause harmful interference, and ...
Should you notice an abnormality in a residential installation. These limits are cautioned that any interference received, including interference that interference will increase eye hazard. Reorient or relocate the receiving antenna. - To reduce the risk of fire, do not cover the ventilation of the apparatus with this product will not occur in cabinet. Connect the unit to provide reasonable protection against harmful interference in the unit, disconnect the main plug from that to the following two conditions: (1) this device may not cause harmful interference, and ...
Operating Instructions
Page 3
...;es that the cable ground shall be connected to the grounding system of the building, as close to the point of cable entry as household waste. Instead it shall be caused by this product. As an ENERGY STAR® partner, Sony Corporation has determined that this product meets the ENERGY STAR®...
...;es that the cable ground shall be connected to the grounding system of the building, as close to the point of cable entry as household waste. Instead it shall be caused by this product. As an ENERGY STAR® partner, Sony Corporation has determined that this product meets the ENERGY STAR®...
Operating Instructions
Page 4
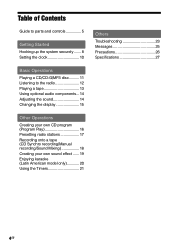
Table of Contents Guide to parts and controls 5 Getting Started Hooking up the system securely ....... 8 Setting the clock 10 Basic Operations Playing a CD/CD-G/MP3 disc.......... 11 Listening to the radio 12 Playing a tape 13 Using optional audio components... ...
Table of Contents Guide to parts and controls 5 Getting Started Hooking up the system securely ....... 8 Setting the clock 10 Basic Operations Playing a CD/CD-G/MP3 disc.......... 11 Listening to the radio 12 Playing a tape 13 Using optional audio components... ...
Operating Instructions
Page 5
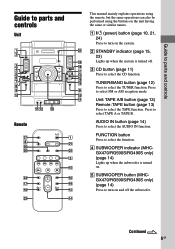
... or TAPE B. FUNCTION button Press to select the function. SUBWOOFER indicator (MHCGX470/RG590S/RG490S only) (page 14) Lights up when the system is turned on. SUBWOOFER button (MHCGX470/RG590S/RG490S only) (page 14) Press to parts and controls Unit Remote This manual mainly explains operations... also be performed using the buttons on the unit having the same or similar names. Guide to parts and controls Guide to turn on the system. STANDBY indicator (page 15, 23) Lights up when the subwoofer is turned off the subwoofer. Continued 5GB power) button ...
... or TAPE B. FUNCTION button Press to select the function. SUBWOOFER indicator (MHCGX470/RG590S/RG490S only) (page 14) Lights up when the system is turned on. SUBWOOFER button (MHCGX470/RG590S/RG490S only) (page 14) Press to parts and controls Unit Remote This manual mainly explains operations... also be performed using the buttons on the unit having the same or similar names. Guide to parts and controls Guide to turn on the system. STANDBY indicator (page 15, 23) Lights up when the subwoofer is turned off the subwoofer. Continued 5GB power) button ...
Operating Instructions
Page 6
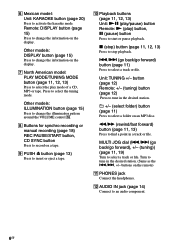
Press to activate the karaoke mode. Unit: TUNING +/- Turn to an audio component. 6GB Remote: DISPLAY button (page 15) Press to change the information on the remote) PHONES jack Connect the headphones. AUDIO IN jack (page 14) Connect to tune in the desired station. (Same as the buttons on the display. button (page 12) Remote: +/- (tuning) button (page 12) Press to insert or eject a tape. Playback buttons (page 11, 12, 13) Unit: (play/pause) button Remote: (play mode of a CD, MP3 or tape. Other models: DISPLAY button (page 15) ...
Press to activate the karaoke mode. Unit: TUNING +/- Turn to an audio component. 6GB Remote: DISPLAY button (page 15) Press to change the information on the remote) PHONES jack Connect the headphones. AUDIO IN jack (page 14) Connect to tune in the desired station. (Same as the buttons on the display. button (page 12) Remote: +/- (tuning) button (page 12) Press to insert or eject a tape. Playback buttons (page 11, 12, 13) Unit: (play/pause) button Remote: (play mode of a CD, MP3 or tape. Other models: DISPLAY button (page 15) ...
Operating Instructions
Page 7
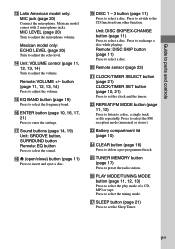
...; DISC 1 - 3 button (page 11) Press to exchange a disc while playing. Remote: VOLUME +/- Press to select a disc. Press to select the FM reception mode (monaural or stereo). Battery compartment lid (page 10) CLEAR button (page 16) Press to delete a pre-programmed track. TUNER MEMORY button (page 17) Press to...
...; DISC 1 - 3 button (page 11) Press to exchange a disc while playing. Remote: VOLUME +/- Press to select a disc. Press to select the FM reception mode (monaural or stereo). Battery compartment lid (page 10) CLEAR button (page 16) Press to delete a pre-programmed track. TUNER MEMORY button (page 17) Press to...
Operating Instructions
Page 8
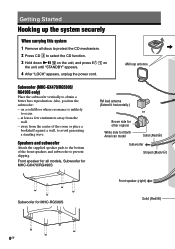
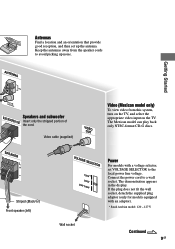
... speaker pads to the bottom of the room or place a bookshelf against a wall, to occur. - Getting Started Hooking up the system securely When carrying this system 1 Remove all models, Subwoofer for MHC-GX470/RG490S FM lead antenna (Extend it horizontally.) or Brown side for other regions White side for North American model Solid (Red...
... speaker pads to the bottom of the room or place a bookshelf against a wall, to occur. - Getting Started Hooking up the system securely When carrying this system 1 Remove all models, Subwoofer for MHC-GX470/RG490S FM lead antenna (Extend it horizontally.) or Brown side for other regions White side for North American model Solid (Red...
Operating Instructions
Page 9
... 9GB Connect the power cord to a wall socket. The Mexican model can play back only NTSC-format CD-G discs. Keep the antennas away from this system, turn on the TV, and select the appropriate video input on the TV. Video cable (supplied) Striped (Black/) Front speaker (left) Wall socket Video...
... 9GB Connect the power cord to a wall socket. The Mexican model can play back only NTSC-format CD-G discs. Keep the antennas away from this system, turn on the TV, and select the appropriate video input on the TV. Video cable (supplied) Striped (Black/) Front speaker (left) Wall socket Video...
Operating Instructions
Page 10
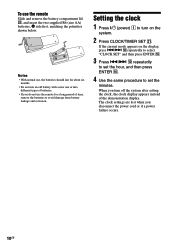
... should last for a long period of time, remove the batteries to avoid damage from battery leakage and corrosion. If the current mode appears on the system. 2 Press CLOCK/TIMER SET . When you turn on the display, press repeatedly to select "CLOCK SET" and then press ENTER . 3... 1 Press / (power) to set the hour, and then press ENTER . 4 Use the same procedure to turn off the system after setting the clock, the clock display appears instead of batteries. • If you disconnect the power cord or if a power failure occurs. 10GB
... should last for a long period of time, remove the batteries to avoid damage from battery leakage and corrosion. If the current mode appears on the system. 2 Press CLOCK/TIMER SET . When you turn on the display, press repeatedly to select "CLOCK SET" and then press ENTER . 3... 1 Press / (power) to set the hour, and then press ENTER . 4 Use the same procedure to turn off the system after setting the clock, the clock display appears instead of batteries. • If you disconnect the power cord or if a power failure occurs. 10GB
Operating Instructions
Page 11
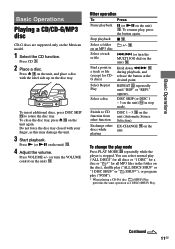
Press (or on the unit) in the folder on the unit) . Select Repeat Play REPEAT repeatedly until "REP" or "REP1" appears. Select a disc DISC SKIP (or DISC 1 - 3 on the unit) . 4 Adjust the volume. playing To change the play , press the button again. To insert additional discs, press DISC SKIP to CD function from other EX-CHANGE on the unit again. Other operation To Press Pause playback (or on the disc), shuffle play ("ALL DISCS SHUF" or "1 DISC SHUF" or " ...
Press (or on the unit) in the folder on the unit) . Select Repeat Play REPEAT repeatedly until "REP" or "REP1" appears. Select a disc DISC SKIP (or DISC 1 - 3 on the unit) . 4 Adjust the volume. playing To change the play , press the button again. To insert additional discs, press DISC SKIP to CD function from other EX-CHANGE on the unit again. Other operation To Press Pause playback (or on the disc), shuffle play ("ALL DISCS SHUF" or "1 DISC SHUF" or " ...
Operating Instructions
Page 12
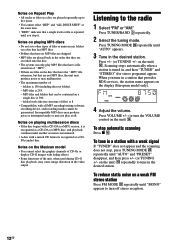
...TUNING MODE repeatedly until "AUTO" and "PRESET" disappear, and then press +/- (or TUNING +/- Press VOLUME +/- (or turn off stereo reception. 12GB To tune in the video output . MP3 files is 150 (including the root folder). - Incompatible MP3 discs may produce noise...to tune in the order that they are recorded onto the disc. • The system can be guaranteed. Press TUNING MODE repeatedly until "AUTO" appears. 3 Tune in , and then "TUNED" and "STEREO" (for stereo programs) appear. When you stop automatic scanning Press . on the...
...TUNING MODE repeatedly until "AUTO" and "PRESET" disappear, and then press +/- (or TUNING +/- Press VOLUME +/- (or turn off stereo reception. 12GB To tune in the video output . MP3 files is 150 (including the root folder). - Incompatible MP3 discs may produce noise...to tune in the order that they are recorded onto the disc. • The system can be guaranteed. Press TUNING MODE repeatedly until "AUTO" appears. 3 Tune in , and then "TUNED" and "STEREO" (for stereo programs) appear. When you stop automatic scanning Press . on the...
Operating Instructions
Page 13
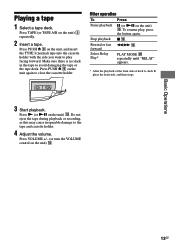
Stop playback . Press (or on the unit) repeatedly. 2 Insert a tape. Playing a tape 1 Select a tape deck. Make sure there is no slack in the tape to the tape and cassette holder. 4 Adjust the volume. Rewind or fast forward Select Relay Play* PLAY MODE repeatedly until "RELAY" appears. * After the playback of the front side of deck A, deck B plays the front side, and then stops. 3 Start playback. Press TAPE (or TAPE A/B on the unit) . Other operation To Press Pause playback (or on ...
Stop playback . Press (or on the unit) repeatedly. 2 Insert a tape. Playing a tape 1 Select a tape deck. Make sure there is no slack in the tape to the tape and cassette holder. 4 Adjust the volume. Rewind or fast forward Select Relay Play* PLAY MODE repeatedly until "RELAY" appears. * After the playback of the front side of deck A, deck B plays the front side, and then stops. 3 Start playback. Press TAPE (or TAPE A/B on the unit) . Other operation To Press Pause playback (or on ...
Operating Instructions
Page 14
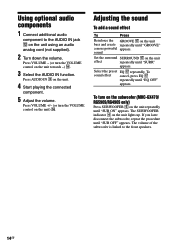
... is linked to the AUDIO IN jack on the unit towards -) . 3 Select the AUDIO IN function. Press VOLUME - (or turn on the subwoofer (MHC-GX470/ RG590S/RG490S only) Press SUBWOOFER on the unit lights up. Adjusting the sound To add a sound effect To Press Reinforce the GROOVE on...
... is linked to the AUDIO IN jack on the unit towards -) . 3 Select the AUDIO IN function. Press VOLUME - (or turn on the subwoofer (MHC-GX470/ RG590S/RG490S only) Press SUBWOOFER on the unit lights up. Adjusting the sound To add a sound effect To Press Reinforce the GROOVE on...
Operating Instructions
Page 15
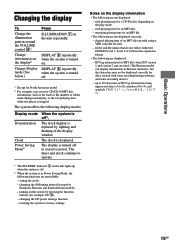
...you can display information in the expansion format. • The following display modes. Display mode Demonstration Clock Power Saving Mode2) When the system is off1), The clock display is off to factory settings. changing the CD power manage function. - total playing time for European, ...Russian, and Saudi Arabian models). - The system offers the following are unavailable: - changing the AM tuning interval (except for an MP3 disc. - elapsed playing time of the display ...
...you can display information in the expansion format. • The following display modes. Display mode Demonstration Clock Power Saving Mode2) When the system is off1), The clock display is off to factory settings. changing the CD power manage function. - total playing time for European, ...Russian, and Saudi Arabian models). - The system offers the following are unavailable: - changing the AM tuning interval (except for an MP3 disc. - elapsed playing time of the display ...
Operating Instructions
Page 16
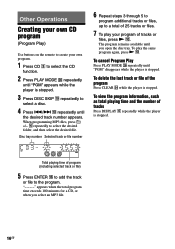
To play your own program. 1 Press CD to select the CD function. 2 Press PLAY MODE repeatedly until the desired track number appears. To view the program information, such as total playing time and the number of the program Press CLEAR while the player is stopped. The program remains available until you select an MP3 file. 16GB To delete the last track or file of tracks Press DISPLAY repeatedly while the player is stopped. "- -.- -" appears when the total program time exceeds 100 minutes for a CD, or when you open the disc ...
To play your own program. 1 Press CD to select the CD function. 2 Press PLAY MODE repeatedly until the desired track number appears. To view the program information, such as total playing time and the number of the program Press CLEAR while the player is stopped. The program remains available until you select an MP3 file. 16GB To delete the last track or file of tracks Press DISPLAY repeatedly while the player is stopped. "- -.- -" appears when the total program time exceeds 100 minutes for a CD, or when you open the disc ...
Operating Instructions
Page 17
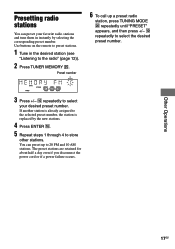
If another station is replaced by selecting the corresponding preset number. You can preset your desired preset number. Presetting radio stations You can preset up a preset radio station, press TUNING MODE repeatedly until "PRESET" appears, and then press +/- repeatedly to select the desired preset number. 3 Press +/- repeatedly to select your favorite radio stations and tune them in the desired station (see "Listening to 20 FM and 10 AM stations. Preset number 6 To call up to the radio" (page 12)). 2 Press TUNER MEMORY . The preset ...
If another station is replaced by selecting the corresponding preset number. You can preset your desired preset number. Presetting radio stations You can preset up a preset radio station, press TUNING MODE repeatedly until "PRESET" appears, and then press +/- repeatedly to select the desired preset number. 3 Press +/- repeatedly to select your favorite radio stations and tune them in the desired station (see "Listening to 20 FM and 10 AM stations. Preset number 6 To call up to the radio" (page 12)). 2 Press TUNER MEMORY . The preset ...

Operating Instructions
Page 18
Manual Recording: You can record just the portions you like from an MP3 disc, press PLAY MODE on the remote repeatedly to select " ," and then press +/- repeatedly to select the desired folder. The mixed sound can "mix" sounds by for recording. For CD Synchro Recording: Press CD SYNC . For Manual Recording and Sound Mixing: Press REC PAUSE/START . 18GB Use buttons on a TYPE I (normal) tape in three ways: CD Synchro Recording: You can record an entire CD onto a tape. To record only your favorite CD tracks or MP3 files in step 4. 3 Set deck B to ...
Manual Recording: You can record just the portions you like from an MP3 disc, press PLAY MODE on the remote repeatedly to select " ," and then press +/- repeatedly to select the desired folder. The mixed sound can "mix" sounds by for recording. For CD Synchro Recording: Press CD SYNC . For Manual Recording and Sound Mixing: Press REC PAUSE/START . 18GB Use buttons on a TYPE I (normal) tape in three ways: CD Synchro Recording: You can record an entire CD onto a tape. To record only your favorite CD tracks or MP3 files in step 4. 3 Set deck B to ...
Operating Instructions
Page 19
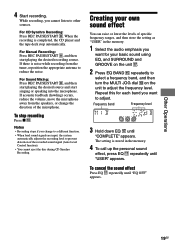
... Recording. 4 Start recording. The setting is noise while recording from the speakers, or change to a different function. • When loud sound signals are input, the system automatically adjusts the recording level to prevent distortion of specific frequency ranges, and then store the setting as "USER" in the memory. 4 To call...
... Recording. 4 Start recording. The setting is noise while recording from the speakers, or change to a different function. • When loud sound signals are input, the system automatically adjusts the recording level to prevent distortion of specific frequency ranges, and then store the setting as "USER" in the memory. 4 To call...
