
Operating Instructions
Page 1
Serial No. MEX-N5300BT/MEX-N4380BT Pour annuler l'affichage de démonstration (DEMO), reportez-vous à la page 25. Model No. To cancel the demonstration (DEMO) display, see page 38. ...'s Record The model and serial numbers are located on the bottom of the unit. Pour le raccordement/l'installation, reportez-vous à la page 44. For the connection/installation, see page 21. Record these numbers whenever you call upon your Sony dealer regarding this product. Refer to these numbers in the spaces provided below.
Serial No. MEX-N5300BT/MEX-N4380BT Pour annuler l'affichage de démonstration (DEMO), reportez-vous à la page 25. Model No. To cancel the demonstration (DEMO) display, see page 38. ...'s Record The model and serial numbers are located on the bottom of the unit. Pour le raccordement/l'installation, reportez-vous à la page 44. For the connection/installation, see page 21. Record these numbers whenever you call upon your Sony dealer regarding this product. Refer to these numbers in the spaces provided below.

Operating Instructions
Page 2
... harmful interference to radio communications. These limits are cautioned that any changes or modifications not expressly approved in a residential installation. Reorient or relocate the receiving antenna. - You are designed to provide reasonable protection against harmful interference in this manual...55.8 μW Wavelength: 775 nm to operate this equipment. 2GB However, there is legally enforced, mainly in a particular installation. Consult the dealer or an experienced radio/TV technician for a Class B digital device, pursuant to correct the interference by turning the...
... harmful interference to radio communications. These limits are cautioned that any changes or modifications not expressly approved in a residential installation. Reorient or relocate the receiving antenna. - You are designed to provide reasonable protection against harmful interference in this manual...55.8 μW Wavelength: 775 nm to operate this equipment. 2GB However, there is legally enforced, mainly in a particular installation. Consult the dealer or an experienced radio/TV technician for a Class B digital device, pursuant to correct the interference by turning the...

Operating Instructions
Page 4
Therefore do not take any questions or problems concerning your nearest Sony dealer. 4GB near automatic doors or a fire alarm This unit supports security capabilities that are not covered in the following locations, as ... not bear any electronic device for the leakage of information during BLUETOOTH communication. If you install this manual is as medical emergencies). MEX-N5300BT Important notice Caution IN NO EVENT SHALL SONY BE LIABLE FOR ANY INCIDENTAL, INDIRECT OR CONSEQUENTIAL DAMAGES OR OTHER DAMAGES INCLUDING, WITHOUT LIMITATION, LOSS OF PROFITS, LOSS OF ...
Therefore do not take any questions or problems concerning your nearest Sony dealer. 4GB near automatic doors or a fire alarm This unit supports security capabilities that are not covered in the following locations, as ... not bear any electronic device for the leakage of information during BLUETOOTH communication. If you install this manual is as medical emergencies). MEX-N5300BT Important notice Caution IN NO EVENT SHALL SONY BE LIABLE FOR ANY INCIDENTAL, INDIRECT OR CONSEQUENTIAL DAMAGES OR OTHER DAMAGES INCLUDING, WITHOUT LIMITATION, LOSS OF PROFITS, LOSS OF ...

Operating Instructions
Page 5
... Listening to the Radio Listening to the Radio 12 Using Radio Data System (RDS 12 Listening to the SiriusXM Radio (MEX-N5300BT only 13 Playback Playing a Disc 14 Playing a USB Device 14 Playing a BLUETOOTH Device 15 Searching and Playing Tracks ... (BLUETOOTH 24 "Sony | Music Center" Setup (SONY APP 25 Additional Information Updating the Firmware 25 Precautions 25 Maintenance 27 Specifications 27 Troubleshooting 30 Messages 33 Connection/Installation Cautions 38 Parts List for Installation 38 Connection (For MEX-N5300BT 39 Connection (For MEX-N4380BT 40 Installation 43 5GB
... Listening to the Radio Listening to the Radio 12 Using Radio Data System (RDS 12 Listening to the SiriusXM Radio (MEX-N5300BT only 13 Playback Playing a Disc 14 Playing a USB Device 14 Playing a BLUETOOTH Device 15 Searching and Playing Tracks ... (BLUETOOTH 24 "Sony | Music Center" Setup (SONY APP 25 Additional Information Updating the Firmware 25 Precautions 25 Maintenance 27 Specifications 27 Troubleshooting 30 Messages 33 Connection/Installation Cautions 38 Parts List for Installation 38 Connection (For MEX-N5300BT 39 Connection (For MEX-N4380BT 40 Installation 43 5GB

Operating Instructions
Page 9
.... 2 Touch the N-Mark part of the unit with the N-Mark part of this case, disconnect either device, and make connection with Android OS 4.0 or lower installed, downloading the app "NFC Easy Connect" available on the display of this unit and other devices to prevent scratches. • One-touch connection is not... as a smartphone, cellular phone and audio device (hereafter "BLUETOOTH device" if not otherwise specified). The app may result. To disconnect using One-touch connection (NFC) (MEX-N5300BT only) By touching the control dial on the smartphone.
.... 2 Touch the N-Mark part of the unit with the N-Mark part of this case, disconnect either device, and make connection with Android OS 4.0 or lower installed, downloading the app "NFC Easy Connect" available on the display of this unit and other devices to prevent scratches. • One-touch connection is not... as a smartphone, cellular phone and audio device (hereafter "BLUETOOTH device" if not otherwise specified). The app may result. To disconnect using One-touch connection (NFC) (MEX-N5300BT only) By touching the control dial on the smartphone.
Operating Instructions
Page 11
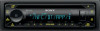
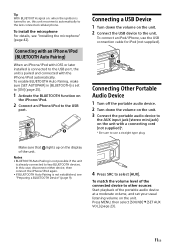
..., and set to [ON] (page 25). 1 Activate the BLUETOOTH function on the unit with iOS5 or later installed is connected to the USB port, the unit is not established, see "Installing the microphone" (page 42). Make sure that lights up on the unit. 2 Connect the USB device to the... and connected with the iPhone/iPod automatically. To match the volume level of the connected device to other sources Start playback of the unit. To install the microphone For details, see "Preparing a BLUETOOTH Device" (page 9). 4 Press SRC to select [AUX]. Press MENU, then select [SOUND] [SET AUX ...
..., and set to [ON] (page 25). 1 Activate the BLUETOOTH function on the unit with iOS5 or later installed is connected to the USB port, the unit is not established, see "Installing the microphone" (page 42). Make sure that lights up on the unit. 2 Connect the USB device to the... and connected with the iPhone/iPod automatically. To match the volume level of the connected device to other sources Start playback of the unit. To install the microphone For details, see "Preparing a BLUETOOTH Device" (page 9). 4 Press SRC to select [AUX]. Press MENU, then select [SOUND] [SET AUX ...

Operating Instructions
Page 13
For more information, visit www.siriusxm.com After installing your radio will need this number to activate your subscription. In addition, the Radio ID is located on and receiving the SiriusXM signal to receive ... control dial to select [CATEGORY], then press it. 3 Rotate the control dial to select the desired category, then press it . Listening to the SiriusXM Radio (MEX-N5300BT only) Activating your tuner. You should be found below. 1 Press MENU and rotate the control dial. 2 Select [GENERAL] [SXM PARENTAL] [LOCK SELECT] ...
For more information, visit www.siriusxm.com After installing your radio will need this number to activate your subscription. In addition, the Radio ID is located on and receiving the SiriusXM signal to receive ... control dial to select [CATEGORY], then press it. 3 Rotate the control dial to select the desired category, then press it . Listening to the SiriusXM Radio (MEX-N5300BT only) Activating your tuner. You should be found below. 1 Press MENU and rotate the control dial. 2 Select [GENERAL] [SXM PARENTAL] [LOCK SELECT] ...

Operating Instructions
Page 14
The initial passcode is installed. Playback starts automatically. Depending on the USB device, the Android mode or MSC/MTP mode can be selected on the new passcode input display, then ... text or illustrations. AOA (Android Open Accessory) 2.0, MSC (Mass Storage Class) and MTP (Media Transfer Protocol) type USB devices* compliant with Android OS 4.1 or higher installed support Android Open Accessory 2.0 (AOA 2.0). Playing a USB Device In these Operating Instructions, "iPod" is [0000]. 4 After entering the passcode, press ENTER. Some digital media players...
The initial passcode is installed. Playback starts automatically. Depending on the USB device, the Android mode or MSC/MTP mode can be selected on the new passcode input display, then ... text or illustrations. AOA (Android Open Accessory) 2.0, MSC (Mass Storage Class) and MTP (Media Transfer Protocol) type USB devices* compliant with Android OS 4.1 or higher installed support Android Open Accessory 2.0 (AOA 2.0). Playing a USB Device In these Operating Instructions, "iPod" is [0000]. 4 After entering the passcode, press ENTER. Some digital media players...

Operating Instructions
Page 28
...; 6 3/8 in) (w/h/d) Mass: Approx. 1.2 kg (2 lb 11 oz) Package contents: Main unit (1) Remote commander (1): RM-X231 Microphone (1) Parts for installation and connections (1 set) Optional accessories/equipment: SiriusXM Connect Vehicle Tuner: SXV100, SXV200, SXV300 (MEX-N5300BT only) Cable for steering wheel remote input: RC-SR1 Ask the dealer for detailed information. Compatible Android Open Accessory...
...; 6 3/8 in) (w/h/d) Mass: Approx. 1.2 kg (2 lb 11 oz) Package contents: Main unit (1) Remote commander (1): RM-X231 Microphone (1) Parts for installation and connections (1 set) Optional accessories/equipment: SiriusXM Connect Vehicle Tuner: SXV100, SXV200, SXV300 (MEX-N5300BT only) Cable for steering wheel remote input: RC-SR1 Ask the dealer for detailed information. Compatible Android Open Accessory...

Operating Instructions
Page 30
... erased. Makes a noise when the position of the unit and connected device. Set [DEMO-OFF] (page 22). The display disappears from the dashboard, see "Connection/Installation" (page 38). Check that the car battery supplies enough power to reset the unit. Press DSPL and CALL for a 2-speaker system. The volume of...
... erased. Makes a noise when the position of the unit and connected device. Set [DEMO-OFF] (page 22). The display disappears from the dashboard, see "Connection/Installation" (page 38). Check that the car battery supplies enough power to reset the unit. Press DSPL and CALL for a 2-speaker system. The volume of...

Operating Instructions
Page 34
... DISPLAY: A screen setting display of the USB is connected. APP NO DEV: The device with the application is not established. Make the "Sony | Music Center" connection again (page 19). NOT SUPPORT - ERROR: The selected operation could not be displayed. ANDROID MODE A USB device ... (page 27). WITHHELD: The phone number is set to the unit while [USB MODE] is hidden by the caller. For "Sony | Music Center" operation: APP --------: A connection with the application installed is open . Exit the list of the application to enable button operation.
... DISPLAY: A screen setting display of the USB is connected. APP NO DEV: The device with the application is not established. Make the "Sony | Music Center" connection again (page 19). NOT SUPPORT - ERROR: The selected operation could not be displayed. ANDROID MODE A USB device ... (page 27). WITHHELD: The phone number is set to the unit while [USB MODE] is hidden by the caller. For "Sony | Music Center" operation: APP --------: A connection with the application installed is open . Exit the list of the application to enable button operation.

Operating Instructions
Page 36
... Register again from any obstructions. Inspect the antenna cable for damage and kinks. Consult the SiriusXM Connect Vehicle Tuner installation manual for damage and kinks. Replace the antenna if the cable is blinking (about 6 seconds) (page 22). 36GB In Canada, visit...fault with a clear view of the sky. Verify that the SiriusXM magnetic mount antenna is mounted on a metal surface on antenna installation. Replace the antenna if the cable is securely connected to this channel, please contact SiriusXM. If you have questions about your ...
... Register again from any obstructions. Inspect the antenna cable for damage and kinks. Consult the SiriusXM Connect Vehicle Tuner installation manual for damage and kinks. Replace the antenna if the cable is blinking (about 6 seconds) (page 22). 36GB In Canada, visit...fault with a clear view of the sky. Verify that the SiriusXM magnetic mount antenna is mounted on a metal surface on antenna installation. Replace the antenna if the cable is securely connected to this channel, please contact SiriusXM. If you have questions about your ...

Operating Instructions
Page 38
... bracket from your car. 38GB For details, see "Removing the protection collar and the bracket" (page 43). • Keep the release keys for Installation × 2 5 × max. 8 mm (7/32 × max. 5/16 in) × 4 •...with other leads have been connected. • Be sure to insulate any loose unconnected leads with electrical tape for a safe and secure installation. Note on the power supply lead (yellow) When connecting this unit in direct sunlight or near heater ducts. • Use only ...
... bracket from your car. 38GB For details, see "Removing the protection collar and the bracket" (page 43). • Keep the release keys for Installation × 2 5 × max. 8 mm (7/32 × max. 5/16 in) × 4 •...with other leads have been connected. • Be sure to insulate any loose unconnected leads with electrical tape for a safe and secure installation. Note on the power supply lead (yellow) When connecting this unit in direct sunlight or near heater ducts. • Use only ...

Operating Instructions
Page 41
...of 4 Ω to 8 Ω, and with adequate power handling capacities to avoid damage. For details on using the wired remote control, see "Installing the microphone" (page 42). *7 Depending on the type of car, use or not, route the microphone input cord such that it is connected to ... REMOTE IN of car, use a subwoofer without a power amplifier when it does not interfere with adequate power handling capacities to avoid damage. 41GB For MEX-N5300BT: To a car's illumination signal Be sure to first connect the black ground (earth) lead to the +12 V power (battery) terminal...
...of 4 Ω to 8 Ω, and with adequate power handling capacities to avoid damage. For details on using the wired remote control, see "Installing the microphone" (page 42). *7 Depending on the type of car, use or not, route the microphone input cord such that it is connected to ... REMOTE IN of car, use a subwoofer without a power amplifier when it does not interfere with adequate power handling capacities to avoid damage. 41GB For MEX-N5300BT: To a car's illumination signal Be sure to first connect the black ground (earth) lead to the +12 V power (battery) terminal...

Operating Instructions
Page 42
...STR CONTROL] in your car, contact the store where you need to [PRESET] (page 22). 42GB When using the steering wheel remote control Installation of the dashboard with your driving operations. • If airbags or any other parts from interfering with a dry cloth. Note Before attaching ... or an experienced technician for details, then connect each lead properly to keep it and other shock-absorbing equipment is in [SET STEERING] to install the microphone . Clip (not supplied) Cautions • It is extremely dangerous if the cord becomes wound...
...STR CONTROL] in your car, contact the store where you need to [PRESET] (page 22). 42GB When using the steering wheel remote control Installation of the dashboard with your driving operations. • If airbags or any other parts from interfering with a dry cloth. Note Before attaching ... or an experienced technician for details, then connect each lead properly to keep it and other shock-absorbing equipment is in [SET STEERING] to install the microphone . Clip (not supplied) Cautions • It is extremely dangerous if the cord becomes wound...

Operating Instructions
Page 43
... from the unit. 1 Pinch both edges of the protection collar , then pull it out. Mounting the unit in the dashboard • Before installing, make sure the catches on both sides of the bracket are bent inwards 2 mm (3/32 in). • For Japanese cars, see "Mounting the...;, then attach the protection collar . Notes • If the catches are straight or bent outwards, the unit will not be installed securely and may spring out. • Make sure the 4 catches on the protection collar are properly engaged in the slots of the unit. ...
... from the unit. 1 Pinch both edges of the protection collar , then pull it out. Mounting the unit in the dashboard • Before installing, make sure the catches on both sides of the bracket are bent inwards 2 mm (3/32 in). • For Japanese cars, see "Mounting the...;, then attach the protection collar . Notes • If the catches are straight or bent outwards, the unit will not be installed securely and may spring out. • Make sure the 4 catches on the protection collar are properly engaged in the slots of the unit. ...

Operating Instructions
Page 44
... some makes of Japanese cars. In such a case, consult your nearest Sony dealer. In such a case, consult your Sony dealer. Resetting the unit For details, see "Detaching the Front Panel" (page 8). Note To prevent malfunction, install only with your car Bracket Detaching and attaching the front panel ... after replacement, there may not be an internal malfunction. Fuse replacement When replacing the fuse, Fuse (10 A) be sure to install this unit in a Japanese car You may be able to use one matching the amperage rating stated on the original fuse.
... some makes of Japanese cars. In such a case, consult your nearest Sony dealer. In such a case, consult your Sony dealer. Resetting the unit For details, see "Detaching the Front Panel" (page 8). Note To prevent malfunction, install only with your car Bracket Detaching and attaching the front panel ... after replacement, there may not be an internal malfunction. Fuse replacement When replacing the fuse, Fuse (10 A) be sure to install this unit in a Japanese car You may be able to use one matching the amperage rating stated on the original fuse.

