
Mobile Library Manager Instructions v1.0
Page 1
... you do with the supplied CD-ROM • You can reinstall Gracenote CDDBR on your library information on the hard disk drive (HDD) of MEX-1HD in the HDD of Sony Corporation. Music Recognition Service and MRS are provided by Gracenote CDDB" logo are registered trademarks ... software will be available after that. Devices manufactured under license for all computers satisfying the system requirements. It is not yet determined whether the service with MEX-1HD and Windows. Mobile Library Manager and Memory Stick are trademarks of 2004. MSAC-PC2N - MSA-16A - MSA-...
... you do with the supplied CD-ROM • You can reinstall Gracenote CDDBR on your library information on the hard disk drive (HDD) of MEX-1HD in the HDD of Sony Corporation. Music Recognition Service and MRS are provided by Gracenote CDDB" logo are registered trademarks ... software will be available after that. Devices manufactured under license for all computers satisfying the system requirements. It is not yet determined whether the service with MEX-1HD and Windows. Mobile Library Manager and Memory Stick are trademarks of 2004. MSAC-PC2N - MSA-16A - MSA-...
Operating Instructions
Page 2
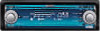
...that interference will increase eye hazard. Welcome ! However, there is no guarantee that any files that are not saved on the internal HDD using MPEG1 Audio Layer-3 with a sampling frequency of 44.1kHz. *3 ID3 tag is an MP3 file that contains information about 2000 tracks on this...X6S Notes • The recorded music is limited to private use of times played back or in a particular installation. Thank you for purchasing this Sony Audio Library System. • Storage of about album name, artist name, track name, etc. *4 A CD TEXT disc is not responsible for music files that...
...that interference will increase eye hazard. Welcome ! However, there is no guarantee that any files that are not saved on the internal HDD using MPEG1 Audio Layer-3 with a sampling frequency of 44.1kHz. *3 ID3 tag is an MP3 file that contains information about 2000 tracks on this...X6S Notes • The recorded music is limited to private use of times played back or in a particular installation. Thank you for purchasing this Sony Audio Library System. • Storage of about album name, artist name, track name, etc. *4 A CD TEXT disc is not responsible for music files that...
Operating Instructions
Page 4
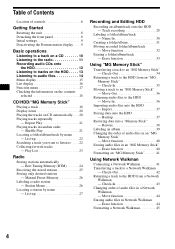
...folder/album/track - Check-In 35 Moving a track to an "MG Memory Stick" - Import 37 Storing data onto the HDD - Move function 44 Erasing audio files in an "MG Memory Stick" - Play List 23 Radio Storing stations automatically - Erase function 33 Using "MG Memory Stick...8 Initial settings 9 Deactivating the Demonstration display . . . .9 Basic operations Listening to a track on a CD 10 Listening to the radio 11 Recording audio CDs onto the HDD 12 Listening to tracks on CD automatically. . . . 20 Playing tracks repeatedly - Check-Out 34 Returning a track to . . . . 22 Collecting ...
...folder/album/track - Check-In 35 Moving a track to an "MG Memory Stick" - Import 37 Storing data onto the HDD - Move function 44 Erasing audio files in an "MG Memory Stick" - Play List 23 Radio Storing stations automatically - Erase function 33 Using "MG Memory Stick...8 Initial settings 9 Deactivating the Demonstration display . . . .9 Basic operations Listening to a track on a CD 10 Listening to the radio 11 Recording audio CDs onto the HDD 12 Listening to tracks on CD automatically. . . . 20 Playing tracks repeatedly - Check-Out 34 Returning a track to . . . . 22 Collecting ...

Operating Instructions
Page 7
Display the sound menu - Skip tracks - r LED (HDD) Lights up while the unit is accessing the "MG Memory Stick." t Digital I/O terminal (4 pins) To connect to turn off the ignition, be sure to press (... p "MG Memory Stick" Slot q LED ("MG Memory Stick") Lights up while the unit is accessing the Digital I /O) Lights up while the unit is accessing the HDD. f OPEN (CLOSE) button 14, 18, 41 g CD Z (eject) button 10, 18 h RELEASE button 8 i OFF (Stop/Power off the clock display. Receive preset stations - m z REC button...
Display the sound menu - Skip tracks - r LED (HDD) Lights up while the unit is accessing the "MG Memory Stick." t Digital I/O terminal (4 pins) To connect to turn off the ignition, be sure to press (... p "MG Memory Stick" Slot q LED ("MG Memory Stick") Lights up while the unit is accessing the Digital I /O) Lights up while the unit is accessing the HDD. f OPEN (CLOSE) button 14, 18, 41 g CD Z (eject) button 10, 18 h RELEASE button 8 i OFF (Stop/Power off the clock display. Receive preset stations - m z REC button...

Operating Instructions
Page 8
... surface of the front panel. • Do not detach the front panel during eject, operation will erase the clock setting and some stored information. CD, HDD, "MG Memory Stick" playback or radio reception stops (the key illumination and display remain on). * If your car has no ACC position on the front...
... surface of the front panel. • Do not detach the front panel during eject, operation will erase the clock setting and some stored information. CD, HDD, "MG Memory Stick" playback or radio reception stops (the key illumination and display remain on). * If your car has no ACC position on the front...

Operating Instructions
Page 9
Deactivating the Demonstration display In the default setting, Demonstration is set correctly, the HDD may trace the playback history incorrectly. 1 Press the RESET button (page 8). 2 Attach the front panel (page 8). 3 Rotate the R dial to select AM Step "9K" or "...," then press the R dial. 3 Rotate the R dial to select "Demonstration," then press the R dial. 4 Rotate the R dial to the previous item. 9 If the frequency allocation system of the week changes automatically according to the date. • If you set to "9K." The normal display appears. 4 Set the date and time. 1 Rotate...
Deactivating the Demonstration display In the default setting, Demonstration is set correctly, the HDD may trace the playback history incorrectly. 1 Press the RESET button (page 8). 2 Attach the front panel (page 8). 3 Rotate the R dial to select AM Step "9K" or "...," then press the R dial. 3 Rotate the R dial to select "Demonstration," then press the R dial. 4 Rotate the R dial to the previous item. 9 If the frequency allocation system of the week changes automatically according to the date. • If you set to "9K." The normal display appears. 4 Set the date and time. 1 Rotate...

Operating Instructions
Page 12
Recording audio CDs onto the HDD 1 2 3 4 1 Press (SOURCE) repeatedly to select "FM" or "AM." To listen to the radio while recording Press (SOURCE) repeatedly to select "CD." To stop recording Press (...
Recording audio CDs onto the HDD 1 2 3 4 1 Press (SOURCE) repeatedly to select "FM" or "AM." To listen to the radio while recording Press (SOURCE) repeatedly to select "CD." To stop recording Press (...

Operating Instructions
Page 13
... display the list. Automatic Music Sensor (AMS) Rotate the R dial. To adjust the volume level Rotate the L dial. In this case, record a CD onto the HDD. 2 Press the R dial to display the function menu "m" and "M." (F1) (m) : To search backward (F2) (M) : To search forward Press and hold (F1) or... when you press the R dial, the list display changes as the source. Note When you use the HDD for the first time, or when there is nothing recorded on the HDD. Listening to tracks on the HDD 1 2 3 1 Press (SOURCE) repeatedly to select the desired track, then press the R dial. L: ...
... display the list. Automatic Music Sensor (AMS) Rotate the R dial. To adjust the volume level Rotate the L dial. In this case, record a CD onto the HDD. 2 Press the R dial to display the function menu "m" and "M." (F1) (m) : To search backward (F2) (M) : To search forward Press and hold (F1) or... when you press the R dial, the list display changes as the source. Note When you use the HDD for the first time, or when there is nothing recorded on the HDD. Listening to tracks on the HDD 1 2 3 1 Press (SOURCE) repeatedly to select the desired track, then press the R dial. L: ...

Operating Instructions
Page 16
... Bin 010 DATA Memory Stick FM AM AUX Digital I/O 16 SOURCE F1 R dial To select the item 1 Press (SOURCE) repeatedly to select the source (CD, HDD, MEMORY STICK, FM, AM or AUX*). * If "AUX" is not displayed when selecting the source, set "AUX Skip" in step 2, then press (F1) (...as follows: Album name list t Folder name list t Source list List structure : Storage folder : Play List folder : Sort folder MEX-1HD CD 001 Album 001 TRACK 002 TRACK HDD 001 Folder001 001 Album 001 TRACK 002 TRACK Each time you select "CD." *2 Available only when station is played/received. List ...
... Bin 010 DATA Memory Stick FM AM AUX Digital I/O 16 SOURCE F1 R dial To select the item 1 Press (SOURCE) repeatedly to select the source (CD, HDD, MEMORY STICK, FM, AM or AUX*). * If "AUX" is not displayed when selecting the source, set "AUX Skip" in step 2, then press (F1) (...as follows: Album name list t Folder name list t Source list List structure : Storage folder : Play List folder : Sort folder MEX-1HD CD 001 Album 001 TRACK 002 TRACK HDD 001 Folder001 001 Album 001 TRACK 002 TRACK Each time you select "CD." *2 Available only when station is played/received. List ...

Operating Instructions
Page 17
...settings or modes easily with the strongest signals. t LOCAL t F3: AM/FM HDD , CD or MEMORY STICK : F1: m REP F2: M t SHUF t F3: * * : available only when you are playing back an audio CD where multiple possible matches of different title information are displayed depending on page 20).... to AM or FM. CDDB/CD TEXT: changes displayed title information (CD TEXT or Gracenote CDDB® information) during playback of an audio CD where multiple possible matches of different title information are assigned to the function buttons (F1) to (F3) according to confirm the item...
...settings or modes easily with the strongest signals. t LOCAL t F3: AM/FM HDD , CD or MEMORY STICK : F1: m REP F2: M t SHUF t F3: * * : available only when you are playing back an audio CD where multiple possible matches of different title information are displayed depending on page 20).... to AM or FM. CDDB/CD TEXT: changes displayed title information (CD TEXT or Gracenote CDDB® information) during playback of an audio CD where multiple possible matches of different title information are assigned to the function buttons (F1) to (F3) according to confirm the item...

Operating Instructions
Page 18
...SOURCE F1 OPEN CDZ OFF F2 FUNCTION R dial To Stop playback Eject the disc Skip tracks - Rotate the R dial. Checking the information on the HDD or "MG Memory Stick," text information (folder name, album name, track name, artist name etc.) is displayed. MENU R dial 1 Press the R... (F2) and release at the desired point. Recording bit rate (- - - Remaining HDD free space - Playback starts automatically. Note When no media such as a CD or an "MG Memory Stick" is inserted, or no audio file is available/not available - Automatic Music Sensor Fast-forward/ reverse - Press (FUNCTION...
...SOURCE F1 OPEN CDZ OFF F2 FUNCTION R dial To Stop playback Eject the disc Skip tracks - Rotate the R dial. Checking the information on the HDD or "MG Memory Stick," text information (folder name, album name, track name, artist name etc.) is displayed. MENU R dial 1 Press the R... (F2) and release at the desired point. Recording bit rate (- - - Remaining HDD free space - Playback starts automatically. Note When no media such as a CD or an "MG Memory Stick" is inserted, or no audio file is available/not available - Automatic Music Sensor Fast-forward/ reverse - Press (FUNCTION...

Operating Instructions
Page 20
... name/Artist name CTrack number/ Elapsed playing time 6 AClock/S.A. Notes on Gracenote CDDB ® • When an audio CD is played back, the Gracenote CDDB ® Music Recognition ServiceSM (CD data base) on the HDD, "MG Memory Stick," or when you press (DSPL), items change CD TEXT to Gracenote CDDB ® information... can edit it with very many characters, information may not be displayed. • For some CD TEXT discs with this unit (page 30) or Mobile Library Manager (page 54). Notes on the HDD Items 1 AClock/S.A.
... name/Artist name CTrack number/ Elapsed playing time 6 AClock/S.A. Notes on Gracenote CDDB ® • When an audio CD is played back, the Gracenote CDDB ® Music Recognition ServiceSM (CD data base) on the HDD, "MG Memory Stick," or when you press (DSPL), items change CD TEXT to Gracenote CDDB ® information... can edit it with very many characters, information may not be displayed. • For some CD TEXT discs with this unit (page 30) or Mobile Library Manager (page 54). Notes on the HDD Items 1 AClock/S.A.

Operating Instructions
Page 21
...Shuffle Play mode changes as follows: Track Repeat t Album Repeat*1 t Folder Repeat*2 t Repeat Off *1 Available only when you select "HDD." *2 Available only when you select "HDD" or when you are played in random order. Shuffle Play Tracks on an album, a folder (or a disc) are playing back an... Play mode changes as follows: Album Shuffle*1 t Folder Shuffle*2 t Shuffle All t Shuffle Off *1 Available only when you select "HDD." *2 Available only when you select "HDD" or you are playing back an MP3 file. Note "Shuffle All" will not shuffle tracks between CD, "MG Memory Stick" and...
...Shuffle Play mode changes as follows: Track Repeat t Album Repeat*1 t Folder Repeat*2 t Repeat Off *1 Available only when you select "HDD." *2 Available only when you select "HDD" or when you are played in random order. Shuffle Play Tracks on an album, a folder (or a disc) are playing back an... Play mode changes as follows: Album Shuffle*1 t Folder Shuffle*2 t Shuffle All t Shuffle Off *1 Available only when you select "HDD." *2 Available only when you select "HDD" or you are playing back an MP3 file. Note "Shuffle All" will not shuffle tracks between CD, "MG Memory Stick" and...

Operating Instructions
Page 22
.... Playback starts. To select a folder Display the album name list in alphabetical order. Note In the case of recorded time. R dial 1 Press (SOURCE) to select "HDD." 2 Press the R dial, then press (F1) ( ) to display the folder name list. 3 Rotate the R dial to the artist. Artist creates albums for each artist and...
.... Playback starts. To select a folder Display the album name list in alphabetical order. Note In the case of recorded time. R dial 1 Press (SOURCE) to select "HDD." 2 Press the R dial, then press (F1) ( ) to display the folder name list. 3 Rotate the R dial to the artist. Artist creates albums for each artist and...

Operating Instructions
Page 23
... name list appears. 5 Rotate the R dial to select the track you finish selecting all tracks are selected in the Play List 1 Press (SOURCE) to select "HDD." 2 Press (MENU). 3 Rotate the R dial to select "Play List," then press the R dial. 4 Rotate the R dial to select the desired track, then press the R dial...
... name list appears. 5 Rotate the R dial to select the track you finish selecting all tracks are selected in the Play List 1 Press (SOURCE) to select "HDD." 2 Press (MENU). 3 Rotate the R dial to select "Play List," then press the R dial. 4 Rotate the R dial to select the desired track, then press the R dial...

Operating Instructions
Page 28
...28 The record setting display appears. REC Recording an album/track onto the HDD - Recording and Editing HDD Overview of the HDD system Recorded tracks on this limit requires permission of the copyright holders. • Sony is not responsible for any files that are sorted out by folders as ... item being selected, press the R dial again. 5 Repeat step 4 until you want to unsuccessful recording from CD or music downloading. • Sony is selected. Storage folder Storage album 001 001 001 (CDA) 002 002 (CDB) 002 001 001 (CDC) Folder Album Track Notes • ...
...28 The record setting display appears. REC Recording an album/track onto the HDD - Recording and Editing HDD Overview of the HDD system Recorded tracks on this limit requires permission of the copyright holders. • Sony is not responsible for any files that are sorted out by folders as ... item being selected, press the R dial again. 5 Repeat step 4 until you want to unsuccessful recording from CD or music downloading. • Sony is selected. Storage folder Storage album 001 001 001 (CDA) 002 002 (CDB) 002 001 001 (CDC) Folder Album Track Notes • ...

Operating Instructions
Page 29
..."Notes on Gracenote CDDB ®" on page 54. • When you need title information, update the Gracenote CDDB ® (CD data base) see "Editing the library" on page 20). 7 Press REC . You can record up to "Off" (page 56). To cancel recording Press (F1) (x) in size. * The default setting.... (Normal speed recording) Records the track up to "On" (page 51). • When an audio CD is played back, the Gracenote CDDB ® Music Recognition ServiceSM (CD data base) on the HDD. • Each time you select the CD, the track being recorded Track number/ Elapsed playing time ...
..."Notes on Gracenote CDDB ®" on page 54. • When you need title information, update the Gracenote CDDB ® (CD data base) see "Editing the library" on page 20). 7 Press REC . You can record up to "Off" (page 56). To cancel recording Press (F1) (x) in size. * The default setting.... (Normal speed recording) Records the track up to "On" (page 51). • When an audio CD is played back, the Gracenote CDDB ® Music Recognition ServiceSM (CD data base) on the HDD. • Each time you select the CD, the track being recorded Track number/ Elapsed playing time ...

Operating Instructions
Page 30
Labeling a folder/album/ track - As you create an easy access music library. Item Explanation Track To assign a name to a track Track Artist To assign an artist name to a track Album To assign a name to an album Album ... (All caps) abc Alphabet (Small caps) 1234 Numbers ! ? # Symbol (OK) to store the characters entered ( SOURCE DSPL MENU L dial R dial 1 Press (SOURCE) repeatedly to select "HDD." 2 Press (MENU). 3 Rotate the R dial to select "Name In," then press the R dial. 4 Rotate the R dial to select the desired character type, then press the...
Labeling a folder/album/ track - As you create an easy access music library. Item Explanation Track To assign a name to a track Track Artist To assign an artist name to a track Album To assign a name to an album Album ... (All caps) abc Alphabet (Small caps) 1234 Numbers ! ? # Symbol (OK) to store the characters entered ( SOURCE DSPL MENU L dial R dial 1 Press (SOURCE) repeatedly to select "HDD." 2 Press (MENU). 3 Rotate the R dial to select "Name In," then press the R dial. 4 Rotate the R dial to select the desired character type, then press the...

Operating Instructions
Page 31
...(SOURCE) repeatedly to select the desired character type, then press the R dial. Name edit display appears. 5 Enter characters. 1 Rotate the R dial to select "HDD." 2 Press (MENU). As you rotate the R dial, the item changes as follows: Item Explanation ABC Alphabet (All caps) abc Alphabet (Small caps) 1234 Number...or imported tracks, changing the artist name of all tracks in step 5 and 6. Creating a folder/album You can create an easy access music library by adding a new folder/album on page 17. The menu display appears. 3 Rotate the R dial to select "Contents Edit," then press the...
...(SOURCE) repeatedly to select the desired character type, then press the R dial. Name edit display appears. 5 Enter characters. 1 Rotate the R dial to select "HDD." 2 Press (MENU). As you rotate the R dial, the item changes as follows: Item Explanation ABC Alphabet (All caps) abc Alphabet (Small caps) 1234 Number...or imported tracks, changing the artist name of all tracks in step 5 and 6. Creating a folder/album You can create an easy access music library by adding a new folder/album on page 17. The menu display appears. 3 Rotate the R dial to select "Contents Edit," then press the...

Operating Instructions
Page 32
When there is no proposed entry, follow steps 1 and 2 to select the proposed entry you desired, then press the L dial. Each time you press (DSPL), the alphabet letter string displayed changes the type of letters as follows: All capital letters t the first letter in capitals t all small letters 3 Rotate the L dial to finish entering the name. 2 Rotate the R dial to select " ," then press the R dial. The proposed entries appear. To change the character types, rotate the R dial to select the desired character, then press the R dial. To move the cursor, rotate the R dial to select "
When there is no proposed entry, follow steps 1 and 2 to select the proposed entry you desired, then press the L dial. Each time you press (DSPL), the alphabet letter string displayed changes the type of letters as follows: All capital letters t the first letter in capitals t all small letters 3 Rotate the L dial to finish entering the name. 2 Rotate the R dial to select " ," then press the R dial. The proposed entries appear. To change the character types, rotate the R dial to select the desired character, then press the R dial. To move the cursor, rotate the R dial to select "
