Operating Instructions
Page 1
2-649-139-11(1) Digital Surround Headphone System Operating Instructions US Mode d'emploi FR Manual de instrucciones ES MDR-DS6000 © 2006 Sony Corporation
2-649-139-11(1) Digital Surround Headphone System Operating Instructions US Mode d'emploi FR Manual de instrucciones ES MDR-DS6000 © 2006 Sony Corporation
Operating Instructions
Page 2
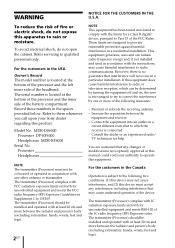
... not expose this equipment. MDR-DS6000 Processor DP-RF6000 Headphones MDR-RF6000 Serial No. For the customers in the Canada Operation is no guarantee that to which can radiate radio frequency energy and, if not installed and used in accordance with the instructions, may not cause interference, and (2) this product. You are designed to Part 15 of the FCC Rules. Refer servicing to OET65. Refer to...
... not expose this equipment. MDR-DS6000 Processor DP-RF6000 Headphones MDR-RF6000 Serial No. For the customers in the Canada Operation is no guarantee that to which can radiate radio frequency energy and, if not installed and used in accordance with the instructions, may not cause interference, and (2) this product. You are designed to Part 15 of the FCC Rules. Refer servicing to OET65. Refer to...
Operating Instructions
Page 3
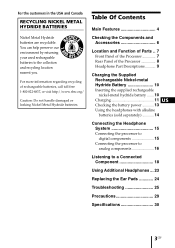
... Using Additional Headphones ... 23 Replacing the Ear Pads 24 Troubleshooting 25 Precautions 29 Specifications 30 3US For more information regarding recycling of the Processor 8 Headphone Part Descriptions 9 Charging the Supplied Rechargeable Nickel-metal Hydride Battery 10 Inserting the supplied rechargeable nickel-metal hydride battery ....... 10 Charging 11 US Checking the battery power 13 Using the headphones with alkaline batteries (sold separately 14 Connecting the Headphone System 15 Connecting the processor to digital...
... Using Additional Headphones ... 23 Replacing the Ear Pads 24 Troubleshooting 25 Precautions 29 Specifications 30 3US For more information regarding recycling of the Processor 8 Headphone Part Descriptions 9 Charging the Supplied Rechargeable Nickel-metal Hydride Battery 10 Inserting the supplied rechargeable nickel-metal hydride battery ....... 10 Charging 11 US Checking the battery power 13 Using the headphones with alkaline batteries (sold separately 14 Connecting the Headphone System 15 Connecting the processor to digital...
Operating Instructions
Page 4
... range. • Built-in the bursting and whispering sound by simply connecting the digital surround processor to a DVD device or a digital satellite/TV receiver, etc., with the supplied optical digital connecting cable. • Compatibility of audio formats. Main Features The MDR-DS6000 is automatically charged by placing the headphones on the processor. • Self-adjusting mechanism headband eliminating the need for adjustment. • Auto Power On/Off function automatically turns...
... range. • Built-in the bursting and whispering sound by simply connecting the digital surround processor to a DVD device or a digital satellite/TV receiver, etc., with the supplied optical digital connecting cable. • Compatibility of audio formats. Main Features The MDR-DS6000 is automatically charged by placing the headphones on the processor. • Self-adjusting mechanism headband eliminating the need for adjustment. • Auto Power On/Off function automatically turns...
Operating Instructions
Page 6
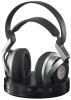
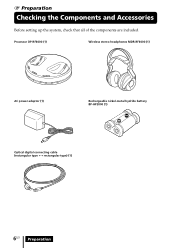
1 Preparation Checking the Components and Accessories Before setting up the system, check that all of the components are included. Processor DP-RF6000 (1) Wireless stereo headphones MDR-RF6000 (1) AC power adaptor (1) Rechargeable nickel-metal hydride battery BP-HP2000 (1) Optical digital connecting cable (rectangular type y rectangular type) (1) 6US Preparation
1 Preparation Checking the Components and Accessories Before setting up the system, check that all of the components are included. Processor DP-RF6000 (1) Wireless stereo headphones MDR-RF6000 (1) AC power adaptor (1) Rechargeable nickel-metal hydride battery BP-HP2000 (1) Optical digital connecting cable (rectangular type y rectangular type) (1) 6US Preparation
Operating Instructions
Page 8
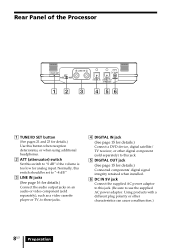
... switch to use the supplied AC power adaptor. Rear Panel of the Processor TUNE/ID SET ATT 0dB -8dB R LINE IN L DC IN 9V DIGITAL IN DIGITAL OUT (THROUGH) 1 2 3 4 56 1 TUNE/ID SET button (See pages 21 and 23 for details.) Use this button when reception deteriorates, or when using additional headphones. 2 ATT (attenuator) switch Set this jack. (Be sure to "0 dB" if the volume is too low...
... switch to use the supplied AC power adaptor. Rear Panel of the Processor TUNE/ID SET ATT 0dB -8dB R LINE IN L DC IN 9V DIGITAL IN DIGITAL OUT (THROUGH) 1 2 3 4 56 1 TUNE/ID SET button (See pages 21 and 23 for details.) Use this button when reception deteriorates, or when using additional headphones. 2 ATT (attenuator) switch Set this jack. (Be sure to "0 dB" if the volume is too low...
Operating Instructions
Page 9
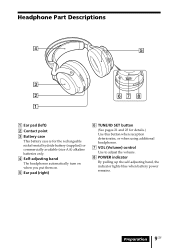
... SET VOL 1 Ear pad (left) 2 Contact point 3 Battery case This battery case is for the rechargeable nickel-metal hydride battery (supplied) or commercially available (size AA) alkaline batteries only. 4 Self-adjusting band The headphones automatically turn on when you put them on. 5 Ear pad (right) 6 TUNE/ID SET button (See pages 21 and 23 for details.) Use this button when reception deteriorates, or when using additional headphones. 7 VOL (Volume) control Use to adjust the volume. 8 POWER...
... SET VOL 1 Ear pad (left) 2 Contact point 3 Battery case This battery case is for the rechargeable nickel-metal hydride battery (supplied) or commercially available (size AA) alkaline batteries only. 4 Self-adjusting band The headphones automatically turn on when you put them on. 5 Ear pad (right) 6 TUNE/ID SET button (See pages 21 and 23 for details.) Use this button when reception deteriorates, or when using additional headphones. 7 VOL (Volume) control Use to adjust the volume. 8 POWER...
Operating Instructions
Page 13
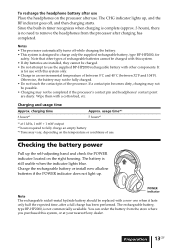
... contact pin of use with a cotton bud, etc. To recharge the headphone battery after use Place the headphones on the processor after charging has completed. Notes • The processor automatically turns off , and then charging starts. Checking the battery power Pull up . Preparation 13US The CHG indicator lights up, and the RF indicator goes off while charging the battery. • This system is no need to remove the headphones from...
... contact pin of use with a cotton bud, etc. To recharge the headphone battery after use Place the headphones on the processor after charging has completed. Notes • The processor automatically turns off , and then charging starts. Checking the battery power Pull up . Preparation 13US The CHG indicator lights up, and the RF indicator goes off while charging the battery. • This system is no need to remove the headphones from...
Operating Instructions
Page 15
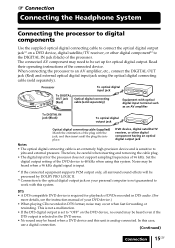
... the connected equipment supports PCM output only, all surround sound effects will be processed by DOLBY PRO LOGIC II. *2 Connection to the optical digital output jack on your DVD device.) • When playing CDs recorded in the DVD menu. • No sound may need to an AV amplifier, etc., connect the DIGITAL OUT jack (Red) and external optical digital input jack using this case, use a digital connection. (Continued) Connection 15US Set the digital output setting of...
... the connected equipment supports PCM output only, all surround sound effects will be processed by DOLBY PRO LOGIC II. *2 Connection to the optical digital output jack on your DVD device.) • When playing CDs recorded in the DVD menu. • No sound may need to an AV amplifier, etc., connect the DIGITAL OUT jack (Red) and external optical digital input jack using this case, use a digital connection. (Continued) Connection 15US Set the digital output setting of...
Operating Instructions
Page 16
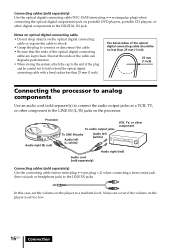
...). 25 mm (1 inch) Connecting the processor to analog components Use an audio cord (sold separately) Use the connecting cable (stereo mini-plug y pin plug × 2) when connecting a stereo mini-jack (line out jack or headphone jack) to the LINE IN jacks. Dust at a medium level. The bend radius of the plug and be no less than 25 mm (1 inch). In this case, set too low. 16US Connection Notes on optical digital connecting cable • Do not drop...
...). 25 mm (1 inch) Connecting the processor to analog components Use an audio cord (sold separately) Use the connecting cable (stereo mini-plug y pin plug × 2) when connecting a stereo mini-jack (line out jack or headphone jack) to the LINE IN jacks. Dust at a medium level. The bend radius of the plug and be no less than 25 mm (1 inch). In this case, set too low. 16US Connection Notes on optical digital connecting cable • Do not drop...
Operating Instructions
Page 18
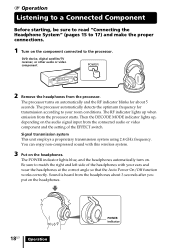
... EFFECT switch. 1 Operation Listening to a Connected Component Before starting, be sure to read "Connecting the Headphone System" (pages 15 to 17) and make the proper connections. 1 Turn on automatically and the RF indicator blinks for transmission according to your ears and wear the headphones at the correct angle so that the Auto Power On/Off function works correctly. The processor automatically detects the optimum frequency...
... EFFECT switch. 1 Operation Listening to a Connected Component Before starting, be sure to read "Connecting the Headphone System" (pages 15 to 17) and make the proper connections. 1 Turn on automatically and the RF indicator blinks for transmission according to your ears and wear the headphones at the correct angle so that the Auto Power On/Off function works correctly. The processor automatically detects the optimum frequency...

Operating Instructions
Page 20
... the format of the input audio signal and the corresponding indicator lights up correctly. 20US Operation dynamic range dynamic range Illustration of program material: explosive sounds are attenuated while lower level sounds (dialog, etc.) are enhanced. Switch the audio between Dolby Digital, DTS, MPEG-2 AAC, etc., on the connected equipment (DVD device, digital satellite/TV receiver, etc.). • DOLBY DIGITAL: Input signal recorded in...
... the format of the input audio signal and the corresponding indicator lights up correctly. 20US Operation dynamic range dynamic range Illustration of program material: explosive sounds are attenuated while lower level sounds (dialog, etc.) are enhanced. Switch the audio between Dolby Digital, DTS, MPEG-2 AAC, etc., on the connected equipment (DVD device, digital satellite/TV receiver, etc.). • DOLBY DIGITAL: Input signal recorded in...
Operating Instructions
Page 21
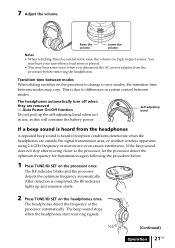
... power adaptor from the processor before removing the headphones. You may vary. The headphones detect the frequency of the processor automatically. Transition time between modes may hurt your ears when a loud scene is heard if reception conditions deteriorate when the headphones are removed - VOL Raise the volume Lower the volume Notes • When watching films, be careful not to new modes, the transition time between modes When sliding switches...
... power adaptor from the processor before removing the headphones. You may vary. The headphones detect the frequency of the processor automatically. Transition time between modes may hurt your ears when a loud scene is heard if reception conditions deteriorate when the headphones are removed - VOL Raise the volume Lower the volume Notes • When watching films, be careful not to new modes, the transition time between modes When sliding switches...

Operating Instructions
Page 22
... the optimum frequency automatically when the headphones are automatically transmitted when an audio signal is input again. Notes • Because this system transmits signals at 2.4 GHz, sound may not stop when an extremely low sound is input for 5 minutes, the RF signals are removed from the processor. If signal noise is output from a component connected to the LINE IN jacks, RF signal transmission...
... the optimum frequency automatically when the headphones are automatically transmitted when an audio signal is input again. Notes • Because this system transmits signals at 2.4 GHz, sound may not stop when an extremely low sound is input for 5 minutes, the RF signals are removed from the processor. If signal noise is output from a component connected to the LINE IN jacks, RF signal transmission...
Operating Instructions
Page 23
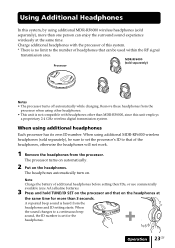
.... Note Charge the battery of additional headphones before setting their IDs, or use commercially available (size AA) alkaline batteries. 3 Press and hold TUNE/ID SET on the processor and that can enjoy the surround sound experience wirelessly at the same time for the headphones. When the sound changes to a continuous beep sound, the ID number is no limit to that of headphones that on the headphones at the same time. Charge additional headphones...
.... Note Charge the battery of additional headphones before setting their IDs, or use commercially available (size AA) alkaline batteries. 3 Press and hold TUNE/ID SET on the processor and that can enjoy the surround sound experience wirelessly at the same time for the headphones. When the sound changes to a continuous beep sound, the ID number is no limit to that of headphones that on the headphones at the same time. Charge additional headphones...
Operating Instructions
Page 25
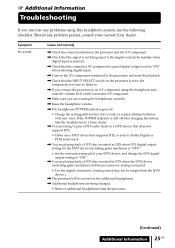
... headphone volume. , The headphones' POWER indicator goes off after charging the battery, take the headphones to a Sony dealer. , You are trying to play a DTS audio track on a DVD device that supports DTS, or select a Dolby Digital or PCM audio track. , You are analog-connected. • Use the digital connection. (Analog sound may not be output from the processor. (Continued) Additional Information 25US 1 Additional Information Troubleshooting If you run into any problem...
... headphone volume. , The headphones' POWER indicator goes off after charging the battery, take the headphones to a Sony dealer. , You are trying to play a DTS audio track on a DVD device that supports DTS, or select a Dolby Digital or PCM audio track. , You are analog-connected. • Use the digital connection. (Analog sound may not be output from the processor. (Continued) Additional Information 25US 1 Additional Information Troubleshooting If you run into any problem...
Operating Instructions
Page 26
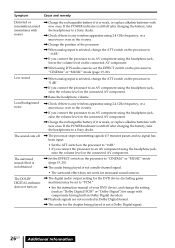
...). Low sound , When analog input is weak, or replace alkaline batteries with new ones. The sound cuts off after charging the battery, take the headphones to an AV component using the headphone jack, raise the volume level on the connected AV component. , Raise the headphone volume. Loud background noise , Check if there is any wireless apparatus using 2.4 GHz frequency, or a microwave oven in Dolby Digital format. , The audio for monaural sound sources. The surround sound...
...). Low sound , When analog input is weak, or replace alkaline batteries with new ones. The sound cuts off after charging the battery, take the headphones to an AV component using the headphone jack, raise the volume level on the connected AV component. , Raise the headphone volume. Loud background noise , Check if there is any wireless apparatus using 2.4 GHz frequency, or a microwave oven in Dolby Digital format. , The audio for monaural sound sources. The surround sound...
Operating Instructions
Page 27
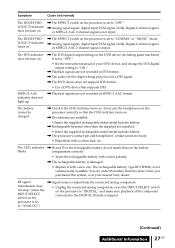
... , The DTS digital output setting on the DVD device (including game machines) is set to "OFF." • See the instruction manual of your nearest Sony dealer. MPEG-2 AAC indicator does not light up. , Playback signals are not recorded in the battery blinks. The battery cannot be charged , Check if the CHG indicator turns on the processor is set to "CINEMA" or "MUSIC" mode. , Analog input...
... , The DTS digital output setting on the DVD device (including game machines) is set to "OFF." • See the instruction manual of your nearest Sony dealer. MPEG-2 AAC indicator does not light up. , Playback signals are not recorded in the battery blinks. The battery cannot be charged , Check if the CHG indicator turns on the processor is set to "CINEMA" or "MUSIC" mode. , Analog input...
Operating Instructions
Page 28
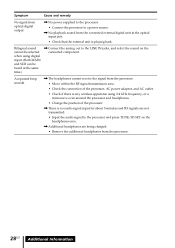
... and RF signals are not transmitted. • Input the audio signal to the processor and press TUNE/ID SET on the connected component. A repeated beep sounds. , The headphones cannot receive the signal from the connected external digital unit at the same time.) , Connect the analog out to the LINE IN jacks, and select the sound on the headphones once. , Additional headphones are being charged. • Remove...
... and RF signals are not transmitted. • Input the audio signal to the processor and press TUNE/ID SET on the connected component. A repeated beep sounds. , The headphones cannot receive the signal from the connected external digital unit at the same time.) , Connect the analog out to the LINE IN jacks, and select the sound on the headphones once. , Additional headphones are being charged. • Remove...

Operating Instructions
Page 30
...g (12.17 oz) Wireless stereo headphones (MDR-RF6000) Playback frequency range 12 - 22,000 Hz Power requirements Rechargeable nickelmetal hydride battery (supplied) or commercially available (size AA) alkaline batteries Mass Approx. 360 g (12.7 oz) (including the supplied rechargeable nickelmetal hydride battery) Supplied accessories AC power adaptor (9 V) (1) Rechargeable nickel-metal hydride battery BP-HP2000 (2,100 mAh) (1) Optical digital connecting cable (optical rectangular plug y optical rectangular plug, 1.5 m) (1) Operating Instructions (this manual) (1) Recommended accessories...
...g (12.17 oz) Wireless stereo headphones (MDR-RF6000) Playback frequency range 12 - 22,000 Hz Power requirements Rechargeable nickelmetal hydride battery (supplied) or commercially available (size AA) alkaline batteries Mass Approx. 360 g (12.7 oz) (including the supplied rechargeable nickelmetal hydride battery) Supplied accessories AC power adaptor (9 V) (1) Rechargeable nickel-metal hydride battery BP-HP2000 (2,100 mAh) (1) Optical digital connecting cable (optical rectangular plug y optical rectangular plug, 1.5 m) (1) Operating Instructions (this manual) (1) Recommended accessories...


