
Operating Instructions
Page 1
3-868-380-12(1) MD Confer-Corder Operating Instructions MDCC-2000 2001 Sony Corporation
3-868-380-12(1) MD Confer-Corder Operating Instructions MDCC-2000 2001 Sony Corporation
Operating Instructions
Page 2
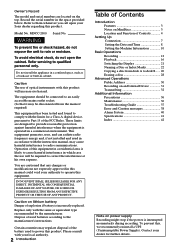
...harmful interference in which case the use of optical instruments with your Sony dealer regarding this , we recommend you call upon your local authority. 2 Introduction Table of Contents Introduction Features 3 Notes on MiniDiscs 3 Location and Function of the FCC Rules. Replace only with the...37 Error and Caution messages 38 Alarm System 40 Specifications 41 Index 42 Note on power supply Recording might stop if the power is interrupted momentarily during recording. MDCC-2000 WARNING Serial No. IN NO EVENT SHALL SELLER BE LIABLE FOR ANY DIRECT, INCIDENTAL OR CONSEQUENTIAL...
...harmful interference in which case the use of optical instruments with your Sony dealer regarding this , we recommend you call upon your local authority. 2 Introduction Table of Contents Introduction Features 3 Notes on MiniDiscs 3 Location and Function of the FCC Rules. Replace only with the...37 Error and Caution messages 38 Alarm System 40 Specifications 41 Index 42 Note on power supply Recording might stop if the power is interrupted momentarily during recording. MDCC-2000 WARNING Serial No. IN NO EVENT SHALL SELLER BE LIABLE FOR ANY DIRECT, INCIDENTAL OR CONSEQUENTIAL...
Operating Instructions
Page 3
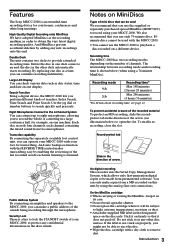
...of mini discs that can continue recording indefinitely. Record protect tab Slide in its case. • Do not break open the slot. Features The Sony MDCC-2000 is an extended-time recording device for transcribing. Notes on MiniDiscs Types of the last recorded words each channel containing the ...mixed sound from a MD recorded on properly, you use only 74-minute discs. 80minute ...
...of mini discs that can continue recording indefinitely. Record protect tab Slide in its case. • Do not break open the slot. Features The Sony MDCC-2000 is an extended-time recording device for transcribing. Notes on MiniDiscs Types of the last recorded words each channel containing the ...mixed sound from a MD recorded on properly, you use only 74-minute discs. 80minute ...

Operating Instructions
Page 4
DECK B button (17, 18) wa DISPLAY MODE B button (21) ws POINT SEARCH·RESET button (deck B) (20) wd POINT SEARCH·POINT button (deck B) (20) wf Z EJECT button (deck B) wg MD insertion slot (deck B) wh FUNCTION button wj DELETE button wk Arrow buttons wl ENTER button e; Number buttons qa SEARCH button (17, 18) qs INDEX button (14) qd MD insertion slot (deck A) qf Z EJECT button (deck A) qg LCD display qh LINE OUT 1 select buttons (ALL/1/2/3/4) (31) qj LINE OUT 2 select buttons (ALL/1/2/3/4) (31) qk PA/ADA selector (OFF/ON [ADA/PA]) (30) Switches the output to the pages indicated in ( ...
DECK B button (17, 18) wa DISPLAY MODE B button (21) ws POINT SEARCH·RESET button (deck B) (20) wd POINT SEARCH·POINT button (deck B) (20) wf Z EJECT button (deck B) wg MD insertion slot (deck B) wh FUNCTION button wj DELETE button wk Arrow buttons wl ENTER button e; Number buttons qa SEARCH button (17, 18) qs INDEX button (14) qd MD insertion slot (deck A) qf Z EJECT button (deck A) qg LCD display qh LINE OUT 1 select buttons (ALL/1/2/3/4) (31) qj LINE OUT 2 select buttons (ALL/1/2/3/4) (31) qk PA/ADA selector (OFF/ON [ADA/PA]) (30) Switches the output to the pages indicated in ( ...

Operating Instructions
Page 5
rk PA (public address) jack (30) rl LINE OUT jacks t; LINE IN jacks ta DC IN 12V jack (7) ts Microphone connectors (Canon XLR-3-31 type) Introduction 5 rj ADA jack Allows the unit to be connected to a separately purchased amplifier system. Left side Rear ra CONTROL UNIT connector (32) rs TRANSCRIBE selector (33) rd REMOTE jack (15) rf EAR jack (16) rg PC connector (RS-232C type) rh DISPLAY connector Used for connection of an external counter unit.
rk PA (public address) jack (30) rl LINE OUT jacks t; LINE IN jacks ta DC IN 12V jack (7) ts Microphone connectors (Canon XLR-3-31 type) Introduction 5 rj ADA jack Allows the unit to be connected to a separately purchased amplifier system. Left side Rear ra CONTROL UNIT connector (32) rs TRANSCRIBE selector (33) rd REMOTE jack (15) rf EAR jack (16) rg PC connector (RS-232C type) rh DISPLAY connector Used for connection of an external counter unit.

Operating Instructions
Page 6
...qs (copied) display (deck B) qd Disc status display (deck B) qf END display (deck B) qg INDEX counter (deck B) qh REC MODE display Indicates the recording mode (2ch/4ch) currently selected. 6 Introduction Depending on the disc by a white box. Location and Function of Controls (continued) Display Window (Information screen) ...1 9 0 2 qa 3 qs 4 qd 5 qf 6 qg 7 qh 8 1 A: display (deck A) Indicates the disc inserted in black. Already recorded parts are indicated in deck A or the status of the disc, the black part might not reach the far right even if the disc is...
...qs (copied) display (deck B) qd Disc status display (deck B) qf END display (deck B) qg INDEX counter (deck B) qh REC MODE display Indicates the recording mode (2ch/4ch) currently selected. 6 Introduction Depending on the disc by a white box. Location and Function of Controls (continued) Display Window (Information screen) ...1 9 0 2 qa 3 qs 4 qd 5 qf 6 qg 7 qh 8 1 A: display (deck A) Indicates the disc inserted in black. Already recorded parts are indicated in deck A or the status of the disc, the black part might not reach the far right even if the disc is...

Operating Instructions
Page 7
... the microphones firmly. Put the cord of the AC power adaptor in the AC power cord to the unit. Porarity of the plug Note When recording the input from an external device, connect it to DC IN 12 V Rear Canon XLR-3-12C type Microphones Notes on the AC power adaptor Use...
... the microphones firmly. Put the cord of the AC power adaptor in the AC power cord to the unit. Porarity of the plug Note When recording the input from an external device, connect it to DC IN 12 V Rear Canon XLR-3-12C type Microphones Notes on the AC power adaptor Use...

Operating Instructions
Page 8
on MiniDiscs when you record, be sure to set it to the information screen. You will see "01" of a month blinking. Note You cannot use the K/k buttons when setting the ... will see the CALENDAR or CLOCK INPUT screen. 4 Select CALENDAR using the jog dial or J/j buttons, and press ENTER. Setting the Date and Time To record the date and time etc. You will return to ON. blink 5 Set the month using the jog dial or the arrow buttons, and press ENTER.
on MiniDiscs when you record, be sure to set it to the information screen. You will see "01" of a month blinking. Note You cannot use the K/k buttons when setting the ... will see the CALENDAR or CLOCK INPUT screen. 4 Select CALENDAR using the jog dial or J/j buttons, and press ENTER. Setting the Date and Time To record the date and time etc. You will return to ON. blink 5 Set the month using the jog dial or the arrow buttons, and press ENTER.

Operating Instructions
Page 9
The display will return to the information screen and the clock will see the SET HOUR (hh) and MINUTE (mm) screen with the hours and AM/PM blinking. Setting Up 9 blink 3 Set the hour using the jog dial or the arrow buttons, and press ENTER. Note You cannot use the K/k buttons when setting the hour and minute. Setting the Time 2, 3, 4 1 Carry out steps 2 and 3 of "Setting the Date". You will start. You will see the CALENDER or CLOCK INPUT screen. 2 Select CLOCK using the jog dial or J/j buttons, and press ENTER. You will see the minutes blinking. 4 Set the minutes in ...
The display will return to the information screen and the clock will see the SET HOUR (hh) and MINUTE (mm) screen with the hours and AM/PM blinking. Setting Up 9 blink 3 Set the hour using the jog dial or the arrow buttons, and press ENTER. Note You cannot use the K/k buttons when setting the hour and minute. Setting the Time 2, 3, 4 1 Carry out steps 2 and 3 of "Setting the Date". You will start. You will see the CALENDER or CLOCK INPUT screen. 2 Select CLOCK using the jog dial or J/j buttons, and press ENTER. You will see the minutes blinking. 4 Set the minutes in ...

Operating Instructions
Page 10
...entering the machine's serial number. The stamp is one of characters might be registered when recording, and refers to the title that can create a stamp of DISC TITLE and INDEX NAME...title. However, the maximum number of the items that appears after the disc title. 10 Setting Up When recording starts, you want to 198 characters. You will see page 22, 24). 4 Select a letter or ...using the jog dial or the arrow buttons, and press ENTER. You will see it to indicate the recording machine, for each character you can use it on the total number of characters of up to input....
...entering the machine's serial number. The stamp is one of characters might be registered when recording, and refers to the title that can create a stamp of DISC TITLE and INDEX NAME...title. However, the maximum number of the items that appears after the disc title. 10 Setting Up When recording starts, you want to 198 characters. You will see page 22, 24). 4 Select a letter or ...using the jog dial or the arrow buttons, and press ENTER. You will see it to indicate the recording machine, for each character you can use it on the total number of characters of up to input....

Operating Instructions
Page 11
... prevent you want to input. Repeat this step for each character you from a disc. Set a password that will be entered when you want to delete recordings from accidentally deleting. Each letter and/or number of the password will be displayed as a " ". 4 Select OK using the jog dial or the arrow buttons...
... prevent you want to input. Repeat this step for each character you from a disc. Set a password that will be entered when you want to delete recordings from accidentally deleting. Each letter and/or number of the password will be displayed as a " ". 4 Select OK using the jog dial or the arrow buttons...
Operating Instructions
Page 12
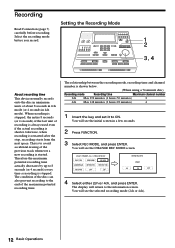
... the maximum potential recording time. When recording is shorter. The relationship between the recording mode, recording time and channel number is started. Setting the Recording Mode 1 2 3, 4 About recording time This device normally records onto the disc in minimum units of the previous track whenever a new recording is shown below. (When using a 74-minute disc) Recording mode Recording time Maximum channel...
... the maximum potential recording time. When recording is shorter. The relationship between the recording mode, recording time and channel number is started. Setting the Recording Mode 1 2 3, 4 About recording time This device normally records onto the disc in minimum units of the previous track whenever a new recording is shown below. (When using a 74-minute disc) Recording mode Recording time Maximum channel...

Operating Instructions
Page 13
... be done in one . The lamp on the recording status of three or more discs successively Replace the MiniDisc in this unit the new recording starts after the previously recorded data. You cannot overwrite onto the previously recorded data. • For continuous recording, always use a recorded disc when you can record continuously by using two decks, deck A and...
... be done in one . The lamp on the recording status of three or more discs successively Replace the MiniDisc in this unit the new recording starts after the previously recorded data. You cannot overwrite onto the previously recorded data. • For continuous recording, always use a recorded disc when you can record continuously by using two decks, deck A and...

Operating Instructions
Page 14
... number) is automatically added when - you to jump to those locations during recording at any location on the recording status of the disc. Adding Index Marks INDEX Notes • You can add up to insert a index mark. Recording will count upwards. 14 Basic Operations The index counter will continue, however, ... pausing You can be added might be less than 200 depending on the disc while recording. you want to 200 index marks. • You can only add index marks during recording. • If the number of index marks has reached 200 (or less than 200, depending on the ...
... number) is automatically added when - you to jump to those locations during recording at any location on the recording status of the disc. Adding Index Marks INDEX Notes • You can add up to insert a index mark. Recording will count upwards. 14 Basic Operations The index counter will continue, however, ... pausing You can be added might be less than 200 depending on the disc while recording. you want to 200 index marks. • You can only add index marks during recording. • If the number of index marks has reached 200 (or less than 200, depending on the ...

Operating Instructions
Page 15
... not work .The MDCC2000 just continues to record. • The REC indicator on the REC button flashes while recording is being paused. 2 1 Connect the remote control unit to the REMOTE jack on the left side of the MDCC-2000. 2 Press REC on the recording status of the disc), the remote control... unit does not work when not recording. • One index mark is added each time you to start recording. 3 Pause and restart recording using the remote control unit. Using the ...
... not work .The MDCC2000 just continues to record. • The REC indicator on the REC button flashes while recording is being paused. 2 1 Connect the remote control unit to the REMOTE jack on the left side of the MDCC-2000. 2 Press REC on the recording status of the disc), the remote control... unit does not work when not recording. • One index mark is added each time you to start recording. 3 Pause and restart recording using the remote control unit. Using the ...
Operating Instructions
Page 16
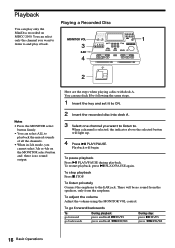
...EAR 4 2 Notes • Press the MONITOR select button firmly. • You can select only the channel you cannot select 3ch or 4ch on MDCC-2000. To pause playback Press u PLAY/PAUSE during playback. To restart playback, press u PLAY/PAUSE again. You can select ALL to playback the mixed sounds... in 2ch mode, you want to MONITOR VOL 1 listen to the EAR jack. To listen privately Connect the earphone to and play only the MiniDisc recorded on the MONITOR select button and there is selected, the indicator above the selected button will light up. 4 Press u PLAY/PAUSE. When ...
...EAR 4 2 Notes • Press the MONITOR select button firmly. • You can select only the channel you cannot select 3ch or 4ch on MDCC-2000. To pause playback Press u PLAY/PAUSE during playback. To restart playback, press u PLAY/PAUSE again. You can select ALL to playback the mixed sounds... in 2ch mode, you want to MONITOR VOL 1 listen to the EAR jack. To listen privately Connect the earphone to and play only the MiniDisc recorded on the MONITOR select button and there is selected, the indicator above the selected button will light up. 4 Press u PLAY/PAUSE. When ...
Operating Instructions
Page 17
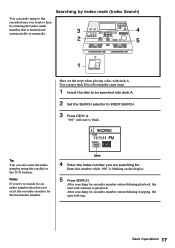
... Press SEARCH. After searching for the final index number. Tip You can use deck B by entering the index mark number that does not exist, the recorder searches for an index number entered during stopping, the unit will stop. blink 4 Enter the index number you are the steps when playing a disc with... deck A. After searching for . Searching by index mark (Index Search) You can easily jump to the recorded area you want to hear by following the same steps. 1 Insert the disc to be searched into deck A. 2 Set the SEARCH selector to INDEX ...
... Press SEARCH. After searching for the final index number. Tip You can use deck B by entering the index mark number that does not exist, the recorder searches for an index number entered during stopping, the unit will stop. blink 4 Enter the index number you are the steps when playing a disc with... deck A. After searching for . Searching by index mark (Index Search) You can easily jump to the recorded area you want to hear by following the same steps. 1 Insert the disc to be searched into deck A. 2 Set the SEARCH selector to INDEX ...
Operating Instructions
Page 18
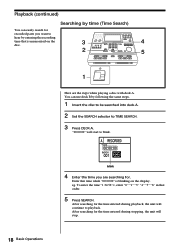
After searching for . Playback (continued) Searching by time (Time Search) You can use deck B by entering the recording time that order. 5 Press SEARCH. Enter this time while "00:00:00" is memorized on the display. blink 4 Enter the time you want to hear ... time entered during stopping, the unit will stop. 18 Basic Operations eg. "00:00:00" will continue to TIME SEARCH. 3 Press DECK A. After searching for recorded parts you are the steps when playing a disc with deck A. You can easily search for the time entered during playback, the unit will start to...
After searching for . Playback (continued) Searching by time (Time Search) You can use deck B by entering the recording time that order. 5 Press SEARCH. Enter this time while "00:00:00" is memorized on the display. blink 4 Enter the time you want to hear ... time entered during stopping, the unit will stop. 18 Basic Operations eg. "00:00:00" will continue to TIME SEARCH. 3 Press DECK A. After searching for recorded parts you are the steps when playing a disc with deck A. You can easily search for the time entered during playback, the unit will start to...

Operating Instructions
Page 19
... or J/j buttons, and press ENTER. If more than one result is obtained from a search When you perform a time search on a disc onto which an appended recording has been made, more than one result might be obtained. 3/31/01 ~ 3/31/01 11:00:00 AM 2:00:00 PM 4/3/01 ~ 11:00:00...
... or J/j buttons, and press ENTER. If more than one result is obtained from a search When you perform a time search on a disc onto which an appended recording has been made, more than one result might be obtained. 3/31/01 ~ 3/31/01 11:00:00 AM 2:00:00 PM 4/3/01 ~ 11:00:00...

Operating Instructions
Page 20
Note Pressing RESET or ejecting the disc by switching to STANDBY. You will continue to playback from the location searched if the search was made during stopping. - the unit will see page 6). A mark appears at the current position on each of decks A and B. POINT MARK RESET will start to playback from the location searched if the search was made during playback. will light up for a few seconds. To mark a point Press POINT at a location. MARKING POINT will light up . When the search is on the Disc position display (see SEARCH MODE light up for ...
Note Pressing RESET or ejecting the disc by switching to STANDBY. You will continue to playback from the location searched if the search was made during stopping. - the unit will see page 6). A mark appears at the current position on each of decks A and B. POINT MARK RESET will start to playback from the location searched if the search was made during playback. will light up for a few seconds. To mark a point Press POINT at a location. MARKING POINT will light up . When the search is on the Disc position display (see SEARCH MODE light up for ...