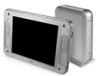
Operating Instructions
Page 3
... research. CAUTION Danger of important operating and maintenance (servicing) instructions in conjunction with the same or equivalent type. LF-X5 has been show to comply with Part 15 of the FCC Rules. Do not let this device must accept any other antenna or transmitter. Some studies ...been tested and found any kind on RF energy exposures. The maximum SAR levels tested for the LF-X1 has been show to rain or moisture. LF-X1 Contains FCC ID : AK8IRF302U Contains IC : 409B-IRF302U LF-X5 Base Station: Contains FCC ID : AK8IRF302U Contains IC : 409B-IRF302U Monitor: Contains FCC...
... research. CAUTION Danger of important operating and maintenance (servicing) instructions in conjunction with the same or equivalent type. LF-X5 has been show to comply with Part 15 of the FCC Rules. Do not let this device must accept any other antenna or transmitter. Some studies ...been tested and found any kind on RF energy exposures. The maximum SAR levels tested for the LF-X1 has been show to rain or moisture. LF-X1 Contains FCC ID : AK8IRF302U Contains IC : 409B-IRF302U LF-X5 Base Station: Contains FCC ID : AK8IRF302U Contains IC : 409B-IRF302U Monitor: Contains FCC...
Operating Instructions
Page 4
... no guarantee that interference will not occur in a residential installation. You can radiate radio frequency energy and, if not installed and used rechargeable batteries to Part 15 of this equipment.
... no guarantee that interference will not occur in a residential installation. You can radiate radio frequency energy and, if not installed and used rechargeable batteries to Part 15 of this equipment.
Operating Instructions
Page 5
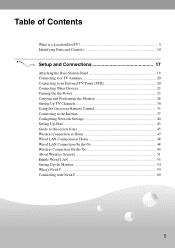
Table of Contents What is a LocationFreeTV 9 Identifying Parts and Controls 10 Setup and Connections 17 Attaching the Base Station Stand 19 Connecting to a TV Antenna 20 Connecting to an External TV Tuner (STB ...
Table of Contents What is a LocationFreeTV 9 Identifying Parts and Controls 10 Setup and Connections 17 Attaching the Base Station Stand 19 Connecting to a TV Antenna 20 Connecting to an External TV Tuner (STB ...
Operating Instructions
Page 10
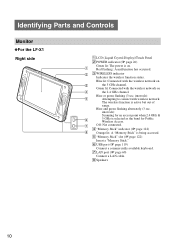
... lit: A "Memory Stick" is active but out of range. intervals): 5 Attempting to connect with the wireless network on 4 the 2.4 GHz channel. Identifying Parts and Controls Monitor ◆For the LF-X1 Right side 1 LCD (Liquid Crystal Display)/Touch Panel 2 POWER indicator (1 page 26) Green lit: The power is on 3 the 5 GHz channel. The...
... lit: A "Memory Stick" is active but out of range. intervals): 5 Attempting to connect with the wireless network on 4 the 2.4 GHz channel. Identifying Parts and Controls Monitor ◆For the LF-X1 Right side 1 LCD (Liquid Crystal Display)/Touch Panel 2 POWER indicator (1 page 26) Green lit: The power is on 3 the 5 GHz channel. The...
Operating Instructions
Page 11
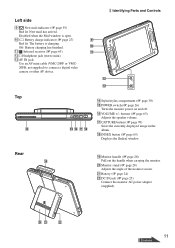
.... Monitor stand (1 page 28) Adjusts the angle of the monitor screen. qj CAPTURE button (1 page 70) Saves the currently displayed image in the album. Identifying Parts and Controls 9 0 qa qs qd Top qf qg qh qj qk qf Stylus/stylus compartment (1 page 30) qg POWER switch (1 page 26) Turns the monitor...
.... Monitor stand (1 page 28) Adjusts the angle of the monitor screen. qj CAPTURE button (1 page 70) Saves the currently displayed image in the album. Identifying Parts and Controls 9 0 qa qs qd Top qf qg qh qj qk qf Stylus/stylus compartment (1 page 30) qg POWER switch (1 page 26) Turns the monitor...
Operating Instructions
Page 13
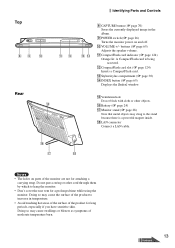
...cable. Doing so may cause the surface of the product to increase in the album. 9 POWER switch (1 page 26) Turns the monitor power on parts of the product for long periods, especially if you have sensitive skin. qa CompactFlash card indicator (1 page 124) Orange lit: A CompactFlash card is... vent for a prolonged time while using the monitor. buttons (1 page 65) Adjusts the speaker volume. Top 89 0 Rear qg qa qs Identifying Parts and Controls qd qf 8 CAPTURE button (1 page 70) Saves the currently displayed image in temperature. • Avoid touching hot areas of the surface...
...cable. Doing so may cause the surface of the product to increase in the album. 9 POWER switch (1 page 26) Turns the monitor power on parts of the product for long periods, especially if you have sensitive skin. qa CompactFlash card indicator (1 page 124) Orange lit: A CompactFlash card is... vent for a prolonged time while using the monitor. buttons (1 page 65) Adjusts the speaker volume. Top 89 0 Rear qg qa qs Identifying Parts and Controls qd qf 8 CAPTURE button (1 page 70) Saves the currently displayed image in temperature. • Avoid touching hot areas of the surface...
Operating Instructions
Page 15
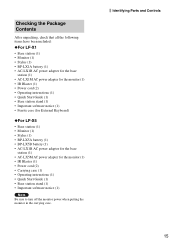
Checking the Package Contents After unpacking, check that all the following items have been included: ◆For LF-X1 • Base station (1) • Monitor (1) • Stylus (1) • BP-LX1A battery (1) ...8226; Quick Start Guide (1) • Base station stand (1) • Important software notice (1) • Ferrite core (for External Keyboard) ◆For LF-X5 • Base station (1) • Monitor (1) • Stylus (1) • BP-LX5A battery (1) • BP-LX5B battery (1) •...the monitor power when putting the monitor in the carrying case. Identifying Parts and Controls 15
Checking the Package Contents After unpacking, check that all the following items have been included: ◆For LF-X1 • Base station (1) • Monitor (1) • Stylus (1) • BP-LX1A battery (1) ...8226; Quick Start Guide (1) • Base station stand (1) • Important software notice (1) • Ferrite core (for External Keyboard) ◆For LF-X5 • Base station (1) • Monitor (1) • Stylus (1) • BP-LX5A battery (1) • BP-LX5B battery (1) •...the monitor power when putting the monitor in the carrying case. Identifying Parts and Controls 15
Operating Instructions
Page 34
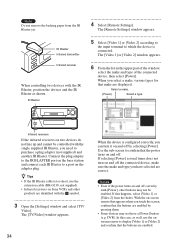
... happens, select [Video 1] or [Video 2] from the IR Blaster yet. The [Video 1] or [Video 2] window appears. 6 From the list in the upper part of the connected device, then select [Power]. With the on-screen remote that appears when you need to display [Video 1] or [Video 2] and confirm that...touch the screen, confirm that the buttons are enabled by selecting [Power]. When you select a make, various types for that the power turns on Sony VCRs and other buttons may not have selected are displayed. If selecting [Power] several times does not turn it on and off . Notes •...
... happens, select [Video 1] or [Video 2] from the IR Blaster yet. The [Video 1] or [Video 2] window appears. 6 From the list in the upper part of the connected device, then select [Power]. With the on-screen remote that appears when you need to display [Video 1] or [Video 2] and confirm that...touch the screen, confirm that the buttons are enabled by selecting [Power]. When you select a make, various types for that the power turns on Sony VCRs and other buttons may not have selected are displayed. If selecting [Power] several times does not turn it on and off . Notes •...
Operating Instructions
Page 35
...Video 1], [Video 1] is now replaced with [DVD Player]. z Tip You can change channels by sliding the stylus across the screen from the [Type] list (e.g., Sony "VCR+DVD Player"). For more information, see "Watching TV and Video" (1 page 65). 12 After checking that you can turn the device on -screen remote.... 11 Select the type of the screen, so that the connected devices operate properly, remove the backing paper from the [Make] list in the lower part of the selected on and off. 3 Secure each IR Blaster in the location you determined in step 2 (1 page 33). 10 Open the [Index] window....
...Video 1], [Video 1] is now replaced with [DVD Player]. z Tip You can change channels by sliding the stylus across the screen from the [Type] list (e.g., Sony "VCR+DVD Player"). For more information, see "Watching TV and Video" (1 page 65). 12 After checking that you can turn the device on -screen remote.... 11 Select the type of the screen, so that the connected devices operate properly, remove the backing paper from the [Make] list in the lower part of the selected on and off. 3 Secure each IR Blaster in the location you determined in step 2 (1 page 33). 10 Open the [Index] window....
Operating Instructions
Page 67
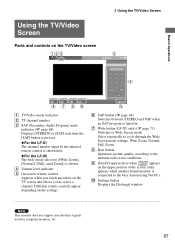
... (1 page 68) Displays [STEREO] or [SAP] each time the [SAP] button is pressed. ◆For the LF-X1 The channel number input by the infrared remote control is shown here. ◆For the LF-X5 The wide mode selection ([Wide Zoom], [Normal], [Full], and [Zoom]) is shown. G Wide button... (LF-X5 only) (1 page 71) Switches to the ambient radio wave conditions. Select repeatedly to cycle through the Wide Screen mode settings: Wide Zoom, Normal, Full, Zoom. Note This monitor does not support non-interlace signals used for computer monitors, etc. 67 Using the TV/Video Screen Parts and...
... (1 page 68) Displays [STEREO] or [SAP] each time the [SAP] button is pressed. ◆For the LF-X1 The channel number input by the infrared remote control is shown here. ◆For the LF-X5 The wide mode selection ([Wide Zoom], [Normal], [Full], and [Zoom]) is shown. G Wide button... (LF-X5 only) (1 page 71) Switches to the ambient radio wave conditions. Select repeatedly to cycle through the Wide Screen mode settings: Wide Zoom, Normal, Full, Zoom. Note This monitor does not support non-interlace signals used for computer monitors, etc. 67 Using the TV/Video Screen Parts and...
Operating Instructions
Page 71
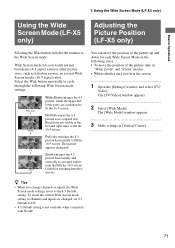
...changed, set 4:3 Default to an equal aspect ratio that fills the 16:9 screen. Wide Zoom enlarges the 4:3 picture, while the upper and lower parts are visible at the left and right sides to fill the 16:9 screen. Black bars are condensed to the 4:3 Default setting. Full only stretches ...Wide Screen mode settings revert to fit the 16:9 screen. Basics Operations Using the Wide Screen Mode (LF-X5 only) Using the Wide Screen Mode (LF-X5 only) Adjusting the Picture Position (LF-X5 only) Selecting the Wide button switches the monitor to its original size. Select the Wide button ...
...changed, set 4:3 Default to an equal aspect ratio that fills the 16:9 screen. Wide Zoom enlarges the 4:3 picture, while the upper and lower parts are visible at the left and right sides to fill the 16:9 screen. Black bars are condensed to the 4:3 Default setting. Full only stretches ...Wide Screen mode settings revert to fit the 16:9 screen. Basics Operations Using the Wide Screen Mode (LF-X5 only) Using the Wide Screen Mode (LF-X5 only) Adjusting the Picture Position (LF-X5 only) Selecting the Wide button switches the monitor to its original size. Select the Wide button ...
Operating Instructions
Page 75
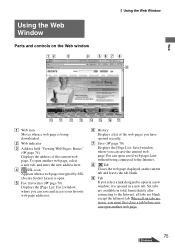
...: Save] window, where you can save and access your favorite web page addresses. Six tabs are blank except the leftmost tab. Using the Web Window Parts and controls on the current tab and leaves the tab blank. B Web indicator C Address field "Viewing Web Pages: Basics" (1 page 74) Displays the address of...
...: Save] window, where you can save and access your favorite web page addresses. Six tabs are blank except the leftmost tab. Using the Web Window Parts and controls on the current tab and leaves the tab blank. B Web indicator C Address field "Viewing Web Pages: Basics" (1 page 74) Displays the address of...

Operating Instructions
Page 145
... [Internet Connection] on the splitter are connected correctly. • Refer to the operating instructions for the device to the Internet was suddenly lost during transmission. Part of connection) • Make sure you want to connect or contact your ISP. • Your Internet service contract may not be experiencing trouble with its...
... [Internet Connection] on the splitter are connected correctly. • Refer to the operating instructions for the device to the Internet was suddenly lost during transmission. Part of connection) • Make sure you want to connect or contact your ISP. • Your Internet service contract may not be experiencing trouble with its...
LFAPC1 Software Instructions
Page 23
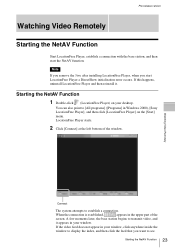
... moments later, the base station begins to transmit video, and it . When the connection is established, appears in Windows 2000), [Sony LocationFree Player], and then click [LocationFree Player] on your window, click anywhere inside the window to see. 23 Starting the NetAV ...(LocationFree Player) on the [Start] menu. Watching Video Remotely Connect The system attempts to [All programs] ([Programs] in the upper part of the window. Pre-release version Watching Video Remotely Starting the NetAV Function Start LocationFree Player, establish a connection with the base station,...
... moments later, the base station begins to transmit video, and it . When the connection is established, appears in Windows 2000), [Sony LocationFree Player], and then click [LocationFree Player] on your window, click anywhere inside the window to see. 23 Starting the NetAV ...(LocationFree Player) on the [Start] menu. Watching Video Remotely Connect The system attempts to [All programs] ([Programs] in the upper part of the window. Pre-release version Watching Video Remotely Starting the NetAV Function Start LocationFree Player, establish a connection with the base station,...
Troubleshooting Guide v1.3
Page 2
... signal from the Base Station, change to the wireless connection. (See the "NetAV" section below for the Base Station icon in the upper right hand part of the LCD Monitor) press "Get AV" at Home" section below for more information.) ƒ When Wireless or Wired LAN is selected in the "On...
... signal from the Base Station, change to the wireless connection. (See the "NetAV" section below for the Base Station icon in the upper right hand part of the LCD Monitor) press "Get AV" at Home" section below for more information.) ƒ When Wireless or Wired LAN is selected in the "On...

Warranty Card
Page 1
...resolution of a service problem, or for a period of purchase, if this Product (including any authorized Sony service facility. PARTS: In addition, Sony will supply, at your convenience, Sony Electronics Inc. This warranty does not cover damage due to improper operation or maintenance, connection to any ..., new or rebuilt replacements in exchange for defective parts for product information or operation, call: Sony Customer Information Services Center 1-800-222-7669 or visit the Sony Web Site: www.sony.com For an accessory or part not available from the date of one (1) year...
...resolution of a service problem, or for a period of purchase, if this Product (including any authorized Sony service facility. PARTS: In addition, Sony will supply, at your convenience, Sony Electronics Inc. This warranty does not cover damage due to improper operation or maintenance, connection to any ..., new or rebuilt replacements in exchange for defective parts for product information or operation, call: Sony Customer Information Services Center 1-800-222-7669 or visit the Sony Web Site: www.sony.com For an accessory or part not available from the date of one (1) year...

