Operating Instructions
Page 3
... been exposed to rain or moisture, does not operate normally, or has been dropped. CAUTION You are cautioned that interference will not occur in this manual could void your authority to operate this equipment does cause harmful interference to radio or television reception, which the receiver is encouraged to try to...
... been exposed to rain or moisture, does not operate normally, or has been dropped. CAUTION You are cautioned that interference will not occur in this manual could void your authority to operate this equipment does cause harmful interference to radio or television reception, which the receiver is encouraged to try to...
Operating Instructions
Page 5
...copyright protection technologies are registered trademarks of Sony Corporation. MPEG Layer-3 audio coding technology and patents licensed from Fraunhofer IIS and Thomson. Note on this manual The LBT-DJ2i consists of: - Note on Multi ...Session disc When you play back discs that do not conform to the Compact Disc (CD) standard, playback on DualDiscs A DualDisc is a trademark of Sony Corporation. "WALKMAN" and "WALKMAN" logo are marketed by this product is recognized as the first session. Unit HCD-DJ2i - Speaker System...
...copyright protection technologies are registered trademarks of Sony Corporation. MPEG Layer-3 audio coding technology and patents licensed from Fraunhofer IIS and Thomson. Note on this manual The LBT-DJ2i consists of: - Note on Multi ...Session disc When you play back discs that do not conform to the Compact Disc (CD) standard, playback on DualDiscs A DualDisc is a trademark of Sony Corporation. "WALKMAN" and "WALKMAN" logo are marketed by this product is recognized as the first session. Unit HCD-DJ2i - Speaker System...
Operating Instructions
Page 6
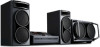
... System (RDS 36 Ajusting the sound effect........... 37 Singing along 37 Using the timer 38 Additional Information Troubleshooting 40 Messages 46 Precautions 48 Specifications 49 Compatible devices with this manual ...5 Guide to parts and controls.......... 7 Information on the display......... 12 Getting Started Hooking up the system 13 Positioning the speakers 16 ...20 Transferring onto an USB device 21 Listening to music of Contents About this system 52 Index 54 6GB Inspiring the DJ's mood Changing the display 32 Viewing...
... System (RDS 36 Ajusting the sound effect........... 37 Singing along 37 Using the timer 38 Additional Information Troubleshooting 40 Messages 46 Precautions 48 Specifications 49 Compatible devices with this manual ...5 Guide to parts and controls.......... 7 Information on the display......... 12 Getting Started Hooking up the system 13 Positioning the speakers 16 ...20 Transferring onto an USB device 21 Listening to music of Contents About this system 52 Index 54 6GB Inspiring the DJ's mood Changing the display 32 Viewing...

Operating Instructions
Page 7
ql 4 qk Continued l 7GB Top view 87 65 9 q; Unit - Guide to parts and controls Guide to parts and controls This manual mainly explains operations using the buttons on the unit, but the same operations can also be performed using the buttons on the remote having the same or similar names. qa qsqd3 9 wj qf wh qg wg wf qh < < wd ws qj wa w; Front view 12 3 4 -
ql 4 qk Continued l 7GB Top view 87 65 9 q; Unit - Guide to parts and controls Guide to parts and controls This manual mainly explains operations using the buttons on the unit, but the same operations can also be performed using the buttons on the remote having the same or similar names. qa qsqd3 9 wj qf wh qg wg wf qh < < wd ws qj wa w; Front view 12 3 4 -
Operating Instructions
Page 21
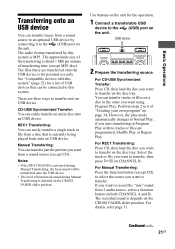
...tray. Perform steps 2 to 6 of transferring time (except MP3 disc). For Manual Transferring: Press the function button (except CD) to select the source you want to an optional USB device by this system is depends on the disc tray. If you want to record the "mix" ...function button on CHANNEL B. USB device 2 Prepare the transferring source. Notes • If the BEAT BLEND is activated during Manual Transferring, the beat sound will be connected to this system" (page 52) for the operation. 1 Connect a transferable USB device to transfer onto an USB device. Select the track...
...tray. Perform steps 2 to 6 of transferring time (except MP3 disc). For Manual Transferring: Press the function button (except CD) to select the source you want to an optional USB device by this system is depends on the disc tray. If you want to record the "mix" ...function button on CHANNEL B. USB device 2 Prepare the transferring source. Notes • If the BEAT BLEND is activated during Manual Transferring, the beat sound will be connected to this system" (page 52) for the operation. 1 Connect a transferable USB device to transfer onto an USB device. Select the track...
Operating Instructions
Page 22
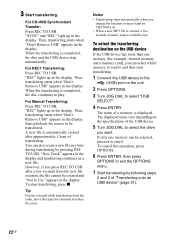
"SYNC" and "REC" light up in the display. For Manual Transferring: Press REC TO USB. "New Track" appears in the display. To stop automatically. The name of a memory is completed, the disc and the USB ...
"SYNC" and "REC" light up in the display. For Manual Transferring: Press REC TO USB. "New Track" appears in the display. To stop automatically. The name of a memory is completed, the disc and the USB ...
Operating Instructions
Page 23
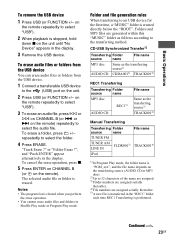
... characters of the name are assigned. 3) Folder numbers are assigned serially thereafter. 4) File numbers are generated within this "MUSIC" folder as the transferring source2) TRACK0014) Manual Transferring Transferring Folder source name TUNER FM TUNER AM FLDR0013) LINE IN iPod File name TRACK0014) 1) In Program Play mode, the folder name is transferred...
... characters of the name are assigned. 3) Folder numbers are assigned serially thereafter. 4) File numbers are generated within this "MUSIC" folder as the transferring source2) TRACK0014) Manual Transferring Transferring Folder source name TUNER FM TUNER AM FLDR0013) LINE IN iPod File name TRACK0014) 1) In Program Play mode, the folder name is transferred...
Operating Instructions
Page 31
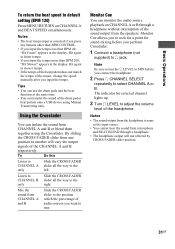
...Hit again in slower tempo. • If the tempo of the beat pattern does not match the tempo of the music, change the speed manually after you want to mix. Mix the sound from microphone and BEAT BLEND through a headphone without interruption of the sound output from CHANNEL A and... B or blend them together using Manual Transferring only. Notes • The sound output from the headphone is canceled if you press any buttons other than BPM 200, "Hit Slower" appears...
...Hit again in slower tempo. • If the tempo of the beat pattern does not match the tempo of the music, change the speed manually after you want to mix. Mix the sound from microphone and BEAT BLEND through a headphone without interruption of the sound output from CHANNEL A and... B or blend them together using Manual Transferring only. Notes • The sound output from the headphone is canceled if you press any buttons other than BPM 200, "Hit Slower" appears...
Operating Instructions
Page 39
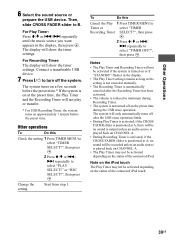
...REC SELECT?", then press . Notes • The Play Timer and Recording Timer will show the timer settings. The system turns on a few seconds before the preset time.* If the system is not turned off on approximately 1 minute before the preset time. Change the setting Start from step 1. For ... until the music source you want appears in the display. • The Play Timer setting remains as long as the setting is not canceled manually. • The Recording Timer is automatically canceled after the USB erase operation finish. • During Play Timer is activated, if the CROSS...
...REC SELECT?", then press . Notes • The Play Timer and Recording Timer will show the timer settings. The system turns on a few seconds before the preset time.* If the system is not turned off on approximately 1 minute before the preset time. Change the setting Start from step 1. For ... until the music source you want appears in the display. • The Play Timer setting remains as long as the setting is not canceled manually. • The Recording Timer is automatically canceled after the USB erase operation finish. • During Play Timer is activated, if the CROSS...

Operating Instructions
Page 54
... Crossfader 31 D Demonstration 14, 32 Display 12 Display mode 32 F FM MODE 20 H Handling discs 48 Hooking up the system 13 M Manual Transferring 21 Monitor cue 31 MP3 BOOSTER+ 29 Multi Session 5 N Non-playable disc 48 Normal Play 19, 26 O OPTIONS menu 22, 29, 32 P Play mode ...19, 26 Playable disc 48 Power Saving Mode 32 Presetting radio station 35 Program Play 34 R Radio station 20 RDS (Radio Data System) 36 REC1 Transferring...
... Crossfader 31 D Demonstration 14, 32 Display 12 Display mode 32 F FM MODE 20 H Handling discs 48 Hooking up the system 13 M Manual Transferring 21 Monitor cue 31 MP3 BOOSTER+ 29 Multi Session 5 N Non-playable disc 48 Normal Play 19, 26 O OPTIONS menu 22, 29, 32 P Play mode ...19, 26 Playable disc 48 Power Saving Mode 32 Presetting radio station 35 Program Play 34 R Radio station 20 RDS (Radio Data System) 36 REC1 Transferring...

