
Operating Instructions
Page 3
...periods of the power plug is intended to alert the user to persons. As an ENERGY STAR® Partner, Sony has determined that interference will fit into the TV, unplug it and have it further. This equipment generates, uses, and can be permanently imprinted onto the screen...to operate this polarized plug with § 15.119 of station logos onto the TV screen. CAUTION When using TV games, computers, and similar products with radio communications. To reduce the risk of Sony Corporation. WEGA®, FD Trinitron, Caption Vision and Steady Sound are registered trademarks of...
...periods of the power plug is intended to alert the user to persons. As an ENERGY STAR® Partner, Sony has determined that interference will fit into the TV, unplug it and have it further. This equipment generates, uses, and can be permanently imprinted onto the screen...to operate this polarized plug with § 15.119 of station logos onto the TV screen. CAUTION When using TV games, computers, and similar products with radio communications. To reduce the risk of Sony Corporation. WEGA®, FD Trinitron, Caption Vision and Steady Sound are registered trademarks of...

Operating Instructions
Page 4
...set , causing injury. For the set by the manufacturer, as they may fall from the set . If a snapping or popping sound from a TV set through the cabinet slots as a precaution against injury, the following basic safety precautions should be moved with a three-wire grounding type AC plug ...with care. It is a safety feature. Installation Always use power-line operated sets near a swimming pool, etc. This is normal for some TV sets to make occasional snapping or popping sounds, particularly when being turned on top of any objects, especially heavy objects, on or off your ...
...set , causing injury. For the set by the manufacturer, as they may fall from the set . If a snapping or popping sound from a TV set through the cabinet slots as a precaution against injury, the following basic safety precautions should be moved with a three-wire grounding type AC plug ...with care. It is a safety feature. Installation Always use power-line operated sets near a swimming pool, etc. This is normal for some TV sets to make occasional snapping or popping sounds, particularly when being turned on top of any objects, especially heavy objects, on or off your ...

Operating Instructions
Page 7
...1 About this Manual...2 Batteries for the Remote Control 2 Front Panel Menu Controls ...2 Using the Remote Control Remote Control Description...3 Connecting Your TV TV Rear Panel ...5 Basic Connections ...6 Connecting Additional Equipment 7 Using Basic Functions Quick Start to the Menus ...16 Using the Menus How to Access... Menus...19 Using the Video Menu ...20 Using the Audio Menu ...21 Using the Channel Setup Menu 22 Using the Parental Control Menu 24 Parental Control ...25 United States:...
...1 About this Manual...2 Batteries for the Remote Control 2 Front Panel Menu Controls ...2 Using the Remote Control Remote Control Description...3 Connecting Your TV TV Rear Panel ...5 Basic Connections ...6 Connecting Additional Equipment 7 Using Basic Functions Quick Start to the Menus ...16 Using the Menus How to Access... Menus...19 Using the Video Menu ...20 Using the Audio Menu ...21 Using the Channel Setup Menu 22 Using the Parental Control Menu 24 Parental Control ...25 United States:...

Operating Instructions
Page 9
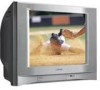
...monitor what their children watch on -screen menus without the use of the Sony FD Trinitron WEGA®. Provides enhanced picture resolution for stereo programs. ❏ 16:9 Enhanced - Allows access to your TV or on the rear of your favorite channels with the touch of a ...delivers a picture with uncompromising accuracy and outstanding image detail. ❏ Surround - Before you will enjoy include: ❏ FD Trinitron FLAT CRT - Introducing the FD Trinitron WEGA® Features Some of the features you begin using this manual, please check the model number located on ...
...monitor what their children watch on -screen menus without the use of the Sony FD Trinitron WEGA®. Provides enhanced picture resolution for stereo programs. ❏ 16:9 Enhanced - Allows access to your TV or on the rear of your favorite channels with the touch of a ...delivers a picture with uncompromising accuracy and outstanding image detail. ❏ Surround - Before you will enjoy include: ❏ FD Trinitron FLAT CRT - Introducing the FD Trinitron WEGA® Features Some of the features you begin using this manual, please check the model number located on ...

Operating Instructions
Page 10
... to access the menu without the remote control. Press again when the setting or adjustment is complete. ✍ To navigate the menus with your new TV. Use the button on the front Audio/Video panel instead of the G, g, and buttons on page 19. 2 Use the and buttons on the front Audio...
... to access the menu without the remote control. Press again when the setting or adjustment is complete. ✍ To navigate the menus with your new TV. Use the button on the front Audio/Video panel instead of the G, g, and buttons on page 19. 2 Use the and buttons on the front Audio...

Operating Instructions
Page 11
..., or 90 minutes. Press again to exit the menu at any time. Moves the cursor in an on -screen menus. Cycles through the Multi-channel TV Sound (MTS) options: Stereo, Mono, and Auto SAP (Second Audio Program). Displays the on or off. Press again to turn the... TV on -screen menu. Press to select or access an option. Press for a direct selection of Effect settings (Simulated, Surround, Off). Press the arrow buttons to ...
..., or 90 minutes. Press again to exit the menu at any time. Moves the cursor in an on -screen menus. Cycles through the Multi-channel TV Sound (MTS) options: Stereo, Mono, and Auto SAP (Second Audio Program). Displays the on or off. Press again to turn the... TV on -screen menu. Press to select or access an option. Press for a direct selection of Effect settings (Simulated, Surround, Off). Press the arrow buttons to ...

Operating Instructions
Page 13
.... Connects to any optional equipment you may not look exactly like those illustrated. 5 Connections Connecting Your TV Read this manual are for KV-24FS120. The real panels on your VHF/UHF antenna or cable. TV Rear Panel 1 4 2 3 Jack 1 S VIDEO Description Connects to your VCR or other video ...equipment. A second video input jack (VIDEO 2) is only for KV-24FS120. 2 VHF/UHF 3 Video/Audio L(Mono),R 4 Y, PB, PR/L, R Connects to the S ...
.... Connects to any optional equipment you may not look exactly like those illustrated. 5 Connections Connecting Your TV Read this manual are for KV-24FS120. The real panels on your VHF/UHF antenna or cable. TV Rear Panel 1 4 2 3 Jack 1 S VIDEO Description Connects to your VCR or other video ...equipment. A second video input jack (VIDEO 2) is only for KV-24FS120. 2 VHF/UHF 3 Video/Audio L(Mono),R 4 Y, PB, PR/L, R Connects to the S ...

Operating Instructions
Page 14
Connections Basic Connections TV with indoor or outdoor antenna, or CATV cable Depending on the cable available in to older homes). ✍ If you are connecting to an indoor or outdoor antenna, you may need to adjust the orientation of the connections below: Use this to connect the TV to a dipole antenna, also known as "rabbit ears" antenna (usually found in your home, choose one of the antenna for best reception. 6 Use this to connect the TV to a cable system or an antenna with a 75-ohms cable (usually built into newer homes).
Connections Basic Connections TV with indoor or outdoor antenna, or CATV cable Depending on the cable available in to older homes). ✍ If you are connecting to an indoor or outdoor antenna, you may need to adjust the orientation of the connections below: Use this to connect the TV to a dipole antenna, also known as "rabbit ears" antenna (usually found in your home, choose one of the antenna for best reception. 6 Use this to connect the TV to a cable system or an antenna with a 75-ohms cable (usually built into newer homes).
Operating Instructions
Page 15
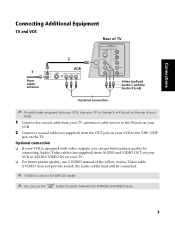
...; If your VCR is only for KV-24FS120 model. ✍ You can get better picture quality by connecting Audio/Video cables (not supplied) from the OUT jack on your TV. ❏ For better picture quality, use the button to the VHF/UHF jack on the TV. the audio cables must still be connected.... ✍ S-VIDEO is equipped with video outputs, you can use S VIDEO instead of your VCR). 1 Connect the coaxial cable from your TV antenna or cable service to the IN jack on your VCR. 2 Connect a coaxial cable (not supplied) from AUDIO and VIDEO OUT on your VCR to...
...; If your VCR is only for KV-24FS120 model. ✍ You can get better picture quality by connecting Audio/Video cables (not supplied) from the OUT jack on your TV. ❏ For better picture quality, use the button to the VHF/UHF jack on the TV. the audio cables must still be connected.... ✍ S-VIDEO is equipped with video outputs, you can use S VIDEO instead of your VCR). 1 Connect the coaxial cable from your TV antenna or cable service to the IN jack on your VCR. 2 Connect a coaxial cable (not supplied) from AUDIO and VIDEO OUT on your VCR to...
Operating Instructions
Page 16
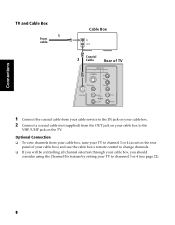
TV and Cable Box 1 From cable Cable Box Coaxial 2 Cable Rear of your cable box) and use the cable box's remote control to change channels. ❏ ... cable box to channnel 3 or 4 (see page 22). 8 Optional Connection ❏ To view channels from your cable box, tune your TV to channel 3 or 4 (as set on the rear panel of TV Connections 1 Connect the coaxial cable from your cable service to the IN jack on your cable box. 2 Connect a coaxial cable...
TV and Cable Box 1 From cable Cable Box Coaxial 2 Cable Rear of your cable box) and use the cable box's remote control to change channels. ❏ ... cable box to channnel 3 or 4 (see page 22). 8 Optional Connection ❏ To view channels from your cable box, tune your TV to channel 3 or 4 (as set on the rear panel of TV Connections 1 Connect the coaxial cable from your cable service to the IN jack on your cable box. 2 Connect a coaxial cable...

Operating Instructions
Page 17
...is equipped with video outputs, you will be connected. ✍ S-VIDEO is only for KV-24FS120 model. ✍ You can get better picture quality by setting your TV to channel 3 or 4 (see page 22). Connections TV, VCR, and Cable Box Rear of the yellow Audio/ Video cable. the audio cables ... by connecting Audio/Video cables (not supplied) from Audio and Video OUT on your VCR to Audio/Video IN on your TV. ❏ For better picture quality, use S VIDEO instead of TV 3 VCR 2 Cable Box 1 From cable Optional connection Video (yellow) Audio L (white) Audio R (red) 1 Connect the coaxial ...
...is equipped with video outputs, you will be connected. ✍ S-VIDEO is only for KV-24FS120 model. ✍ You can get better picture quality by setting your TV to channel 3 or 4 (see page 22). Connections TV, VCR, and Cable Box Rear of the yellow Audio/ Video cable. the audio cables ... by connecting Audio/Video cables (not supplied) from Audio and Video OUT on your VCR to Audio/Video IN on your TV. ❏ For better picture quality, use S VIDEO instead of TV 3 VCR 2 Cable Box 1 From cable Optional connection Video (yellow) Audio L (white) Audio R (red) 1 Connect the coaxial ...

Operating Instructions
Page 18
... cable/ antenna 2 Rear of the yellow audio/video cable. the audio cables must still be connected. ✍ S-VIDEO is only for KV-24FS120 model. ✍ You can use S VIDEO instead of TV Satellite Receiver 1 Satellite antenna cable 3 Video (yellow) Audio L (white) Audio R (red) 1 Connect the cable from your satellite antenna...SATELLITE IN on your satellite receiver. 2 Connect the coaxial cable from your cable service or antenna to the VHF/UHF jack on your TV. 3 Using audio/video cables (not supplied), connect AUDIO and VIDEO OUT on your satellite receiver to AUDIO and VIDEO IN on your...
... cable/ antenna 2 Rear of the yellow audio/video cable. the audio cables must still be connected. ✍ S-VIDEO is only for KV-24FS120 model. ✍ You can use S VIDEO instead of TV Satellite Receiver 1 Satellite antenna cable 3 Video (yellow) Audio L (white) Audio R (red) 1 Connect the cable from your satellite antenna...SATELLITE IN on your satellite receiver. 2 Connect the coaxial cable from your cable service or antenna to the VHF/UHF jack on your TV. 3 Using audio/video cables (not supplied), connect AUDIO and VIDEO OUT on your satellite receiver to AUDIO and VIDEO IN on your...

Operating Instructions
Page 19
...IN jack on your VCR. 3 Using a coaxial cable (not supplied), connect the OUT jack on your VCR to the VHF/UHF jack on your TV. 4 Using audio/video cables (not supplied), connect AUDIO and VIDEO OUT on your satellite receiver to AUDIO and VIDEO IN on your VCR. 5... Using audio/video cables (not supplied), connect AUDIO and VIDEO OUT on the remote control. 11 Connections TV, Satellite Receiver, and VCR Satellite antenna 4 cable 1 From cable/ antenna 2 VCR Rear of TV Satellite Receiver 5 Video (yellow) 3 Audio L (white) Audio R (red) 1 Connect the cable from your satellite ...
...IN jack on your VCR. 3 Using a coaxial cable (not supplied), connect the OUT jack on your VCR to the VHF/UHF jack on your TV. 4 Using audio/video cables (not supplied), connect AUDIO and VIDEO OUT on your satellite receiver to AUDIO and VIDEO IN on your VCR. 5... Using audio/video cables (not supplied), connect AUDIO and VIDEO OUT on the remote control. 11 Connections TV, Satellite Receiver, and VCR Satellite antenna 4 cable 1 From cable/ antenna 2 VCR Rear of TV Satellite Receiver 5 Video (yellow) 3 Audio L (white) Audio R (red) 1 Connect the cable from your satellite ...

Operating Instructions
Page 20
... Composite Video (Video/Audio L(Mono), R) Using audio/video cables (not supplied), connect AUDIO/VIDEO OUT on your DVD player to like colors. 12 Rear of TV Rear of DVD Player Connections Optional connection Video (yellow) Audio L (white) Audio R (red) Optional connection ❏ For better picture quality, use S VIDEO... video cables (not supplied), connect the Y, PB, PR OUT on your DVD player to Y, PB, PR IN on your TV. 2 Connect AUDIO OUT on your DVD player to AUDIO IN on your TV. ✍ The Y, PB, PR outputs on your DVD player are sometimes labeled Y, CB, and CR or Y, B-Y, and ...
... Composite Video (Video/Audio L(Mono), R) Using audio/video cables (not supplied), connect AUDIO/VIDEO OUT on your DVD player to like colors. 12 Rear of TV Rear of DVD Player Connections Optional connection Video (yellow) Audio L (white) Audio R (red) Optional connection ❏ For better picture quality, use S VIDEO... video cables (not supplied), connect the Y, PB, PR OUT on your DVD player to Y, PB, PR IN on your TV. 2 Connect AUDIO OUT on your DVD player to AUDIO IN on your TV. ✍ The Y, PB, PR outputs on your DVD player are sometimes labeled Y, CB, and CR or Y, B-Y, and ...

Operating Instructions
Page 21
Front A/V Panel Connecting a Camcorder Using audio/video cables (not supplied), connect AUDIO and VIDEO OUT on your camcorder to the jack on your TV. Headphone jack is STEREO. Front A/V Panel A/V output Audio R (red) Audio L (white) Video (yellow) 13 Connections Connecting Headphones Connect the headphones to AUDIO and VIDEO IN on the front of your TV.
Front A/V Panel Connecting a Camcorder Using audio/video cables (not supplied), connect AUDIO and VIDEO OUT on your camcorder to the jack on your TV. Headphone jack is STEREO. Front A/V Panel A/V output Audio R (red) Audio L (white) Video (yellow) 13 Connections Connecting Headphones Connect the headphones to AUDIO and VIDEO IN on the front of your TV.

Operating Instructions
Page 22
Connections Connecting for Video Tape Editing (VCR and Camcorder) Camcorder (for playback) 1b Rear of TV A/V output VCR (for playback) 1a VCR (for recording) 2 Video (yellow) Audio L (white) Audio R (red) 1 For video tape editing connect to the VCR the following sources (... on your second VCR 2 Using audio/video cables (not supplied), connect AUDIO/VIDEO OUT on the second VCR to the AUDIO/VIDEO IN on your TV. 14
Connections Connecting for Video Tape Editing (VCR and Camcorder) Camcorder (for playback) 1b Rear of TV A/V output VCR (for playback) 1a VCR (for recording) 2 Video (yellow) Audio L (white) Audio R (red) 1 For video tape editing connect to the VCR the following sources (... on your second VCR 2 Using audio/video cables (not supplied), connect AUDIO/VIDEO OUT on the second VCR to the AUDIO/VIDEO IN on your TV. 14

Operating Instructions
Page 23
... finished; Basic Functions Initial Setup First please connect cable/antenna Auto Program [CH+] Exit [CH-] 2 Press on the remote control or on the TV front panel to start Auto Program wait until you can use Auto Program to exit. To perform Auto Program again 1 Press . 2 Press g... to highlight Channel Menu. 3 Press f to highlight Auto Program. The TV will skip over channels that are available. Press to search for available channels and program receivable channels. ✍ When you connected your...
... finished; Basic Functions Initial Setup First please connect cable/antenna Auto Program [CH+] Exit [CH-] 2 Press on the remote control or on the TV front panel to start Auto Program wait until you can use Auto Program to exit. To perform Auto Program again 1 Press . 2 Press g... to highlight Channel Menu. 3 Press f to highlight Auto Program. The TV will skip over channels that are available. Press to search for available channels and program receivable channels. ✍ When you connected your...

Operating Instructions
Page 24
Audio Treble Bass Balance Steady Sound: Off Effect : Off MTS : Stereo Move Select End Change your TV based on a program's rating or content. 16 Parental Control Password : Move Select End Set rating limits on your audio settings. Basic Functions Quick Start to ...
Audio Treble Bass Balance Steady Sound: Off Effect : Off MTS : Stereo Move Select End Change your TV based on a program's rating or content. 16 Parental Control Password : Move Select End Set rating limits on your audio settings. Basic Functions Quick Start to ...

Operating Instructions
Page 25
Menu Timer Timer 1 : Set Timer 2 : Set Current Time Move Select End Setup Caption Vision : Off Info Banner : Off Video Label Tilt Correction Language : English 16:9 Enhanced: Off Move Select End Allows you to Set the clock on your TV and program scheduled viewing using Timer 1 and Timer 2. Basic Functions 17 Select closed captioning options, label video inputs, adjust tilt correction, select menu languages, or run a demo of the menus.
Menu Timer Timer 1 : Set Timer 2 : Set Current Time Move Select End Setup Caption Vision : Off Info Banner : Off Video Label Tilt Correction Language : English 16:9 Enhanced: Off Move Select End Allows you to Set the clock on your TV and program scheduled viewing using Timer 1 and Timer 2. Basic Functions 17 Select closed captioning options, label video inputs, adjust tilt correction, select menu languages, or run a demo of the menus.

Operating Instructions
Page 27
... on-screen menus, use the "arrow" buttons (F , f , G , g) to select an option. Press to select it. 3 Use the F or f buttons to scroll up and adjusting your TV. Menus 19 How to Access Menus To Access a Menu 1 Press to display the on-screen menu. 2 Use the G or g buttons to normal viewing. If no...
... on-screen menus, use the "arrow" buttons (F , f , G , g) to select an option. Press to select it. 3 Use the F or f buttons to scroll up and adjusting your TV. Menus 19 How to Access Menus To Access a Menu 1 Press to display the on-screen menu. 2 Use the G or g buttons to normal viewing. If no...


