Operating Instructions
Page 1
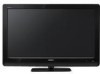
KLV-40S400A KLV-37S400A KLV-32S400A KLV-26S400A © 2008 Sony Corporation LCD Colour TV Operating Instructions 3-870-396-13(1) 3-870-396-13(1)
KLV-40S400A KLV-37S400A KLV-32S400A KLV-26S400A © 2008 Sony Corporation LCD Colour TV Operating Instructions 3-870-396-13(1) 3-870-396-13(1)
Operating Instructions
Page 2
Before operating the TV, please read this manual thoroughly and retain it for choosing this manual are trademarks of the KLV-32S400A unless otherwise stated. Trademark information • HDMI, the HDMI logo and High-Definition Multimedia Interface are trademarks or registered trademarks of HDMI Licensing LLC. • "BRAVIA" and are of Sony Corporation. 2 GB The illustrations used in this Sony product. Introduction Thank you for future reference.
Before operating the TV, please read this manual thoroughly and retain it for choosing this manual are trademarks of the KLV-32S400A unless otherwise stated. Trademark information • HDMI, the HDMI logo and High-Definition Multimedia Interface are trademarks or registered trademarks of HDMI Licensing LLC. • "BRAVIA" and are of Sony Corporation. 2 GB The illustrations used in this Sony product. Introduction Thank you for future reference.
Operating Instructions
Page 4
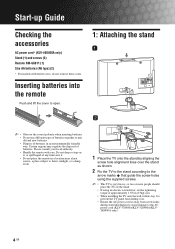
...the arrow marks that guide the screw holes using the supplied screws. ~ • This TV is very heavy, so two or more people should place the TV on the stand. • If using an electric screwdriver, set the tightening torque at ...approximately 1.5N·m (15kgf·cm). • When installing the TV onto the wall, follow step 1 to prevent the TV panel from falling over. • Ensure the AC power cord is away from screw holes during ...batteries into the remote Push and lift the cover to the AC power cord (KLV-37S400A/KLV-32S400A/KLV26S400A only). 4 GB
...the arrow marks that guide the screw holes using the supplied screws. ~ • This TV is very heavy, so two or more people should place the TV on the stand. • If using an electric screwdriver, set the tightening torque at ...approximately 1.5N·m (15kgf·cm). • When installing the TV onto the wall, follow step 1 to prevent the TV panel from falling over. • Ensure the AC power cord is away from screw holes during ...batteries into the remote Push and lift the cover to the AC power cord (KLV-37S400A/KLV-32S400A/KLV26S400A only). 4 GB
Operating Instructions
Page 6
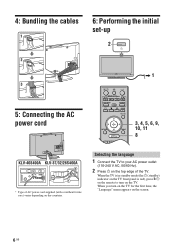
...the "Language" menu appears on the TV. When you turn on the screen. 6 GB 4: Bundling the cables 6: Performing the initial set-up , 1 5: Connecting the AC power cord BRAVIA Sync SYNC MENU THEATRE AUDIO 3, 4, 5, 6, 9, RETURN TOOLS 10, 11 8 KLV-40S400A KLV-37/32/26S400A * Type of AC power cord... supplied (with or without ferrite core) varies depending on the top edge of the TV. When the TV is in standby mode (the 1 (standby) indicator on the TV front panel is red), press "/1 on the ...
...the "Language" menu appears on the TV. When you turn on the screen. 6 GB 4: Bundling the cables 6: Performing the initial set-up , 1 5: Connecting the AC power cord BRAVIA Sync SYNC MENU THEATRE AUDIO 3, 4, 5, 6, 9, RETURN TOOLS 10, 11 8 KLV-40S400A KLV-37/32/26S400A * Type of AC power cord... supplied (with or without ferrite core) varies depending on the top edge of the TV. When the TV is in standby mode (the 1 (standby) indicator on the TV front panel is red), press "/1 on the ...
Operating Instructions
Page 9
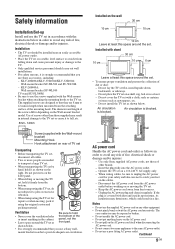
... Two or more people are designed so that you use Sony accessories, including: - Use only Sony supplied AC power cords, not those supplied may result in a closet. - KLV-40S400A/KLV-37S400A/KLV-32S400A: Wall-mount bracket SU-WL500 and SU-WL50B - Do not place the TV set on a shelf, rug, bed or in internal damage... feet on the LCD panel. • When lifting or moving , pack it firmly from the AC power outlet before working on any risk of fire, electrical shock or damage and/or injuries. Disconnect the AC power cord from the bottom. • When transporting the TV set, do not...
... Two or more people are designed so that you use Sony accessories, including: - Use only Sony supplied AC power cords, not those supplied may result in a closet. - KLV-40S400A/KLV-37S400A/KLV-32S400A: Wall-mount bracket SU-WL500 and SU-WL50B - Do not place the TV set on a shelf, rug, bed or in internal damage... feet on the LCD panel. • When lifting or moving , pack it firmly from the AC power outlet before working on any risk of fire, electrical shock or damage and/or injuries. Disconnect the AC power cord from the bottom. • When transporting the TV set, do not...
Operating Instructions
Page 21
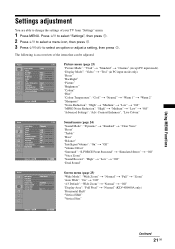
...Voice Zoom" "Sound Booster": "High" t "Low" t "Off" "Dual Sound" Screen Wide Mode Auto Wide 4:3 Default Display Area Horizontal Shift Vertical Shift Vertical Size TV Wide Zoom Full Pixel 0 0 Screen menu (page 25) "Wide Mode": "Wide Zoom" t "Normal" t "Full" t "Zoom" "Auto Wide": "On" t... "Off" "4:3 Default": "Wide Zoom" t "Normal" t "Off" "Display Area": "Full Pixel" t "Normal" (KLV-40S400A only) "Horizontal Shift" "Vertical Shift" "Vertical Size" Select: Set: Exit: MENU Continued 21 GB Press F/f to select "Settings", then press . 2 Press F/f to ...
...Voice Zoom" "Sound Booster": "High" t "Low" t "Off" "Dual Sound" Screen Wide Mode Auto Wide 4:3 Default Display Area Horizontal Shift Vertical Shift Vertical Size TV Wide Zoom Full Pixel 0 0 Screen menu (page 25) "Wide Mode": "Wide Zoom" t "Normal" t "Full" t "Zoom" "Auto Wide": "On" t... "Off" "4:3 Default": "Wide Zoom" t "Normal" t "Off" "Display Area": "Full Pixel" t "Normal" (KLV-40S400A only) "Horizontal Shift" "Vertical Shift" "Vertical Size" Select: Set: Exit: MENU Continued 21 GB Press F/f to select "Settings", then press . 2 Press F/f to ...
Operating Instructions
Page 26
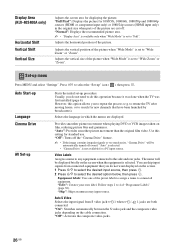
Display Area (KLV-40S400A only) Horizontal Shift Vertical Shift Vertical Size Adjusts the screen area for new channels that you do this operation because it was done when the TV was first installed (page 6). "Full Pixel": Displays the picture for 1080/50i, 1080/60i, 1080/50p and 1080/60p sources (HDMI or ...in the original size when parts of the picture when "Wide Mode" is set to select the desired option below, then press . to retune the TV after moving house, or to repeat the process (e.g. Use this option allows you do not need to do not want displayed on the screen when...
Display Area (KLV-40S400A only) Horizontal Shift Vertical Shift Vertical Size Adjusts the screen area for new channels that you do this operation because it was done when the TV was first installed (page 6). "Full Pixel": Displays the picture for 1080/50i, 1080/60i, 1080/50p and 1080/60p sources (HDMI or ...in the original size when parts of the picture when "Wide Mode" is set to select the desired option below, then press . to retune the TV after moving house, or to repeat the process (e.g. Use this option allows you do not need to do not want displayed on the screen when...
Operating Instructions
Page 32
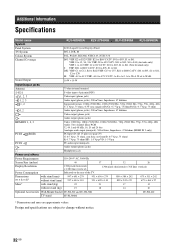
...Power Requirements 110-240 V AC, 50/60 Hz Screen Size (inches) 40 37 32 26 Display Resolution Power Consumption 1,920 pixels (horizontal) × 1,080 lines (vertical) Indicated on the rear of the TV. 1,366 pixels (horizontal) × 768 lines (vertical) Dimensions (w ×...466 × 97 Mass* with stand (kg) 22 21 17 13 without notice. 32 GB Additional Information Specifications Model name System KLV-40S400A KLV-37S400A KLV-32S400A KLV-26S400A Panel System LCD (Liquid Crystal Display) Panel TV System B/G, I, D/K, M Colour System PAL, PAL60, SECAM, NTSC4.43, NTSC3.58...
...Power Requirements 110-240 V AC, 50/60 Hz Screen Size (inches) 40 37 32 26 Display Resolution Power Consumption 1,920 pixels (horizontal) × 1,080 lines (vertical) Indicated on the rear of the TV. 1,366 pixels (horizontal) × 768 lines (vertical) Dimensions (w ×...466 × 97 Mass* with stand (kg) 22 21 17 13 without notice. 32 GB Additional Information Specifications Model name System KLV-40S400A KLV-37S400A KLV-32S400A KLV-26S400A Panel System LCD (Liquid Crystal Display) Panel TV System B/G, I, D/K, M Colour System PAL, PAL60, SECAM, NTSC4.43, NTSC3.58...


