Limited Warranty
Page 1
...PRODUCT. For your authorized dealer, call : 1-800-222-7669. 4-096-275-02 ® LCD COLOR TV LIMITED WARRANTY Sony Electronics Inc. ("Sony") warrants this Product is within 90 days of the date of sale, the limitation on how ...operation, call: Sony Customer Information Services Center 1-800-222-7669 Or visit the Sony Web Site: www.sony.com For an accessory or part not available from your convenience, Sony Electronics Inc. ACCESSORIES: Parts and labor for all accessories are for all parts costs. 3. In addition, if you . This warranty does not cover customer instruction...
...PRODUCT. For your authorized dealer, call : 1-800-222-7669. 4-096-275-02 ® LCD COLOR TV LIMITED WARRANTY Sony Electronics Inc. ("Sony") warrants this Product is within 90 days of the date of sale, the limitation on how ...operation, call: Sony Customer Information Services Center 1-800-222-7669 Or visit the Sony Web Site: www.sony.com For an accessory or part not available from your convenience, Sony Electronics Inc. ACCESSORIES: Parts and labor for all accessories are for all parts costs. 3. In addition, if you . This warranty does not cover customer instruction...

Operating Instructions
Page 5
...batteries into the remote 8 Step 4 Set up your TV automatically (Auto Startup 9 Connecting optional components 11 Watching the TV 12 Operating optional components 16 Adjusting Your Setup (MENU) Adjusting the "PICTURE" setting ... 17 Adjusting the "SOUND" setting ..... 19 Setting the... 27 Specifications 29 Television Channel Number Guide for United Kingdom 30 Checking the supplied accessories Remote Control RM-932 (1) Batteries (R6 Type) (2) AC power adapter (1) Cleaning cloth (1) Coaxial cable (1) AC Cable (Type C) (1) AC Cable (Type BF) (1) Operating Instructions (1) Do not ...
...batteries into the remote 8 Step 4 Set up your TV automatically (Auto Startup 9 Connecting optional components 11 Watching the TV 12 Operating optional components 16 Adjusting Your Setup (MENU) Adjusting the "PICTURE" setting ... 17 Adjusting the "SOUND" setting ..... 19 Setting the... 27 Specifications 29 Television Channel Number Guide for United Kingdom 30 Checking the supplied accessories Remote Control RM-932 (1) Batteries (R6 Type) (2) AC power adapter (1) Cleaning cloth (1) Coaxial cable (1) AC Cable (Type C) (1) AC Cable (Type BF) (1) Operating Instructions (1) Do not ...
Operating Instructions (SU-W100)
Page 3
Do not use the bracket with a TV whose operating instructions do not specify the use of this bracket. • Be especially careful not to drop the TV when you install it high on a wall. Caution • This Wall-Mount Bracket is only for Sony 15-inch LCD Color TVs. US 3
Do not use the bracket with a TV whose operating instructions do not specify the use of this bracket. • Be especially careful not to drop the TV when you install it high on a wall. Caution • This Wall-Mount Bracket is only for Sony 15-inch LCD Color TVs. US 3
Operating Instructions (SU-W100)
Page 6
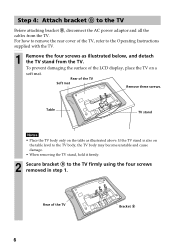
To prevent damaging the surface of the TV, refer to the Operating Instructions supplied with the TV. 1 Remove the four screws as illustrated above. Rear of the TV 6 Bracket B For how to remove the rear cover of the LCD display, place the TV on the table as illustrated below, and detach the TV stand...
To prevent damaging the surface of the TV, refer to the Operating Instructions supplied with the TV. 1 Remove the four screws as illustrated above. Rear of the TV 6 Bracket B For how to remove the rear cover of the LCD display, place the TV on the table as illustrated below, and detach the TV stand...
Operating Instructions (SU-W100)
Page 8
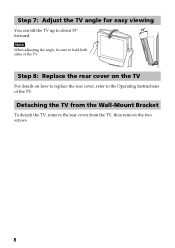
Detaching the TV from the Wall-Mount Bracket To detach the TV, remove the rear cover from the TV, then remove the two screws. 8 Note When adjusting the angle, be sure to the Operating Instructions of the TV. Step 8: Replace the rear cover on the TV For details on how to replace the rear cover, refer to hold both sides of the TV. Step 7: Adjust the TV angle for easy viewing You can tilt the TV up to about 15° forward.
Detaching the TV from the Wall-Mount Bracket To detach the TV, remove the rear cover from the TV, then remove the two screws. 8 Note When adjusting the angle, be sure to the Operating Instructions of the TV. Step 8: Replace the rear cover on the TV For details on how to replace the rear cover, refer to hold both sides of the TV. Step 7: Adjust the TV angle for easy viewing You can tilt the TV up to about 15° forward.

Quick Start Guide
Page 1
...Pass the cables into the stand. 3 Replace the cable cover while aligning the claws on page 11 of your TV. - Cleaning cloth (1) Operating Instructions (1) • Use this AC cable (with the hook holes on the rear cover with safety earth) if you for viewing TV programmes.... supplied) R/D/D/D L/G/S/I 2 S2 2 To i 1/ 16.5V : Signal flow To play a video tape, press t on the stand. GB © 2002 Sony Corporation Printed in the stand. KLV-17HR1 KLV-15SR1 1 Checking the Supplied Accessories 3 Connecting the Aerial, VCR and AC Cable 4 Inserting Batteries into the Remote. -
...Pass the cables into the stand. 3 Replace the cable cover while aligning the claws on page 11 of your TV. - Cleaning cloth (1) Operating Instructions (1) • Use this AC cable (with the hook holes on the rear cover with safety earth) if you for viewing TV programmes.... supplied) R/D/D/D L/G/S/I 2 S2 2 To i 1/ 16.5V : Signal flow To play a video tape, press t on the stand. GB © 2002 Sony Corporation Printed in the stand. KLV-17HR1 KLV-15SR1 1 Checking the Supplied Accessories 3 Connecting the Aerial, VCR and AC Cable 4 Inserting Batteries into the Remote. -

Quick Start Guide
Page 2
... EXIT : MENU The initial display appears. MENU Your TV is now ready for broadcast channels and stores all the menus will operate the TV, then press OK. By following the instructions, the TV automatically searches for use . Changing the Programme Order of the Broadcast 8 Channels You can rearrange the order of the...
... EXIT : MENU The initial display appears. MENU Your TV is now ready for broadcast channels and stores all the menus will operate the TV, then press OK. By following the instructions, the TV automatically searches for use . Changing the Programme Order of the Broadcast 8 Channels You can rearrange the order of the...
Marketing Specifications
Page 2
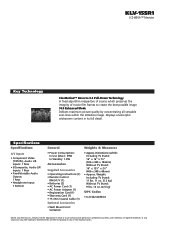
...Sony or their respective owners. Specifications Specifications A/V Inputs • Component Video (Y/Pb/Pr), Audio L/R Inputs: 1 Rear • S/Composite, Audio L/R Inputs: 1 Rear • Fixed/Variable Audio Output: 1 Rear • Headphone Input: 1 Bottom General • Power Consumption: In Use (Max.): 39W In Standby: 1.9W Accessories Supplied Accessories • Operating Instructions.... KLV-15SR1 LCD WEGA™ Television Key Technology CineMotion™ Reverse 3-2 Pull-Down Technology A fixed algorithm irrespective of source which preserves the integrity of Sony Corporation...
...Sony or their respective owners. Specifications Specifications A/V Inputs • Component Video (Y/Pb/Pr), Audio L/R Inputs: 1 Rear • S/Composite, Audio L/R Inputs: 1 Rear • Fixed/Variable Audio Output: 1 Rear • Headphone Input: 1 Bottom General • Power Consumption: In Use (Max.): 39W In Standby: 1.9W Accessories Supplied Accessories • Operating Instructions.... KLV-15SR1 LCD WEGA™ Television Key Technology CineMotion™ Reverse 3-2 Pull-Down Technology A fixed algorithm irrespective of source which preserves the integrity of Sony Corporation...


