Operating Instructions
Page 3
... 2. Installing the TV 5 How to Carry the TV 5 How to Attach the Table-Top Stand 5 Securing the TV 6 Bundling the Connecting Cables 8 Preparation for HDMI 19 Remote Control and TV Controls/Indicators Inserting Batteries 20 When Using the Remote Control 20 Remote Control 21 TV Controls/Indicators 25 Using TV Menus Navigating through TV Menus 27 Menu... (separate volume) Provides a variety of BRAVIA® The Four Steps to the World of optional equipment connection diagrams. Customer Support http://www.sony.com/tvsupport On-line Registration United States http://productregistration...
... 2. Installing the TV 5 How to Carry the TV 5 How to Attach the Table-Top Stand 5 Securing the TV 6 Bundling the Connecting Cables 8 Preparation for HDMI 19 Remote Control and TV Controls/Indicators Inserting Batteries 20 When Using the Remote Control 20 Remote Control 21 TV Controls/Indicators 25 Using TV Menus Navigating through TV Menus 27 Menu... (separate volume) Provides a variety of BRAVIA® The Four Steps to the World of optional equipment connection diagrams. Customer Support http://www.sony.com/tvsupport On-line Registration United States http://productregistration...
Operating Instructions
Page 19
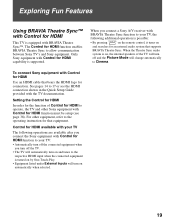
... Mode will turn on and tunes to the respective HDMI input when the connected equipment is possible: • By pressing on the remote control, it turns on , the internal speakers of Control for HDMI to the operating instruction for that equipment. For other equipment, refer...turned on automatically when selected. 19 See pages 14 to allow communication between Sony TV's and Sony equipment. Only Sony equipment with Control for HDMI capability is equipped with BRAVIA Theatre Sync™. To connect Sony equipment with Control for HDMI Use an HDMI cable that supports BRAVIA Theatre Sync...
... Mode will turn on and tunes to the respective HDMI input when the connected equipment is possible: • By pressing on the remote control, it turns on , the internal speakers of Control for HDMI to the operating instruction for that equipment. For other equipment, refer...turned on automatically when selected. 19 See pages 14 to allow communication between Sony TV's and Sony equipment. Only Sony equipment with Control for HDMI capability is equipped with BRAVIA Theatre Sync™. To connect Sony equipment with Control for HDMI Use an HDMI cable that supports BRAVIA Theatre Sync...
Operating Instructions
Page 20
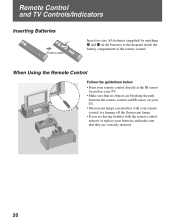
... AA batteries (supplied) by matching e and E on your TV. • Fluorescent lamps can interfere with the remote control, reinsert or replace your remote control; When Using the Remote Control Follow the guidelines below • Point your remote control directly at the IR sensor located on your TV. • Make sure that they are blocking the path...
... AA batteries (supplied) by matching e and E on your TV. • Fluorescent lamps can interfere with the remote control, reinsert or replace your remote control; When Using the Remote Control Follow the guidelines below • Point your remote control directly at the IR sensor located on your TV. • Make sure that they are blocking the path...
Operating Instructions
Page 21
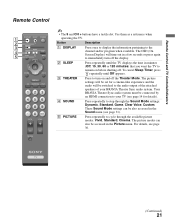
... the time in the Picture menu. The picture modes can be switched to the channel and/or program when available. Remote Control and TV Controls/Indicators Remote Control 1 2 3 4 5 SOUND GUIDE TOOLS MENU • The 5 and CH + buttons have a tactile dot. Button Description 1 DISPLAY Press once to display the information pertaining to the ...
... the time in the Picture menu. The picture modes can be switched to the channel and/or program when available. Remote Control and TV Controls/Indicators Remote Control 1 2 3 4 5 SOUND GUIDE TOOLS MENU • The 5 and CH + buttons have a tactile dot. Button Description 1 DISPLAY Press once to display the information pertaining to the ...
Operating Instructions
Page 23
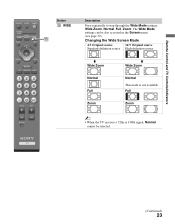
Changing the Wide Screen Mode 4:3 Original source 16:9 Original source Standard-definition source High-definition source m Wide Zoom Normal Full Zoom m Wide Zoom Normal This mode is not available Full Zoom ~ • When the TV receives a 720p or 1080i signal, Normal cannot be also accessed in the Screen menu (see page 32). Remote Control and TV Controls/Indicators SOUND GUIDE Button qg WIDE qg TOOLS MENU Description Press repeatedly to step through the Wide Mode settings: Wide Zoom, Normal, Full, Zoom. The Wide Mode settings can be selected. (Continued) 23
Changing the Wide Screen Mode 4:3 Original source 16:9 Original source Standard-definition source High-definition source m Wide Zoom Normal Full Zoom m Wide Zoom Normal This mode is not available Full Zoom ~ • When the TV receives a 720p or 1080i signal, Normal cannot be also accessed in the Screen menu (see page 32). Remote Control and TV Controls/Indicators SOUND GUIDE Button qg WIDE qg TOOLS MENU Description Press repeatedly to step through the Wide Mode settings: Wide Zoom, Normal, Full, Zoom. The Wide Mode settings can be selected. (Continued) 23
Operating Instructions
Page 24
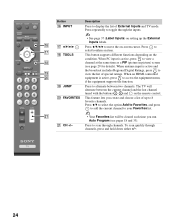
Press V/v/B/b to move the on the remote control. Press to your Favorites list. When an HDMI controlled equipment is active, press to alternate between the current channel and the last channel tuned ... a PIP (picture in picture) screen (see pages 18 and 33). wa Button qh INPUT Description Press to view the list of External Inputs and TV mode. The TV will be cleared each time you create and choose a list of up the External Inputs labels. wa CH +/- • Your Favorites list will alternate...
Press V/v/B/b to move the on the remote control. Press to your Favorites list. When an HDMI controlled equipment is active, press to alternate between the current channel and the last channel tuned ... a PIP (picture in picture) screen (see pages 18 and 33). wa Button qh INPUT Description Press to view the list of External Inputs and TV mode. The TV will be cleared each time you create and choose a list of up the External Inputs labels. wa CH +/- • Your Favorites list will alternate...
Operating Instructions
Page 25
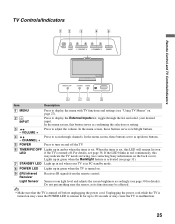
...the menu screen, these buttons serve as up in red continuously, this may indicate the TV needs servicing (see contacting Sony information on . 9 (IR) Infrared Receiver Light Sensor Receives IR signals from the remote control. For details, see page 31). 7 STANDBY LED Light up in green when... the TV is turned off the TV. 6 TIMER/PIC OFF Lights up /down buttons. When the timer is...
...the menu screen, these buttons serve as up in red continuously, this may indicate the TV needs servicing (see contacting Sony information on . 9 (IR) Infrared Receiver Light Sensor Receives IR signals from the remote control. For details, see page 31). 7 STANDBY LED Light up in green when... the TV is turned off the TV. 6 TIMER/PIC OFF Lights up /down buttons. When the timer is...

Operating Instructions
Page 27
... levels; you create a password, confirm the Temp (Color Temperature), password by entering it again. Sharpness, Advanced Settings or Reset. on the remote control Mode, Backlight, Picture, to perform a variety of the screen. The first Brightness, Color, Hue, Color time you can also select... tune and change the proportions of tasks intuitively with a control panel on the remote control to display the menu options. 2 To highlight a menu option press B, then press V/v to go through TV Menus SOUND GUIDE TOOLS 1 Press on the screen. The Screen menu allows you...
... levels; you create a password, confirm the Temp (Color Temperature), password by entering it again. Sharpness, Advanced Settings or Reset. on the remote control Mode, Backlight, Picture, to perform a variety of the screen. The first Brightness, Color, Hue, Color time you can also select... tune and change the proportions of tasks intuitively with a control panel on the remote control to display the menu options. 2 To highlight a menu option press B, then press V/v to go through TV Menus SOUND GUIDE TOOLS 1 Press on the screen. The Screen menu allows you...

Operating Instructions
Page 29
... list. To Exit from PC-PIP (PC input) 1 Press MENU and select External Inputs on the Shortcuts menu. 2 From External Inputs list, select TV input to return to TV Channels. • To exit from PC-PIP, you can also select a channel from Shortcuts menu, the PC-PIP will appear with the Sub... This PIP (Picture In Picture) feature provides PC input signal and TV channels, allowing you to use PC-PIP function. • To turn on or off the Sub Window on the screen press from the list. Press MENU , select External Inputs, then select PC input from the remote control while using the -
... list. To Exit from PC-PIP (PC input) 1 Press MENU and select External Inputs on the Shortcuts menu. 2 From External Inputs list, select TV input to return to TV Channels. • To exit from PC-PIP, you can also select a channel from Shortcuts menu, the PC-PIP will appear with the Sub... This PIP (Picture In Picture) feature provides PC input signal and TV channels, allowing you to use PC-PIP function. • To turn on or off the Sub Window on the screen press from the list. Press MENU , select External Inputs, then select PC input from the remote control while using the -
Operating Instructions
Page 32
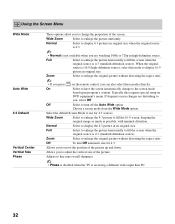
... the picture horizontally to fill the screen when the original source is 16:9 (high-definition source), select this requires special setup on the remote control, you , select Off. Allows you to move the position of the picture. Zoom Select to enlarge the original picture without distorting... the aspect ratio. Select the default Screen Mode to use for 4:3. Adjusts to fine tune overall sharpness. • Phase is disabled when the TV is 4:3 (standard-definition source). Wide Zoom Select to fill the 16:9 screen, keeping the original image as much as possible, with minimal distortion...
... the picture horizontally to fill the screen when the original source is 16:9 (high-definition source), select this requires special setup on the remote control, you , select Off. Allows you to move the position of the picture. Zoom Select to enlarge the original picture without distorting... the aspect ratio. Select the default Screen Mode to use for 4:3. Adjusts to fine tune overall sharpness. • Phase is disabled when the TV is 4:3 (standard-definition source). Wide Zoom Select to fill the 16:9 screen, keeping the original image as much as possible, with minimal distortion...
Operating Instructions
Page 34
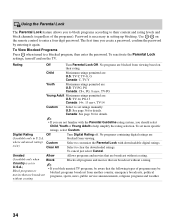
...U.S: TV-PG, PG Canada: C8+, PG, 8 ans+, TV-PG Young Adult Maximum ratings permitted are: U.S: TV-14, PG-13 Canada: 14+, 13 ans+, TV-14 Custom Select to a blocked program, then enter the password. U.S.A.) Block programs or movies that are blocked from viewing based on the remote control ...feature allows you to block programs according to their rating. Canada: See page 36 for details. The first time you block unrated TV programs, be aware that are not familiar with downloadable digital ratings. No programs containing digital ratings are broadcast without a rating. Password...
...U.S: TV-PG, PG Canada: C8+, PG, 8 ans+, TV-PG Young Adult Maximum ratings permitted are: U.S: TV-14, PG-13 Canada: 14+, 13 ans+, TV-14 Custom Select to a blocked program, then enter the password. U.S.A.) Block programs or movies that are blocked from viewing based on the remote control ...feature allows you to block programs according to their rating. Canada: See page 36 for details. The first time you block unrated TV programs, be aware that are not familiar with downloadable digital ratings. No programs containing digital ratings are broadcast without a rating. Password...
Operating Instructions
Page 37
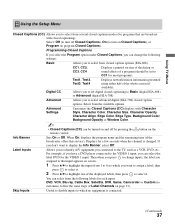
... digital (EIA-708) closed caption options. When On: displays the program name and the remaining time (if the broadcaster offers this service). Using TV Menus Using the Setup Menu Closed Captions (CC) Allows you to select from several closed captions modes (for each input: DVD, VCR, Blu-ray...Satellite, DVR, Game, Camcorder or Custom (to customize, follow the same steps of Label Channels on page 33). Select: Off (to turn on the remote control. CC1, CC2, CC3, CC4 Displays a printed version of the dialog or sound effects of the whole screen (if available). Select from the available...
... digital (EIA-708) closed caption options. When On: displays the program name and the remaining time (if the broadcaster offers this service). Using TV Menus Using the Setup Menu Closed Captions (CC) Allows you to select from several closed captions modes (for each input: DVD, VCR, Blu-ray...Satellite, DVR, Game, Camcorder or Custom (to customize, follow the same steps of Label Channels on page 33). Select: Off (to turn on the remote control. CC1, CC2, CC3, CC4 Displays a printed version of the dialog or sound effects of the whole screen (if available). Select from the available...
Operating Instructions
Page 38
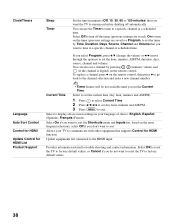
...Source, Channel and Volume that you want to tune to sort. To replace a channel press b on the remote control, then press B to go back to trouble shooting and contact information. Allows your language of choice:... for HDMI List Product Support • Timer feature will be not available until you don't want the TV to communicate with other equipment that you select Program, press V/v (change the values) or B/b (move... OK to reset the TV to factory default values, or Cancel if you want to reset the TV to sort the Shortcuts menu and Inputs list, based on the remote control. On to the...
...Source, Channel and Volume that you want to tune to sort. To replace a channel press b on the remote control, then press B to go back to trouble shooting and contact information. Allows your language of choice:... for HDMI List Product Support • Timer feature will be not available until you don't want the TV to communicate with other equipment that you select Program, press V/v (change the values) or B/b (move... OK to reset the TV to factory default values, or Cancel if you want to reset the TV to sort the Shortcuts menu and Inputs list, based on the remote control. On to the...

Operating Instructions
Page 39
...cancel Auto Program some video sources. ❑ Check the connection between the optional video equipment and the TV. ❑ Press INPUT on the remote control (page 24). ❑ Press MENU on the remote control. To receive or select UHF channels over an antenna, make sure Cable is set to the use...set to add receivable channels that are not presently in normal use of the following numbers: http://www.sony.com/tvsupport 1-800-222-SONY(7669) for US Support 1-877-899-SONY(7669) for more details. ❑ Perform Auto Program to add receivable channels that are not presently ...
...cancel Auto Program some video sources. ❑ Check the connection between the optional video equipment and the TV. ❑ Press INPUT on the remote control (page 24). ❑ Press MENU on the remote control. To receive or select UHF channels over an antenna, make sure Cable is set to the use...set to add receivable channels that are not presently in normal use of the following numbers: http://www.sony.com/tvsupport 1-800-222-SONY(7669) for US Support 1-877-899-SONY(7669) for more details. ❑ Perform Auto Program to add receivable channels that are not presently ...
Operating Instructions
Page 40
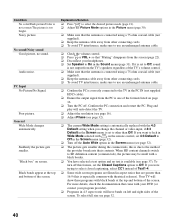
...22). ❑ Disconnect your program provider). ❑ Programs in the Screen menu (see page 37). Your TV will show these programs with a black border. ❑ You have bands on the remote control, set 4:3 Default to use an undamaged antenna cable. ❑ Check the volume control. ❑ ...details, check the documentation that "Muting" disappears from other than 16:9 (this feature, set to other connecting cords. ❑ To avoid TV interference, make sure to Off in the Screen menu is too bright. If you were trying to the method the provider broadcasts their contents...
...22). ❑ Disconnect your program provider). ❑ Programs in the Screen menu (see page 37). Your TV will show these programs with a black border. ❑ You have bands on the remote control, set 4:3 Default to use an undamaged antenna cable. ❑ Check the volume control. ❑ ...details, check the documentation that "Muting" disappears from other than 16:9 (this feature, set to other connecting cords. ❑ To avoid TV interference, make sure to Off in the Screen menu is too bright. If you were trying to the method the provider broadcasts their contents...

Operating Instructions
Page 41
...following master password: 4357. Condition Certain programs on the TV. try turning off the fluorescent lamps. ❑ Keep the remote control sensor area clear from obstacles. ❑ Certain cable companies have limitations on the TV. Release the V button. Some digital cable channels ... pixelations) to factory settings. Other Information 41 Lost password. The reset will clear all of the TV. ❑ Fluorescent lamps can interfere with your remote control operation; Check with your cable company for certain digitally recorded programs. ❑ Check the polarity ...
...following master password: 4357. Condition Certain programs on the TV. try turning off the fluorescent lamps. ❑ Keep the remote control sensor area clear from obstacles. ❑ Certain cable companies have limitations on the TV. Release the V button. Some digital cable channels ... pixelations) to factory settings. Other Information 41 Lost password. The reset will clear all of the TV. ❑ Fluorescent lamps can interfere with your remote control operation; Check with your cable company for certain digitally recorded programs. ❑ Check the polarity ...
Operating Instructions
Page 42
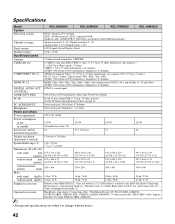
... Remote control RM-YD026 (1) / Size AA batteries (2) / Cable holder (1 attached to change without stand (kg/lb.) Supplied accessories Optional accessories ~ NTSC: American TV ...standard ATSC (8VSB terrestrial): ATSC compliant 8VSB QAM on cable: ANSI/SCTE 07 2000 (Does not include CableCARD functionality) Analog terrestrial: 2 - 69 / Digital terrestrial: 2 - 69 Analog Cable: 1-125 / Digital Cable: 1-135 LCD...than 1 W 26 1,366 dots × 768 lines 146 × 35 mm 5 3/4 × 1 3/8 inches 675 × 511 × 242 (26 5/8 × 20 1/8 × 9 5/8) 675 × 466 × 97 (26 5/8 ×...
... Remote control RM-YD026 (1) / Size AA batteries (2) / Cable holder (1 attached to change without stand (kg/lb.) Supplied accessories Optional accessories ~ NTSC: American TV ...standard ATSC (8VSB terrestrial): ATSC compliant 8VSB QAM on cable: ANSI/SCTE 07 2000 (Does not include CableCARD functionality) Analog terrestrial: 2 - 69 / Digital terrestrial: 2 - 69 Analog Cable: 1-125 / Digital Cable: 1-135 LCD...than 1 W 26 1,366 dots × 768 lines 146 × 35 mm 5 3/4 × 1 3/8 inches 675 × 511 × 242 (26 5/8 × 20 1/8 × 9 5/8) 675 × 466 × 97 (26 5/8 ×...
Operating Instructions
Page 43
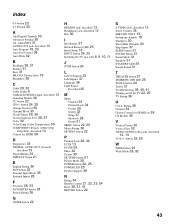
... jack, described 13 Headphone jack, described 12 Hue 30 I Info Banner 37 Infrared Receiver (IR) 25 Initial Setup 18 INPUT button 24, 25 Installing the TV on a wall 8, 9, 10, 11 J JUMP button 24 L Label Channels 33 Label Inputs 37 Language 38 Light Sensor Described 25 M Menu Channel 33 Parental Lock 34... PC-PIP 29 Phase 32 Picture 30 PICTURE button 21 Picture Mode 30 POWER button 22, 25 POWER LED 25 Product Support 38 R Rating 34 Remote Control 21, 22, 23, 24 Reset 30, 31, 41 RETURN button 22 S S VIDEO jack, described 13 Select Country 35 SERVICE ONLY 13 Setting up channels...
... jack, described 13 Headphone jack, described 12 Hue 30 I Info Banner 37 Infrared Receiver (IR) 25 Initial Setup 18 INPUT button 24, 25 Installing the TV on a wall 8, 9, 10, 11 J JUMP button 24 L Label Channels 33 Label Inputs 37 Language 38 Light Sensor Described 25 M Menu Channel 33 Parental Lock 34... PC-PIP 29 Phase 32 Picture 30 PICTURE button 21 Picture Mode 30 POWER button 22, 25 POWER LED 25 Product Support 38 R Rating 34 Remote Control 21, 22, 23, 24 Reset 30, 31, 41 RETURN button 22 S S VIDEO jack, described 13 Select Country 35 SERVICE ONLY 13 Setting up channels...


