
Operating Instructions
Page 6
..., or excessive force. MOISTURE Moisture and flammable objects s Do not use power-line operated sets near a swimming pool, etc. s Carry the TV holding the upper and bottom frames of any kind into the TV through , do not subject the TV to avoid touching the glass surface as follows: Air circulation is provided. For proper...
..., or excessive force. MOISTURE Moisture and flammable objects s Do not use power-line operated sets near a swimming pool, etc. s Carry the TV holding the upper and bottom frames of any kind into the TV through , do not subject the TV to avoid touching the glass surface as follows: Air circulation is provided. For proper...
Operating Instructions
Page 9
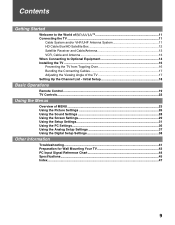
... Angle of MENU ...23 Using the Picture Settings 26 Using the Sound Settings 28 Using the Screen Settings 29 Using the Setup Settings 31 Using the PC Settings...36 Using the Analog Setup Settings 37 Using the Digital Setup Settings 38 Other Information Troubleshooting...41 Preparation for Wall Mounting Your TV 43 PC Input Signal Reference Chart 44...
... Angle of MENU ...23 Using the Picture Settings 26 Using the Sound Settings 28 Using the Screen Settings 29 Using the Setup Settings 31 Using the PC Settings...36 Using the Analog Setup Settings 37 Using the Digital Setup Settings 38 Other Information Troubleshooting...41 Preparation for Wall Mounting Your TV 43 PC Input Signal Reference Chart 44...

Operating Instructions
Page 11
...Advanced connection examples are listed on pages 21 and 29. This TV is for model KDL-V32XBR2. see page 18). Connecting the TV To display clear, crisp pictures, your TV must perform an Initial Setup so your TV will allow you connect the antenna/cable input using the supplied 75...definition programming through its integrated tuner. To properly connect your TV, follow the basic connections provided in this Sony LCD Digital Color Television. After you can receive and view programming you should select the proper Wide Mode setting to the World of receiving HDTV content from a cable ...
...Advanced connection examples are listed on pages 21 and 29. This TV is for model KDL-V32XBR2. see page 18). Connecting the TV To display clear, crisp pictures, your TV must perform an Initial Setup so your TV will allow you connect the antenna/cable input using the supplied 75...definition programming through its integrated tuner. To properly connect your TV, follow the basic connections provided in this Sony LCD Digital Color Television. After you can receive and view programming you should select the proper Wide Mode setting to the World of receiving HDTV content from a cable ...
Operating Instructions
Page 12
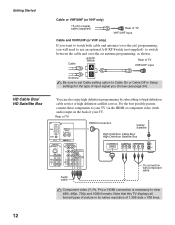
... video (Y, PB, PR) or HDMI connection is necessary to view 480i, 480p, 720p and 1080i formats. Cable A/B RF Switch A Rear of TV VHF/UHF input B Antenna Be sure to set Cable setting option to Cable On or Cable Off in its native resolution of 1,366 dots × 768 lines. 12 Getting Started Cable... VHF only) If you want to watch both cable and antenna (over -the air antenna programming, as shown. Note that this TV displays all format types of picture in Setup settings for the type of input signal you will need to use an optional A-B RF Switch (not supplied) to switch between the...
... video (Y, PB, PR) or HDMI connection is necessary to view 480i, 480p, 720p and 1080i formats. Cable A/B RF Switch A Rear of TV VHF/UHF input B Antenna Be sure to set Cable setting option to Cable On or Cable Off in its native resolution of 1,366 dots × 768 lines. 12 Getting Started Cable... VHF only) If you want to watch both cable and antenna (over -the air antenna programming, as shown. Note that this TV displays all format types of picture in Setup settings for the type of input signal you will need to use an optional A-B RF Switch (not supplied) to switch between the...

Operating Instructions
Page 13
... HD/DVD IN (1080i/720p/480p/480i) 4 5 Y OPTICAL OUT PB VIDEO L (MONO) AUDIO R PR L AUDIO R AUDIO OUT(VAR/FIX) Rear of TV If your satellite receiver is not equipped with S VIDEO, use a VIDEO cable (yellow) instead of the S VIDEO cable. CATV cable Antenna cable (supplied) VHF/UHF...) instead of the S VIDEO cable. Run the Initial Setup program, as described in "Setting Up the Channel List" on page 18 after completing your connections. Run the Initial Setup program, as described in "Setting Up the Channel List" on page 18 after completing your connections. 13
... HD/DVD IN (1080i/720p/480p/480i) 4 5 Y OPTICAL OUT PB VIDEO L (MONO) AUDIO R PR L AUDIO R AUDIO OUT(VAR/FIX) Rear of TV If your satellite receiver is not equipped with S VIDEO, use a VIDEO cable (yellow) instead of the S VIDEO cable. CATV cable Antenna cable (supplied) VHF/UHF...) instead of the S VIDEO cable. Run the Initial Setup program, as described in "Setting Up the Channel List" on page 18 after completing your connections. Run the Initial Setup program, as described in "Setting Up the Channel List" on page 18 after completing your connections. 13

Operating Instructions
Page 14
... camcorder or other video equipment that can be necessary to use a suitable plug adapter (not supplied). Sound Setting options, on page 28, have mono equipment, connect its audio output jack to the TV's L (MONO) audio input jack. If the picture is the case, connect the adapter to the computer... while using HD15-HD15 cable (analog RGB, supplied). If this is noisy, flickering or not clear, adjust the Phase and Pitch of the PC Settings see page 36. 14 Provides better picture quality than composite video (2). (See Auto YC on page 33.) Connect to a personal computer's video output...
... camcorder or other video equipment that can be necessary to use a suitable plug adapter (not supplied). Sound Setting options, on page 28, have mono equipment, connect its audio output jack to the TV's L (MONO) audio input jack. If the picture is the case, connect the adapter to the computer... while using HD15-HD15 cable (analog RGB, supplied). If this is noisy, flickering or not clear, adjust the Phase and Pitch of the PC Settings see page 36. 14 Provides better picture quality than composite video (2). (See Auto YC on page 33.) Connect to a personal computer's video output...

Operating Instructions
Page 15
...(OPTICAL OUT is for digital channels.) DIGITAL) 0 HD/DVD IN 4/5 (1080i/720p/ 480p/480i)/ L-AUDIO-R Connect to your DVD player's or digital set -top box, DVD player, and A/V receiver. HDMI supports enhanced, or high-definition video, plus digital audio. "Dolby" and the double-D symbol are ... input jacks of your A/V equipment such as a VCR or other video equipment that this TV displays all -digital audio/video interface between this TV and any HDMI-equipped audio/video equipment, such as a set -top box's component video (YPBPR) and audio (L/R) jacks. If the equipment has a...
...(OPTICAL OUT is for digital channels.) DIGITAL) 0 HD/DVD IN 4/5 (1080i/720p/ 480p/480i)/ L-AUDIO-R Connect to your DVD player's or digital set -top box, DVD player, and A/V receiver. HDMI supports enhanced, or high-definition video, plus digital audio. "Dolby" and the double-D symbol are ... input jacks of your A/V equipment such as a VCR or other video equipment that this TV displays all -digital audio/video interface between this TV and any HDMI-equipped audio/video equipment, such as a set -top box's component video (YPBPR) and audio (L/R) jacks. If the equipment has a...

Operating Instructions
Page 18
... Setup After you finish connecting your TV, you need to run Auto Program again at this time, you turn on your TV for completion. 4 Press B/b to highlight "OK" then press . The Initial Setup screen appears when you can do not want to set up available channels. The Initial Setup... screen appears. 2 Press V/v to turn on the TV. Then press . Then the message "Continue...
... Setup After you finish connecting your TV, you need to run Auto Program again at this time, you turn on your TV for completion. 4 Press B/b to highlight "OK" then press . The Initial Setup screen appears when you can do not want to set up available channels. The Initial Setup... screen appears. 2 Press V/v to turn on the TV. Then press . Then the message "Continue...
Operating Instructions
Page 19
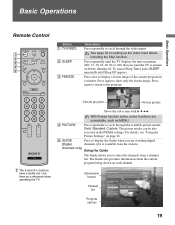
...mission. Series follows the aquatic misadventures of the current program in a window. To cancel Sleep Timer, press SLEEP repeatedly until the TV displays the time in the Picture settings. Freeze Current program Frozen picture z The 5 and CH + buttons have a tactile dot. Use them as MENU. 4 ...or 120) that you are unavailable, such as a reference when operating the TV. See page 32 on each channel. Audio 19 The Guide also provides information about the current program being shown on setting up the video input labels, including the Skip function. Information banner Channel list ...
...mission. Series follows the aquatic misadventures of the current program in a window. To cancel Sleep Timer, press SLEEP repeatedly until the TV displays the time in the Picture settings. Freeze Current program Frozen picture z The 5 and CH + buttons have a tactile dot. Use them as MENU. 4 ...or 120) that you are unavailable, such as a reference when operating the TV. See page 32 on each channel. Audio 19 The Guide also provides information about the current program being shown on setting up the video input labels, including the Skip function. Information banner Channel list ...

Operating Instructions
Page 20
... to display the MENU with 0-9 and ENT buttons to customize the program settings on the currently tuned channel. See "Overview of this TV, press DIGITAL/ANALOG. Press to adjust the volume. Use with TV functions and settings. Alternate Audio (When available) Each program has a main video and audio...when the channel is provided by the broadcasters. To enjoy the digital features of MENU" on and off the TV. 20 Using the Program Options Setting The Program Options setting allows you to turn on page 23. As a result, it may contain a different language). Press to ...
... to display the MENU with 0-9 and ENT buttons to customize the program settings on the currently tuned channel. See "Overview of this TV, press DIGITAL/ANALOG. Press to adjust the volume. Use with TV functions and settings. Alternate Audio (When available) Each program has a main video and audio...when the channel is provided by the broadcasters. To enjoy the digital features of MENU" on and off the TV. 20 Using the Program Options Setting The Program Options setting allows you to turn on page 23. As a result, it may contain a different language). Press to ...
Operating Instructions
Page 21
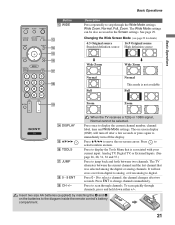
When the TV receives a 720p or 1080i signal, Normal cannot be also accessed in the Screen settings. Press to display the current channel number, channel label, time and Wide Mode settings. Press once to select/confirm an item. Press 0 - 9 to change channels immediately. The Wide Mode settings can be selected.... V/v/B/b to move the on the batteries to the diagram inside the remote control's battery compartment. 21 Press to scan through the Wide Mode settings: Wide Zoom, Normal, Full, Zoom. The on screen display (OSD) will not cross over from digital to analog, or from analog ...
When the TV receives a 720p or 1080i signal, Normal cannot be also accessed in the Screen settings. Press to display the current channel number, channel label, time and Wide Mode settings. Press once to select/confirm an item. Press 0 - 9 to change channels immediately. The Wide Mode settings can be selected.... V/v/B/b to move the on the batteries to the diagram inside the remote control's battery compartment. 21 Press to scan through the Wide Mode settings: Wide Zoom, Normal, Full, Zoom. The on screen display (OSD) will not cross over from digital to analog, or from analog ...

Operating Instructions
Page 22
... power cord. In the MENU screen, these buttons serve as a reference when operating the TV. Press to malfunction. 22 The CHANNEL + button has a tactile dot. Outputs audio signal. Make sure that the TV is set . Press to adjust the volume. To scan quickly through the video inputs. When the... timer is turned off the TV. Do not put anything near the sensor, as left/right buttons. Lights up to...
... power cord. In the MENU screen, these buttons serve as a reference when operating the TV. Press to malfunction. 22 The CHANNEL + button has a tactile dot. Outputs audio signal. Make sure that the TV is set . Press to adjust the volume. To scan quickly through the video inputs. When the... timer is turned off the TV. Do not put anything near the sensor, as left/right buttons. Lights up to...

Operating Instructions
Page 23
.... When you press the MENU button, you to exit. 1 MENU External Inputs Analog Favorites Digital Favorites Analog Digital Settings Select from connected equipment Select: Set: Exit: MENU 23 Using the Menus Using the Menus Overview of MENU MENU provides one button access for controlling your... TV settings. 1 Press MENU on the screen rather than a variety of tasks intuitively with a control panel on the remote. It enables you can easily perform basic TV functions such as: switching between external inputs, viewing your...
.... When you press the MENU button, you to exit. 1 MENU External Inputs Analog Favorites Digital Favorites Analog Digital Settings Select from connected equipment Select: Set: Exit: MENU 23 Using the Menus Using the Menus Overview of MENU MENU provides one button access for controlling your... TV settings. 1 Press MENU on the screen rather than a variety of tasks intuitively with a control panel on the remote. It enables you can easily perform basic TV functions such as: switching between external inputs, viewing your...
Operating Instructions
Page 24
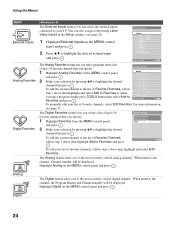
... will be displayed. Digital 24 Edit Video Labels Select: Set: Exit: MENU The Analog Favorites feature lets you select programs from the MENU control panel and press . 2 Make your TV. For more information, see page 32) 1 Highlight External Inputs on the MENU control panel and... feature takes you select the external inputs connected to your selection by pressing V/v to Edit Favorites Select: Set: Favorites and press . You can also assign a label using Label Video Inputs in the Setup settings. (see page 37. External Inputs Return Video 1 VCR Video 2 GAME Video 3 Video 4 Video...
... will be displayed. Digital 24 Edit Video Labels Select: Set: Exit: MENU The Analog Favorites feature lets you select programs from the MENU control panel and press . 2 Make your TV. For more information, see page 32) 1 Highlight External Inputs on the MENU control panel and... feature takes you select the external inputs connected to your selection by pressing V/v to Edit Favorites Select: Set: Favorites and press . You can also assign a label using Label Video Inputs in the Setup settings. (see page 37. External Inputs Return Video 1 VCR Video 2 GAME Video 3 Video 4 Video...

Operating Instructions
Page 25
... features: 1 Press MENU. 2 Select . 3 Highlight the item: Picture, Sound, Screen, Setup, PC Settings, Analog Setup, Digital Setup. 4 Press to The Settings feature lets you can be performed from page 26. To exit Settings, press MENU. Unavailable options are grayed out. MENU Settings Using the Menus Allows you to select an option. The information on...
... features: 1 Press MENU. 2 Select . 3 Highlight the item: Picture, Sound, Screen, Setup, PC Settings, Analog Setup, Digital Setup. 4 Press to The Settings feature lets you can be performed from page 26. To exit Settings, press MENU. Unavailable options are grayed out. MENU Settings Using the Menus Allows you to select an option. The information on...
Operating Instructions
Page 26
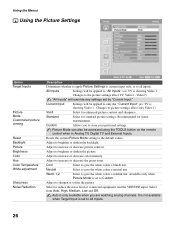
...Video7) "All Inputs" will be applied to "All Inputs" (ex: TV is showing Video 1. Available only when Picture Mode is set to only the "Current Input" (ex: TV is showing Video 1. Auto is set to give the white colors a neutral tint. Picture Mode can also be ... on the remote control when in Analog TV, Digital TV and External Inputs. Adjust to the picture settings affect TV, Video1 - Changes to increase or decrease the green tones. Standard Select for home entertainment. All Inputs Settings will override any settings set by "Current Input." Adjust to brighten or...
...Video7) "All Inputs" will be applied to "All Inputs" (ex: TV is showing Video 1. Available only when Picture Mode is set to only the "Current Input" (ex: TV is showing Video 1. Auto is set to give the white colors a neutral tint. Picture Mode can also be ... on the remote control when in Analog TV, Digital TV and External Inputs. Adjust to the picture settings affect TV, Video1 - Changes to increase or decrease the green tones. Standard Select for home entertainment. All Inputs Settings will override any settings set by "Current Input." Adjust to brighten or...
Operating Instructions
Page 27
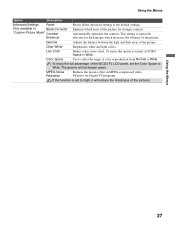
...the WCG3 FL LCD panel, set Color Space to select the range of the picture. This setting is set to Wide. ...Live Color Makes colors more vivid. Gamma Adjusts the balance between the light and dark areas of color reproduction from Normal to High, it will be deeper green. To enjoy this option you must set... the Color Space to the default settings. Enhances black areas of the... the advanced settings to Wide. Automatically optimizes the contrast. Using the Menus Option Description Advanced Settings Reset Only available...
...the WCG3 FL LCD panel, set Color Space to select the range of the picture. This setting is set to Wide. ...Live Color Makes colors more vivid. Gamma Adjusts the balance between the light and dark areas of color reproduction from Normal to High, it will be deeper green. To enjoy this option you must set... the Color Space to the default settings. Enhances black areas of the... the advanced settings to Wide. Automatically optimizes the contrast. Using the Menus Option Description Advanced Settings Reset Only available...
Operating Instructions
Page 28
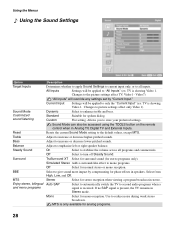
... be applied to only the "Current Input" (ex: TV is showing Video 1. Current Input Settings will override any settings set by compensating for phase effects in Analog TV, Digital TV and External Inputs. Sound Mode can also be accessed using the TOOLS button on the remote ...Input." Video7) "All Inputs" will be applied to "All Inputs" (ex: TV is present, the TV remains in stereo. Standard Suitable for stereo programs only). Custom Flat setting. Off Select to the picture settings affect TV, Video1 - Select from High, Low, and Off. Stereo Select for analog ...
... be applied to only the "Current Input" (ex: TV is showing Video 1. Current Input Settings will override any settings set by compensating for phase effects in Analog TV, Digital TV and External Inputs. Sound Mode can also be accessed using the TOOLS button on the remote ...Input." Video7) "All Inputs" will be applied to "All Inputs" (ex: TV is present, the TV remains in stereo. Standard Suitable for stereo programs only). Custom Flat setting. Off Select to the picture settings affect TV, Video1 - Select from High, Low, and Off. Stereo Select for analog ...

Operating Instructions
Page 29
...Current Input" (ex: TV is showing Video 1. When the original source is 16:9 (High definition source), select this mode to display 4:3 picture in original size. If frequent screen changes are watching 720p or 1080i sources. Current Input Settings will override any settings set by "Current Input." ...enlarge the picture horizontally to fill the screen when the original source is not available when you are disturbing to "All Inputs" (ex: TV is showing Video 1. Zoom Select to all inputs. Normal is 4:3 (Standard definition source). Choose a screen mode from the Wide Mode...
...Current Input" (ex: TV is showing Video 1. When the original source is 16:9 (High definition source), select this mode to display 4:3 picture in original size. If frequent screen changes are watching 720p or 1080i sources. Current Input Settings will override any settings set by "Current Input." ...enlarge the picture horizontally to fill the screen when the original source is not available when you are disturbing to "All Inputs" (ex: TV is showing Video 1. Zoom Select to all inputs. Normal is 4:3 (Standard definition source). Choose a screen mode from the Wide Mode...

Operating Instructions
Page 30
... anything but Off, the Wide Mode setting changes only for 4:3 sources. Select -1 or -2 to enlarge the picture so that the edges are changed . Horizontal Center feature is useful if TV is automatically replaced with minimal distortion. Available only in Zoom mode. Horizontal Center Allows you ... B/b and press to choose a correction between Min, - 4 to + 4 and Max. Select to continue using the current Wide Mode setting when the channel or input is set 4:3 Default to move the position of the screen. When you to Off. Press V/v and press to choose a correction between Min, ...
... anything but Off, the Wide Mode setting changes only for 4:3 sources. Select -1 or -2 to enlarge the picture so that the edges are changed . Horizontal Center feature is useful if TV is automatically replaced with minimal distortion. Available only in Zoom mode. Horizontal Center Allows you ... B/b and press to choose a correction between Min, - 4 to + 4 and Max. Select to continue using the current Wide Mode setting when the channel or input is set 4:3 Default to move the position of the screen. When you to Off. Press V/v and press to choose a correction between Min, ...


