Setup Guide (Operating Instructions)
Page 9
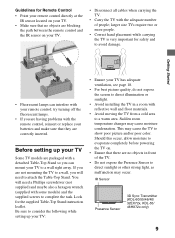
...remote control and the IR sensor on . • Ensure that they are correctly inserted. Should this occur, allow moisture to evaporate completely before powering the TV on your TV. • Disconnect all cables when carrying the TV. • Carry the TV with your TV has adequate ventilation... your TV Some TV models are packaged with some models) and the supplied screws to attach the Table-Top Stand. This may cause moisture condensation. IR Sensor Presence Sensor 3D Sync Transmitter (KDL-60/55/46/40/ 32EX72x, KDL-55/ 46HX72x only) 9 try turning off the fluorescent lamps. •...
...remote control and the IR sensor on . • Ensure that they are correctly inserted. Should this occur, allow moisture to evaporate completely before powering the TV on your TV. • Disconnect all cables when carrying the TV. • Carry the TV with your TV has adequate ventilation... your TV Some TV models are packaged with some models) and the supplied screws to attach the Table-Top Stand. This may cause moisture condensation. IR Sensor Presence Sensor 3D Sync Transmitter (KDL-60/55/46/40/ 32EX72x, KDL-55/ 46HX72x only) 9 try turning off the fluorescent lamps. •...

Setup Guide (Operating Instructions)
Page 10
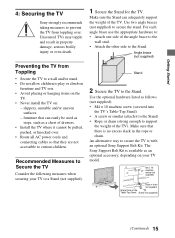
...; Be careful to not pinch your hands or the AC power cord when you use an electric screwdriver, set the torque at approximately 1.5 N·m {15 kgf·cm}. ~ • Tighten to the Table-Top Stand. Guide pins For KDL-60EX72x 1 Align with the supplied screw and hexagon wrench. ~ • Align the TV... from the top, slide it in until the guide pins cannot be seen. 2 Use the supplied screws to attach the TV unit to the Table-Top Stand. * Head...
...; Be careful to not pinch your hands or the AC power cord when you use an electric screwdriver, set the torque at approximately 1.5 N·m {15 kgf·cm}. ~ • Tighten to the Table-Top Stand. Guide pins For KDL-60EX72x 1 Align with the supplied screw and hexagon wrench. ~ • Align the TV... from the top, slide it in until the guide pins cannot be seen. 2 Use the supplied screws to attach the TV unit to the Table-Top Stand. * Head...
Setup Guide (Operating Instructions)
Page 15
... angle brace to the wall stud. • Attach the other side to the Stand. Angle brace (not supplied) Preventing the TV from toppling over . • Route all AC power cords and connecting cables so that there is no excess slack in property damage, serious bodily injury or even ...accessible to curious children. Recommended Measures to Secure the TV Consider the following measures when securing your TV model. Getting Started 4: Securing the TV Sony strongly recommends taking measures to prevent the TV from Toppling • Secure the TV to a wall and/or stand. • Do not allow...
... angle brace to the wall stud. • Attach the other side to the Stand. Angle brace (not supplied) Preventing the TV from toppling over . • Route all AC power cords and connecting cables so that there is no excess slack in property damage, serious bodily injury or even ...accessible to curious children. Recommended Measures to Secure the TV Consider the following measures when securing your TV model. Getting Started 4: Securing the TV Sony strongly recommends taking measures to prevent the TV from Toppling • Secure the TV to a wall and/or stand. • Do not allow...
Setup Guide (Operating Instructions)
Page 16
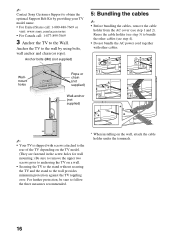
... wall provides minimum protection against the TV toppling over. ~ Contact Sony Customer Support to obtain the optional Support Belt Kit by using bolts, wall anchor and chain (or rope). Wallmount holes Rope or 1 chain (not supplied) Wall-anchor 3 (not supplied) 2 4 * ~ • Your TV is shipped with ...other cables. Anchor bolts (M6) (not supplied) 5: Bundling the cables ~ • Before bundling the cables, remove the cable holder from the AC cover (see step 4). • Do not bundle the AC power cord together with screws attached to the rear of the TV...
... wall provides minimum protection against the TV toppling over. ~ Contact Sony Customer Support to obtain the optional Support Belt Kit by using bolts, wall anchor and chain (or rope). Wallmount holes Rope or 1 chain (not supplied) Wall-anchor 3 (not supplied) 2 4 * ~ • Your TV is shipped with ...other cables. Anchor bolts (M6) (not supplied) 5: Bundling the cables ~ • Before bundling the cables, remove the cable holder from the AC cover (see step 4). • Do not bundle the AC power cord together with screws attached to the rear of the TV...
Setup Guide (Operating Instructions)
Page 17
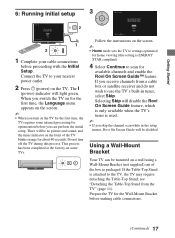
... wish to use the TV's built-in the setup menus, Rovi On Screen Guide will be mounted on a wall using a Wall-Mount Bracket (not supplied) out of the TV blinks orange for the Wall-Mount Bracket before proceeding with the Initial Setup. Connect the TV to the TV, the TV... If you receive channels from the TV" (page 11). Prepare the TV for about 40 seconds. Getting Started 6: Running initial setup 3 1 Complete your nearest power outlet. 2 Press 1 (power) on the TV. There will light green. When you switch the TV on for optimization before you turn off the TV during this setting...
... wish to use the TV's built-in the setup menus, Rovi On Screen Guide will be mounted on a wall using a Wall-Mount Bracket (not supplied) out of the TV blinks orange for the Wall-Mount Bracket before proceeding with the Initial Setup. Connect the TV to the TV, the TV... If you receive channels from the TV" (page 11). Prepare the TV for about 40 seconds. Getting Started 6: Running initial setup 3 1 Complete your nearest power outlet. 2 Press 1 (power) on the TV. There will light green. When you switch the TV on for optimization before you turn off the TV during this setting...
Setup Guide (Operating Instructions)
Page 33
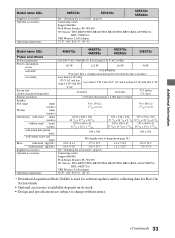
Additional Information Model name KDL- Power and others Power requirement Power consumption in use in DAM* in standby Screen size (inches measured diagonally) Display resolution Speaker Full range (mm) (inches) Woofer (mm) (....) 18.8 / 41.4 17.9 / 39.5 14.4 / 31.8 10.4 / 22.9 14.4 / 31.8 14.3 / 31.5 11.2 / 24.7 7.9 / 17.4 See "Checking the accessories" (page 8). Supplied accessories Optional accessories Operating temperature 60EX72x 55HX72x 55EX72x 55EX62x See "Checking the accessories" (page 8). Connecting cables Support Belt Kit Wall-Mount Bracket: SU-WL500 3D...
Additional Information Model name KDL- Power and others Power requirement Power consumption in use in DAM* in standby Screen size (inches measured diagonally) Display resolution Speaker Full range (mm) (inches) Woofer (mm) (....) 18.8 / 41.4 17.9 / 39.5 14.4 / 31.8 10.4 / 22.9 14.4 / 31.8 14.3 / 31.5 11.2 / 24.7 7.9 / 17.4 See "Checking the accessories" (page 8). Supplied accessories Optional accessories Operating temperature 60EX72x 55HX72x 55EX72x 55EX62x See "Checking the accessories" (page 8). Connecting cables Support Belt Kit Wall-Mount Bracket: SU-WL500 3D...


