Operating Instructions
Page 1
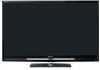
3-297-695-12(1) LCD Digital Color TV Operating Instructions KDL-40Z4100 KDL-46Z4100 © 2008 Sony Corporation
3-297-695-12(1) LCD Digital Color TV Operating Instructions KDL-40Z4100 KDL-46Z4100 © 2008 Sony Corporation
Operating Instructions
Page 2
...and, if not installed and used under license from Gemstar-TV Guide International, Inc. "Dolby" and the double-D symbol are trademarks or registered marks of the following WALL-MOUNT BRACKET or TV-stand. KDL-40Z4100 KDL-46Z4100 Sony Wall-Mount Bracket Model No. Do not use this ...device must accept any way liable for help. Gemstar-TV Guide International Inc. Blu-ray Disc is no event shall Gemstar-TV Guide International, Inc. For ...
...and, if not installed and used under license from Gemstar-TV Guide International, Inc. "Dolby" and the double-D symbol are trademarks or registered marks of the following WALL-MOUNT BRACKET or TV-stand. KDL-40Z4100 KDL-46Z4100 Sony Wall-Mount Bracket Model No. Do not use this ...device must accept any way liable for help. Gemstar-TV Guide International Inc. Blu-ray Disc is no event shall Gemstar-TV Guide International, Inc. For ...
Operating Instructions
Page 3
...Troubleshooting 55 Specifications 58 Index 59 Customer Support http://www.sony.com/tvsupport On-line Registration United States http://productregistration.sony.com Canada http://www.sonystyle.ca/registration 3 Initial Setup 16 Operating the TV Inserting Batteries into the Remote Control...19 When Using ...the Remote Control 19 TV Controls 19 Remote Control Button Description 20 ...
...Troubleshooting 55 Specifications 58 Index 59 Customer Support http://www.sony.com/tvsupport On-line Registration United States http://productregistration.sony.com Canada http://www.sonystyle.ca/registration 3 Initial Setup 16 Operating the TV Inserting Batteries into the Remote Control...19 When Using ...the Remote Control 19 TV Controls 19 Remote Control Button Description 20 ...
Operating Instructions
Page 4
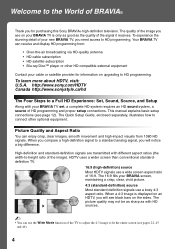
...high-definition signal to a standard analog signal, you will see pages 22, 45 and 46). 4 High-definition and standard-definition signals are transmitted with HD sources. ~ • You can use the Wide Mode function of the TV to adjust the 4:3 image to fit the entire screen (see black bars on the ...ca/hd The Four Steps to a Full HD Experience: Set, Sound, Source, and Setup Along with your cable or satellite provider for purchasing this Sony BRAVIA® high-definition television. This manual explains basic setup connections (see on an HDTV, you need access to -height ratio of the image...
...high-definition signal to a standard analog signal, you will see pages 22, 45 and 46). 4 High-definition and standard-definition signals are transmitted with HD sources. ~ • You can use the Wide Mode function of the TV to adjust the 4:3 image to fit the entire screen (see black bars on the ...ca/hd The Four Steps to a Full HD Experience: Set, Sound, Source, and Setup Along with your cable or satellite provider for purchasing this Sony BRAVIA® high-definition television. This manual explains basic setup connections (see on an HDTV, you need access to -height ratio of the image...
Operating Instructions
Page 5
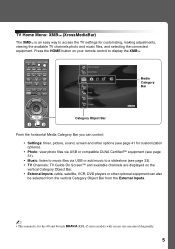
...REPLAY ADVANCE NEXT PLAY SYNC MENU PAUSE STOP THEATER SOUND PICTURE WIDE CC FREEZE Product Support Clock/Timers Settings Sound Screen Channel Media Category Bar TV Category Object Bar From the horizontal Media Category Bar you can control: • Settings: timer, picture, sound, screen and other optional ... the vertical Category Object Bar from the External Inputs. ~ • This manual is an easy way to display the XMB™. TV Home Menu: XMB™ (XrossMediaBar) The XMB™ is for the 40 and 46 inch BRAVIA KDL-Z series models with screen size measured diagonally. 5
...REPLAY ADVANCE NEXT PLAY SYNC MENU PAUSE STOP THEATER SOUND PICTURE WIDE CC FREEZE Product Support Clock/Timers Settings Sound Screen Channel Media Category Bar TV Category Object Bar From the horizontal Media Category Bar you can control: • Settings: timer, picture, sound, screen and other optional ... the vertical Category Object Bar from the External Inputs. ~ • This manual is an easy way to display the XMB™. TV Home Menu: XMB™ (XrossMediaBar) The XMB™ is for the 40 and 46 inch BRAVIA KDL-Z series models with screen size measured diagonally. 5
Operating Instructions
Page 6
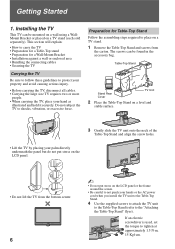
... to follow these guidelines to the "Attaching the Table-Top Stand" flyer). Table-Top Stand Stand Rear Cover TV Unit 2 Place the Table-Top Stand on the LCD panel. • Do not lift the TV from the carton. Installing the TV This TV can be mounted on a wall using a WallMount Bracket or placed on the... LCD panel or the frame around the screen. • Be careful to not pinch your hands or the AC ...
... to follow these guidelines to the "Attaching the Table-Top Stand" flyer). Table-Top Stand Stand Rear Cover TV Unit 2 Place the Table-Top Stand on the LCD panel. • Do not lift the TV from the carton. Installing the TV This TV can be mounted on a wall using a WallMount Bracket or placed on the... LCD panel or the frame around the screen. • Be careful to not pinch your hands or the AC ...
Operating Instructions
Page 7
... this much space around the set or cause it to fall, etc. 8-12 mm When Installing the TV Against a Wall or Enclosed Area Make sure that they are ready to be performed by a Sony dealer or licensed contractor. • For bracket installation, refer to the supplied "Installing the Wall-Mount...the Table-Top Stand. Use of the screws differ depending on a wall. • For product protection and safety reasons, Sony strongly recommends that you are designed so that your TV or cause a fire. The supplied screws are ready to store the unused screws and Table-Top Stand in length when ...
... this much space around the set or cause it to fall, etc. 8-12 mm When Installing the TV Against a Wall or Enclosed Area Make sure that they are ready to be performed by a Sony dealer or licensed contractor. • For bracket installation, refer to the supplied "Installing the Wall-Mount...the Table-Top Stand. Use of the screws differ depending on a wall. • For product protection and safety reasons, Sony strongly recommends that you are designed so that your TV or cause a fire. The supplied screws are ready to store the unused screws and Table-Top Stand in length when ...
Operating Instructions
Page 8
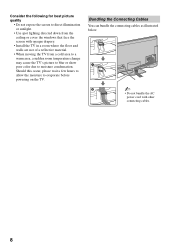
... few hours to allow the moisture to evaporate before powering on the TV. Bundling the Connecting Cables You can bundle the connecting cables as illustrated below. ~ • Do not bundle the AC power cord with opaque drapery. • Install the TV in a room where the floor and walls are not of a... reflective material. • When moving the TV from the ceiling or cover the windows that face the screen with other connecting cables. 8 Consider the...
... few hours to allow the moisture to evaporate before powering on the TV. Bundling the Connecting Cables You can bundle the connecting cables as illustrated below. ~ • Do not bundle the AC power cord with opaque drapery. • Install the TV in a room where the floor and walls are not of a... reflective material. • When moving the TV from the ceiling or cover the windows that face the screen with other connecting cables. 8 Consider the...
Operating Instructions
Page 9
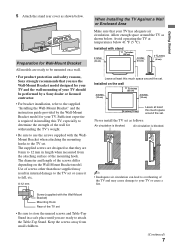
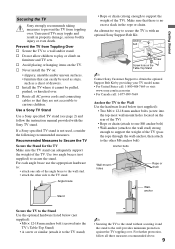
... (screwed into the top-most wall-mount holes located on furniture and TV sets. An alternative way to the wall provides minimum protection against the TV toppling over. s Never install the TV on the TV. If a Sony specified TV stand is no excess slack in property damage, serious bodily injury or ... to the wall stud. • attach the other side to Secure the TV Secure the Stand for the TV Make sure the TV stand can easily be pulled, pushed, or knocked over . Use a Sony TV Stand Use a Sony specified TV stand (see page 2) and follow all AC power cords and connecting cables ...
... (screwed into the top-most wall-mount holes located on furniture and TV sets. An alternative way to the wall provides minimum protection against the TV toppling over. s Never install the TV on the TV. If a Sony specified TV stand is no excess slack in property damage, serious bodily injury or ... to the wall stud. • attach the other side to Secure the TV Secure the Stand for the TV Make sure the TV stand can easily be pulled, pushed, or knocked over . Use a Sony TV Stand Use a Sony specified TV stand (see page 2) and follow all AC power cords and connecting cables ...
Operating Instructions
Page 10
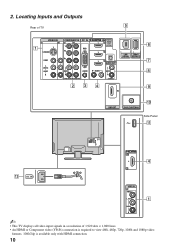
Locating Inputs and Outputs 5 Rear of TV VIDEO IN 1 3 1 S VIDEO COMPONENT IN 1 2 Y PB PC IN RGB IN DIGITAL 1 AUDIO OUT (OPTICAL) 3 VIDEO L (MONO) AUDIO R PR L AUDIO R AUDIO (1080p/1080i/720p/480p/480i ) 4 ... R (VAR/FIX) 234 LAN DMe x / (10/100) SERVICE 6 7 8 9 DMPORT CABLE/ANTENNA 0 Side Panel qa qs AC IN IN 4 2 VIDEO IN 2 VIDEO L (MONO) 1 AUDIO R ~ • This TV displays all video input signals in a resolution of 1,920 dots × 1,080 lines. • An HDMI or Component video (YPBPR) connection is required to view...
Locating Inputs and Outputs 5 Rear of TV VIDEO IN 1 3 1 S VIDEO COMPONENT IN 1 2 Y PB PC IN RGB IN DIGITAL 1 AUDIO OUT (OPTICAL) 3 VIDEO L (MONO) AUDIO R PR L AUDIO R AUDIO (1080p/1080i/720p/480p/480i ) 4 ... R (VAR/FIX) 234 LAN DMe x / (10/100) SERVICE 6 7 8 9 DMPORT CABLE/ANTENNA 0 Side Panel qa qs AC IN IN 4 2 VIDEO IN 2 VIDEO L (MONO) 1 AUDIO R ~ • This TV displays all video input signals in a resolution of 1,920 dots × 1,080 lines. • An HDMI or Component video (YPBPR) connection is required to view...
Operating Instructions
Page 11
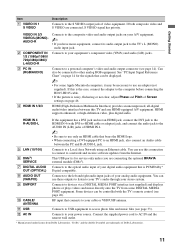
... Getting Started Item 1 VIDEO IN 1 S VIDEO Description Connects to your power source. If both composite video and S VIDEO are trademarks of Screen settings on page 46. VIDEO IN 2/3 VIDEO/L(MONO)AUDIO-R 2 COMPONENT IN 1/2 (1080p/1080i/ 720p/480p/480i)/ L-AUDIO-R 3 PC IN (RGB/AUDIO) 4 HDMI IN 1/2/3 ... HDMI cable that is for the signals that connects to the left and right audio input jacks of your analog audio equipment. Connects to the TV's L (MONO) audio input jack. See "PC Input Signal Reference Chart" on your A/V equipment. ~ • If you are connecting the optional BRAVIA...
... Getting Started Item 1 VIDEO IN 1 S VIDEO Description Connects to your power source. If both composite video and S VIDEO are trademarks of Screen settings on page 46. VIDEO IN 2/3 VIDEO/L(MONO)AUDIO-R 2 COMPONENT IN 1/2 (1080p/1080i/ 720p/480p/480i)/ L-AUDIO-R 3 PC IN (RGB/AUDIO) 4 HDMI IN 1/2/3 ... HDMI cable that is for the signals that connects to the left and right audio input jacks of your analog audio equipment. Connects to the TV's L (MONO) audio input jack. See "PC Input Signal Reference Chart" on your A/V equipment. ~ • If you are connecting the optional BRAVIA...
Operating Instructions
Page 12
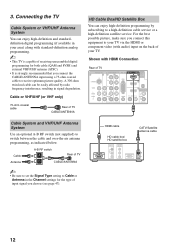
..., resulting in signal degradation. HDMI cable HD cable box/ HD satellite box CATV/Satellite antenna cable 12 Shown with audio) input on the back of TV VIDEO IN 1 3 S VIDEO COMPONENT IN 1 2 Y PB PC IN RGB IN DIGITAL 1 AUDIO OUT (OPTICAL) 3 VIDEO L (MONO) AUDIO R PR L AUDIO R AUDIO (.../ANTENNA HD Cable Box/HD Satellite Box You can be easily affected by subscribing to receive optimum picture quality. Connecting the TV Cable System or VHF/UHF Antenna System You can enjoy high-definition and standarddefinition digital programming (if available in the Channel ...
..., resulting in signal degradation. HDMI cable HD cable box/ HD satellite box CATV/Satellite antenna cable 12 Shown with audio) input on the back of TV VIDEO IN 1 3 S VIDEO COMPONENT IN 1 2 Y PB PC IN RGB IN DIGITAL 1 AUDIO OUT (OPTICAL) 3 VIDEO L (MONO) AUDIO R PR L AUDIO R AUDIO (.../ANTENNA HD Cable Box/HD Satellite Box You can be easily affected by subscribing to receive optimum picture quality. Connecting the TV Cable System or VHF/UHF Antenna System You can enjoy high-definition and standarddefinition digital programming (if available in the Channel ...
Operating Instructions
Page 13
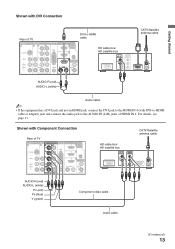
Getting Started Shown with DVI Connection Rear of TV VIDEO IN 1 3 S VIDEO COMPONENT IN 1 2 Y PB PC IN RGB IN DIGITAL 1 AUDIO OUT (OPTICAL) 3 DVI-to-HDMI cable HD cable box/ HD satellite box VIDEO L (... Connection Rear of HDMI IN 4. Shown with DVI-to-HDMI cable or adapter) jack and connect the audio jack to the AUDIO IN (L/R) jacks of TV VIDEO IN 1 3 S VIDEO COMPONENT IN 1 2 Y PB PC IN RGB IN DIGITAL 1 AUDIO OUT (OPTICAL) 3 VIDEO L (MONO) AUDIO R PR L AUDIO R AUDIO (1080p/1080i/720p/480p/480i...
Getting Started Shown with DVI Connection Rear of TV VIDEO IN 1 3 S VIDEO COMPONENT IN 1 2 Y PB PC IN RGB IN DIGITAL 1 AUDIO OUT (OPTICAL) 3 DVI-to-HDMI cable HD cable box/ HD satellite box VIDEO L (... Connection Rear of HDMI IN 4. Shown with DVI-to-HDMI cable or adapter) jack and connect the audio jack to the AUDIO IN (L/R) jacks of TV VIDEO IN 1 3 S VIDEO COMPONENT IN 1 2 Y PB PC IN RGB IN DIGITAL 1 AUDIO OUT (OPTICAL) 3 VIDEO L (MONO) AUDIO R PR L AUDIO R AUDIO (1080p/1080i/720p/480p/480i...
Operating Instructions
Page 14
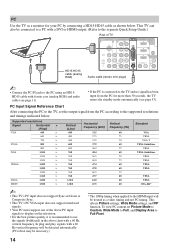
...the PC for your PC by connecting a HD15-HD15 cable as a video timing and not PC timing. This TV can also be treated as shown below . In plug and play, signals with a 60 Hz vertical frequency ... 400 600 600 768 768 768 768 768 768 768 1,024 1,080 Horizontal frequency (kHz) 31.5 37.5 31.5 37.9 46.9 48.4 56.5 60.0 47.4 47.8 60.3 47.7 64.0 67.5 Vertical frequency (Hz) 60 75 70 60 75 ...VESA VGA-T VESA Guidelines VESA VESA Guidelines VESA VESA VESA VESA VESA VESA CEA-861* ~ • This TV's PC input does not support Sync on the television. • For the best picture quality, it is ...
...the PC for your PC by connecting a HD15-HD15 cable as a video timing and not PC timing. This TV can also be treated as shown below . In plug and play, signals with a 60 Hz vertical frequency ... 400 600 600 768 768 768 768 768 768 768 1,024 1,080 Horizontal frequency (kHz) 31.5 37.5 31.5 37.9 46.9 48.4 56.5 60.0 47.4 47.8 60.3 47.7 64.0 67.5 Vertical frequency (Hz) 60 75 70 60 75 ...VESA VGA-T VESA Guidelines VESA VESA Guidelines VESA VESA VESA VESA VESA VESA CEA-861* ~ • This TV's PC input does not support Sync on the television. • For the best picture quality, it is ...
Operating Instructions
Page 15
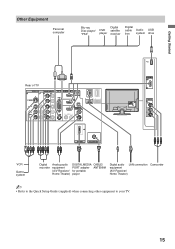
Getting Started Other Equipment Personal computer Blu-ray Disc player/ "PS3" DVD player Digital satellite receiver Digital cable Audio USB box system drive Rear of TV VIDEO IN 1 3 S VIDEO COMPONENT IN 1 2 Y PB PC IN RGB IN DIGITAL 1 AUDIO OUT (OPTICAL) 3 VIDEO L (MONO) AUDIO R PR L AUDIO R AUDIO (1080p/1080i/720p/480p/480i) 4 ... portable player Digital audio LAN connection equipment (A/V Receiver/ Home Theater) Camcorder ~ • Refer to the Quick Setup Guide (supplied) when connecting other equipment to your TV. 15
Getting Started Other Equipment Personal computer Blu-ray Disc player/ "PS3" DVD player Digital satellite receiver Digital cable Audio USB box system drive Rear of TV VIDEO IN 1 3 S VIDEO COMPONENT IN 1 2 Y PB PC IN RGB IN DIGITAL 1 AUDIO OUT (OPTICAL) 3 VIDEO L (MONO) AUDIO R PR L AUDIO R AUDIO (1080p/1080i/720p/480p/480i) 4 ... portable player Digital audio LAN connection equipment (A/V Receiver/ Home Theater) Camcorder ~ • Refer to the Quick Setup Guide (supplied) when connecting other equipment to your TV. 15
Operating Instructions
Page 16
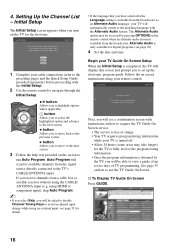
... 35 on how to highlight options where applicable. Initial Setup Step 1 of 6 Initial Setup is complete. Language settings will apply to on the TV for available channels from the broadcaster as an Alternate Audio language, your remote control. Highlight a choice and press to avoid accidental input change while using... you to move to the next screen. 3 Follow the help text provided on the remote control when an alternate audio stream is completed, the TV will be asked to disable Channel Tuning Keys to continue. If you will see page 45). 4 Set the date and time. using the CABLE...
... 35 on how to highlight options where applicable. Initial Setup Step 1 of 6 Initial Setup is complete. Language settings will apply to on the TV for available channels from the broadcaster as an Alternate Audio language, your remote control. Highlight a choice and press to avoid accidental input change while using... you to move to the next screen. 3 Follow the help text provided on the remote control when an alternate audio stream is completed, the TV will be asked to disable Channel Tuning Keys to continue. If you will see page 45). 4 Set the date and time. using the CABLE...
Operating Instructions
Page 17
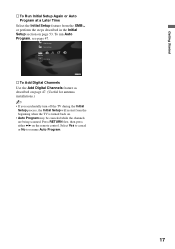
...scanned. To run Auto Program, see page 47. Press RETURN first, then press either B/b on page 53. HDMI Settings General Setup Settings Initial Setup TV s To Add Digital Channels Use the Add Digital Channels feature as described on page 47. (Useful for antenna installations.) ~ • If you accidentally... turn off the TV during the Initial Setup process, the Initial Setup will restart from the XMB™ or perform the steps described in the Initial Setup section ...
...scanned. To run Auto Program, see page 47. Press RETURN first, then press either B/b on page 53. HDMI Settings General Setup Settings Initial Setup TV s To Add Digital Channels Use the Add Digital Channels feature as described on page 47. (Useful for antenna installations.) ~ • If you accidentally... turn off the TV during the Initial Setup process, the Initial Setup will restart from the XMB™ or perform the steps described in the Initial Setup section ...
Operating Instructions
Page 19
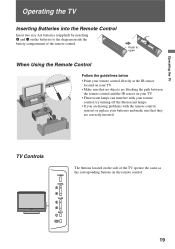
... batteries to open When Using the Remote Control Follow the guidelines below • Point your remote control directly at the IR sensor located on your TV. • Make sure that no objects are blocking the path between the remote control and the IR sensor on your... TV. • Fluorescent lamps can interfere with the remote control, reinsert or replace your batteries and make sure that they are having problems with your remote ...
... batteries to open When Using the Remote Control Follow the guidelines below • Point your remote control directly at the IR sensor located on your TV. • Make sure that no objects are blocking the path between the remote control and the IR sensor on your... TV. • Fluorescent lamps can interfere with the remote control, reinsert or replace your batteries and make sure that they are having problems with your remote ...
Operating Instructions
Page 20
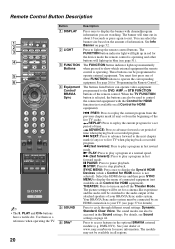
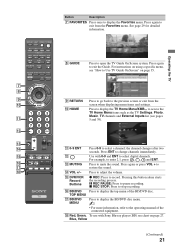
...pause playback. The picture settings will be accessed in fast rewind mode. Remote Control Button Description 1 2 3 4 DISPLAY LIGHT POWER TV POWER DVD AMP STB TV FUNCTION PREV REPLAY ADVANCE NEXT PLAY SYNC MENU PAUSE STOP 5 6 THEATER SOUND PICTURE WIDE CC FREEZE VOL MUTING CH JUMP REC ...to display the Sync'd HDMI Devices (while a Control for HDMI equipment). See your dealer or www.sony.com/bravia for "Programming the Remote Control". Use them as a reference when operating the TV. X PAUSE: Press to display the banner with the Control for HDMI function (not available on the...
...pause playback. The picture settings will be accessed in fast rewind mode. Remote Control Button Description 1 2 3 4 DISPLAY LIGHT POWER TV POWER DVD AMP STB TV FUNCTION PREV REPLAY ADVANCE NEXT PLAY SYNC MENU PAUSE STOP 5 6 THEATER SOUND PICTURE WIDE CC FREEZE VOL MUTING CH JUMP REC ...to display the Sync'd HDMI Devices (while a Control for HDMI equipment). See your dealer or www.sony.com/bravia for "Programming the Remote Control". Use them as a reference when operating the TV. X PAUSE: Press to display the banner with the Control for HDMI function (not available on the...
Operating Instructions
Page 21
... exit from the screen when displaying menu items and settings. See page 29 for detailed information. 8 GUIDE Press to select a channel; Press 0-9 to open the TV Guide On Screen system. qg DVR/VCR Record Buttons z REC: Press to pause recording. X REC PAUSE: Press to record. Blue, Yellow (Continued) 21 the channel... RECPAUSE RECSTOP BD/DVD TOP MENU MENU F1 F2 Button Description 7 FAVORITES Press once to stop recording. Press again to select digital channels. Use with Sony Blu-ray player (BD) see "How to Use TV Guide On Screen" on page 27.
... exit from the screen when displaying menu items and settings. See page 29 for detailed information. 8 GUIDE Press to select a channel; Press 0-9 to open the TV Guide On Screen system. qg DVR/VCR Record Buttons z REC: Press to pause recording. X REC PAUSE: Press to record. Blue, Yellow (Continued) 21 the channel... RECPAUSE RECSTOP BD/DVD TOP MENU MENU F1 F2 Button Description 7 FAVORITES Press once to stop recording. Press again to select digital channels. Use with Sony Blu-ray player (BD) see "How to Use TV Guide On Screen" on page 27.
