Operating Instructions
Page 1
3-297-695-12(1) LCD Digital Color TV Operating Instructions KDL-40Z4100 KDL-46Z4100 © 2008 Sony Corporation
3-297-695-12(1) LCD Digital Color TV Operating Instructions KDL-40Z4100 KDL-46Z4100 © 2008 Sony Corporation
Operating Instructions
Page 2
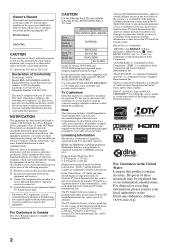
... U.S. Refer to operate this product contains mercury. KDL-40Z4100 KDL-46Z4100 Sony Wall-Mount Bracket Model No. To Customers Sufficient expertise is a trademark of Gemstar-TV Guide International, Inc. and/or one or more of Conformity Trade Name: SONY Model: KDL-40Z4100/KDL-46Z4100 Responsible Party: Sony Electronics Inc. In the United States, TV Guide and other countries. Pursuant to FCC...
... U.S. Refer to operate this product contains mercury. KDL-40Z4100 KDL-46Z4100 Sony Wall-Mount Bracket Model No. To Customers Sufficient expertise is a trademark of Gemstar-TV Guide International, Inc. and/or one or more of Conformity Trade Name: SONY Model: KDL-40Z4100/KDL-46Z4100 Responsible Party: Sony Electronics Inc. In the United States, TV Guide and other countries. Pursuant to FCC...
Operating Instructions
Page 3
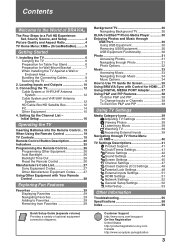
... the Remote Control 26 Manufacturer's Code List 27 Sony Equipment Codes 27 Other Manufacturer Equipment Codes.........27 Using Other Equipment with Control for Wall-Mount Bracket 7 When Installing the TV Against a Wall or Enclosed Area 7 Bundling the Connecting Cables 8 Securing the TV 9 2. Installing the TV 6 Carrying the TV 6 Preparation for Table-Top Stand 6 Preparation for...
... the Remote Control 26 Manufacturer's Code List 27 Sony Equipment Codes 27 Other Manufacturer Equipment Codes.........27 Using Other Equipment with Control for Wall-Mount Bracket 7 When Installing the TV Against a Wall or Enclosed Area 7 Bundling the Connecting Cables 8 Securing the TV 9 2. Installing the TV 6 Carrying the TV 6 Preparation for Table-Top Stand 6 Preparation for...
Operating Instructions
Page 4
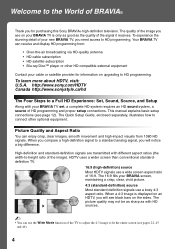
...programming and proper setup connections. To learn more about HDTV, visit: U.S.A. http://www.sony.com/HDTV Canada http://www.sonystyle.ca/hd The Four Steps to a Full HD Experience: Set, Sound, Source, and Setup Along with your BRAVIA TV set, a complete HD system requires an HD sound system, a source of your... Most standard-definition signals use a wide screen aspect ratio of the image). Welcome to the World of the TV to adjust the 4:3 image to fit the entire screen (see pages 22, 45 and 46). 4 The picture quality may not be as sharp as the quality of the image you compare a high...
...programming and proper setup connections. To learn more about HDTV, visit: U.S.A. http://www.sony.com/HDTV Canada http://www.sonystyle.ca/hd The Four Steps to a Full HD Experience: Set, Sound, Source, and Setup Along with your BRAVIA TV set, a complete HD system requires an HD sound system, a source of your... Most standard-definition signals use a wide screen aspect ratio of the image). Welcome to the World of the TV to adjust the 4:3 image to fit the entire screen (see pages 22, 45 and 46). 4 The picture quality may not be as sharp as the quality of the image you compare a high...
Operating Instructions
Page 5
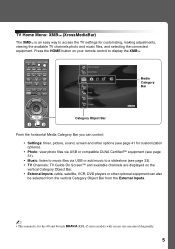
...NEXT PLAY SYNC MENU PAUSE STOP THEATER SOUND PICTURE WIDE CC FREEZE Product Support Clock/Timers Settings Sound Screen Channel Media Category Bar TV Category Object Bar From the horizontal Media Category Bar you can control: • Settings: timer, picture, sound, screen and ...other options (see page 41 for customizing, making adjustments, viewing the available TV channels photo and music files, and selecting the connected equipment. TV Home Menu: XMB™ (XrossMediaBar) The XMB™ is for the 40 and 46 inch BRAVIA KDL-Z series models with screen size measured diagonally. 5
...NEXT PLAY SYNC MENU PAUSE STOP THEATER SOUND PICTURE WIDE CC FREEZE Product Support Clock/Timers Settings Sound Screen Channel Media Category Bar TV Category Object Bar From the horizontal Media Category Bar you can control: • Settings: timer, picture, sound, screen and ...other options (see page 41 for customizing, making adjustments, viewing the available TV channels photo and music files, and selecting the connected equipment. TV Home Menu: XMB™ (XrossMediaBar) The XMB™ is for the 40 and 46 inch BRAVIA KDL-Z series models with screen size measured diagonally. 5
Operating Instructions
Page 6
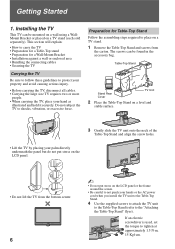
...illustrated and hold it securely. This section will explain: • How to carry the TV • Preparation for a Table-Top stand • Preparation for Table-Top Stand Follow the assembling steps required to place on the LCD panel or the frame around the screen. • Be careful to not pinch your... your palm directly underneath the panel but do not put stress on the LCD panel. • Do not lift the TV from the bottom center. 6 ~ • Do not put stress on a TV stand. 1 Remove the Table-Top Stand and screws from the carton. If an electric screwdriver is used, set the ...
...illustrated and hold it securely. This section will explain: • How to carry the TV • Preparation for a Table-Top stand • Preparation for Table-Top Stand Follow the assembling steps required to place on the LCD panel or the frame around the screen. • Be careful to not pinch your... your palm directly underneath the panel but do not put stress on the LCD panel. • Do not lift the TV from the bottom center. 6 ~ • Do not put stress on a TV stand. 1 Remove the Table-Top Stand and screws from the carton. If an electric screwdriver is used, set the ...
Operating Instructions
Page 7
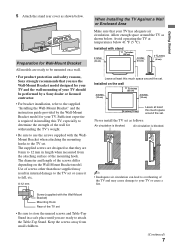
...other than those supplied may cause damage to be performed by a Sony dealer or licensed contractor. • For bracket installation, refer to the TV set . Use of the mounting hook. Allow enough space around the TV as follows: Air circulation is blocked. Screw (supplied with the Wall...) Mounting Hook Rear of the screws differ depending on a wall. • For product protection and safety reasons, Sony strongly recommends that they are ready to your TV. Getting Started 5 Attach the stand rear cover as shown below . The supplied screws are designed so that you...
...other than those supplied may cause damage to be performed by a Sony dealer or licensed contractor. • For bracket installation, refer to the TV set . Use of the mounting hook. Allow enough space around the TV as follows: Air circulation is blocked. Screw (supplied with the Wall...) Mounting Hook Rear of the screws differ depending on a wall. • For product protection and safety reasons, Sony strongly recommends that they are ready to your TV. Getting Started 5 Attach the stand rear cover as shown below . The supplied screws are designed so that you...
Operating Instructions
Page 8
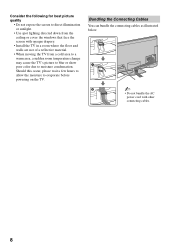
.... ~ • Do not bundle the AC power cord with opaque drapery. • Install the TV in a room where the floor and walls are not of a reflective material. • When moving the TV from the ceiling or cover the windows that face the screen with other connecting cables. 8 Should this... occur, please wait a few hours to allow the moisture to evaporate before powering on the TV. Consider the following for best picture quality • Do not expose the screen to direct illumination or sunlight. • Use spot lighting directed ...
.... ~ • Do not bundle the AC power cord with opaque drapery. • Install the TV in a room where the floor and walls are not of a reflective material. • When moving the TV from the ceiling or cover the windows that face the screen with other connecting cables. 8 Should this... occur, please wait a few hours to allow the moisture to evaporate before powering on the TV. Consider the following for best picture quality • Do not expose the screen to direct illumination or sunlight. • Use spot lighting directed ...
Operating Instructions
Page 9
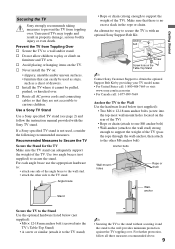
... through the wall-anchor, then attach to the other side to the TV stand. s Never install the TV on the rear of the TV) • Rope or chain (attach to one side of drawers. Use a Sony TV Stand Use a Sony specified TV stand (see page 2) and follow all AC power cords and connecting... securing it cannot be used , consider the following recommended measures. For further protection, follow the instruction manual provided with an optional Sony Support Belt Kit. If a Sony specified TV stand is not used as steps, such as a chest of the angle brace to the wall stud. • attach the...
... through the wall-anchor, then attach to the other side to the TV stand. s Never install the TV on the rear of the TV) • Rope or chain (attach to one side of drawers. Use a Sony TV Stand Use a Sony specified TV stand (see page 2) and follow all AC power cords and connecting... securing it cannot be used , consider the following recommended measures. For further protection, follow the instruction manual provided with an optional Sony Support Belt Kit. If a Sony specified TV stand is not used as steps, such as a chest of the angle brace to the wall stud. • attach the...
Operating Instructions
Page 10
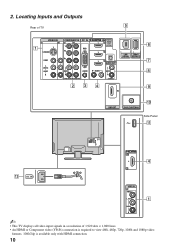
Locating Inputs and Outputs 5 Rear of TV VIDEO IN 1 3 1 S VIDEO COMPONENT IN 1 2 Y PB PC IN RGB IN DIGITAL 1 AUDIO OUT (OPTICAL) 3 VIDEO L (MONO) AUDIO R PR L AUDIO R AUDIO (1080p/1080i/720p/480p/480i ) 4 ... R (VAR/FIX) 234 LAN DMe x / (10/100) SERVICE 6 7 8 9 DMPORT CABLE/ANTENNA 0 Side Panel qa qs AC IN IN 4 2 VIDEO IN 2 VIDEO L (MONO) 1 AUDIO R ~ • This TV displays all video input signals in a resolution of 1,920 dots × 1,080 lines. • An HDMI or Component video (YPBPR) connection is required to view...
Locating Inputs and Outputs 5 Rear of TV VIDEO IN 1 3 1 S VIDEO COMPONENT IN 1 2 Y PB PC IN RGB IN DIGITAL 1 AUDIO OUT (OPTICAL) 3 VIDEO L (MONO) AUDIO R PR L AUDIO R AUDIO (1080p/1080i/720p/480p/480i ) 4 ... R (VAR/FIX) 234 LAN DMe x / (10/100) SERVICE 6 7 8 9 DMPORT CABLE/ANTENNA 0 Side Panel qa qs AC IN IN 4 2 VIDEO IN 2 VIDEO L (MONO) 1 AUDIO R ~ • This TV displays all video input signals in a resolution of 1,920 dots × 1,080 lines. • An HDMI or Component video (YPBPR) connection is required to view...
Operating Instructions
Page 11
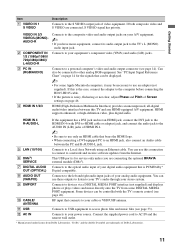
... DMPORT Connects to devices via a DIGITAL MEDIA PORT interface (not supplied) and displays photos or plays videos and music directly onto the TV from some Apple Macintosh computers, it may be connected to other analog RGB equipment. Can also be necessary to use only an HDMI cable...Started Item 1 VIDEO IN 1 S VIDEO Description Connects to the S VIDEO output jack of Screen settings on page 46. Some devices can use these outputs to listen to your TV's audio through your analog audio equipment. HDMI supports enhanced, or high-definition video, plus digital audio. Connect the ...
... DMPORT Connects to devices via a DIGITAL MEDIA PORT interface (not supplied) and displays photos or plays videos and music directly onto the TV from some Apple Macintosh computers, it may be connected to other analog RGB equipment. Can also be necessary to use only an HDMI cable...Started Item 1 VIDEO IN 1 S VIDEO Description Connects to the S VIDEO output jack of Screen settings on page 46. Some devices can use these outputs to listen to your TV's audio through your analog audio equipment. HDMI supports enhanced, or high-definition video, plus digital audio. Connect the ...
Operating Instructions
Page 12
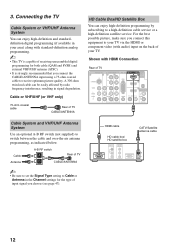
... cable HD cable box/ HD satellite box CATV/Satellite antenna cable 12 Cable or VHF/UHF (or VHF only) 75-ohm coaxial cable Rear of TV VIDEO IN 1 3 S VIDEO COMPONENT IN 1 2 Y PB PC IN RGB IN DIGITAL 1 AUDIO OUT (OPTICAL) 3 VIDEO L (MONO) AUDIO R PR L AUDIO R AUDIO (... Shown with audio) input on the back of your area) along with standard-definition analog programming. ~ • This TV is capable of receiving unscrambled digital programming for the type of TV B CABLE/ANTENNA ~ • Be sure to set the Signal Type setting to a high-definition cable service or a...
... cable HD cable box/ HD satellite box CATV/Satellite antenna cable 12 Cable or VHF/UHF (or VHF only) 75-ohm coaxial cable Rear of TV VIDEO IN 1 3 S VIDEO COMPONENT IN 1 2 Y PB PC IN RGB IN DIGITAL 1 AUDIO OUT (OPTICAL) 3 VIDEO L (MONO) AUDIO R PR L AUDIO R AUDIO (... Shown with audio) input on the back of your area) along with standard-definition analog programming. ~ • This TV is capable of receiving unscrambled digital programming for the type of TV B CABLE/ANTENNA ~ • Be sure to set the Signal Type setting to a high-definition cable service or a...
Operating Instructions
Page 13
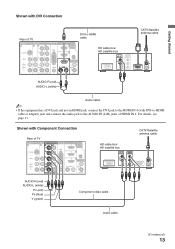
Getting Started Shown with DVI Connection Rear of TV VIDEO IN 1 3 S VIDEO COMPONENT IN 1 2 Y PB PC IN RGB IN DIGITAL 1 AUDIO OUT (OPTICAL) 3 DVI-to-HDMI cable HD cable box/ HD satellite box VIDEO L (... cable Audio cable ~ • If the equipment has a DVI jack and not an HDMI jack, connect the DVI jack to the AUDIO IN (L/R) jacks of TV VIDEO IN 1 3 S VIDEO COMPONENT IN 1 2 Y PB PC IN RGB IN DIGITAL 1 AUDIO OUT (OPTICAL) 3 VIDEO L (MONO) AUDIO R PR L AUDIO R AUDIO (1080p/1080i/720p/480p/480i...
Getting Started Shown with DVI Connection Rear of TV VIDEO IN 1 3 S VIDEO COMPONENT IN 1 2 Y PB PC IN RGB IN DIGITAL 1 AUDIO OUT (OPTICAL) 3 DVI-to-HDMI cable HD cable box/ HD satellite box VIDEO L (... cable Audio cable ~ • If the equipment has a DVI jack and not an HDMI jack, connect the DVI jack to the AUDIO IN (L/R) jacks of TV VIDEO IN 1 3 S VIDEO COMPONENT IN 1 2 Y PB PC IN RGB IN DIGITAL 1 AUDIO OUT (OPTICAL) 3 VIDEO L (MONO) AUDIO R PR L AUDIO R AUDIO (1080p/1080i/720p/480p/480i...
Operating Instructions
Page 14
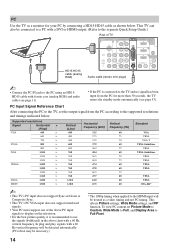
...with a 60 Hz vertical frequency. This affects Picture settings, Wide Mode settings, and PIP function. This TV can also be treated as shown below . Supported resolutions Signal VGA Horizontal × (Pixel) 640 ×... 768 768 768 768 768 768 1,024 1,080 Horizontal frequency (kHz) 31.5 37.5 31.5 37.9 46.9 48.4 56.5 60.0 47.4 47.8 60.3 47.7 64.0 67.5 Vertical frequency (Hz) 60 75... PC using an HD15HD15 cable with a DVI or HDMI output. (Refer to the separate Quick Setup Guide.) Rear of TV VIDEO IN 1 3 S VIDEO COMPONENT IN 1 2 Y PB PC IN RGB IN DIGITAL 1 AUDIO OUT (OPTICAL)...
...with a 60 Hz vertical frequency. This affects Picture settings, Wide Mode settings, and PIP function. This TV can also be treated as shown below . Supported resolutions Signal VGA Horizontal × (Pixel) 640 ×... 768 768 768 768 768 768 1,024 1,080 Horizontal frequency (kHz) 31.5 37.5 31.5 37.9 46.9 48.4 56.5 60.0 47.4 47.8 60.3 47.7 64.0 67.5 Vertical frequency (Hz) 60 75... PC using an HD15HD15 cable with a DVI or HDMI output. (Refer to the separate Quick Setup Guide.) Rear of TV VIDEO IN 1 3 S VIDEO COMPONENT IN 1 2 Y PB PC IN RGB IN DIGITAL 1 AUDIO OUT (OPTICAL)...
Operating Instructions
Page 15
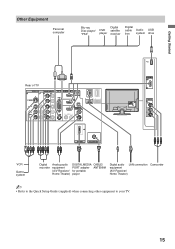
Getting Started Other Equipment Personal computer Blu-ray Disc player/ "PS3" DVD player Digital satellite receiver Digital cable Audio USB box system drive Rear of TV VIDEO IN 1 3 S VIDEO COMPONENT IN 1 2 Y PB PC IN RGB IN DIGITAL 1 AUDIO OUT (OPTICAL) 3 VIDEO L (MONO) AUDIO R PR L AUDIO R AUDIO (1080p/1080i/720p/480p/480i) 4 ... portable player Digital audio LAN connection equipment (A/V Receiver/ Home Theater) Camcorder ~ • Refer to the Quick Setup Guide (supplied) when connecting other equipment to your TV. 15
Getting Started Other Equipment Personal computer Blu-ray Disc player/ "PS3" DVD player Digital satellite receiver Digital cable Audio USB box system drive Rear of TV VIDEO IN 1 3 S VIDEO COMPONENT IN 1 2 Y PB PC IN RGB IN DIGITAL 1 AUDIO OUT (OPTICAL) 3 VIDEO L (MONO) AUDIO R PR L AUDIO R AUDIO (1080p/1080i/720p/480p/480i) 4 ... portable player Digital audio LAN connection equipment (A/V Receiver/ Home Theater) Camcorder ~ • Refer to the Quick Setup Guide (supplied) when connecting other equipment to your TV. 15
Operating Instructions
Page 16
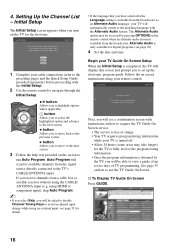
...Initial Setup. 2 Use the remote control to navigate through the Initial Setup: CEC CC FREEZE V/v button: Allows you turn on the TV for the TV to use the TV Guide On Screen. The Alternate Audio option may take longer) for the first time. Initial Setup Step 6 of 6 Please select a...English Español Français 1 Complete your remote control. see page 45). 4 Set the date and time. Select to continue. This TV features an electronic program guide. Initial Setup The Initial Setup screen appears when you to the next screen. 4. using HDMI or component input), skip...
...Initial Setup. 2 Use the remote control to navigate through the Initial Setup: CEC CC FREEZE V/v button: Allows you turn on the TV for the TV to use the TV Guide On Screen. The Alternate Audio option may take longer) for the first time. Initial Setup Step 6 of 6 Please select a...English Español Français 1 Complete your remote control. see page 45). 4 Set the date and time. Select to continue. This TV features an electronic program guide. Initial Setup The Initial Setup screen appears when you to the next screen. 4. using HDMI or component input), skip...
Operating Instructions
Page 17
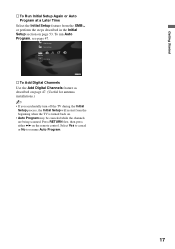
.... Getting Started s To Run Initial Setup Again or Auto Program at a Later Time Select the Initial Setup feature from the beginning when the TV is turned back on. • Auto Program may be canceled while the channels are being scanned. HDMI Settings General Setup Settings Initial Setup...Digital Channels Use the Add Digital Channels feature as described on page 47. (Useful for antenna installations.) ~ • If you accidentally turn off the TV during the Initial Setup process, the Initial Setup will restart from the XMB™ or perform the steps described in the Initial Setup section on...
.... Getting Started s To Run Initial Setup Again or Auto Program at a Later Time Select the Initial Setup feature from the beginning when the TV is turned back on. • Auto Program may be canceled while the channels are being scanned. HDMI Settings General Setup Settings Initial Setup...Digital Channels Use the Add Digital Channels feature as described on page 47. (Useful for antenna installations.) ~ • If you accidentally turn off the TV during the Initial Setup process, the Initial Setup will restart from the XMB™ or perform the steps described in the Initial Setup section on...
Operating Instructions
Page 19
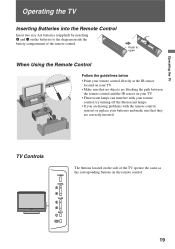
...same as the corresponding buttons on the remote control. 19 try turning off the fluorescent lamps. • If you are correctly inserted. Operating the TV Operating the TV Inserting Batteries into the Remote Control Insert two size AA batteries (supplied) by matching e and E on the batteries to open When Using the Remote... Control Follow the guidelines below • Point your remote control directly at the IR sensor located on your TV. • Make sure that no objects are blocking the path between the remote control and the IR sensor on your...
...same as the corresponding buttons on the remote control. 19 try turning off the fluorescent lamps. • If you are correctly inserted. Operating the TV Operating the TV Inserting Batteries into the Remote Control Insert two size AA batteries (supplied) by matching e and E on the batteries to open When Using the Remote... Control Follow the guidelines below • Point your remote control directly at the IR sensor located on your TV. • Make sure that no objects are blocking the path between the remote control and the IR sensor on your...
Operating Instructions
Page 20
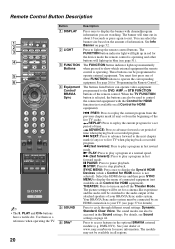
... settings will be set period of information. For details, see page 37 for "Programming the Remote Control". See your dealer or www.sony.com/bravia for a set for a cinema-like experience and the audio will light up momentarily when pressed to show which external equipment ... Press to cycle through different sound settings: Dynamic, Standard, Clear Voice. Remote Control Button Description 1 2 3 4 DISPLAY LIGHT POWER TV POWER DVD AMP STB TV FUNCTION PREV REPLAY ADVANCE NEXT PLAY SYNC MENU PAUSE STOP 5 6 THEATER SOUND PICTURE WIDE CC FREEZE VOL MUTING CH JUMP REC RECPAUSE ...
... settings will be set period of information. For details, see page 37 for "Programming the Remote Control". See your dealer or www.sony.com/bravia for a set for a cinema-like experience and the audio will light up momentarily when pressed to show which external equipment ... Press to cycle through different sound settings: Dynamic, Standard, Clear Voice. Remote Control Button Description 1 2 3 4 DISPLAY LIGHT POWER TV POWER DVD AMP STB TV FUNCTION PREV REPLAY ADVANCE NEXT PLAY SYNC MENU PAUSE STOP 5 6 THEATER SOUND PICTURE WIDE CC FREEZE VOL MUTING CH JUMP REC RECPAUSE ...
Operating Instructions
Page 21
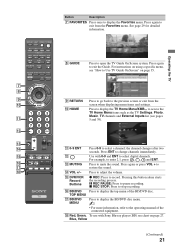
..., , 1 and ENT. qk Red, Green, To use with 0-9 and ENT to select a channel; Press 0-9 to select digital channels. Use with Sony Blu-ray player (BD) see "How to Use TV Guide On Screen" on page 27. Press to stop recording. x REC STOP: Press to mute the sound. qh BD/DVD Press...adjust the volume. See page 29 for detailed information. 8 GUIDE Press to record. qg DVR/VCR Record Buttons z REC: Press to open the TV Guide On Screen system. Blue, Yellow (Continued) 21 Press again to the previous screen or exit from the Favorites menu. Product Support Clock/Timers...
..., , 1 and ENT. qk Red, Green, To use with 0-9 and ENT to select a channel; Press 0-9 to select digital channels. Use with Sony Blu-ray player (BD) see "How to Use TV Guide On Screen" on page 27. Press to stop recording. x REC STOP: Press to mute the sound. qh BD/DVD Press...adjust the volume. See page 29 for detailed information. 8 GUIDE Press to record. qg DVR/VCR Record Buttons z REC: Press to open the TV Guide On Screen system. Blue, Yellow (Continued) 21 Press again to the previous screen or exit from the Favorites menu. Product Support Clock/Timers...
