Operating Instructions
Page 2
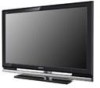
... upon your area. Adobe is a trademark of Dolby Laboratories. KDL-32XBR6 KDL-37XBR6 KDL-40V4150 KDL-40V4100 KDL-40W4100 KDL-42V4100 KDL-46V4100 KDL-46W4100 KDL-46W4150 KDL-52V4100 KDL-52W4100 Sony Wall-Mount Bracket Model No. Use with the accuracy or availability of Sony Corporation. To Customers Sufficient expertise is manufactured under license from Gemstar-TV Guide International, Inc. Address: 16530 Via Esprillo, San Diego...
... upon your area. Adobe is a trademark of Dolby Laboratories. KDL-32XBR6 KDL-37XBR6 KDL-40V4150 KDL-40V4100 KDL-40W4100 KDL-42V4100 KDL-46V4100 KDL-46W4100 KDL-46W4150 KDL-52V4100 KDL-52W4100 Sony Wall-Mount Bracket Model No. Use with the accuracy or availability of Sony Corporation. To Customers Sufficient expertise is manufactured under license from Gemstar-TV Guide International, Inc. Address: 16530 Via Esprillo, San Diego...
Operating Instructions
Page 3
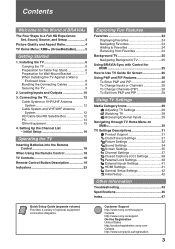
...from P&P and PIP 28 Using TV Settings Media Category Icons 29 Adjusting TV Settings 29 Watching TV 29 Accessing External Inputs 29 Navigating through TV Home Menu on XMB 30 TV Settings Descriptions 31 Product Support ...Settings 41 General Setup Settings 42 Initial Setup 42 Other Information Troubleshooting 43 Specifications 46 Index 47 Quick Setup Guide (separate volume) Provides a variety of BRAVIA® The Four ... diagrams. Customer Support http://www.sony.com/tvsupport Canada http://www.sony.ca/support On-line Registration United States http://productregistration...
...from P&P and PIP 28 Using TV Settings Media Category Icons 29 Adjusting TV Settings 29 Watching TV 29 Accessing External Inputs 29 Navigating through TV Home Menu on XMB 30 TV Settings Descriptions 31 Product Support ...Settings 41 General Setup Settings 42 Initial Setup 42 Other Information Troubleshooting 43 Specifications 46 Index 47 Quick Setup Guide (separate volume) Provides a variety of BRAVIA® The Four ... diagrams. Customer Support http://www.sony.com/tvsupport Canada http://www.sony.ca/support On-line Registration United States http://productregistration...

Operating Instructions
Page 4
...illustrates how to HD programming. Welcome to the World of BRAVIA® Thank you for information on upgrading to HD programming. http://www.sony.com/HDTV Canada http://www.sonystyle.ca/hd The Four Steps to a Full HD Experience: Set, Sound, Source, and Setup Along ...cable subscription • HD satellite subscription • Blu-ray Disc™ player or other optional equipment. HDTV uses a wider screen than conventional standarddefinition TV. 16:9 (high-definition) source Most HDTV signals use a boxy 4:3 aspect ratio. The picture quality may not be as sharp as the quality of 16:9.
...illustrates how to HD programming. Welcome to the World of BRAVIA® Thank you for information on upgrading to HD programming. http://www.sony.com/HDTV Canada http://www.sonystyle.ca/hd The Four Steps to a Full HD Experience: Set, Sound, Source, and Setup Along ...cable subscription • HD satellite subscription • Blu-ray Disc™ player or other optional equipment. HDTV uses a wider screen than conventional standarddefinition TV. 16:9 (high-definition) source Most HDTV signals use a boxy 4:3 aspect ratio. The picture quality may not be as sharp as the quality of 16:9.
Operating Instructions
Page 6
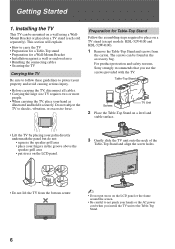
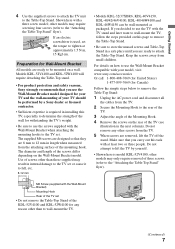
... force. Installing the TV This TV can be mounted on a wall using a WallMount Bracket or placed on a TV stand (each sold separately). The screws can be found in the groove above the speaker grill area • put stress on the LCD panel. 3 Gently slide the TV unit onto the neck... Do not lift the TV from the bottom center. ~ • Do not put stress on a TV stand (except models: KDL-52V4100 and KDL-52W4100). 1 Remove the Table-Top Stand and screws from the carton. For product protection and safety reasons, Sony strongly recommends that you install the TV unit to the Table-Top...
... force. Installing the TV This TV can be mounted on a wall using a WallMount Bracket or placed on a TV stand (each sold separately). The screws can be found in the groove above the speaker grill area • put stress on the LCD panel. 3 Gently slide the TV unit onto the neck... Do not lift the TV from the bottom center. ~ • Do not put stress on a TV stand (except models: KDL-52V4100 and KDL-52W4100). 1 Remove the Table-Top Stand and screws from the carton. For product protection and safety reasons, Sony strongly recommends that you install the TV unit to the Table-Top...
Operating Instructions
Page 7
...TV should be performed by yourself. • Shown here is model KDL-52V4100; other models may only require removal of the KDL-52V4100 and KDL-52W4100 for any other than those supplied may require screwing four screws (refer to fall, etc. 8-12 mm • Models KDL-32/37XBR6, KDL-40V4150, KDL-40/42/46V4100, KDL-40/46W4100 and KDL...All models are removed, lift the TV off the stand. Models KDL-52V4100 and KDL-52W4100 will require detaching the Table-Top stand. • For product protection and safety reasons, Sony strongly recommends that you use the screws supplied with the Wall-...
...TV should be performed by yourself. • Shown here is model KDL-52V4100; other models may only require removal of the KDL-52V4100 and KDL-52W4100 for any other than those supplied may require screwing four screws (refer to fall, etc. 8-12 mm • Models KDL-32/37XBR6, KDL-40V4150, KDL-40/42/46V4100, KDL-40/46W4100 and KDL...All models are removed, lift the TV off the stand. Models KDL-52V4100 and KDL-52W4100 will require detaching the Table-Top stand. • For product protection and safety reasons, Sony strongly recommends that you use the screws supplied with the Wall-...
Operating Instructions
Page 8
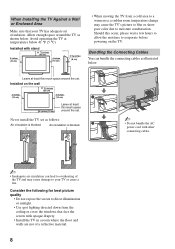
...10 cm) 2 3/8 inches (6 cm) • When moving the TV from a cold area to a warm area, a sudden room temperature change may cause the TV's picture to blur or show poor color due to direct illumination or sunlight. • Use spot lighting directed down from the ceiling or cover the windows that... your TV or cause a fire. Consider the following for best picture quality...
...10 cm) 2 3/8 inches (6 cm) • When moving the TV from a cold area to a warm area, a sudden room temperature change may cause the TV's picture to blur or show poor color due to direct illumination or sunlight. • Use spot lighting directed down from the ceiling or cover the windows that... your TV or cause a fire. Consider the following for best picture quality...
Operating Instructions
Page 9
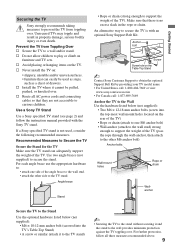
...property damage, serious bodily injury or even death. Prevent the TV from toppling over . For further protection, follow the instruction manual provided with an optional Sony Support Belt Kit. Use a Sony TV Stand Use a Sony specified TV stand (see page 2) and follow all AC power cords... and connecting cables so that can adequately support the weight of the TV). Angle brace Stand • Rope or...
...property damage, serious bodily injury or even death. Prevent the TV from toppling over . For further protection, follow the instruction manual provided with an optional Sony Support Belt Kit. Use a Sony TV Stand Use a Sony specified TV stand (see page 2) and follow all AC power cords... and connecting cables so that can adequately support the weight of the TV). Angle brace Stand • Rope or...
Operating Instructions
Page 11
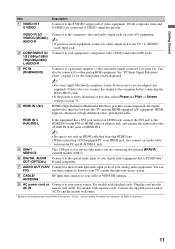
...cords: Plug the cord into the AC IN nearest wall outlet. For models with separate cords: Connect the supplied power cord to use these outputs to listen to your TV's audio through your A/V equipment. ~ • If you are connected, S VIDEO signal has priority. "Dolby" and the double... BRAVIA external module (DMex). 6 DIGITAL AUDIO Connects to the optical audio input of your digital audio equipment that is for the signals that can FIX) use an adapter (not supplied). VIDEO IN 2/3 VIDEO/L(MONO)AUDIO-R 2 COMPONENT IN 1/2 (1080p/1080i/ 720p/480p/480i)/ L-AUDIO-R 3 PC IN (RGB/AUDIO...
...cords: Plug the cord into the AC IN nearest wall outlet. For models with separate cords: Connect the supplied power cord to use these outputs to listen to your TV's audio through your A/V equipment. ~ • If you are connected, S VIDEO signal has priority. "Dolby" and the double... BRAVIA external module (DMex). 6 DIGITAL AUDIO Connects to the optical audio input of your digital audio equipment that is for the signals that can FIX) use an adapter (not supplied). VIDEO IN 2/3 VIDEO/L(MONO)AUDIO-R 2 COMPONENT IN 1/2 (1080p/1080i/ 720p/480p/480i)/ L-AUDIO-R 3 PC IN (RGB/AUDIO...
Operating Instructions
Page 12
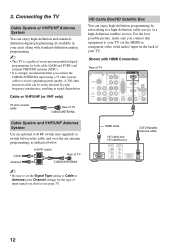
...enjoy high-definition and standarddefinition digital programming (if available in your TV. Cable Antenna A-B RF switch A Rear of input signal you choose (see page 37). For the best possible picture, make sure you connect the CABLE/ANTENNA input using a 75-ohm coaxial cable to Cable or Antenna in signal ...degradation. Cable or VHF/UHF (or VHF only) 75-ohm coaxial cable Rear of TV CABLE/ANTENNA HD Cable Box/HD Satellite Box You can be easily...
...enjoy high-definition and standarddefinition digital programming (if available in your TV. Cable Antenna A-B RF switch A Rear of input signal you choose (see page 37). For the best possible picture, make sure you connect the CABLE/ANTENNA input using a 75-ohm coaxial cable to Cable or Antenna in signal ...degradation. Cable or VHF/UHF (or VHF only) 75-ohm coaxial cable Rear of TV CABLE/ANTENNA HD Cable Box/HD Satellite Box You can be easily...
Operating Instructions
Page 14
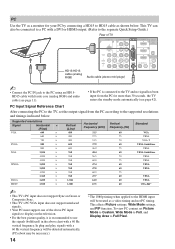
... PC for your PC by connecting a HD15 to the supported resolutions and timings indicated below . This TV can also be treated as shown below . This affects Picture settings, Wide Mode settings, and PIP ...600 600 768 768 768 768 768 768 768 1,024 1,080 Horizontal frequency (kHz) 31.5 37.5 31.5 37.9 46.9 48.4 56.5 60.0 47.4 47.8 60.3 47.7 64.0 67.5 Vertical frequency (Hz) 60 75 70 60...VESA VESA CEA-861* ~ • This TV's PC input does not support Sync on the television. • For the best picture quality, it is connected to use the signals (boldfaced) in the above chart with...
... PC for your PC by connecting a HD15 to the supported resolutions and timings indicated below . This TV can also be treated as shown below . This affects Picture settings, Wide Mode settings, and PIP ...600 600 768 768 768 768 768 768 768 1,024 1,080 Horizontal frequency (kHz) 31.5 37.5 31.5 37.9 46.9 48.4 56.5 60.0 47.4 47.8 60.3 47.7 64.0 67.5 Vertical frequency (Hz) 60 75 70 60...VESA VESA CEA-861* ~ • This TV's PC input does not support Sync on the television. • For the best picture quality, it is connected to use the signals (boldfaced) in the above chart with...
Operating Instructions
Page 16
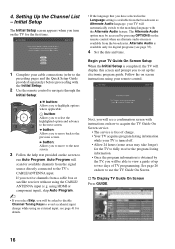
... able to view a guide of up the electronic program guide. B button: Allows you to the TV's CABLE/ANTENNA input. Begin your remote control. Follow the on screen instructions using your TV Guide On Screen Setup When the Initial Setup is available from a cable box or satellite receiver without...Allows you to move to the next screen. 3 Follow the help text provided on the screen to use the TV Guide On Screen. English Español Français 1 Complete your TV is available from the signal source directly connected to highlight options where applicable. b button: Allows you ...
... able to view a guide of up the electronic program guide. B button: Allows you to the TV's CABLE/ANTENNA input. Begin your remote control. Follow the on screen instructions using your TV Guide On Screen Setup When the Initial Setup is available from a cable box or satellite receiver without...Allows you to move to the next screen. 3 Follow the help text provided on the screen to use the TV Guide On Screen. English Español Français 1 Complete your TV is available from the signal source directly connected to highlight options where applicable. b button: Allows you ...
Operating Instructions
Page 17
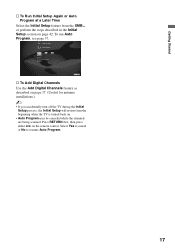
... run Auto Program, see page 37. HDMI Settings General Setup Settings Initial Setup TV s To Add Digital Channels Use the Add Digital Channels feature as described on page 37. (Useful for antenna installations.) ~ • If you accidentally turn off the TV during the Initial Setup process, the Initial Setup will restart from the XMB... page 42. Getting Started s To Run Initial Setup Again or Auto Program at a Later Time Select the Initial Setup feature from the beginning when the TV is turned back on. • Auto Program may be canceled while the channels are being scanned.
... run Auto Program, see page 37. HDMI Settings General Setup Settings Initial Setup TV s To Add Digital Channels Use the Add Digital Channels feature as described on page 37. (Useful for antenna installations.) ~ • If you accidentally turn off the TV during the Initial Setup process, the Initial Setup will restart from the XMB... page 42. Getting Started s To Run Initial Setup Again or Auto Program at a Later Time Select the Initial Setup feature from the beginning when the TV is turned back on. • Auto Program may be canceled while the channels are being scanned.

Operating Instructions
Page 18
... Push to the diagram inside the battery compartment of the remote control. TV Controls The buttons located on the top of the TV operate the same as the corresponding buttons on the batteries to open When Using the Remote Control Follow the guidelines below • Point your remote control... directly at the IR sensor located on your batteries and make sure that no objects are correctly inserted. Operating the TV Inserting Batteries into the Remote Control ...
... Push to the diagram inside the battery compartment of the remote control. TV Controls The buttons located on the top of the TV operate the same as the corresponding buttons on the batteries to open When Using the Remote Control Follow the guidelines below • Point your remote control... directly at the IR sensor located on your batteries and make sure that no objects are correctly inserted. Operating the TV Inserting Batteries into the Remote Control ...
Operating Instructions
Page 19
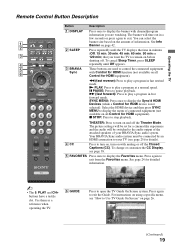
..., 30 min, 45 min, 60 min, 90 min or 3 120 min) that you are used to play a program at a normal speed. Press again to display the Favorites menu. Use them as a reference when operating the TV. 6 GUIDE Press to stop playback. See Info Banner on page 42. 2 2 SLEEP Press ... buttons are watching. See page 24 for details). 4 CC Press to the audio output of the attached speakers of your TV (see "How to your BRAVIA Sync audio system. For instructions on using a specific menu, see page 25 for detailed information. ~ • The 5, PLAY and CH+ buttons have a tactile...
..., 30 min, 45 min, 60 min, 90 min or 3 120 min) that you are used to play a program at a normal speed. Press again to display the Favorites menu. Use them as a reference when operating the TV. 6 GUIDE Press to stop playback. See Info Banner on page 42. 2 2 SLEEP Press ... buttons are watching. See page 24 for details). 4 CC Press to the audio output of the attached speakers of your TV (see "How to your BRAVIA Sync audio system. For instructions on using a specific menu, see page 25 for detailed information. ~ • The 5, PLAY and CH+ buttons have a tactile...

Operating Instructions
Page 20
... While the Freeze feature is active, pressing HOME will deactivate Freeze and display the XMB™. See your dealer or www.sony.com/bravia for more information. qg FREEZE Press once to access features in all regions. Product Support Clock/Timers Settings Sound Screen qg... Press to select/ confirm an item. 20 qd MUTING Press to display the list of External Inputs and TV mode. Press to mute the sound. Press ENT to change channels immediately. 8 qa Use with 0-9 and ENT to a different location on setting up the External Inputs labels. qj V/v/B/b Press ...
... While the Freeze feature is active, pressing HOME will deactivate Freeze and display the XMB™. See your dealer or www.sony.com/bravia for more information. qg FREEZE Press once to access features in all regions. Product Support Clock/Timers Settings Sound Screen qg... Press to select/ confirm an item. 20 qd MUTING Press to display the list of External Inputs and TV mode. Press to mute the sound. Press ENT to change channels immediately. 8 qa Use with 0-9 and ENT to a different location on setting up the External Inputs labels. qj V/v/B/b Press ...
Operating Instructions
Page 25
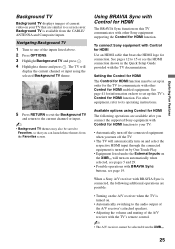
... a theme and press . Available options using the selected Background TV theme. 5 Press RETURN to exit the Background TV and return to Favorites, so that you can launch these themes from the Favorites screen. To connect Sony equipment with Control for HDMI Use an HDMI cable that are possible: &#...8226; Turning on the A/V receiver when the TV is connected, the following operations are available after you connect the supported Sony equipment with Control for HDMI function ...
... a theme and press . Available options using the selected Background TV theme. 5 Press RETURN to exit the Background TV and return to Favorites, so that you can launch these themes from the Favorites screen. To connect Sony equipment with Control for HDMI Use an HDMI cable that are possible: &#...8226; Turning on the A/V receiver when the TV is connected, the following operations are available after you connect the supported Sony equipment with Control for HDMI function ...
Operating Instructions
Page 26
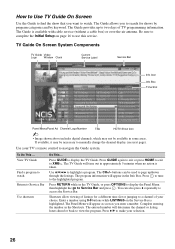
...(see next page). Complete entering the number in some areas. Use V/v/B/b to view the program. buttons can also press V repeatedly to access the Service Bar. The Guide provides up /down through the listings. How to Use TV Guide On Screen Use the Guide to find the show that you want to watch ...Return to Service Bar Use shortcuts Do This... Be sure to complete the Initial Setup on the Service Bar is highlighted...
...(see next page). Complete entering the number in some areas. Use V/v/B/b to view the program. buttons can also press V repeatedly to access the Service Bar. The Guide provides up /down through the listings. How to Use TV Guide On Screen Use the Guide to find the show that you want to watch ...Return to Service Bar Use shortcuts Do This... Be sure to complete the Initial Setup on the Service Bar is highlighted...
Operating Instructions
Page 27
... highlight KEYWORD. Press then press B/b to customize your search option. Keyword search Keyword search can search for programs using V/v and/or 0-9 buttons. Customizing the TV Guide On Screen system settings Highlight SETUP on the Service Bar then press v to display the Listings Options in ...options in the Panel Menu. Do This... Search program Press V/v/B/b to watch. You can be used to remain on Service Bar. Press V/v to have the Guide appear when the TV powers on to narrow your numerically sorting by pressing V/v/B/b. You can also be done by type...
... highlight KEYWORD. Press then press B/b to customize your search option. Keyword search Keyword search can search for programs using V/v and/or 0-9 buttons. Customizing the TV Guide On Screen system settings Highlight SETUP on the Service Bar then press v to display the Listings Options in ...options in the Panel Menu. Do This... Search program Press V/v/B/b to watch. You can be used to remain on Service Bar. Press V/v to have the Guide appear when the TV powers on to narrow your numerically sorting by pressing V/v/B/b. You can also be done by type...
Operating Instructions
Page 28
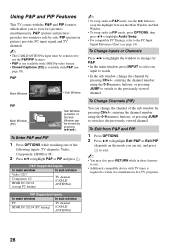
...1/2/3 Component 1/2 HDMI IN 1/2/3/4 (except PC timing) TV channel (CABLE/ ANTENNA) PIP Supported Inputs In main window In sub window PC HDMI IN 1/2/3/4 (PC timing) TV channel (CABLE/ ANTENNA) ~ • To swap audio in P&P mode, use the B/b button to swap the highlight between the Main...P&P or PIP and press . or pressing JUMP to switch to the previously viewed channel. Using P&P and PIP Features This TV comes with TV tuner is available with P&P (see page 14). entering the channel number using the 0-9 numeric buttons; PIP (picture in PIP mode, press OPTIONS, then press V/v ...
...1/2/3 Component 1/2 HDMI IN 1/2/3/4 (except PC timing) TV channel (CABLE/ ANTENNA) PIP Supported Inputs In main window In sub window PC HDMI IN 1/2/3/4 (PC timing) TV channel (CABLE/ ANTENNA) ~ • To swap audio in P&P mode, use the B/b button to swap the highlight between the Main...P&P or PIP and press . or pressing JUMP to switch to the previously viewed channel. Using P&P and PIP Features This TV comes with TV tuner is available with P&P (see page 14). entering the channel number using the 0-9 numeric buttons; PIP (picture in PIP mode, press OPTIONS, then press V/v ...
Operating Instructions
Page 29
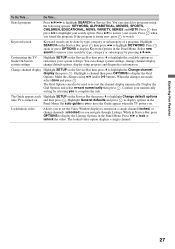
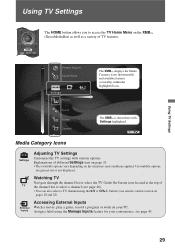
...for your PC. Accessing External Inputs External Watch a movie, play a game, record a program or work on pages 20 and 22). Using TV Settings Product Support Clock/Timers Settings The XMB™ displays the Media Category icons (horizontally) and available features (vertically) within the highlighted icon.... Unavailable options are grayed out or not displayed. Sound Screen Channel The XMB™ is shown here with various options. Using TV Settings The HOME button allows you to select a channel (see remote control section on your convenience, see page 41. 29 Inputs Assign...
...for your PC. Accessing External Inputs External Watch a movie, play a game, record a program or work on pages 20 and 22). Using TV Settings Product Support Clock/Timers Settings The XMB™ displays the Media Category icons (horizontally) and available features (vertically) within the highlighted icon.... Unavailable options are grayed out or not displayed. Sound Screen Channel The XMB™ is shown here with various options. Using TV Settings The HOME button allows you to select a channel (see remote control section on your convenience, see page 41. 29 Inputs Assign...


