
Operating Instructions
Page 3
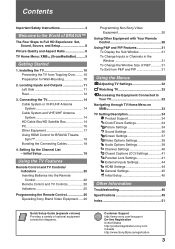
... Setup 19 Using the TV Features Remote Control and TV Controls/ Indicators 20 Inserting Batteries into the Remote Control 20 Remote Control and TV Controls 20 Indicators 25 Programming the Remote Control 26 Operating Sony Brand Video Equipment......26 Programming Non-Sony Video Equipment 26 Using... Settings 37 Video Options Settings 38 Audio Options Settings 39 Channel Settings 40 CC Closed Captions (CC) Settings 41 Parental Lock Settings 41 External Inputs Settings 44 HDMI Settings 44 General Settings 45 Initial Setup 45 Other Information Troubleshooting 46 Specifications ...
... Setup 19 Using the TV Features Remote Control and TV Controls/ Indicators 20 Inserting Batteries into the Remote Control 20 Remote Control and TV Controls 20 Indicators 25 Programming the Remote Control 26 Operating Sony Brand Video Equipment......26 Programming Non-Sony Video Equipment 26 Using... Settings 37 Video Options Settings 38 Audio Options Settings 39 Channel Settings 40 CC Closed Captions (CC) Settings 41 Parental Lock Settings 41 External Inputs Settings 44 HDMI Settings 44 General Settings 45 Initial Setup 45 Other Information Troubleshooting 46 Specifications ...

Operating Instructions
Page 8
... the signal it receives. The 1080 HD signals provide more about HDTV, visit: http://www.sony.com/HDTV The Four Steps to Full HD Experience: Set, Sound, Source, and Setup Along with your BRAVIA TV set, a complete HD system requires an HD sound system, a source of 16:9. Welcome... to the World of the standard TV signal. This manual explains basic setup connections (see pages 23, 37 and 38). 8 The quality of the TV to adjust the 4:3 image to connect other external equipment Contact your BRAVIA TV is displayed on an HDTV, you see black bars on...
... the signal it receives. The 1080 HD signals provide more about HDTV, visit: http://www.sony.com/HDTV The Four Steps to Full HD Experience: Set, Sound, Source, and Setup Along with your BRAVIA TV set, a complete HD system requires an HD sound system, a source of 16:9. Welcome... to the World of the standard TV signal. This manual explains basic setup connections (see pages 23, 37 and 38). 8 The quality of the TV to adjust the 4:3 image to connect other external equipment Contact your BRAVIA TV is displayed on an HDTV, you see black bars on...
Operating Instructions
Page 16
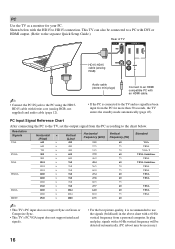
...400 600 600 768 768 768 768 768 768 768 1024 1024 1080 Horizontal frequency (kHz) 31.5 37.5 31.5 37.9 46.9 48.4 56.5 60.0 47.4 47.8 60.3 47.7 64.0 80.0 67.5 Vertical frequency (Hz...) 60 75 70 60 75 60 70 75 60 60 75 60 60 75 60 Standard VGA VESA VGA-T VESA Guidelines VESA VESA Guidelines VESA VESA VESA VESA VESA VESA VESA ~ • This TV... to a PC with DVI or HDMI output. (Refer to the separate Quick Setup Guide.) Rear of TV PC IN 1 IN 3 RGB AUDIO L HD15-HD15 AUDIO cable (analog R RGB) ~ •...
...400 600 600 768 768 768 768 768 768 768 1024 1024 1080 Horizontal frequency (kHz) 31.5 37.5 31.5 37.9 46.9 48.4 56.5 60.0 47.4 47.8 60.3 47.7 64.0 80.0 67.5 Vertical frequency (Hz...) 60 75 70 60 75 60 70 75 60 60 75 60 60 75 60 Standard VGA VESA VGA-T VESA Guidelines VESA VESA Guidelines VESA VESA VESA VESA VESA VESA VESA ~ • This TV... to a PC with DVI or HDMI output. (Refer to the separate Quick Setup Guide.) Rear of TV PC IN 1 IN 3 RGB AUDIO L HD15-HD15 AUDIO cable (analog R RGB) ~ •...
Operating Instructions
Page 19
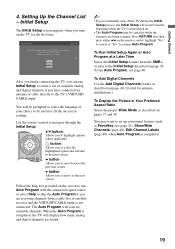
... select a language. Use the remote control to navigate through the Initial Setup: V/v button: Allows you are found. ~ • If you turn off the TV during the Initial Setup process, the Initial Setup will be canceled while the channels are being scanned. button: Allows you to select the highlighted option...is completed. 19 To run Initial Setup to create a list of available analog and digital channels if you to move back to on pages 37 and 38. You may be prompted to set up convenient features such as described on screen display as well as default audio for available ...
... select a language. Use the remote control to navigate through the Initial Setup: V/v button: Allows you are found. ~ • If you turn off the TV during the Initial Setup process, the Initial Setup will be canceled while the channels are being scanned. button: Allows you to select the highlighted option...is completed. 19 To run Initial Setup to create a list of available analog and digital channels if you to move back to on pages 37 and 38. You may be prompted to set up convenient features such as described on screen display as well as default audio for available ...
Operating Instructions
Page 23
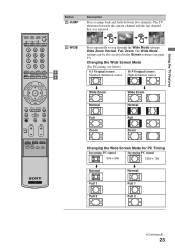
... JUMP wd WIDE ws wd Press repeatedly to jump back and forth between the current channel and the last channel that was selected. Using the TV Features Button ws JUMP Description Press to step through the Wide Mode settings: Wide Zoom, Normal, Full, Zoom. Changing the Wide Screen Mode (For PC...
... JUMP wd WIDE ws wd Press repeatedly to jump back and forth between the current channel and the last channel that was selected. Using the TV Features Button ws JUMP Description Press to step through the Wide Mode settings: Wide Zoom, Normal, Full, Zoom. Changing the Wide Screen Mode (For PC...
Operating Instructions
Page 24
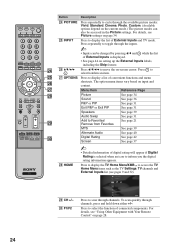
... the External Inputs labels, including the Skip feature. The option menu items vary based on page 34. F1/F2 Sound Screen Video Options TV Press to select/confirm an item. For details, see Picture settings on input and content. Press to scan through the inputs. ~ &#... while the list of convenient functions and menu wh shortcuts. Digital Rating See page 42 Screen See page 37 wk HOME ~ • Detailed information of External Inputs and TV mode. Button Description wf PICTURE Press repeatedly to select the function of connected components. wg INPUT Press to...
... the External Inputs labels, including the Skip feature. The option menu items vary based on page 34. F1/F2 Sound Screen Video Options TV Press to select/confirm an item. For details, see Picture settings on input and content. Press to scan through the inputs. ~ &#... while the list of convenient functions and menu wh shortcuts. Digital Rating See page 42 Screen See page 37 wk HOME ~ • Detailed information of External Inputs and TV mode. Button Description wf PICTURE Press repeatedly to select the function of connected components. wg INPUT Press to...
Operating Instructions
Page 33
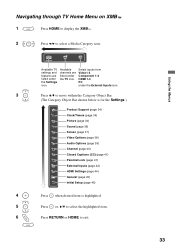
... Bar shown below is for the Settings.) Product Support (page 34) Clock/Timers (page 34) Picture (page 34) Sound (page 36) Screen (page 37) Video Options (page 38) Audio Options (page 39) Channel (page 40) CC Closed Captions (CC) (page 41) Parental Lock (page 41) External... V/v to select the highlighted item. 6 Press RETURN or HOME to select a Media Category icon. Settings Available TV settings and features are listed under the Settings icon. Using the Menus Navigating through TV Home Menu on XMB™ 1 Press HOME to display the XMB™. 2 Press B/b to exit. 33 ...
... Bar shown below is for the Settings.) Product Support (page 34) Clock/Timers (page 34) Picture (page 34) Sound (page 36) Screen (page 37) Video Options (page 38) Audio Options (page 39) Channel (page 40) CC Closed Captions (CC) (page 41) Parental Lock (page 41) External... V/v to select the highlighted item. 6 Press RETURN or HOME to select a Media Category icon. Settings Available TV settings and features are listed under the Settings icon. Using the Menus Navigating through TV Home Menu on XMB™ 1 Press HOME to display the XMB™. 2 Press B/b to exit. 33 ...
Operating Instructions
Page 37
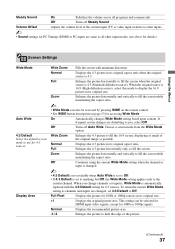
...Off. • If 4:3 Default is 4:3 (Standard-definition source). Full Enlarges the picture horizontally to hide the edge of the current input (TV or video input) relative to fill the screen while maintaining the aspect ratio. Zoom Enlarges the picture horizontally and vertically to other input modes ...inputs are disturbing to fill the screen. Off Turns off Auto Wide. Volume Offset Adjusts the volume level of the picture. (Continued) 37 Using the Menus Screen Settings Wide Mode Auto Wide 4:3 Default Select the default screen mode to Off. On Automatically changes Wide Mode ...
...Off. • If 4:3 Default is 4:3 (Standard-definition source). Full Enlarges the picture horizontally to hide the edge of the current input (TV or video input) relative to fill the screen while maintaining the aspect ratio. Zoom Enlarges the picture horizontally and vertically to other input modes ...inputs are disturbing to fill the screen. Off Turns off Auto Wide. Volume Offset Adjusts the volume level of the picture. (Continued) 37 Using the Menus Screen Settings Wide Mode Auto Wide 4:3 Default Select the default screen mode to Off. On Automatically changes Wide Mode ...

Operating Instructions
Page 46
...Cannot receive or select channels • Perform Auto Program to select the desired Picture Mode (see page 37). 46 No color/Dark picture/Color is too • Adjust the Picture Mode options in the TV's memory (see page 34). Select your desired input from some video sources • Check the connection... the black level (see page 24). • Press HOME on the power of the following numbers: http://www.sony.com/tvsupport 1-800-222-SONY(7669) for US Support 1-877-899-SONY(7669) for that are not present in the Channel settings is not as good as cars, motorcycles, or hair...
...Cannot receive or select channels • Perform Auto Program to select the desired Picture Mode (see page 37). 46 No color/Dark picture/Color is too • Adjust the Picture Mode options in the TV's memory (see page 34). Select your desired input from some video sources • Check the connection... the black level (see page 24). • Press HOME on the power of the following numbers: http://www.sony.com/tvsupport 1-800-222-SONY(7669) for US Support 1-877-899-SONY(7669) for that are not present in the Channel settings is not as good as cars, motorcycles, or hair...
Operating Instructions
Page 47
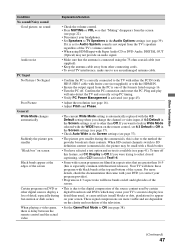
... control. • Press MUTING or VOL + so that "Muting" disappears from the screen (see page 22). • Disconnect your headphones. • Set Speakers to TV Speakers in 4:3 aspect ratio will have selected a text option and no text is delay between the remote control and the actual video • Set the...the TV with either the PC IN (with HD15-HD15 cable with ferrite core (not supplied)) or with Super Audio CD or DVD-Audio, DIGITAL OUT (Optical) may be small with black bands at the edges of the source content used by certain other than 16:9 (this is activated (see page 37...
... control. • Press MUTING or VOL + so that "Muting" disappears from the screen (see page 22). • Disconnect your headphones. • Set Speakers to TV Speakers in 4:3 aspect ratio will have selected a text option and no text is delay between the remote control and the actual video • Set the...the TV with either the PC IN (with HD15-HD15 cable with ferrite core (not supplied)) or with Super Audio CD or DVD-Audio, DIGITAL OUT (Optical) may be small with black bands at the edges of the source content used by certain other than 16:9 (this is activated (see page 37...
Operating Instructions
Page 51
...Channel Block 42 CineMotion 38 Color 35 Color Matrix 39 Color Temperature 35 COMPONENT IN jack (1080p/1080i/ 720p/480p/480i) 13 Connecting the TV 14 Contact Sony 34 Country 41 Current Time 34 D Device Auto Power Off 44 Device List 44 Digital CC 41 DIGITAL OUT (OPTICAL) jack 13 Digital Rating... 21 Sound Mode 36 Speaker 25 Speakers 39 STANDBY LED 25 Steady Sound 37 Surround 36 T THEATER button 22 Timer 34 Treble 36 Troubleshooting 46-48 TV Auto Power On 44 TV POWER button 22 TV Rating 43 U U.S.A. Index 0-9 buttons 20 4:3 Default 37 A AC IN 13 Add Digital Channels 40 Advanced Settings 36 Analog CC ...
...Channel Block 42 CineMotion 38 Color 35 Color Matrix 39 Color Temperature 35 COMPONENT IN jack (1080p/1080i/ 720p/480p/480i) 13 Connecting the TV 14 Contact Sony 34 Country 41 Current Time 34 D Device Auto Power Off 44 Device List 44 Digital CC 41 DIGITAL OUT (OPTICAL) jack 13 Digital Rating... 21 Sound Mode 36 Speaker 25 Speakers 39 STANDBY LED 25 Steady Sound 37 Surround 36 T THEATER button 22 Timer 34 Treble 36 Troubleshooting 46-48 TV Auto Power On 44 TV POWER button 22 TV Rating 43 U U.S.A. Index 0-9 buttons 20 4:3 Default 37 A AC IN 13 Add Digital Channels 40 Advanced Settings 36 Analog CC ...
