
Safety and Regulatory Booklet
Page 4
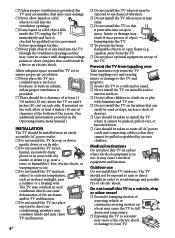
...pulled over and causing injury or damage to the TV and property. ☐ Secure the TV to a wall and/or stand. ☐ Never install the TV on unstable and/or uneven surfaces. ☐ Do not...accessible AC power outlet. ☐ Do not install the TV face up or down, upside down or on the wall, allow at least 4 inches (10 cm) of clearance at least 11 7/8 inches (30 cm) above the...oily smoke or steam (e.g., near a radiator or a heating vent. It may cause a medical equipment malfunction. If mounted on its side. ☐ Do not install the TV in hot, humid, excessively dusty places or in use...
...pulled over and causing injury or damage to the TV and property. ☐ Secure the TV to a wall and/or stand. ☐ Never install the TV on unstable and/or uneven surfaces. ☐ Do not...accessible AC power outlet. ☐ Do not install the TV face up or down, upside down or on the wall, allow at least 4 inches (10 cm) of clearance at least 11 7/8 inches (30 cm) above the...oily smoke or steam (e.g., near a radiator or a heating vent. It may cause a medical equipment malfunction. If mounted on its side. ☐ Do not install the TV in hot, humid, excessively dusty places or in use...
Safety and Regulatory Booklet
Page 5
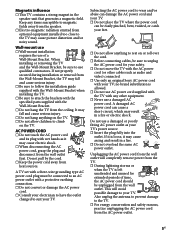
...as audio and video) connected. ☐ Use only an original Sony AC power cord with the Wall‑Mount Bracket. ☐ Do not hang the TV from the wall outlet. When installing or removing the TV and the Wall‑Mount Bracket, be connected to an AC power outlet with any items ...9744; Do not allow children to climb on or roll over the cord. ☐ Before connecting cables, be unplugged from the ceiling. Wall-mount use ☐ Wall‑mount installation requires the use a damaged or poorly fitting AC power outlet as it is allowed. ☐ Do not use AC power cord ...
...as audio and video) connected. ☐ Use only an original Sony AC power cord with the Wall‑Mount Bracket. ☐ Do not hang the TV from the wall outlet. When installing or removing the TV and the Wall‑Mount Bracket, be connected to an AC power outlet with any items ...9744; Do not allow children to climb on or roll over the cord. ☐ Before connecting cables, be unplugged from the ceiling. Wall-mount use ☐ Wall‑mount installation requires the use a damaged or poorly fitting AC power outlet as it is allowed. ☐ Do not use AC power cord ...

Child Safety: It Makes A Difference How and Where You Use Your Flat Panel Display
Page 1
...; The consumer electronics industry is appropriate. Follow the manufacturer's recommendations for installation. WALL MOUNTING: IF YOU DECIDE TO WALL MOUNT YOUR FLAT PANEL DISPLAY, ALWAYS: • Use a mount that has been recommended by the display manufacturer and/or listed by the display and wall mount manufacturers. • If you have any doubts about professional installation. • Make...
...; The consumer electronics industry is appropriate. Follow the manufacturer's recommendations for installation. WALL MOUNTING: IF YOU DECIDE TO WALL MOUNT YOUR FLAT PANEL DISPLAY, ALWAYS: • Use a mount that has been recommended by the display manufacturer and/or listed by the display and wall mount manufacturers. • If you have any doubts about professional installation. • Make...

Operating Instructions
Page 3
...30 Wide Mode 30 Wide Mode with PC 31 Inputs 32 Playing back Photo/Music/Video via USB. . . 32 Photo Frame (KDL-42EX440/32EX340 only 34 Using the Menus Navigating through TV Menus 36 Using the Picture Settings 38 Using the Sound Settings 40 Using the ... Reference Chart for PC and HDMI IN 54 Using a Wall-Mount Bracket 55 Installing the Wall-Mount Bracket 56 Troubleshooting 65 Important Notices 71 Specifications 72 Index 74 Customer Support United States http://www.sony.com/tvsupport Canada http://www.sony.ca/support On-line Registration United States http://productregistration...
...30 Wide Mode 30 Wide Mode with PC 31 Inputs 32 Playing back Photo/Music/Video via USB. . . 32 Photo Frame (KDL-42EX440/32EX340 only 34 Using the Menus Navigating through TV Menus 36 Using the Picture Settings 38 Using the Sound Settings 40 Using the ... Reference Chart for PC and HDMI IN 54 Using a Wall-Mount Bracket 55 Installing the Wall-Mount Bracket 56 Troubleshooting 65 Important Notices 71 Specifications 72 Index 74 Customer Support United States http://www.sony.com/tvsupport Canada http://www.sony.ca/support On-line Registration United States http://productregistration...

Operating Instructions
Page 7
... TVs require two or more people. • Correct hand placement while carrying the TV is very important for the attachment instructions provided with reflective wall and floor materials. • Avoid moving the TV from a cold area to direct illumination or sunlight. • Avoid installing the TV in... TV on. 7 This may cause moisture condensation. Getting Started Getting Started Setting Up Your TV Some TV models are not mounting the TV to a wall, you can mount your TV to a wall right away. You will need a Phillips screwdriver and the supplied screws to attach the Table-Top Stand.
... TVs require two or more people. • Correct hand placement while carrying the TV is very important for the attachment instructions provided with reflective wall and floor materials. • Avoid moving the TV from a cold area to direct illumination or sunlight. • Avoid installing the TV in... TV on. 7 This may cause moisture condensation. Getting Started Getting Started Setting Up Your TV Some TV models are not mounting the TV to a wall, you can mount your TV to a wall right away. You will need a Phillips screwdriver and the supplied screws to attach the Table-Top Stand.

Operating Instructions
Page 19
... there is with an optional Sony Support Belt Kit. Anchor the TV to obtain the optional Support Belt Kit by using bolts, wall anchor and chain (or rope). Anchor bolts (not supplied) Wall-mount holes Rope or chain (not supplied) Wall-anchor (not supplied) • Contact Sony Customer Support to the wall by providing your TV model...
... there is with an optional Sony Support Belt Kit. Anchor the TV to obtain the optional Support Belt Kit by using bolts, wall anchor and chain (or rope). Anchor bolts (not supplied) Wall-mount holes Rope or chain (not supplied) Wall-anchor (not supplied) • Contact Sony Customer Support to the wall by providing your TV model...

Operating Instructions
Page 55
.... 55 The diameter and length of the screws differ depending on a wall using a Wall-Mount Bracket (not supplied) out of the box as indicated by a Sony dealer or licensed contractor. • Follow the instruction guide provided with the Wall-Mount Bracket) 32EX340: M4 42EX440/EX441: M6 Mounting Hook Hook attachment on rear of screws other than those supplied...
.... 55 The diameter and length of the screws differ depending on a wall using a Wall-Mount Bracket (not supplied) out of the box as indicated by a Sony dealer or licensed contractor. • Follow the instruction guide provided with the Wall-Mount Bracket) 32EX340: M4 42EX440/EX441: M6 Mounting Hook Hook attachment on rear of screws other than those supplied...
Operating Instructions
Page 56
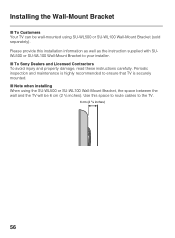
... separately). Use this installation information as well as the instruction supplied with SUWL500 or SU-WL100 Wall-Mount Bracket to the TV. 6 cm (2 3/8 inches) 56 Please provide this space to route cables to your installer. x To Sony Dealers and Licensed Contractors To avoid injury and property damage, read these instructions carefully. Periodic inspection...
... separately). Use this installation information as well as the instruction supplied with SUWL500 or SU-WL100 Wall-Mount Bracket to the TV. 6 cm (2 3/8 inches) 56 Please provide this space to route cables to your installer. x To Sony Dealers and Licensed Contractors To avoid injury and property damage, read these instructions carefully. Periodic inspection...
Operating Instructions
Page 57
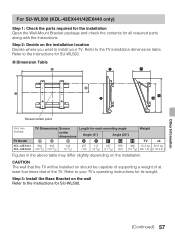
...dimensions table. Step 2: Decide on the wall Refer to the Instructions for SU-WL500. (Continued) 57 Refer to install your TV's operating instructions for each mounting angle Weight center dimensions Angle (0°) Angle (20°) AB C D EFGH TV ×4 KDL-42EX441 983 603 KDL-42EX440 (38 3/4) (23 3/4) 143 (5 ... where you want to the Instructions for all required parts along with the Instructions. For SU-WL500 (KDL-42EX441/42EX440 only) Step 1: Check the parts required for the installation Open the Wall-Mount Bracket package and check the contents for SU-WL500.
...dimensions table. Step 2: Decide on the wall Refer to the Instructions for SU-WL500. (Continued) 57 Refer to install your TV's operating instructions for each mounting angle Weight center dimensions Angle (0°) Angle (20°) AB C D EFGH TV ×4 KDL-42EX441 983 603 KDL-42EX440 (38 3/4) (23 3/4) 143 (5 ... where you want to the Instructions for all required parts along with the Instructions. For SU-WL500 (KDL-42EX441/42EX440 only) Step 1: Check the parts required for the installation Open the Wall-Mount Bracket package and check the contents for SU-WL500.

Operating Instructions
Page 58
.... 1 Place the TV with its screen facing down behind the TV. 58 Step 4: Prepare the TV for wall mount installation Follow the steps below to avoid it dropping when detaching. • Before attaching the Wall-Mount Bracket, hang the AC power cord down . 2 Remove the screws guided by the arrow marks and of the...
.... 1 Place the TV with its screen facing down behind the TV. 58 Step 4: Prepare the TV for wall mount installation Follow the steps below to avoid it dropping when detaching. • Before attaching the Wall-Mount Bracket, hang the AC power cord down . 2 Remove the screws guided by the arrow marks and of the...
Operating Instructions
Page 60
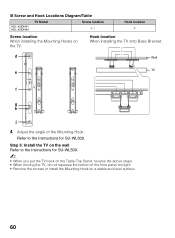
x Screw and Hook Locations Diagram/Table KDL-42EX441 KDL-42EX440 TV Model Screw location e, j Hook location b Screw location When installing the Mounting Hooks on a stable and level surface. 60 Refer to the Instructions for SU-WL500. Step 5: Install the TV on the wall Refer to the Instructions for SU-WL500. ~ &#... Stand, reverse the above steps. • When moving the TV, do not squeeze the bottom of the Mounting Hook. Hook location When installing the TV onto Base Bracket. Wall TV 4 Adjust the angle of the front panel too tight. • Remove the screws or install the...
x Screw and Hook Locations Diagram/Table KDL-42EX441 KDL-42EX440 TV Model Screw location e, j Hook location b Screw location When installing the Mounting Hooks on a stable and level surface. 60 Refer to the Instructions for SU-WL500. Step 5: Install the TV on the wall Refer to the Instructions for SU-WL500. ~ &#... Stand, reverse the above steps. • When moving the TV, do not squeeze the bottom of the Mounting Hook. Hook location When installing the TV onto Base Bracket. Wall TV 4 Adjust the angle of the front panel too tight. • Remove the screws or install the...
Operating Instructions
Page 61
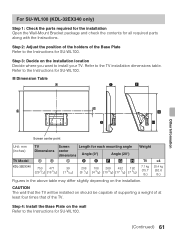
...times that of the Base Plate Refer to install your TV. Step 4: Install the Base Plate on the wall Refer to the TV installation dimensions table. Refer to the Instructions for each mounting angle Dimensions center dimensions Angle (0°) Angle (20°) Weight AB C D E F G H... kg (15.7 lb.) 28.4 kg (62.6 lb.) Figures in the above table may differ slightly depending on the installation. For SU-WL100 (KDL-32EX340 only) Step 1: Check the parts required for the installation Open the Wall-Mount Bracket package and check the contents for all required parts along with the Instructions.
...times that of the Base Plate Refer to install your TV. Step 4: Install the Base Plate on the wall Refer to the TV installation dimensions table. Refer to the Instructions for each mounting angle Dimensions center dimensions Angle (0°) Angle (20°) Weight AB C D E F G H... kg (15.7 lb.) 28.4 kg (62.6 lb.) Figures in the above table may differ slightly depending on the installation. For SU-WL100 (KDL-32EX340 only) Step 1: Check the parts required for the installation Open the Wall-Mount Bracket package and check the contents for all required parts along with the Instructions.

Operating Instructions
Page 62
For details, see page 58. 3 Align the holes on the rear of the Mounting Hook. Screw (M4 × 12) Mounting Hook 4 Adjust the angle of the TV. Mounting Hook Arm 62 Secure them to prepare for installing the TV. 1 Disconnect all the cables from the TV. 2 Detach the Table-Top Stand from the TV. Step 5: Prepare the TV for wall mount installation Follow the steps below to the TV using two screws (supplied with the corresponding holes on the left Mounting Hook with SU-WL100).
For details, see page 58. 3 Align the holes on the rear of the Mounting Hook. Screw (M4 × 12) Mounting Hook 4 Adjust the angle of the TV. Mounting Hook Arm 62 Secure them to prepare for installing the TV. 1 Disconnect all the cables from the TV. 2 Detach the Table-Top Stand from the TV. Step 5: Prepare the TV for wall mount installation Follow the steps below to the TV using two screws (supplied with the corresponding holes on the left Mounting Hook with SU-WL100).

Operating Instructions
Page 71
... outlet on the type of programming and signal provided by one or more of the FCC Rules. KDL-42EX441 KDL-42EX440 KDL-32EX340 Sony Wall-Mount Bracket Model No. Other Information 71 However, there is required for TV installations. Be sure to subcontract the installation ...SU-WL500 SU-WL100 Use with part 15 of Conformity Trade Name: SONY Model: KDL-42EX441/KDL-42EX440/KDL-32EX340 Responsible Party: Sony Electronics Inc. Telephone Number: 858-942-2230 This device complies with other Wall-Mount Brackets may cause undesired operation. To Customers Sufficient expertise is no guarantee...
... outlet on the type of programming and signal provided by one or more of the FCC Rules. KDL-42EX441 KDL-42EX440 KDL-32EX340 Sony Wall-Mount Bracket Model No. Other Information 71 However, there is required for TV installations. Be sure to subcontract the installation ...SU-WL500 SU-WL100 Use with part 15 of Conformity Trade Name: SONY Model: KDL-42EX441/KDL-42EX440/KDL-32EX340 Responsible Party: Sony Electronics Inc. Telephone Number: 858-942-2230 This device complies with other Wall-Mount Brackets may cause undesired operation. To Customers Sufficient expertise is no guarantee...

Operating Instructions
Page 72
... (horizontal) × 768 lines (vertical) Speaker/Full range (2) (mm) (inches) Dimensions* with stand (mm) (inches) without stand (mm) (inches) wall-mount hole pattern (mm) wall-mount screw size (mm) 983 × 643 × 233 38 3/4 × 25 3/8 × 9 1/4 983 × 603 × 75 38 3/4...terrestrial: 2 - 69 / Digital terrestrial: 2 - 69 Analog Cable: 1 - 135 / Digital Cable: 1 - 135 LCD (Liquid Crystal Display) Panel KDL-42EX440/KDL-32EX340: 6 W + 6 W KDL-42EX441: 8 W + 8 W 75-ohm external terminal for RF inputs VIDEO: 1 Vp-p, 75 ohms unbalanced, sync negative AUDIO: 500 mVrms (Typical) /...
... (horizontal) × 768 lines (vertical) Speaker/Full range (2) (mm) (inches) Dimensions* with stand (mm) (inches) without stand (mm) (inches) wall-mount hole pattern (mm) wall-mount screw size (mm) 983 × 643 × 233 38 3/4 × 25 3/8 × 9 1/4 983 × 603 × 75 38 3/4...terrestrial: 2 - 69 / Digital terrestrial: 2 - 69 Analog Cable: 1 - 135 / Digital Cable: 1 - 135 LCD (Liquid Crystal Display) Panel KDL-42EX440/KDL-32EX340: 6 W + 6 W KDL-42EX441: 8 W + 8 W 75-ohm external terminal for RF inputs VIDEO: 1 Vp-p, 75 ohms unbalanced, sync negative AUDIO: 500 mVrms (Typical) /...

Operating Instructions
Page 73
Model name KDL-42EX441 KDL-42EX440 KDL-32EX340 Mass* with stand (kg) 14.1 7.7 (lb.) 31.1 17.0 without stand (kg) 13.2 7.1 (lb.) 29.1 15.7 Supplied accessories common to all models... and Regulatory Booklet (1)/Software License (1)/Stand installation guide (1)/Table-Top Stand (1 set)/Screw (3) Optional accessories Connecting cables / Support Belt Kit / Wall-Mount Bracket: SU-WL500 (KDL-42EX441/ 42EX440), SU-WL100 (KDL-32EX340) • Optional accessories availability depends on its stock. • Design and specifications are subject to change without notice. * Dimensions and ...
Model name KDL-42EX441 KDL-42EX440 KDL-32EX340 Mass* with stand (kg) 14.1 7.7 (lb.) 31.1 17.0 without stand (kg) 13.2 7.1 (lb.) 29.1 15.7 Supplied accessories common to all models... and Regulatory Booklet (1)/Software License (1)/Stand installation guide (1)/Table-Top Stand (1 set)/Screw (3) Optional accessories Connecting cables / Support Belt Kit / Wall-Mount Bracket: SU-WL500 (KDL-42EX441/ 42EX440), SU-WL100 (KDL-32EX340) • Optional accessories availability depends on its stock. • Design and specifications are subject to change without notice. * Dimensions and ...

Quick Setup Guide
Page 1
.... ■ Determine whether you are transmitted with different aspect ratios (the width-to-height ratio of the image). Sony wall-mounting brackets are displayed on the screen when your BRAVIA is receiving. ■ Contact your cable, satellite or HD Service...with an adapter, a separate audio L/R is necessary.) Audio/Video Performance COMPONENT SD VIDEO Component connection Composite video connection Audio L/R Audio L/R KDL-42EX441 / 42EX440 / 32EX340 2 Running Initial Setup 3 Watching Your TV Initial Setup instructions are designed to provide the best fit. ■ Give your TV...
.... ■ Determine whether you are transmitted with different aspect ratios (the width-to-height ratio of the image). Sony wall-mounting brackets are displayed on the screen when your BRAVIA is receiving. ■ Contact your cable, satellite or HD Service...with an adapter, a separate audio L/R is necessary.) Audio/Video Performance COMPONENT SD VIDEO Component connection Composite video connection Audio L/R Audio L/R KDL-42EX441 / 42EX440 / 32EX340 2 Running Initial Setup 3 Watching Your TV Initial Setup instructions are designed to provide the best fit. ■ Give your TV...

