Operating Instructions
Page 3
...Settings 41 Picture Settings 42 Sound Settings 44 Screen Settings 45 Channel Settings 47 CC Closed Captions (CC) Settings 48 Parental Lock Settings 48 External Inputs Settings 51 HDMI Settings 51 Network Settings 52 General Setup Settings 52 Initial Setup 53 Other Information Troubleshooting 55 Specifications 58 Index 59 Customer Support http://www.sony... Favorites 29 Quick Setup Guide (separate volume) Provides a variety of BRAVIA® The Four Steps to Use TV Guide On Screen 35 Using BRAVIA Sync with Your Remote Control 28 Exploring Fun Features Favorites 29 Displaying ...
...Settings 41 Picture Settings 42 Sound Settings 44 Screen Settings 45 Channel Settings 47 CC Closed Captions (CC) Settings 48 Parental Lock Settings 48 External Inputs Settings 51 HDMI Settings 51 Network Settings 52 General Setup Settings 52 Initial Setup 53 Other Information Troubleshooting 55 Specifications 58 Index 59 Customer Support http://www.sony... Favorites 29 Quick Setup Guide (separate volume) Provides a variety of BRAVIA® The Four Steps to Use TV Guide On Screen 35 Using BRAVIA Sync with Your Remote Control 28 Exploring Fun Features Favorites 29 Displaying ...
Operating Instructions
Page 4
... and standard-definition signals are transmitted with your cable or satellite provider for purchasing this Sony BRAVIA® high-definition television. The Quick Setup Guide, enclosed separately, illustrates how to connect other HD compatible external equipment Contact your BRAVIA TV set, a complete HD system requires an HD sound system, a source of the signal it receives...
... and standard-definition signals are transmitted with your cable or satellite provider for purchasing this Sony BRAVIA® high-definition television. The Quick Setup Guide, enclosed separately, illustrates how to connect other HD compatible external equipment Contact your BRAVIA TV set, a complete HD system requires an HD sound system, a source of the signal it receives...
Operating Instructions
Page 5
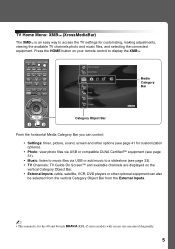
... Screen Channel Media Category Bar TV Category Object Bar From the horizontal Media Category Bar you can control: • Settings: timer, picture, sound, screen and other optional equipment can also be selected from the vertical Category Object Bar from the External Inputs. ~ • This manual ... a slideshow (see page 33). • TV Channels: TV Guide On Screen™ and available channels are displayed on your remote control to access the TV settings for the 40 and 46 inch BRAVIA KDL-Z series models with screen size measured diagonally. 5
... Screen Channel Media Category Bar TV Category Object Bar From the horizontal Media Category Bar you can control: • Settings: timer, picture, sound, screen and other optional equipment can also be selected from the vertical Category Object Bar from the External Inputs. ~ • This manual ... a slideshow (see page 33). • TV Channels: TV Guide On Screen™ and available channels are displayed on your remote control to access the TV settings for the 40 and 46 inch BRAVIA KDL-Z series models with screen size measured diagonally. 5
Operating Instructions
Page 6
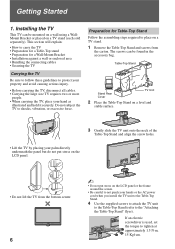
... stand (each sold separately). Do not subject the TV to tighten at approximately 1.5 N·m, 15 Kgf·cm. If an electric screwdriver is used, set the torque to shocks, vibration, or excessive force. Table-Top Stand Stand Rear Cover TV Unit 2 Place the Table-Top Stand on a level and stable... screws can be found in the accessory bag. Installing the TV This TV can be mounted on a wall using a WallMount Bracket or placed on the LCD panel or the frame around the screen. • Be careful to the "Attaching the Table-Top Stand" flyer). Preparation for a Wall-Mount Bracket &#...
... stand (each sold separately). Do not subject the TV to tighten at approximately 1.5 N·m, 15 Kgf·cm. If an electric screwdriver is used, set the torque to shocks, vibration, or excessive force. Table-Top Stand Stand Rear Cover TV Unit 2 Place the Table-Top Stand on a level and stable... screws can be found in the accessory bag. Installing the TV This TV can be mounted on a wall using a WallMount Bracket or placed on the LCD panel or the frame around the screen. • Be careful to the "Attaching the Table-Top Stand" flyer). Preparation for a Wall-Mount Bracket &#...
Operating Instructions
Page 7
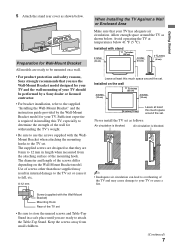
... when measured from small children. (Continued) 7 Air circulation is blocked. Wall Wall ~ • Inadequate air circulation can lead to the TV set as shown below. Keep the screws away from the attaching surface of the screws differ depending on a wall. • For product protection and ...safety reasons, Sony strongly recommends that they are ready to use the Wall-Mount Bracket model designed for your TV and the wall-mounting of the TV set . The diameter and length of the mounting hook. Installed on the wall...
... when measured from small children. (Continued) 7 Air circulation is blocked. Wall Wall ~ • Inadequate air circulation can lead to the TV set as shown below. Keep the screws away from the attaching surface of the screws differ depending on a wall. • For product protection and ...safety reasons, Sony strongly recommends that they are ready to use the Wall-Mount Bracket model designed for your TV and the wall-mounting of the TV set . The diameter and length of the mounting hook. Installed on the wall...
Operating Instructions
Page 9
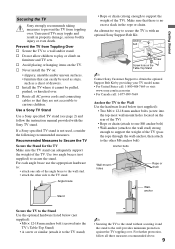
...Securing the TV Sony strongly recommends taking measures to prevent the TV from Toppling Over s Secure the TV to one side of the TV). s Route all three measures recommended above. 9 Prevent the TV from toppling over . s Never install the TV on furniture and TV sets. An alternative way... to secure the TV is with the Sony TV stand. s Install the TV where it and the stand to the stand without securing it cannot be used , ...
...Securing the TV Sony strongly recommends taking measures to prevent the TV from Toppling Over s Secure the TV to one side of the TV). s Route all three measures recommended above. 9 Prevent the TV from toppling over . s Never install the TV on furniture and TV sets. An alternative way... to secure the TV is with the Sony TV stand. s Install the TV where it and the stand to the stand without securing it cannot be used , ...
Operating Instructions
Page 11
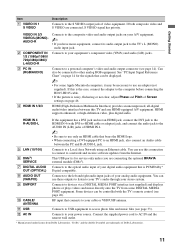
..." on page 46. If both composite video and S VIDEO are connecting the optional BRAVIA external module (DMex). 7 DIGITAL AUDIO Connects to the optical audio input of video equipment. "Dolby" and the double-D symbol are trademarks of Screen settings on page 14 for service only unless you have mono equipment, connect its audio...
..." on page 46. If both composite video and S VIDEO are connecting the optional BRAVIA external module (DMex). 7 DIGITAL AUDIO Connects to the optical audio input of video equipment. "Dolby" and the double-D symbol are trademarks of Screen settings on page 14 for service only unless you have mono equipment, connect its audio...
Operating Instructions
Page 12
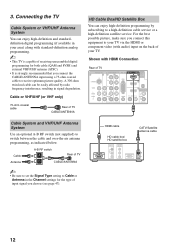
...-the-air antenna programming, as indicated below. Cable Antenna A-B RF switch A Rear of TV B CABLE/ANTENNA ~ • Be sure to set the Signal Type setting to Cable or Antenna in the Channel settings for the type of receiving unscrambled digital programming for both cable (QAM and 8VSB) and external VHF/UHF antenna (ATSC...
...-the-air antenna programming, as indicated below. Cable Antenna A-B RF switch A Rear of TV B CABLE/ANTENNA ~ • Be sure to set the Signal Type setting to Cable or Antenna in the Channel settings for the type of receiving unscrambled digital programming for both cable (QAM and 8VSB) and external VHF/UHF antenna (ATSC...
Operating Instructions
Page 14
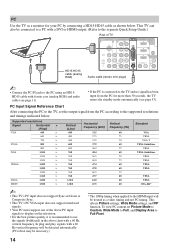
...VESA VESA VESA CEA-861* ~ • This TV's PC input does not support Sync on the television. • For the best picture quality, it is connected to the TV and no signal has been...input from the PC according to the supported resolutions and timings indicated below . This affects Picture settings, Wide Mode settings, and PIP function. PC Use the TV as a monitor for more than 30 seconds, the...be treated as shown below . PC Input Signal Reference Chart After connecting the PC to the TV, set Picture Mode to Custom, Wide Mode to Full, and Display Area to the separate Quick Setup Guide...
...VESA VESA VESA CEA-861* ~ • This TV's PC input does not support Sync on the television. • For the best picture quality, it is connected to the TV and no signal has been...input from the PC according to the supported resolutions and timings indicated below . This affects Picture settings, Wide Mode settings, and PIP function. PC Use the TV as a monitor for more than 30 seconds, the...be treated as shown below . PC Input Signal Reference Chart After connecting the PC to the TV, set Picture Mode to Custom, Wide Mode to Full, and Display Area to the separate Quick Setup Guide...
Operating Instructions
Page 16
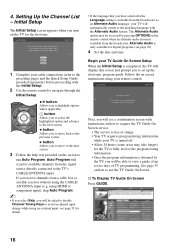
...that you to select the highlighted option and advance to the TV's CABLE/ANTENNA input. button: Allows you have selected in the Language setting is completed, the TV will display this screen and prompt you to move back to highlight options where applicable. If you turn on ...asked to disable Channel Tuning Keys to run Auto Program. The Alternate Audio option may take longer) for digital programs (see page 45). 4 Set the date and time. Highlight a choice and press to the matching language with instructions on screen instructions using your TV is obtained by pressing...
...that you to select the highlighted option and advance to the TV's CABLE/ANTENNA input. button: Allows you have selected in the Language setting is completed, the TV will display this screen and prompt you to move back to highlight options where applicable. If you turn on ...asked to disable Channel Tuning Keys to run Auto Program. The Alternate Audio option may take longer) for digital programs (see page 45). 4 Set the date and time. Highlight a choice and press to the matching language with instructions on screen instructions using your TV is obtained by pressing...
Operating Instructions
Page 17
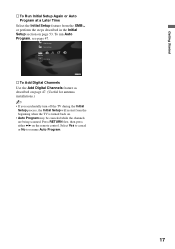
... either B/b on the remote control. Select Yes to cancel or No to resume Auto Program. 17 To run Auto Program, see page 47. HDMI Settings General Setup Settings Initial Setup TV s To Add Digital Channels Use the Add Digital Channels feature as described on page 47. (Useful for antenna installations.) ~ • If...
... either B/b on the remote control. Select Yes to cancel or No to resume Auto Program. 17 To run Auto Program, see page 47. HDMI Settings General Setup Settings Initial Setup TV s To Add Digital Channels Use the Add Digital Channels feature as described on page 47. (Useful for antenna installations.) ~ • If...
Operating Instructions
Page 20
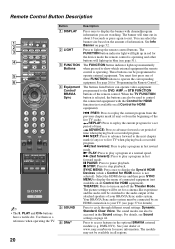
...connected equipment with channel/program information you are watching. See page 26 for more information. THEATER: Press to cycle through different sound settings: Dynamic, Standard, Clear Voice. Press to turn on the amount of time. DMX-NV1). REPLAY: Press to play a program...a reference when operating the TV. Button 1 DISPLAY 2 LIGHT 3 FUNCTION Buttons 4 Equipment Control/ BRAVIA Sync 5 SOUND 6 DMex Description Press once to your dealer or www.sony.com/bravia for "Programming the Remote Control". You must be used to show which external equipment the remote control ...
...connected equipment with channel/program information you are watching. See page 26 for more information. THEATER: Press to cycle through different sound settings: Dynamic, Standard, Clear Voice. Press to turn on the amount of time. DMX-NV1). REPLAY: Press to play a program...a reference when operating the TV. Button 1 DISPLAY 2 LIGHT 3 FUNCTION Buttons 4 Equipment Control/ BRAVIA Sync 5 SOUND 6 DMex Description Press once to your dealer or www.sony.com/bravia for "Programming the Remote Control". You must be used to show which external equipment the remote control ...
Operating Instructions
Page 21
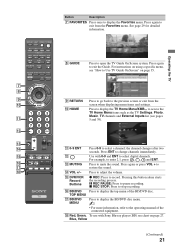
...STOP: Press to adjust the volume. Press to stop recording. Press again to exit from the screen when displaying menu items and settings. Press again to pause recording. Use with Sony Blu-ray player (BD) see chart on page 35. 9 RETURN 0 HOME Press to go back to select digital channels..... Press again or press VOL + to the operating manual of the BD/DVD disc. Blue, Yellow (Continued) 21 Product Support Clock/Timers Settings Sound Screen Channel TV qa 0-9 ENT qs qd MUTING qf VOL +/- TOP MENU qj BD/DVD MENU Press to display the BD/DVD disc...
...STOP: Press to adjust the volume. Press to stop recording. Press again to exit from the screen when displaying menu items and settings. Press again to pause recording. Use with Sony Blu-ray player (BD) see chart on page 35. 9 RETURN 0 HOME Press to go back to select digital channels..... Press again or press VOL + to the operating manual of the BD/DVD disc. Blue, Yellow (Continued) 21 Product Support Clock/Timers Settings Sound Screen Channel TV qa 0-9 ENT qs qd MUTING qf VOL +/- TOP MENU qj BD/DVD MENU Press to display the BD/DVD disc...

Operating Instructions
Page 22
... be also accessed in the Screen settings (see pages 45 and 46). Zoom H Stretch Zoom VOL MUTING CH JUMP REC RECPAUSE RECSTOP BD/DVD TOP MENU MENU F1 F2 ~ • Normal is ... signal 800 × 600 1,280 × 768 m Normal m Normal Full 1 Full 1 Full 2 Full 2 22 POWER wa WIDE Press to cycle through the available Wide Mode settings: Wide Zoom, Normal, Full, H Stretch, Zoom. Changing the Wide Screen Mode 4:3 Original source 16:9 Original source Standard-definition source High-definition source SYNC MENU PAUSE...
... be also accessed in the Screen settings (see pages 45 and 46). Zoom H Stretch Zoom VOL MUTING CH JUMP REC RECPAUSE RECSTOP BD/DVD TOP MENU MENU F1 F2 ~ • Normal is ... signal 800 × 600 1,280 × 768 m Normal m Normal Full 1 Full 1 Full 2 Full 2 22 POWER wa WIDE Press to cycle through the available Wide Mode settings: Wide Zoom, Normal, Full, H Stretch, Zoom. Changing the Wide Screen Mode 4:3 Original source 16:9 Original source Standard-definition source High-definition source SYNC MENU PAUSE...

Operating Instructions
Page 23
...move focus/highlight. Press to a different location on the screen. ~ • With the Freeze feature active, some features are available in the Picture settings. wh V/v/B/b Press V/v/B/b to cycle through the available picture modes: Vivid, Standard, Cinema, Custom, Photo-Vivid, Photo-Standard, Photo-Original, Photo-...Custom, Video, Text. (Available options depend on setting up the External Inputs labels. DISPLAY LIGHT POWER TV POWER DVD AMP STB TV FUNCTION PREV REPLAY ADVANCE NEXT Button ws PICTURE wd ...
...move focus/highlight. Press to a different location on the screen. ~ • With the Freeze feature active, some features are available in the Picture settings. wh V/v/B/b Press V/v/B/b to cycle through the available picture modes: Vivid, Standard, Cinema, Custom, Photo-Vivid, Photo-Standard, Photo-Original, Photo-...Custom, Video, Text. (Available options depend on setting up the External Inputs labels. DISPLAY LIGHT POWER TV POWER DVD AMP STB TV FUNCTION PREV REPLAY ADVANCE NEXT Button ws PICTURE wd ...
Operating Instructions
Page 25
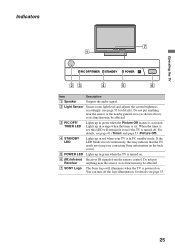
Lights up in green when the TV is powered on . 6 (IR) Infrared Receives IR signals from the remote control. When the timer is set . Operating the TV Indicators 7 1 PIC OFF/TIMER STANDBY POWER 23 4 5 6 Item Description 1 Speaker Outputs the audio signal. 2 Light Sensor Senses room light ...up in PC standby mode. Do not put Receiver anything near the sensor, as its function may be affected. 7 SONY Logo The Sony logo will remain lit even if the TV is set , this may be affected. 3 PIC OFF/ TIMER LED Lights up in red continuously, this LED will illuminate ...
Lights up in green when the TV is powered on . 6 (IR) Infrared Receives IR signals from the remote control. When the timer is set . Operating the TV Indicators 7 1 PIC OFF/TIMER STANDBY POWER 23 4 5 6 Item Description 1 Speaker Outputs the audio signal. 2 Light Sensor Senses room light ...up in PC standby mode. Do not put Receiver anything near the sensor, as its function may be affected. 7 SONY Logo The Sony logo will remain lit even if the TV is set , this may be affected. 3 PIC OFF/ TIMER LED Lights up in red continuously, this LED will illuminate ...
Operating Instructions
Page 26
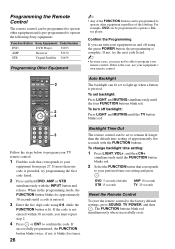
... STOP THEATER SOUND PICTURE WIDE CC FREEZE 2 4 Auto Backlight The backlight can be programmed to operate a Bluray player. To change backlight time setting: 1 Press LIGHT, VOL+, and then CH+ simultaneously until the four FUNCTION buttons blink red. The FUNCTION buttons blink red simultaneously when successfully ...15 seconds AMP 10 seconds TV 20 seconds Reset the Remote Control To reset the remote control to confirm the code. To set to your TV remote control. 1 Find the code that corresponds to light up when a button is pre-programmed to operate the following Sony equipment.
... STOP THEATER SOUND PICTURE WIDE CC FREEZE 2 4 Auto Backlight The backlight can be programmed to operate a Bluray player. To change backlight time setting: 1 Press LIGHT, VOL+, and then CH+ simultaneously until the four FUNCTION buttons blink red. The FUNCTION buttons blink red simultaneously when successfully ...15 seconds AMP 10 seconds TV 20 seconds Reset the Remote Control To reset the remote control to confirm the code. To set to your TV remote control. 1 Find the code that corresponds to light up when a button is pre-programmed to operate the following Sony equipment.
Operating Instructions
Page 29
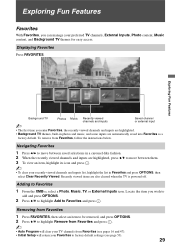
... TV is powered off. Displaying Favorites Press FAVORITES. Locate the item you wish to add and press OPTIONS. 2 Press V/v to highlight Add to factory default settings (see pages 16 and 47). • Initial Setup will clear your Favorites to Favorites and press .
... TV is powered off. Displaying Favorites Press FAVORITES. Locate the item you wish to add and press OPTIONS. 2 Press V/v to highlight Add to factory default settings (see pages 16 and 47). • Initial Setup will clear your Favorites to Favorites and press .
Operating Instructions
Page 32
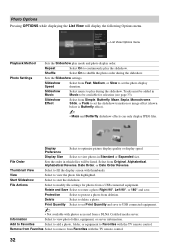
.... Slideshow Speed Select from Original, Alphabetical, Alphabetical Reverse, Date Order, or Date Order Reverse. Slideshow Music Select music to set the photo display duration. Select from Fast, Medium, or Slow to play mode and photo display order. Rotate and Save ...Maze and Butterfly slideshow effects can only display JPEG files. Shuffle Select On to view photo folder, equipment, or server information. Sets the Slideshow settings. Print Quantity Select to USB connected equipment. ~ • Not available with the TV remote control. 32 Slideshow Effect Select from...
.... Slideshow Speed Select from Original, Alphabetical, Alphabetical Reverse, Date Order, or Date Order Reverse. Slideshow Music Select music to set the photo display duration. Select from Fast, Medium, or Slow to play mode and photo display order. Rotate and Save ...Maze and Butterfly slideshow effects can only display JPEG files. Shuffle Select On to view photo folder, equipment, or server information. Sets the Slideshow settings. Print Quantity Select to USB connected equipment. ~ • Not available with the TV remote control. 32 Slideshow Effect Select from...
Operating Instructions
Page 33
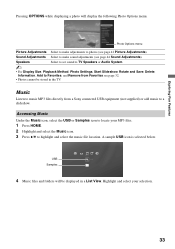
... and folders will display the following Photo Options menu. Speakers Select to set sound to TV Speakers or Audio System. ~ • For Display Size, Playback Method, Photo Settings, Start Slideshow, Rotate and Save, Delete, Information, Add to Favorites, and Remove from a Sony connected USB equipment (not supplied) or add music to make sound...
... and folders will display the following Photo Options menu. Speakers Select to set sound to TV Speakers or Audio System. ~ • For Display Size, Playback Method, Photo Settings, Start Slideshow, Rotate and Save, Delete, Information, Add to Favorites, and Remove from a Sony connected USB equipment (not supplied) or add music to make sound...


