

Operating Instructions Setup Guide
Page 2
... set-up 15 Preparing a Wired Network 16 Viewing the Network Status 16 If You Cannot Connect to the Internet 16 Privacy Policy 16 Watching TV Select Your Content Source 17 Adjust Screen Shape and Aspect Ratio 17 Customize Sound and Picture Quality 17 Changing the Viewing Style 18 Changing the... Wide Mode 18 Setting Scene Select 18 Navigating through Home Menu All Apps 19 Photo Sharing Plus 19 Using the TV as a Photo Frame Mode 20 Favorites 20 Media 21 Playback Photo/Music/Video via USB 21 Home Network 22 Connecting to a Home Network . . . . . 22...
... set-up 15 Preparing a Wired Network 16 Viewing the Network Status 16 If You Cannot Connect to the Internet 16 Privacy Policy 16 Watching TV Select Your Content Source 17 Adjust Screen Shape and Aspect Ratio 17 Customize Sound and Picture Quality 17 Changing the Viewing Style 18 Changing the... Wide Mode 18 Setting Scene Select 18 Navigating through Home Menu All Apps 19 Photo Sharing Plus 19 Using the TV as a Photo Frame Mode 20 Favorites 20 Media 21 Playback Photo/Music/Video via USB 21 Home Network 22 Connecting to a Home Network . . . . . 22...

Operating Instructions Setup Guide
Page 3
Viewing Pictures from Connected Equipment Connection Diagram 33 Connecting the TV 34 Showing a Set Top Box with HDMI connection 34 Showing a Set Top Box with Component connection 35 Cable System or VHF/UHF Antenna System 35 ... 38 Using Audio and Video Equipment 39 Using Screen Mirroring 39 Additional Information Using a Wall-Mount Bracket 40 Detaching the Table-Top Stand from the TV 40 Installing the TV Against a Wall or Enclosed Area 41 Troubleshooting 41 Picture 41 Sound 42 Channels 42 Network 42 General 44 Specifications 45 3US
Viewing Pictures from Connected Equipment Connection Diagram 33 Connecting the TV 34 Showing a Set Top Box with HDMI connection 34 Showing a Set Top Box with Component connection 35 Cable System or VHF/UHF Antenna System 35 ... 38 Using Audio and Video Equipment 39 Using Screen Mirroring 39 Additional Information Using a Wall-Mount Bracket 40 Detaching the Table-Top Stand from the TV 40 Installing the TV Against a Wall or Enclosed Area 41 Troubleshooting 41 Picture 41 Sound 42 Channels 42 Network 42 General 44 Specifications 45 3US
Operating Instructions Setup Guide
Page 4
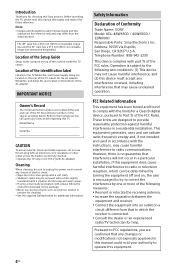
...No. These limits are located on DC 19.5 V (with part 15 of Conformity Trade Name: SONY Model: KDL-48W650D / 40W650D / 32W600D Responsible Party: Sony Electronics Inc. Pursuant to FCC regulations, you are for a Class B digital device, pursuant to... provide reasonable protection against harmful interference in a residential installation. Operation is connected. Consult the dealer or an experienced radio/TV technician for the TV...
...No. These limits are located on DC 19.5 V (with part 15 of Conformity Trade Name: SONY Model: KDL-48W650D / 40W650D / 32W600D Responsible Party: Sony Electronics Inc. Pursuant to FCC regulations, you are for a Class B digital device, pursuant to... provide reasonable protection against harmful interference in a residential installation. Operation is connected. Consult the dealer or an experienced radio/TV technician for the TV...
Operating Instructions Setup Guide
Page 5
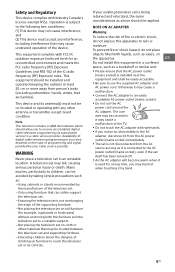
... not coil the AC power cord around the AC adapter. Availability of digital cable television programming in your area depends on the type of the TV. Do not touch the AC adapter with liquids, such as it is connected to the AC power outlet (mains socket), even if the set...
... not coil the AC power cord around the AC adapter. Availability of digital cable television programming in your area depends on the type of the TV. Do not touch the AC adapter with liquids, such as it is connected to the AC power outlet (mains socket), even if the set...
Operating Instructions Setup Guide
Page 6
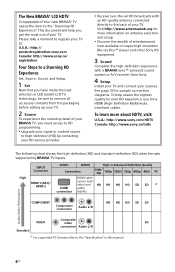
...air HD broadcasts with a BRAVIA Sync™ surround sound system or A/V receiver from Sony. 4 Setup Install your TV and connect your TV. See page 33 for your TV. Your new BRAVIA® TV opens the door to the back of entertainment now available on super-high resolution Blu-ray... diagrams. To help you need access to HD programming. Upgrade your TV at: U.S.A.: http:// productregistration.sony.com Canada: http://www.sony.ca/ registration Four Steps to high-definition (HD) by BRAVIA TV inputs. To learn more information on antenna selection and setup. Discover ...
...air HD broadcasts with a BRAVIA Sync™ surround sound system or A/V receiver from Sony. 4 Setup Install your TV and connect your TV. See page 33 for your TV. Your new BRAVIA® TV opens the door to the back of entertainment now available on super-high resolution Blu-ray... diagrams. To help you need access to HD programming. Upgrade your TV at: U.S.A.: http:// productregistration.sony.com Canada: http://www.sony.ca/ registration Four Steps to high-definition (HD) by BRAVIA TV inputs. To learn more information on antenna selection and setup. Discover ...
Operating Instructions Setup Guide
Page 7
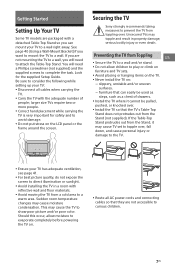
.... If the Table-Top Stand protrudes out from the Stand (not supplied). Be sure to consider the following while setting up your TV to a wall right away. Securing the TV Sony strongly recommends taking measures to avoid damage. Do not put stress on : slippery, unstable and/or uneven surfaces. furniture...
.... If the Table-Top Stand protrudes out from the Stand (not supplied). Be sure to consider the following while setting up your TV to a wall right away. Securing the TV Sony strongly recommends taking measures to avoid damage. Do not put stress on : slippery, unstable and/or uneven surfaces. furniture...

Operating Instructions Setup Guide
Page 8
... below illustration for M6 eye bolt length. 10 - 12 mm VS TV's rear cover M6 eye bolt Note • Securing the TV to the Stand without securing the TV and the Stand to a Stand (not supplied). 1 Secure the Stand for the TV. Make sure that there is no excess slack in the rope or... supplied) The length of the angle brace to the wall stud. Attach the other side to support the weight of the TV. Wall-mount holes VS Stand 2 Secure the TV to secure the Stand. Use two angle braces (not supplied) to the Stand. Screw hole M6 machine on the rope or...
... below illustration for M6 eye bolt length. 10 - 12 mm VS TV's rear cover M6 eye bolt Note • Securing the TV to the Stand without securing the TV and the Stand to a Stand (not supplied). 1 Secure the Stand for the TV. Make sure that there is no excess slack in the rope or... supplied) The length of the angle brace to the wall stud. Attach the other side to support the weight of the TV. Wall-mount holes VS Stand 2 Secure the TV to secure the Stand. Use two angle braces (not supplied) to the Stand. Screw hole M6 machine on the rope or...

Operating Instructions Setup Guide
Page 9
... read and follow the instruction provided on the package. Never spray water or detergent directly on a stable surface to the TV set . The TV should also be removed with a cloth slightly moistened with a soft cloth. Stubborn stains may cause damage to prevent it from... toppling over (see page 7). Unplug the TV and other connected equipment from cleaning has evaporated. If you have young children or pets at home, check regularly to care for cleaning. ...
... read and follow the instruction provided on the package. Never spray water or detergent directly on a stable surface to the TV set . The TV should also be removed with a cloth slightly moistened with a soft cloth. Stubborn stains may cause damage to prevent it from... toppling over (see page 7). Unplug the TV and other connected equipment from cleaning has evaporated. If you have young children or pets at home, check regularly to care for cleaning. ...
Operating Instructions Setup Guide
Page 10
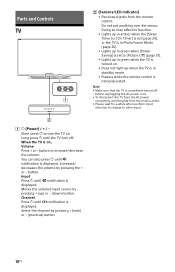
... control is completely turned off . Short press to turn off before unplugging the AC power cord. • To disconnect the TV from the AC power completely, pull the plug from the remote control. You can also press until notification is displayed. Note ...• Make sure that the TV is being operated. button to increase/decrease the volume. Input Press until notification is displayed. Long press until CH notification...
... control is completely turned off . Short press to turn off before unplugging the AC power cord. • To disconnect the TV from the AC power completely, pull the plug from the remote control. You can also press until notification is displayed. Note ...• Make sure that the TV is being operated. button to increase/decrease the volume. Input Press until notification is displayed. Long press until CH notification...

Operating Instructions Setup Guide
Page 11
... selected items. RETURN • Returns to operate equipment that you are available). NETFLIX (Only on limited region/ country/TV model) Accesses the "NETFLIX" online service. DISPLAY Displays information. The following options can be selected from [Device Selection]. Remote Control... HOME Displays or cancels the menu. 11US Press once to display information about the program/ input you want the TV to select digital channels. Device Control: Use the [Device Control] to the previous screen of remote control button may vary depending...
... selected items. RETURN • Returns to operate equipment that you are available). NETFLIX (Only on limited region/ country/TV model) Accesses the "NETFLIX" online service. DISPLAY Displays information. The following options can be selected from [Device Selection]. Remote Control... HOME Displays or cancels the menu. 11US Press once to display information about the program/ input you want the TV to select digital channels. Device Control: Use the [Device Control] to the previous screen of remote control button may vary depending...

Operating Instructions Setup Guide
Page 12
...on VOD service. (REPLAY)/ (ADVANCE) Replays the scene/briefly fast forwards the scene (USB and IPTV Video playback only). POWER Turns the TV on . WIDE Adjusts the screen display. Press repeatedly to select the desired wide mode (page 18). OPTIONS Displays a list that contains ... • The number 5, , CH + and AUDIO buttons have a tactile dots. VOL +/- Use the tactile dots as references when operating the TV. 12US The listed options vary depending on the current input and content. JUMP Returns to operate VOD (Video on...
...on VOD service. (REPLAY)/ (ADVANCE) Replays the scene/briefly fast forwards the scene (USB and IPTV Video playback only). POWER Turns the TV on . WIDE Adjusts the screen display. Press repeatedly to select the desired wide mode (page 18). OPTIONS Displays a list that contains ... • The number 5, , CH + and AUDIO buttons have a tactile dots. VOL +/- Use the tactile dots as references when operating the TV. 12US The listed options vary depending on the current input and content. JUMP Returns to operate VOD (Video on...

Operating Instructions Setup Guide
Page 13
try turning off the fluorescent lamps. If you are correctly inserted. 13US US Fluorescent lamps can interfere with the remote control, reinsert or replace your TV. Guidelines for Remote Control Point your remote control directly at the IR sensor located on your TV. Make sure that no objects are blocking the path between the remote control and the IR sensor on your batteries and make sure that they are having problems with your remote control;
try turning off the fluorescent lamps. If you are correctly inserted. 13US US Fluorescent lamps can interfere with the remote control, reinsert or replace your TV. Guidelines for Remote Control Point your remote control directly at the IR sensor located on your TV. Make sure that no objects are blocking the path between the remote control and the IR sensor on your batteries and make sure that they are having problems with your remote control;

Operating Instructions Setup Guide
Page 14
...the router (e.g. automatic setting: [Set up if your router has an automatic setting button, e.g. Connecting TV to the Internet Setting up the Internet Connection To use the network features of your TV it . Check your wireless LAN environment using the following chart. AOSS button). 4 Follow the instructions... (PIN)] provides a PIN code for Secured network without Wi-Fi Protected Setup™ (WPS). PIN code is selected, HTTP Proxy cannot be sure to a TV in a non-secure status. • To use WPS for network set -up ] 3 Select [WPS (Push Button)] for Push Button method or [WPS ...
...the router (e.g. automatic setting: [Set up if your router has an automatic setting button, e.g. Connecting TV to the Internet Setting up the Internet Connection To use the network features of your TV it . Check your wireless LAN environment using the following chart. AOSS button). 4 Follow the instructions... (PIN)] provides a PIN code for Secured network without Wi-Fi Protected Setup™ (WPS). PIN code is selected, HTTP Proxy cannot be sure to a TV in a non-secure status. • To use WPS for network set -up ] 3 Select [WPS (Push Button)] for Push Button method or [WPS ...

Operating Instructions Setup Guide
Page 16
...] is selected at [Automatic Software Download] in Initial Setup or Setting Menu, the system software updating is available. Preparing a Wired Network TV Internet Modem with router functions or Router Modem Internet Note • For LAN connections, use these functions, please check [Agree] in each... setting screen. Viewing the Network Status You can change this setting by connecting to Sony Corporation's global servers, which is checked, the above two functions are not available. Privacy Policy When you want to use a Category 7...
...] is selected at [Automatic Software Download] in Initial Setup or Setting Menu, the system software updating is available. Preparing a Wired Network TV Internet Modem with router functions or Router Modem Internet Note • For LAN connections, use these functions, please check [Agree] in each... setting screen. Viewing the Network Status You can change this setting by connecting to Sony Corporation's global servers, which is checked, the above two functions are not available. Privacy Policy When you want to use a Category 7...

Operating Instructions Setup Guide
Page 17
... must be adjusted to fill the screen. to -height ratio of the image). or connecting to your PC, you are watching cable, satellite or broadcast TV; to select a TV channel. 4 Press VOL +/- US • Press the WIDE button on -screen. playing a VCR, DVD or Blu-ray Disc; Watching... TV 1 Press on the TV or POWER on the remote control to turn on the TV. 2 Press PIC OFF to turn picture off, and sound remains on your TV: • Press the remote control's HOME button, select [Settings] [Preferences], ...
... must be adjusted to fill the screen. to -height ratio of the image). or connecting to your PC, you are watching cable, satellite or broadcast TV; to select a TV channel. 4 Press VOL +/- US • Press the WIDE button on -screen. playing a VCR, DVD or Blu-ray Disc; Watching... TV 1 Press on the TV or POWER on the remote control to turn on the TV. 2 Press PIC OFF to turn picture off, and sound remains on your TV: • Press the remote control's HOME button, select [Settings] [Preferences], ...
Operating Instructions Setup Guide
Page 19
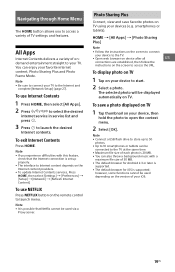
...; [Preferences] [Setup] [Network] [Refresh Internet Content]. To save favorite photos on the version of TV settings and features. Navigating through Home Menu The HOME button allows you experience difficulties with a maximum file size of ondemand entertainment straight to ...Internet content depends on TV. To use Internet Contents 1 Press HOME, then select [All Apps]. 2 Press to select the desired internet service in service...
...; [Preferences] [Setup] [Network] [Refresh Internet Content]. To save favorite photos on the version of TV settings and features. Navigating through Home Menu The HOME button allows you experience difficulties with a maximum file size of ondemand entertainment straight to ...Internet content depends on TV. To use Internet Contents 1 Press HOME, then select [All Apps]. 2 Press to select the desired internet service in service...

Operating Instructions Setup Guide
Page 20
... to avoid panel burn-in the [Photo Frame Settings] (page 28). HOME [All Apps] [Photo Frame Mode] Duration To save power, the TV continually plays back in the [Photo Frame Settings] (page 28). To select Clock Display mode You can change the setting of the [Duration] in , the...the same time as a Photo Frame Mode Photo Frame Mode displays the clock and calendar at least one hour to launch Photo Frame. Using the TV as displaying a photo and listening to music. To select Display mode You can select among three clock display modes by selecting [Display Mode] in ...
... to avoid panel burn-in the [Photo Frame Settings] (page 28). HOME [All Apps] [Photo Frame Mode] Duration To save power, the TV continually plays back in the [Photo Frame Settings] (page 28). To select Clock Display mode You can change the setting of the [Duration] in , the...the same time as a Photo Frame Mode Photo Frame Mode displays the clock and calendar at least one hour to launch Photo Frame. Using the TV as displaying a photo and listening to music. To select Display mode You can select among three clock display modes by selecting [Display Mode] in ...

Operating Instructions Setup Guide
Page 21
...be held liable for any connected devices or the TV. • USB Auto Start shows photo files in the newest digital still camera folder (DCF-compliant, highest-numbered "DCIM" folder). • USB Auto Start may be damaged. • Sony will not be played back. To adjust the... and NTFS. • The file name and folder name may not display correctly in some digital still cameras are connected. • When you connect a Sony digital still camera, set [Slideshow Effect] and [Slideshow Speed], press OPTIONS t [Playback Method]. Press / then to select a device. 6 ...
...be held liable for any connected devices or the TV. • USB Auto Start shows photo files in the newest digital still camera folder (DCF-compliant, highest-numbered "DCIM" folder). • USB Auto Start may be damaged. • Sony will not be played back. To adjust the... and NTFS. • The file name and folder name may not display correctly in some digital still cameras are connected. • When you connect a Sony digital still camera, set [Slideshow Effect] and [Slideshow Speed], press OPTIONS t [Playback Method]. Press / then to select a device. 6 ...

Operating Instructions Setup Guide
Page 22
...] t [Home Network Setup] t [Show/Hide Media Servers]. 2 Select the server to enjoy network content in the Home Menu. photo/ music/video files) stored on the TV screen by directly operating the target device. Renderer settings Press HOME, then select [Settings] t [Preferences] t [Setup] t [Network] t [Home Network Setup] t [Renderer]. The home network feature...
...] t [Home Network Setup] t [Show/Hide Media Servers]. 2 Select the server to enjoy network content in the Home Menu. photo/ music/video files) stored on the TV screen by directly operating the target device. Renderer settings Press HOME, then select [Settings] t [Preferences] t [Setup] t [Network] t [Home Network Setup] t [Renderer]. The home network feature...

Operating Instructions Setup Guide
Page 24
...[Off] to convert Dolby Digital Plus stream to reduce noise during weak stereo broadcasts. Auto SAP: Select to automatically switch the TV to stabilize the volume across all programs and commercials. Auto Wide Automatically changes the wide mode according to ARC when Dolby Digital Plus...options. Mono: Select for differences in the audio level between different channels. Select [Off] to may vary depending on limited region/country/TV model. Screen Wide Mode For details about wide mode, see page 18. Clear Voice Makes voices sound clearer. Vertical Center Adjusts the ...
...[Off] to convert Dolby Digital Plus stream to reduce noise during weak stereo broadcasts. Auto SAP: Select to automatically switch the TV to stabilize the volume across all programs and commercials. Auto Wide Automatically changes the wide mode according to ARC when Dolby Digital Plus...options. Mono: Select for differences in the audio level between different channels. Select [Off] to may vary depending on limited region/country/TV model. Screen Wide Mode For details about wide mode, see page 18. Clear Voice Makes voices sound clearer. Vertical Center Adjusts the ...


