Operating Instructions
Page 2
... the literature accompanying the TV. CAUTION Use the following Sony TVs only with part 15 of Conformity Trade Name: SONY Model: KDL-32XBR4/KDL-40D3000 Responsible Party: Sony Electronics Inc. Sony TV Model No. Refer to excessive dust or mechanical vibration. If you call upon your dealer. s To prevent internal heat buildup, do not expose the screen to radio communications. To...
... the literature accompanying the TV. CAUTION Use the following Sony TVs only with part 15 of Conformity Trade Name: SONY Model: KDL-32XBR4/KDL-40D3000 Responsible Party: Sony Electronics Inc. Sony TV Model No. Refer to excessive dust or mechanical vibration. If you call upon your dealer. s To prevent internal heat buildup, do not expose the screen to radio communications. To...
Operating Instructions
Page 3
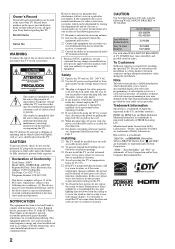
...Welcome to the World of BRAVIA™ The Four Steps to your TV 28 Navigating through TV Home Menu on XMB 29 TV Settings Descriptions 30 Product Support 30 Clock/Timers Settings 30 Picture Settings 30 Sound Settings 32 Screen Settings 32 Video Options Settings 34 Audio Options Settings 35 Channel Settings 35 CC Closed...Information Troubleshooting 41 Specifications 44 Index 45 Quick Setup Guide (separate volume) Provides a variety of optional equipment connection diagrams. Customer Support http://www.sony.com/tvsupport On-line Registration United States http://productregistration...
...Welcome to the World of BRAVIA™ The Four Steps to your TV 28 Navigating through TV Home Menu on XMB 29 TV Settings Descriptions 30 Product Support 30 Clock/Timers Settings 30 Picture Settings 30 Sound Settings 32 Screen Settings 32 Video Options Settings 34 Audio Options Settings 35 Channel Settings 35 CC Closed...Information Troubleshooting 41 Specifications 44 Index 45 Quick Setup Guide (separate volume) Provides a variety of optional equipment connection diagrams. Customer Support http://www.sony.com/tvsupport On-line Registration United States http://productregistration...

Operating Instructions
Page 5
... THEM IS ALMOST INVARIABLY FATAL. Be sure the antenna system is installed, follow the instruction provided on the LCD panel. Antenna grounding according to provide some TV's to follow these slots and openings must never be sure to make occasional snapping or popping sounds, particularly ... on the package. s Do not short circuit, disassemble or overheat the batteries. Replace only with a soft cloth. Cleaning the screen surface/ cabinet of children's reach. Never use strong solvents such as to the National Electrical Code, ANSI/NFPA 70 MAGNETIC INFLUENCE This...
... THEM IS ALMOST INVARIABLY FATAL. Be sure the antenna system is installed, follow the instruction provided on the LCD panel. Antenna grounding according to provide some TV's to follow these slots and openings must never be sure to make occasional snapping or popping sounds, particularly ... on the package. s Do not short circuit, disassemble or overheat the batteries. Replace only with a soft cloth. Cleaning the screen surface/ cabinet of children's reach. Never use strong solvents such as to the National Electrical Code, ANSI/NFPA 70 MAGNETIC INFLUENCE This...
Operating Instructions
Page 7
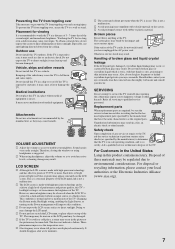
... not install this condition. Sound carries very easily at the TV. However, uneven brightness may be observed when the LCD TV is used replacement parts specified by the impact and cause serious injury. s Do not expose the LCD screen surface to qualified service personnel. Doing so may result. s... If the TV is viewed in moderate brightness. It should disappear ...
... not install this condition. Sound carries very easily at the TV. However, uneven brightness may be observed when the LCD TV is used replacement parts specified by the impact and cause serious injury. s Do not expose the LCD screen surface to qualified service personnel. Doing so may result. s... If the TV is viewed in moderate brightness. It should disappear ...

Operating Instructions
Page 8
...sony.com/HDTV The Four Steps to a standard analog signal, you will see on upgrading to the World of BRAVIA™ Thank you need access to connect other external equipment Contact your BRAVIA TV set, a complete HD system requires an HD sound system, a source of the standard TV signal. HDTV uses a wider screen... subscription • Blu-ray Disc™ player or other optional equipment. This manual explains basic setup connections (see pages 24, 32 and 34). 8 High-definition and standard-definition signals are transmitted with HD sources. ~ • You can receive and display ...
...sony.com/HDTV The Four Steps to a standard analog signal, you will see on upgrading to the World of BRAVIA™ Thank you need access to connect other external equipment Contact your BRAVIA TV set, a complete HD system requires an HD sound system, a source of the standard TV signal. HDTV uses a wider screen... subscription • Blu-ray Disc™ player or other optional equipment. This manual explains basic setup connections (see pages 24, 32 and 34). 8 High-definition and standard-definition signals are transmitted with HD sources. ~ • You can receive and display ...
Operating Instructions
Page 9
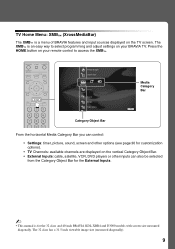
... TV screen. TV Home Menu: XMB™ (XrossMediaBar) The XMB™ is a menu of BRAVIA features and input sources displayed on the vertical Category Object Bar. • External Inputs: cable, satellite, VCR, DVD players or other inputs can also be selected from the Category Object Bar for the 32 class and 40 inch BRAVIA KDL...
... TV screen. TV Home Menu: XMB™ (XrossMediaBar) The XMB™ is a menu of BRAVIA features and input sources displayed on the vertical Category Object Bar. • External Inputs: cable, satellite, VCR, DVD players or other inputs can also be selected from the Category Object Bar for the 32 class and 40 inch BRAVIA KDL...
Operating Instructions
Page 15
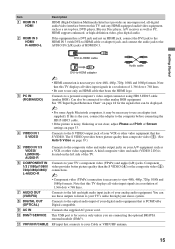
...1 HDMI 2 HDMI IN 3 HDMI/ R-AUDIO-L Description HDMI (High-Definition Multimedia Interface) provides an uncompressed, all-digital audio/video interface between this TV and any HDMI-equipped audio/video equipment, such as a set-top box, DVD player, Blu-ray Disc player, A/V receiver as well as a... video (5) connections. ~ • Component video (YPBPR) connection is PCM/Dolby Digital compatible. Note that this TV displays all video input signals in a resolution of Screen settings on the left and right audio input jacks of your VCR or other video equipment that bears the HDMI ...
...1 HDMI 2 HDMI IN 3 HDMI/ R-AUDIO-L Description HDMI (High-Definition Multimedia Interface) provides an uncompressed, all-digital audio/video interface between this TV and any HDMI-equipped audio/video equipment, such as a set-top box, DVD player, Blu-ray Disc player, A/V receiver as well as a... video (5) connections. ~ • Component video (YPBPR) connection is PCM/Dolby Digital compatible. Note that this TV displays all video input signals in a resolution of Screen settings on the left and right audio input jacks of your VCR or other video equipment that bears the HDMI ...

Operating Instructions
Page 21
...Edit Channel Labels (page 36) when Auto Program is turned back on page 40. button: Allows you accidentally turn on -screen settings. Follow the help text provided on pages 24 and 32. The Auto Program will restart from the XMB™ (XrossMediaBar) or refer to the Initial Setup described on . &#...8226; The Auto Program may want to the next screen. When the Auto Program is completed, the TV will display how many analog and digital...
...Edit Channel Labels (page 36) when Auto Program is turned back on page 40. button: Allows you accidentally turn on -screen settings. Follow the help text provided on pages 24 and 32. The Auto Program will restart from the XMB™ (XrossMediaBar) or refer to the Initial Setup described on . &#...8226; The Auto Program may want to the next screen. When the Auto Program is completed, the TV will display how many analog and digital...
Operating Instructions
Page 22
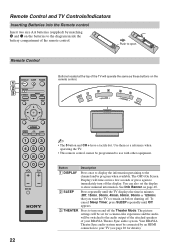
...to the channel and/or program when available. Remote Control and TV Controls/Indicators Inserting Batteries into the Remote control Insert two size AA batteries (supplied) by an HDMI connection to your BRAVIA Theatre Sync audio system. The OSD (On Screen Display) will time out in minutes (Off, 15min, 30min..., 45min, 60min, 90min or 120min) that you want the TV to remain on the remote control.
...to the channel and/or program when available. Remote Control and TV Controls/Indicators Inserting Batteries into the Remote control Insert two size AA batteries (supplied) by an HDMI connection to your BRAVIA Theatre Sync audio system. The OSD (On Screen Display) will time out in minutes (Off, 15min, 30min..., 45min, 60min, 90min or 120min) that you want the TV to remain on the remote control.
Operating Instructions
Page 23
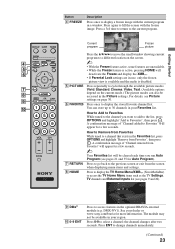
.... A confirmation message of "Channel removed from the screen when displaying menu items and settings. 8 HOME Press to display the TV Home Menu/XMB™ (XrossMediaBar) to access the TV Home Menu items such as the TV Settings, TV channels and External Inputs list (see Picture 9 settings.... Press a 3rd time to return to select a channel; Product Support Clock/Timers 9 DMex 0 0-9 ENT Sound Screen Video Options TV Press to access features in your dealer or www.sony.com/bravia for a few seconds. ~ Your Favorites list will 6 deactivate the Freeze and display the XMB™....
.... A confirmation message of "Channel removed from the screen when displaying menu items and settings. 8 HOME Press to display the TV Home Menu/XMB™ (XrossMediaBar) to access the TV Home Menu items such as the TV Settings, TV channels and External Inputs list (see Picture 9 settings.... Press a 3rd time to return to select a channel; Product Support Clock/Timers 9 DMex 0 0-9 ENT Sound Screen Video Options TV Press to access features in your dealer or www.sony.com/bravia for a few seconds. ~ Your Favorites list will 6 deactivate the Freeze and display the XMB™....
Operating Instructions
Page 24
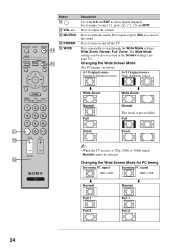
... Wide Zoom Normal Full Zoom m Wide Zoom Normal This mode is not available Full Zoom ~ • When the TV receives a 720p, 1080i or 1080p signal, Normal cannot be also accessed in the Screen settings (see page 32). The Wide Mode settings can be selected. Press to turn on and off the... TV. Press repeatedly to select digital channels. qd MUTING qf POWER qf qg WIDE qg Description Use with 0-9 ...
... Wide Zoom Normal Full Zoom m Wide Zoom Normal This mode is not available Full Zoom ~ • When the TV receives a 720p, 1080i or 1080p signal, Normal cannot be also accessed in the Screen settings (see page 32). The Wide Mode settings can be selected. Press to turn on and off the... TV. Press repeatedly to select digital channels. qd MUTING qf POWER qf qg WIDE qg Description Use with 0-9 ...
Operating Instructions
Page 25
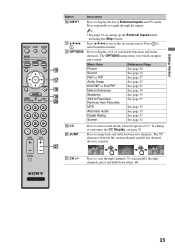
... and the last channel that was selected. Remove from Favorites MTS See page 35 Alternate Audio See page 35 Digital Rating See page 37 Screen See page 32 ql CC w; To change or customize the CC Display, see page 36. Getting Started Button Description qh INPUT Press to display the list... Press to turn on setting up the External Inputs labels, including the Skip feature. JUMP wa Press to display a list of External Inputs and TV mode. The TV alternates between two channels. JUMP JUMP wa CH +/- To scan quickly through the inputs. ~ • See page 39 on and off the Closed...
... and the last channel that was selected. Remove from Favorites MTS See page 35 Alternate Audio See page 35 Digital Rating See page 37 Screen See page 32 ql CC w; To change or customize the CC Display, see page 36. Getting Started Button Description qh INPUT Press to display the list... Press to turn on setting up the External Inputs labels, including the Skip feature. JUMP wa Press to display a list of External Inputs and TV mode. The TV alternates between two channels. JUMP JUMP wa CH +/- To scan quickly through the inputs. ~ • See page 39 on and off the Closed...

Operating Instructions
Page 26
...4 POWER 5 Item Description 1 Speaker Outputs the audio signal. 2 Light Sensor Senses room light level and adjusts the screen brightness accordingly (see page 30. 4 STANDBY Lights up in red when your TV is in PC standby mode. When the timer is set . If the LED LED blinks in red continuously, this... turned on the back cover). 5 POWER Lights up in green when the TV is turned off. Do not put anything near the sensor, as its function may indicate the TV needs servicing (see contacting Sony information on . LED 6 (IR) Receives IR signals from the remote control. Lights up...
...4 POWER 5 Item Description 1 Speaker Outputs the audio signal. 2 Light Sensor Senses room light level and adjusts the screen brightness accordingly (see page 30. 4 STANDBY Lights up in red when your TV is in PC standby mode. When the timer is set . If the LED LED blinks in red continuously, this... turned on the back cover). 5 POWER Lights up in green when the TV is turned off. Do not put anything near the sensor, as its function may indicate the TV needs servicing (see contacting Sony information on . LED 6 (IR) Receives IR signals from the remote control. Lights up...

Operating Instructions
Page 28
... page 39. 28 Access the equipment connected to access the TV Home Menu on the situations and conditions applied. TV Media Category Icons Settings Adjust TV Settings Customize the TV settings with Settings highlighted. Unavailable options are grayed out or not displayed. Sound Screen Video Options The XMB™ is shown here with various options...
... page 39. 28 Access the equipment connected to access the TV Home Menu on the situations and conditions applied. TV Media Category Icons Settings Adjust TV Settings Customize the TV settings with Settings highlighted. Unavailable options are grayed out or not displayed. Sound Screen Video Options The XMB™ is shown here with various options...
Operating Instructions
Page 29
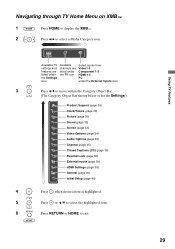
... Available TV settings and features are listed under the External Inputs icon. 3 Press V/v to move within the Category Object Bar. (The Category Object Bar shown below is for the Settings.) Product Support (page 30) Clock/Timers (page 30) Picture (page 30) Sound (page 32) Screen (page 32) Video...is highlighted. 5 Press or, V/v to select the highlighted item. 6 RETURN Press RETURN or HOME to select a Media Category icon. Using TV Features Navigating through TV Home Menu on XMB™ 1 HOME Press HOME to display the XMB™. 2 Press B/b to exit. HOME 29
... Available TV settings and features are listed under the External Inputs icon. 3 Press V/v to move within the Category Object Bar. (The Category Object Bar shown below is for the Settings.) Product Support (page 30) Clock/Timers (page 30) Picture (page 30) Sound (page 32) Screen (page 32) Video...is highlighted. 5 Press or, V/v to select the highlighted item. 6 RETURN Press RETURN or HOME to select a Media Category icon. Using TV Features Navigating through TV Home Menu on XMB™ 1 HOME Press HOME to display the XMB™. 2 Press B/b to exit. HOME 29
Operating Instructions
Page 30
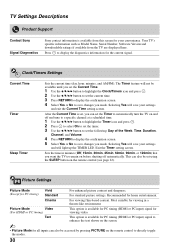
...Mode for all inputs can also be set the current time. 3 Press RETURN to display the confirmation screen. 4 Select Yes or No to automatically turn the TV on the remote control (see page 22). The Timer feature will save changes you made . After ... control to display the diagnostics information for your convenience. Most suitable for viewing video. TV Settings Descriptions Product Support Contact Sony Signal Diagnostics Sony contact information is available from the TV are displayed here. Clock/Timers Settings Current Time Timer Sleep Timer Sets the current time...
...Mode for all inputs can also be set the current time. 3 Press RETURN to display the confirmation screen. 4 Select Yes or No to automatically turn the TV on the remote control (see page 22). The Timer feature will save changes you made . After ... control to display the diagnostics information for your convenience. Most suitable for viewing video. TV Settings Descriptions Product Support Contact Sony Signal Diagnostics Sony contact information is available from the TV are displayed here. Clock/Timers Settings Current Time Timer Sleep Timer Sets the current time...
Operating Instructions
Page 32
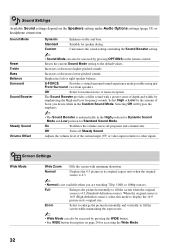
...(Standard-definition source). Zoom Select to enlarge the picture horizontally and vertically to fill the screen while maintaining the aspect ratio. ~ • Wide Mode can also be accessed by emphasizing.... Increases or decreases higher-pitched sounds. Adjusts the volume level of the current input (TV or video input) relative to display the 16:9 picture in its original aspect ratio when.... • See WIDE button description on page 24 for accessing the Wide Mode. 32 Increases or decreases lower-pitched sounds. S-FORCE Provides a virtual surround sound experience made ...
...(Standard-definition source). Zoom Select to enlarge the picture horizontally and vertically to fill the screen while maintaining the aspect ratio. ~ • Wide Mode can also be accessed by emphasizing.... Increases or decreases higher-pitched sounds. Adjusts the volume level of the current input (TV or video input) relative to display the 16:9 picture in its original aspect ratio when.... • See WIDE button description on page 24 for accessing the Wide Mode. 32 Increases or decreases lower-pitched sounds. S-FORCE Provides a virtual surround sound experience made ...
Operating Instructions
Page 33
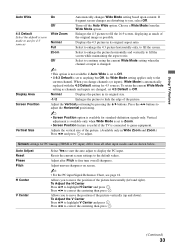
... possible. Vertical adjustment is available only when Wide Mode is set to Zoom. • Screen Position feature is useful if the TV is set 4:3 Default to Off. Screen settings for 4:3 sources Display Area Screen Position Vertical Size On Automatically changes Wide Mode setting based upon content. Using... TV Features Auto Wide 4:3 Default Select the default screen mode to use for PC timings (HDMI or PC input) differ from the Wide Mode option. If frequent screen changes are disturbing to hide the edge of the picture...
... possible. Vertical adjustment is available only when Wide Mode is set to Zoom. • Screen Position feature is useful if the TV is set 4:3 Default to Off. Screen settings for 4:3 sources Display Area Screen Position Vertical Size On Automatically changes Wide Mode setting based upon content. Using... TV Features Auto Wide 4:3 Default Select the default screen mode to use for PC timings (HDMI or PC input) differ from the Wide Mode option. If frequent screen changes are disturbing to hide the edge of the picture...

Operating Instructions
Page 34
Select to enlarge the picture to fill the screen. ~ • Wide Mode can be accessed by pressing the WIDE button. Off Turns off the CineMotion. ~ • The CineMotion feature can also be set CineMotion ... blur. Wide Mode Normal Full 1 Full 2 Select to display the picture in Auto2 mode. On Optimize the enjoyment of picture movement and to fill the screen, while maintaining its original resolution and aspect ratio. Select for each input (except PC IN). • The Motion Enhancer feature is On. 34
Select to enlarge the picture to fill the screen. ~ • Wide Mode can be accessed by pressing the WIDE button. Off Turns off the CineMotion. ~ • The CineMotion feature can also be set CineMotion ... blur. Wide Mode Normal Full 1 Full 2 Select to display the picture in Auto2 mode. On Optimize the enjoyment of picture movement and to fill the screen, while maintaining its original resolution and aspect ratio. Select for each input (except PC IN). • The Motion Enhancer feature is On. 34
Operating Instructions
Page 35
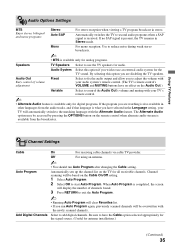
... list on the Audio Out.) Variable Select to control the Audio Out's volume and muting with your TV's remote control. ~ • Alternate Audio feature is completed, the screen will display the number of volume adjustment Fixed Select to fix the audio output and allow you wish... to use the TV speakers for antenna installations.) (Continued) 35 Mono For mono reception. Using TV Features Channel Settings Cable Auto Program Add ...
... list on the Audio Out.) Variable Select to control the Audio Out's volume and muting with your TV's remote control. ~ • Alternate Audio feature is completed, the screen will display the number of volume adjustment Fixed Select to fix the audio output and allow you wish... to use the TV speakers for antenna installations.) (Continued) 35 Mono For mono reception. Using TV Features Channel Settings Cable Auto Program Add ...


