Operating Instructions
Page 3
... Four Steps to your TV 28 Navigating through TV Home Menu on XMB 29 TV Settings Descriptions 30 Product Support 30 Clock/Timers Settings 30 Picture Settings 30 Sound Settings 32 Screen Settings 32 Video Options Settings 34 Audio Options Settings 35 Channel Settings 35 CC Closed Captions (CC) Settings 36 Parental Lock Settings 36 External Inputs Settings 39 HDMI Settings 39 General Settings 40 Initial Setup 40...
... Four Steps to your TV 28 Navigating through TV Home Menu on XMB 29 TV Settings Descriptions 30 Product Support 30 Clock/Timers Settings 30 Picture Settings 30 Sound Settings 32 Screen Settings 32 Video Options Settings 34 Audio Options Settings 35 Channel Settings 35 CC Closed Captions (CC) Settings 36 Parental Lock Settings 36 External Inputs Settings 39 HDMI Settings 39 General Settings 40 Initial Setup 40...
Operating Instructions
Page 4
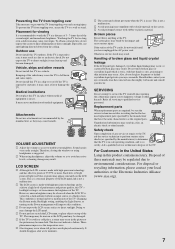
...power cord plug must be sure to unplug the AC power cord for your dealer or Sony service center to avoid injury from the TV with a protective earthing connection. To disconnect the TV set is required when the apparatus has been damaged in any heat sources such as radiators,... storms For added protection for replacement of the obsolete outlet. 10) Protect the power cord from the TV set is left unattended and unused for several days, the TV set . Overloading This TV set . Contact your outlet, consult an electrician for this apparatus near any way, such as this could result...
...power cord plug must be sure to unplug the AC power cord for your dealer or Sony service center to avoid injury from the TV with a protective earthing connection. To disconnect the TV set is required when the apparatus has been damaged in any heat sources such as radiators,... storms For added protection for replacement of the obsolete outlet. 10) Protect the power cord from the TV set is left unattended and unused for several days, the TV set . Overloading This TV set . Contact your outlet, consult an electrician for this apparatus near any way, such as this could result...

Operating Instructions
Page 5
... conductors (NEC Section 810-21) Ground clamps Power service grounding electrode system (NEC Art 250 Part H) BATTERIES s Do not dispose of the TV set Unplug the AC power cord when cleaning this TV. An outdoor antenna system should not be located in the specified manner To avoid dropping the...serious injury, be removed with a cloth slightly dampened with a solution of the TV with the same or equivalent type. CARRYING THE TV Carry the TV in the vicinity of the TV and to follow the instruction provided on the LCD panel. Clean the cabinet of mild soap and warm water. s When lifting...
... conductors (NEC Section 810-21) Ground clamps Power service grounding electrode system (NEC Art 250 Part H) BATTERIES s Do not dispose of the TV set Unplug the AC power cord when cleaning this TV. An outdoor antenna system should not be located in the specified manner To avoid dropping the...serious injury, be removed with a cloth slightly dampened with a solution of the TV with the same or equivalent type. CARRYING THE TV Carry the TV in the vicinity of the TV and to follow the instruction provided on the LCD panel. Clean the cabinet of mild soap and warm water. s When lifting...
Operating Instructions
Page 6
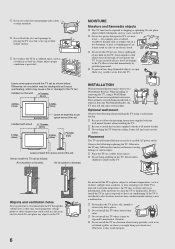
... mount Observe the following in hot, oily, humid or excessively dusty places. It may enter. If the TV is provided. s Do not install the TV where it may cause a fire or damage to the TV set as in injury. candles) away from the stand or wall mount, causing damage or serious injury. s ... swimming pool, etc. Installed with stand 11 7/8 inches (30 cm) 4 inches (10 cm) 4 inches (10 cm) 2 3/8 inches (6 cm) Leave at least this space around the TV set as vases, on the wall 11 7/8 inches (30 cm) 4 inches (10 cm) 4 inches (10 cm) 4 inches (10 cm) Leave at least this...
... mount Observe the following in hot, oily, humid or excessively dusty places. It may enter. If the TV is provided. s Do not install the TV where it may cause a fire or damage to the TV set as in injury. candles) away from the stand or wall mount, causing damage or serious injury. s ... swimming pool, etc. Installed with stand 11 7/8 inches (30 cm) 4 inches (10 cm) 4 inches (10 cm) 2 3/8 inches (6 cm) Leave at least this space around the TV set as vases, on the wall 11 7/8 inches (30 cm) 4 inches (10 cm) 4 inches (10 cm) 4 inches (10 cm) Leave at least this...
Operating Instructions
Page 7
... occur when still pictures are required, be damaged. Replacement parts When replacement parts are displayed continuously. Bumping of the TV. s The LCD screen is in use Do not install this TV in this TV's backlight setting is not a malfunction. Broken pieces Do not throw anything at night. s Ghosting may break by the manufacturer that of...
... occur when still pictures are required, be damaged. Replacement parts When replacement parts are displayed continuously. Bumping of the TV. s The LCD screen is in use Do not install this TV in this TV's backlight setting is not a malfunction. Broken pieces Do not throw anything at night. s Ghosting may break by the manufacturer that of...

Operating Instructions
Page 8
This manual explains basic setup connections (see pages 24, 32 and 34). 8 Picture Quality and Aspect Ratio You can receive... other optional equipment. The Quick Setup Guide, enclosed separately, illustrates how to connect other external equipment Contact your BRAVIA TV is only as good as with HD sources. ~ • You can use a wide screen aspect ratio of ... to HD programming. The 1080 HD signals provide more about HDTV, visit: http://www.sony.com/HDTV The Four Steps to Stunning HD Experience: Set, Sound, Source, and Setup Along with different aspect ratios (the width-to-height ratio...
This manual explains basic setup connections (see pages 24, 32 and 34). 8 Picture Quality and Aspect Ratio You can receive... other optional equipment. The Quick Setup Guide, enclosed separately, illustrates how to connect other external equipment Contact your BRAVIA TV is only as good as with HD sources. ~ • You can use a wide screen aspect ratio of ... to HD programming. The 1080 HD signals provide more about HDTV, visit: http://www.sony.com/HDTV The Four Steps to Stunning HD Experience: Set, Sound, Source, and Setup Along with different aspect ratios (the width-to-height ratio...
Operating Instructions
Page 9
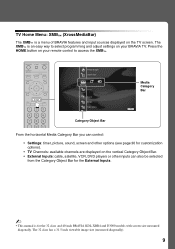
... Category Object Bar for the 32 class and 40 inch BRAVIA KDL-XBR4 and D3000 models with screen size measured diagonally. The 32 class has a 31.5 inch viewable image size (measured diagonally). 9 Press the HOME button on your remote control to select programming and adjust settings on the TV screen. TV Home Menu: XMB™ (XrossMediaBar...
... Category Object Bar for the 32 class and 40 inch BRAVIA KDL-XBR4 and D3000 models with screen size measured diagonally. The 32 class has a 31.5 inch viewable image size (measured diagonally). 9 Press the HOME button on your remote control to select programming and adjust settings on the TV screen. TV Home Menu: XMB™ (XrossMediaBar...
Operating Instructions
Page 13
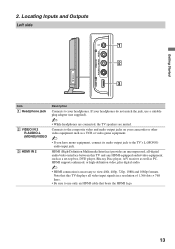
... to use a suitable plug adapter (not supplied). ~ • While headphones are connected, the TV speakers are muted. Getting Started 2. Connects to the TV's L (MONO) audio input jack. Note that this TV and any HDMI-equipped audio/video equipment, such as a set-top box, DVD player, Blu-ray Disc player, A/V receiver as well as a VCR...
... to use a suitable plug adapter (not supplied). ~ • While headphones are connected, the TV speakers are muted. Getting Started 2. Connects to the TV's L (MONO) audio input jack. Note that this TV and any HDMI-equipped audio/video equipment, such as a set-top box, DVD player, Blu-ray Disc player, A/V receiver as well as a VCR...
Operating Instructions
Page 15
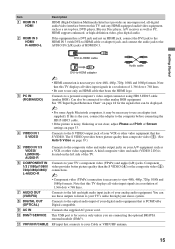
... IN (RGB/AUDIO) 4 VIDEO IN 1 S VIDEO DVI-to view 480i, 480p, 720p, 1080i and 1080p formats. If this TV and any HDMI-equipped audio/video equipment, such as a set-top box, DVD player, Blu-ray Disc player, A/V receiver as well as a VCR or other analog RGB equipment. The S ... (4) or the composite video (5) connections. ~ • Component video (YPBPR) connection is noisy, flickering or not clear, adjust Phase and Pitch of Screen settings on page 18 for service only unless you are connecting the optional BRAVIA external module (DMex). Getting Started Item 1 HDMI IN 1 HDMI 2 HDMI IN 3...
... IN (RGB/AUDIO) 4 VIDEO IN 1 S VIDEO DVI-to view 480i, 480p, 720p, 1080i and 1080p formats. If this TV and any HDMI-equipped audio/video equipment, such as a set-top box, DVD player, Blu-ray Disc player, A/V receiver as well as a VCR or other analog RGB equipment. The S ... (4) or the composite video (5) connections. ~ • Component video (YPBPR) connection is noisy, flickering or not clear, adjust Phase and Pitch of Screen settings on page 18 for service only unless you are connecting the optional BRAVIA external module (DMex). Getting Started Item 1 HDMI IN 1 HDMI 2 HDMI IN 3...

Operating Instructions
Page 16
... box/ HD satellite box CATV/Satellite antenna cable 16 For the best possible picture, make sure you choose (see page 35). Connecting the TV Cable System or VHF/UHF Antenna System You can also enjoy high-definition programming by radio frequency interference, resulting in your area) along with ...audio) input on the back of TV B VHF/UHF/CABLE input ~ • Be sure to set the Cable setting to On or Off in the Channel settings for both cable (QAM and 8VSB) and external VHF/UHF antenna (ATSC). • It ...
... box/ HD satellite box CATV/Satellite antenna cable 16 For the best possible picture, make sure you choose (see page 35). Connecting the TV Cable System or VHF/UHF Antenna System You can also enjoy high-definition programming by radio frequency interference, resulting in your area) along with ...audio) input on the back of TV B VHF/UHF/CABLE input ~ • Be sure to set the Cable setting to On or Off in the Channel settings for both cable (QAM and 8VSB) and external VHF/UHF antenna (ATSC). • It ...

Operating Instructions
Page 18
... will be detected automatically. (PC reboot may be connected to a PC with DVI or HDMI output. (Refer to the separate Quick Setup Guide.) Rear of TV 1 RGB S VIDEO Y PB 3 VIDEO PR DIGITAL OUT (OPTICAL) R AUDIO L AUDIO L (MONO) AUDIO R 1 3 IN PC IN VIDEO IN L AUDIO R 1 2 (VAR/FIX) ...60 Hz vertical frequency from the PC for your PC. PC Input Signal Reference Chart After connecting the PC to the TV, set the output signal from the PC according to the TV and no signal has been input from a personal computer. Resolution Signals VGA SVGA XGA WXGA Horizontal × (Pixel...
... will be detected automatically. (PC reboot may be connected to a PC with DVI or HDMI output. (Refer to the separate Quick Setup Guide.) Rear of TV 1 RGB S VIDEO Y PB 3 VIDEO PR DIGITAL OUT (OPTICAL) R AUDIO L AUDIO L (MONO) AUDIO R 1 3 IN PC IN VIDEO IN L AUDIO R 1 2 (VAR/FIX) ...60 Hz vertical frequency from the PC for your PC. PC Input Signal Reference Chart After connecting the PC to the TV, set the output signal from the PC according to the TV and no signal has been input from a personal computer. Resolution Signals VGA SVGA XGA WXGA Horizontal × (Pixel...
Operating Instructions
Page 20
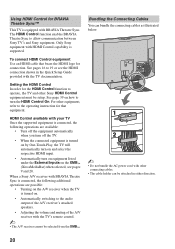
...to the operating instruction for that bears the HDMI logo for the HDMI Control function to operate, the TV and other equipment, refer to allow communication between Sony TV's and Sony equipment. See pages 16 to the audio output of the A/V receiver's attached speakers. • Adjusting... connecting cables as illustrated below. 1 2 ~ • Do not bundle the AC power cord with the TV's remote control. ~ • The A/V receiver cannot be setup. For other Sony HDMI Control equipment must be selected from the XMB™. Setting the HDMI Control In order for connection. Only...
...to the operating instruction for that bears the HDMI logo for the HDMI Control function to operate, the TV and other equipment, refer to allow communication between Sony TV's and Sony equipment. See pages 16 to the audio output of the A/V receiver's attached speakers. • Adjusting... connecting cables as illustrated below. 1 2 ~ • Do not bundle the AC power cord with the TV's remote control. ~ • The A/V receiver cannot be setup. For other Sony HDMI Control equipment must be selected from the XMB™. Setting the HDMI Control In order for connection. Only...

Operating Instructions
Page 21
... the Initial Setup process, the Initial Setup will apply to resume Auto Program. Language settings will restart from the beginning when the TV is turned back on pages 24 and 32. Use the remote control to navigate through the Initial Setup: V/v button: Allows you accidentally turn on screen display ...on the remote control, highlight "Yes" to cancel or "No" to on the TV for available channels. Setting Up the Channel List - Step 1 of available analog and digital channels if you to move back to the TV's VHF/UHF/ CABLE input. You will scan for the first time. Follow the...
... the Initial Setup process, the Initial Setup will apply to resume Auto Program. Language settings will restart from the beginning when the TV is turned back on pages 24 and 32. Use the remote control to navigate through the Initial Setup: V/v button: Allows you accidentally turn on screen display ...on the remote control, highlight "Yes" to cancel or "No" to on the TV for available channels. Setting Up the Channel List - Step 1 of available analog and digital channels if you to move back to the TV's VHF/UHF/ CABLE input. You will scan for the first time. Follow the...
Operating Instructions
Page 22
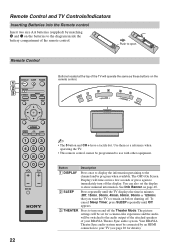
...1 2 3 Buttons located at the top of the TV will be set the display to show minimal information. The OSD (On Screen Display) will time out in minutes (Off, 15min, 30min, 45min, 60min, 90min or 120min) that you want the TV to your BRAVIA Theatre Sync audio system. Use them ... turn on and off the display. HOME ~ • The 5 button and CH + have a tactile dot. You can also set for details). 22 Remote Control and TV Controls/Indicators Inserting Batteries into the Remote control Insert two size AA batteries (supplied) by an HDMI connection to remain on before...
...1 2 3 Buttons located at the top of the TV will be set the display to show minimal information. The OSD (On Screen Display) will time out in minutes (Off, 15min, 30min, 45min, 60min, 90min or 120min) that you want the TV to your BRAVIA Theatre Sync audio system. Use them ... turn on and off the display. HOME ~ • The 5 button and CH + have a tactile dot. You can also set for details). 22 Remote Control and TV Controls/Indicators Inserting Batteries into the Remote control Insert two size AA batteries (supplied) by an HDMI connection to remain on before...
Operating Instructions
Page 23
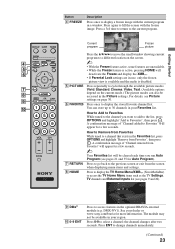
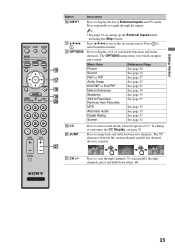
...to Remove from Favorites", then press . Product Support Clock/Timers 9 DMex 0 0-9 ENT Sound Screen Video Options TV Press to select a channel; See your dealer or www.sony.com/bravia for Auto Program). 7 RETURN Press to go back to the previous screen or exit from Favorites" will... module (e.g. A confirmation message of "Channel added to the current program. DMX-NV1). Press again to access the TV Home Menu items such as the TV Settings, TV channels and External Inputs list (see pages 21 and 35 for more information. Getting Started Button 4 FREEZE Description Press...
...to Remove from Favorites", then press . Product Support Clock/Timers 9 DMex 0 0-9 ENT Sound Screen Video Options TV Press to select a channel; See your dealer or www.sony.com/bravia for Auto Program). 7 RETURN Press to go back to the previous screen or exit from Favorites" will... module (e.g. A confirmation message of "Channel added to the current program. DMX-NV1). Press again to access the TV Home Menu items such as the TV Settings, TV channels and External Inputs list (see pages 21 and 35 for more information. Getting Started Button 4 FREEZE Description Press...
Operating Instructions
Page 24
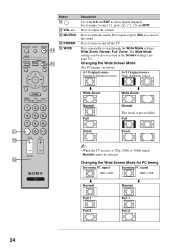
...qg WIDE qg Description Use with 0-9 and ENT to turn on and off the TV. Press to select digital channels. Press to restore the sound. The Wide Mode settings can be also accessed in the Screen settings (see below) 4:3 Original source 16:9 Original source Standard-definition source High-definition ...Full Zoom ~ • When the TV receives a 720p, 1080i or 1080p signal, Normal cannot be selected. Changing the Wide Screen Mode (For PC timing, see page 32). Press again or press VOL + to mute the sound. Press to step through the Wide Mode settings: Wide Zoom, Normal, Full, Zoom...
...qg WIDE qg Description Use with 0-9 and ENT to turn on and off the TV. Press to select digital channels. Press to restore the sound. The Wide Mode settings can be also accessed in the Screen settings (see below) 4:3 Original source 16:9 Original source Standard-definition source High-definition ...Full Zoom ~ • When the TV receives a 720p, 1080i or 1080p signal, Normal cannot be selected. Changing the Wide Screen Mode (For PC timing, see page 32). Press again or press VOL + to mute the sound. Press to step through the Wide Mode settings: Wide Zoom, Normal, Full, Zoom...
Operating Instructions
Page 25
To scan quickly through channels. qj V/v/B/b Press V/v/B/b to move the on setting up the External Inputs labels, including the Skip feature. Press to scan through channels, press and hold down either +/-. 25 Press repeatedly to toggle through ... channel that was selected. Remove from Favorites MTS See page 35 Alternate Audio See page 35 Digital Rating See page 37 Screen See page 32 ql CC w; The TV alternates between two channels. Getting Started Button Description qh INPUT Press to display the list of convenient functions and menu shortcuts. Menu Item...
To scan quickly through channels. qj V/v/B/b Press V/v/B/b to move the on setting up the External Inputs labels, including the Skip feature. Press to scan through channels, press and hold down either +/-. 25 Press repeatedly to toggle through ... channel that was selected. Remove from Favorites MTS See page 35 Alternate Audio See page 35 Digital Rating See page 37 Screen See page 32 ql CC w; The TV alternates between two channels. Getting Started Button Description qh INPUT Press to display the list of convenient functions and menu shortcuts. Menu Item...

Operating Instructions
Page 26
... LED blinks in red continuously, this may be affected. 3 PIC OFF/ TIMER LED Lights up in orange when the timer is set , this LED will remain lit even if the TV is activated. LED 6 (IR) Receives IR signals from the remote control. Infrared Receiver 26 Indicators 1 6 PIC OFF/TIMER 2 3... Senses room light level and adjusts the screen brightness accordingly (see contacting Sony information on . Lights up in green when the Picture Off feature is turned off. Do not put anything near the sensor, as its function may indicate the TV needs servicing (see page 40 for details).
... LED blinks in red continuously, this may be affected. 3 PIC OFF/ TIMER LED Lights up in orange when the timer is set , this LED will remain lit even if the TV is activated. LED 6 (IR) Receives IR signals from the remote control. Infrared Receiver 26 Indicators 1 6 PIC OFF/TIMER 2 3... Senses room light level and adjusts the screen brightness accordingly (see contacting Sony information on . Lights up in green when the Picture Off feature is turned off. Do not put anything near the sensor, as its function may indicate the TV needs servicing (see page 40 for details).

Operating Instructions
Page 27
If channel blocking is set to block programs by ratings. press OPTIONS to display the OPTIONS menu. ~ • The input you to view two pictures simultaneously. To change the channels or enter the channel number using the 0-9 numeric buttons. PIP (picture in picture) provides PC input signal and TV channels. ~ • The VHF...
If channel blocking is set to block programs by ratings. press OPTIONS to display the OPTIONS menu. ~ • The input you to view two pictures simultaneously. To change the channels or enter the channel number using the 0-9 numeric buttons. PIP (picture in picture) provides PC input signal and TV channels. ~ • The VHF...

Operating Instructions
Page 28
... features (vertically) within the highlighted icon. Using TV Features The HOME button allows you to your TV External Watch a movie, play a game, record a program or work on your convenience, see remote control section pages 23 and 25). TV Media Category Icons Settings Adjust TV Settings Customize the TV settings with Settings highlighted. Watching TV Select a channel. Access the equipment connected...
... features (vertically) within the highlighted icon. Using TV Features The HOME button allows you to your TV External Watch a movie, play a game, record a program or work on your convenience, see remote control section pages 23 and 25). TV Media Category Icons Settings Adjust TV Settings Customize the TV settings with Settings highlighted. Watching TV Select a channel. Access the equipment connected...


