Quick Setup Guide
Page 1
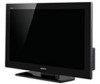
... completed. ■ See reverse side of the signal it is highlighted on your BRAVIA. Please take these items: Set Closed Captions (CC) Label Video Inputs Set Parental...Manual. LCD Digital Color TV Quick Setup Guide 4-183-343-11(1) KDL-32BX300 / 22BX300 Sony Customer Support U.S.A.: www.sony.com/tvsupport Canada: www.sony.ca/support United States 1.800.222.SONY Canada 1.877.899.SONY Please...not supplied) and change the switch to antenna, then start Auto Program to cancel. Sony wall-mounting brackets are displaying on your TV: ■ Press the remote control's MENU button...
... completed. ■ See reverse side of the signal it is highlighted on your BRAVIA. Please take these items: Set Closed Captions (CC) Label Video Inputs Set Parental...Manual. LCD Digital Color TV Quick Setup Guide 4-183-343-11(1) KDL-32BX300 / 22BX300 Sony Customer Support U.S.A.: www.sony.com/tvsupport Canada: www.sony.ca/support United States 1.800.222.SONY Canada 1.877.899.SONY Please...not supplied) and change the switch to antenna, then start Auto Program to cancel. Sony wall-mounting brackets are displaying on your TV: ■ Press the remote control's MENU button...
Safety and Regulatory Booklet
Page 1
...9744; Replace only with rubber or plastic material to your TV; When installing or removing the TV and the Wall‑Mount Bracket, be sure to the LCD panel, small traces of liquid crystal sandwiched between the glass may be exposed to rain or moisture, does not ...use qualified contractors. Folleto de instrucciones de seguridad Lea y entienda el contenido de este folleto antes de operar su nuevo televisor. © 2008 Sony Corporation Printed in a place exposed to extreme temperature, such as radiators, heat registers, stoves, or other apparatus (including amplifiers) that adequate ...
...9744; Replace only with rubber or plastic material to your TV; When installing or removing the TV and the Wall‑Mount Bracket, be sure to the LCD panel, small traces of liquid crystal sandwiched between the glass may be exposed to rain or moisture, does not ...use qualified contractors. Folleto de instrucciones de seguridad Lea y entienda el contenido de este folleto antes de operar su nuevo televisor. © 2008 Sony Corporation Printed in a place exposed to extreme temperature, such as radiators, heat registers, stoves, or other apparatus (including amplifiers) that adequate ...

Operating Instructions
Page 3
...When Installing the TV Against a Wall or Enclosed Area 14 Securing the TV 15 Running Initial Setup 17 Operating the TV Using the Remote Control 18 Remote Control Button Description 19 TV Controls and Indicators 22 Using Features BRAVIA® SyncTM with Control for ... 42 Using a Wall-Mount Bracket 43 Installing the Wall-Mount Bracket 43 Troubleshooting 51 Important Notices 55 Specifications 56 Index 57 Customer Support United States http://www.sony.com/tvsupport Canada http://www.sony.ca/support On-line Registration United States http://productregistration.sony.com Canada http://...
...When Installing the TV Against a Wall or Enclosed Area 14 Securing the TV 15 Running Initial Setup 17 Operating the TV Using the Remote Control 18 Remote Control Button Description 19 TV Controls and Indicators 22 Using Features BRAVIA® SyncTM with Control for ... 42 Using a Wall-Mount Bracket 43 Installing the Wall-Mount Bracket 43 Troubleshooting 51 Important Notices 55 Specifications 56 Index 57 Customer Support United States http://www.sony.com/tvsupport Canada http://www.sony.ca/support On-line Registration United States http://productregistration.sony.com Canada http://...
Operating Instructions
Page 6
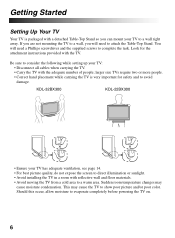
If you are not mounting the TV to a wall, you can mount your TV: • Disconnect all cables when carrying the TV. • Carry the TV with the adequate number of people; larger size TVs require two ... to attach the Table-Top Stand. Should this occur, allow moisture to a wall right away. Getting Started Setting Up Your TV Your TV is very important for the attachment instructions provided with the TV. This may cause moisture condensation. KDL-32BX300 KDL-22BX300 • Ensure your TV has adequate ventilation, see page 14. •...
If you are not mounting the TV to a wall, you can mount your TV: • Disconnect all cables when carrying the TV. • Carry the TV with the adequate number of people; larger size TVs require two ... to attach the Table-Top Stand. Should this occur, allow moisture to a wall right away. Getting Started Setting Up Your TV Your TV is very important for the attachment instructions provided with the TV. This may cause moisture condensation. KDL-32BX300 KDL-22BX300 • Ensure your TV has adequate ventilation, see page 14. •...
Operating Instructions
Page 16
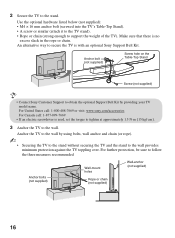
...it to the TV stand). • Rope or chain (strong enough to follow the three measures recommended Anchor bolts (not supplied) Wall-mount holes Rope or chain (not supplied) Wall-anchor (not supplied) 16 For further protection, be sure to support the weight of the TV). Anchor bolt (not supplied) Screw... hole on the Table-Top Stand Screw (not supplied) • Contact Sony Customer Support to obtain the optional Support Belt Kit by using bolts, wall anchor and chain (or rope). ~ • Securing the TV to the stand without securing the TV and the...
...it to the TV stand). • Rope or chain (strong enough to follow the three measures recommended Anchor bolts (not supplied) Wall-mount holes Rope or chain (not supplied) Wall-anchor (not supplied) 16 For further protection, be sure to support the weight of the TV). Anchor bolt (not supplied) Screw... hole on the Table-Top Stand Screw (not supplied) • Contact Sony Customer Support to obtain the optional Support Belt Kit by using bolts, wall anchor and chain (or rope). ~ • Securing the TV to the stand without securing the TV and the...
Operating Instructions
Page 43
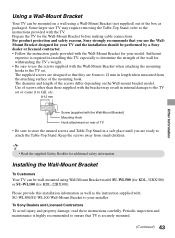
... and safety reasons, Sony strongly recommends that you are 8 mm to 12 mm in internal damage to determine the strength of the wall for KDL-22BX300). The diameter and length of the screws differ depending on a wall using Wall Mount Bracket model SU-WL500 (for KDL-32BX300) or SU-WL100...to your TV and the installation should be performed by a Sony dealer or licensed contractor. • Follow the instruction guide provided with the Wall-Mount Bracket for the Wall-Mount Bracket before making cable connections. To Sony Dealers and Licensed Contractors To avoid injury and property damage, ...
... and safety reasons, Sony strongly recommends that you are 8 mm to 12 mm in internal damage to determine the strength of the wall for KDL-22BX300). The diameter and length of the screws differ depending on a wall using Wall Mount Bracket model SU-WL500 (for KDL-32BX300) or SU-WL100...to your TV and the installation should be performed by a Sony dealer or licensed contractor. • Follow the instruction guide provided with the Wall-Mount Bracket for the Wall-Mount Bracket before making cable connections. To Sony Dealers and Licensed Contractors To avoid injury and property damage, ...
Operating Instructions
Page 44
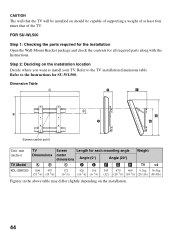
... Table Screen center point Unit: mm (inches) TV Model KDL-32BX300 TV Screen Length for all required parts along with the Instructions. FOR SU-WL500 Step 1: Checking the parts required for the installation Open the Wall-Mount Bracket package and check the contents for each mounting angle Dimensions center dimensions Angle (0°) Angle (20°...
... Table Screen center point Unit: mm (inches) TV Model KDL-32BX300 TV Screen Length for all required parts along with the Instructions. FOR SU-WL500 Step 1: Checking the parts required for the installation Open the Wall-Mount Bracket package and check the contents for each mounting angle Dimensions center dimensions Angle (0°) Angle (20°...
Operating Instructions
Page 45
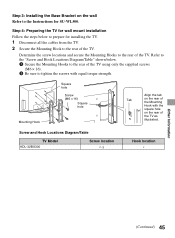
...1 Disconnect all the cables from the TV. 2 Secure the Mounting Hook to the rear of the TV. Screw and Hook Locations Diagram/Table TV Model KDL-32BX300 Screw location e, g Hook location c Other Information (Continued) 45 Mounting Hook Square hole Screw (M6 × 16) Square hole... Align the tab Tab on the rear of the Mounting Hook with the square hole on the wall Refer to the Instructions for wall mount installation Follow...
...1 Disconnect all the cables from the TV. 2 Secure the Mounting Hook to the rear of the TV. Screw and Hook Locations Diagram/Table TV Model KDL-32BX300 Screw location e, g Hook location c Other Information (Continued) 45 Mounting Hook Square hole Screw (M6 × 16) Square hole... Align the tab Tab on the rear of the Mounting Hook with the square hole on the wall Refer to the Instructions for wall mount installation Follow...

Operating Instructions
Page 46
When installing the TV onto Base Bracket. Screw location Hook location When installing the Mounting Hooks on the TV. Refer to the Instructions for SU-WL500. 4 Remove the screws guided by the arrow marks Do not remove any other screws from the TV. of the Mounting Hook. Wall TV 3 Adjust the angle of the TV. 46
When installing the TV onto Base Bracket. Screw location Hook location When installing the Mounting Hooks on the TV. Refer to the Instructions for SU-WL500. 4 Remove the screws guided by the arrow marks Do not remove any other screws from the TV. of the Mounting Hook. Wall TV 3 Adjust the angle of the TV. 46
Operating Instructions
Page 47
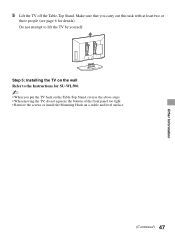
Other Information 5 Lift the TV off the Table-Top Stand. Step 5: Installing the TV on the wall Refer to lift the TV by yourself. Do not attempt to the Instructions for SU-WL500. ~ • When you carry out this task with at least two or three people (see page 6 for details). Make sure that you put the TV back on the Table-Top Stand, reverse the above steps. • When moving the TV, do not squeeze the bottom of the front panel too tight. • Remove the screws or install the Mounting Hook on a stable and level surface. (Continued) 47
Other Information 5 Lift the TV off the Table-Top Stand. Step 5: Installing the TV on the wall Refer to lift the TV by yourself. Do not attempt to the Instructions for SU-WL500. ~ • When you carry out this task with at least two or three people (see page 6 for details). Make sure that you put the TV back on the Table-Top Stand, reverse the above steps. • When moving the TV, do not squeeze the bottom of the front panel too tight. • Remove the screws or install the Mounting Hook on a stable and level surface. (Continued) 47

Operating Instructions
Page 48
...-WL100. Dimension Table Screen center point Unit: mm (inches) TV Model KDL-22BX300 TV Screen Length for all required parts along with the Instructions. Refer to install your TV. CAUTION The wall that the TV will be installed on should be capable of supporting a ... you want to the TV installation dimensions table. FOR SU-WL100 Step 1: Checking the parts required for the installation Open the Wall-Mount Bracket package and check the contents for each mounting angle Dimensions center dimensions Angle (0°) Angle (20°) Weight AB C D E FGH TV ×4 575 361 (22 3/4) ...
...-WL100. Dimension Table Screen center point Unit: mm (inches) TV Model KDL-22BX300 TV Screen Length for all required parts along with the Instructions. Refer to install your TV. CAUTION The wall that the TV will be installed on should be capable of supporting a ... you want to the TV installation dimensions table. FOR SU-WL100 Step 1: Checking the parts required for the installation Open the Wall-Mount Bracket package and check the contents for each mounting angle Dimensions center dimensions Angle (0°) Angle (20°) Weight AB C D E FGH TV ×4 575 361 (22 3/4) ...
Operating Instructions
Page 49
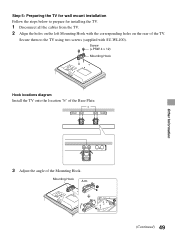
Step 5: Preparing the TV for wall mount installation Follow the steps below to the TV using two screws (supplied with the corresponding holes on the left Mounting Hook with SU-WL100). Screw (+PSW 4 × 12) Mounting Hook Hook locations diagram Install the TV onto the location "b" of the TV. b Other Information 3 Adjust the angle of the Mounting Hook. Mounting Hook Arm (Continued) 49 Secure them to prepare for installing the TV. 1 Disconnect all the cables from the TV. 2 Align the holes on the rear of the Base Plate.
Step 5: Preparing the TV for wall mount installation Follow the steps below to the TV using two screws (supplied with the corresponding holes on the left Mounting Hook with SU-WL100). Screw (+PSW 4 × 12) Mounting Hook Hook locations diagram Install the TV onto the location "b" of the TV. b Other Information 3 Adjust the angle of the Mounting Hook. Mounting Hook Arm (Continued) 49 Secure them to prepare for installing the TV. 1 Disconnect all the cables from the TV. 2 Align the holes on the rear of the Base Plate.
Operating Instructions
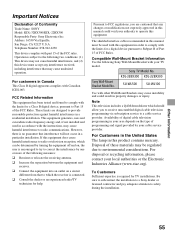
Page 55
... in this equipment. KDL-32BX300 KDL-22BX300 Sony Wall-Mount Bracket Model No. The shielded interface cable recommended in a particular installation. SU-WL500 SU-WL100 Use with the limits for help. Availability of FCC Rules. For Customers in the United States The lamp in this device must be regulated due to radio or television reception, which can...
... in this equipment. KDL-32BX300 KDL-22BX300 Sony Wall-Mount Bracket Model No. The shielded interface cable recommended in a particular installation. SU-WL500 SU-WL100 Use with the limits for help. Availability of FCC Rules. For Customers in the United States The lamp in this device must be regulated due to radio or television reception, which can...
Operating Instructions
Page 56
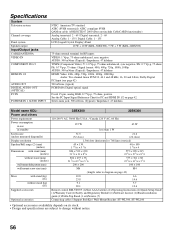
Specifications System Television system Channel coverage Panel system ...- 69 / Digital terrestrial: 2 - 69 Analog Cable: 1 - 135 / Digital Cable: 1 - 135 LCD (Liquid Crystal Display) Panel 10 W + 10 W (KDL-32BX300) / 5 W + 5 W (KDL-22BX300) 75-ohm external terminal for RF inputs VIDEO: 1 Vp-p, 75 ohms unbalanced, sync negative AUDIO: 500 ...(1)/Software License (1)/Stand installation guide (1)/Table-Top Stand (1 set)/Screws (7) Connecting cables / Support Belt Kit / Wall-Mount Bracket: SU-WL500, SU-WL100 • Optional accessories availability depends on page 42. Stereo mini jack, 500 ...
Specifications System Television system Channel coverage Panel system ...- 69 / Digital terrestrial: 2 - 69 Analog Cable: 1 - 135 / Digital Cable: 1 - 135 LCD (Liquid Crystal Display) Panel 10 W + 10 W (KDL-32BX300) / 5 W + 5 W (KDL-22BX300) 75-ohm external terminal for RF inputs VIDEO: 1 Vp-p, 75 ohms unbalanced, sync negative AUDIO: 500 ...(1)/Software License (1)/Stand installation guide (1)/Table-Top Stand (1 set)/Screws (7) Connecting cables / Support Belt Kit / Wall-Mount Bracket: SU-WL500, SU-WL100 • Optional accessories availability depends on page 42. Stereo mini jack, 500 ...


