
Operating Instructions
Page 1
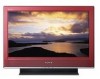
3-196-472-17(1) LCD Digital Color TV Operating Instructions KDL-26S3000 KDL-32SL130 KDL-32S3000 KDL-40SL130 KDL-40S3000 KDL-46S3000 © 2007 Sony Corporation
3-196-472-17(1) LCD Digital Color TV Operating Instructions KDL-26S3000 KDL-32SL130 KDL-32S3000 KDL-40SL130 KDL-40S3000 KDL-46S3000 © 2007 Sony Corporation
Operating Instructions
Page 2
...Owner's Record The model and serial numbers are trademarks or registered trademarks of HDMI Licensing LLC. Sony TV-Stand Model No. KDL-26S3000 KDL-32S3000 KDL-40S3000 KDL-32SL130 KDL-46S3000 KDL-40SL130 SU-WL100 SU-WL500 RHT-G800 - Address: 16530 Via Esprillo, San Diego, CA ... of Apple Inc., registered in the literature accompanying the TV. WARNING To reduce the risk of Conformity Trade Name: SONY Model: KDL-26S3000/KDL-32S3000/ KDL-40S3000/KDL-46S3000/ KDL-32SL130/KDL-40SL130 Responsible Party: Sony Electronics Inc. Pursuant to FCC regulations, you will not...
...Owner's Record The model and serial numbers are trademarks or registered trademarks of HDMI Licensing LLC. Sony TV-Stand Model No. KDL-26S3000 KDL-32S3000 KDL-40S3000 KDL-32SL130 KDL-46S3000 KDL-40SL130 SU-WL100 SU-WL500 RHT-G800 - Address: 16530 Via Esprillo, San Diego, CA ... of Apple Inc., registered in the literature accompanying the TV. WARNING To reduce the risk of Conformity Trade Name: SONY Model: KDL-26S3000/KDL-32S3000/ KDL-40S3000/KDL-46S3000/ KDL-32SL130/KDL-40SL130 Responsible Party: Sony Electronics Inc. Pursuant to FCC regulations, you will not...
Operating Instructions
Page 3
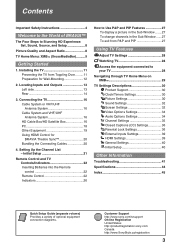
Initial Setup 21 Remote Control and TV Controls/Indicators 22 Inserting Batteries into the Remote control 22 Remote Control 22 Indicators 26 How to Use P&P and PIP Features 27 To display a picture in the Sub Window .......27 To change channels ...connection diagrams. Customer Support http://www.sony.com/tvsupport On-line Registration United States http://productregistration.sony.com Canada http://www.SonyStyle.ca/registration 3 Installing the TV 11 Preventing the TV from P&P and PIP 27 Using TV Features Adjust TV Settings 28 Watching TV 28 Access the equipment connected to ...
Initial Setup 21 Remote Control and TV Controls/Indicators 22 Inserting Batteries into the Remote control 22 Remote Control 22 Indicators 26 How to Use P&P and PIP Features 27 To display a picture in the Sub Window .......27 To change channels ...connection diagrams. Customer Support http://www.sony.com/tvsupport On-line Registration United States http://productregistration.sony.com Canada http://www.SonyStyle.ca/registration 3 Installing the TV 11 Preventing the TV from P&P and PIP 27 Using TV Features Adjust TV Settings 28 Watching TV 28 Access the equipment connected to ...
Operating Instructions
Page 4
...Picture distortion and/or noisy sound may occur if the TV set , the picture may cause arcing and result in close to the TV set . Servicing is positioned in a fire. s Do not allow anything to catch your dealer or Sony service center to grasp the plug when disconnecting the power ...cord. s Use only an original Sony AC power cord, not other apparatus (including amplifiers)...
...Picture distortion and/or noisy sound may occur if the TV set , the picture may cause arcing and result in close to the TV set . Servicing is positioned in a fire. s Do not allow anything to catch your dealer or Sony service center to grasp the plug when disconnecting the power ...cord. s Use only an original Sony AC power cord, not other apparatus (including amplifiers)...
Operating Instructions
Page 5
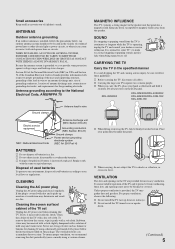
...dry soft cloth. Keep any items susceptible to make occasional snapping or popping sounds, particularly when being turned on the LCD panel. s Carrying the large size TV requires two or more people. s Do not short circuit, disassemble or overheat the batteries. The ventilation holes can...be blocked or covered. s When carrying, do not subject the TV to protect it can accumulate dust over or upside down or sideways. Do not put stress on or off. KDL-26S3000 KDL-32S3000/KDL-40S3000/ KDL-46S3000/KDL-32SL130/ KDL-40SL130 Ground clamps Antenna lead-in a fire. To remove dust ...
...dry soft cloth. Keep any items susceptible to make occasional snapping or popping sounds, particularly when being turned on the LCD panel. s Carrying the large size TV requires two or more people. s Do not short circuit, disassemble or overheat the batteries. The ventilation holes can...be blocked or covered. s When carrying, do not subject the TV to protect it can accumulate dust over or upside down or sideways. Do not put stress on or off. KDL-26S3000 KDL-32S3000/KDL-40S3000/ KDL-46S3000/KDL-32SL130/ KDL-40SL130 Ground clamps Antenna lead-in a fire. To remove dust ...

Operating Instructions
Page 6
... other materials. Installed with stand 11 7/8 inches (30 cm) 4 inches (10 cm) 4 inches (10 cm) 2 3/8 inches (6 cm) Leave at least this TV get wet. s Do not hang anything on a stable, level surface. Wall Wall Objects and ventilation holes Never push objects of a Wall-Mount Bracket. If the... cm) 4 inches (10 cm) 4 inches (10 cm) Leave at least this space around the set. s Do not hang the TV from the TV. s Do not install the TV in a wet basement, or near a heating vent. Do not place objects filled with liquids, such as shown below. Otherwise, air-circulation...
... other materials. Installed with stand 11 7/8 inches (30 cm) 4 inches (10 cm) 4 inches (10 cm) 2 3/8 inches (6 cm) Leave at least this TV get wet. s Do not hang anything on a stable, level surface. Wall Wall Objects and ventilation holes Never push objects of a Wall-Mount Bracket. If the... cm) 4 inches (10 cm) 4 inches (10 cm) Leave at least this space around the set. s Do not hang the TV from the TV. s Do not install the TV in a wet basement, or near a heating vent. Do not place objects filled with liquids, such as shown below. Otherwise, air-circulation...

Operating Instructions
Page 7
... may occur when still pictures are required, be regulated due to qualified service personnel. s Ghosting may be observed when the LCD TV is in a vehicle. s Avoid prolonged contact with high-precision technology and to achieve a high level of light (red, blue, or green) ..., poisoning or skin irritation may heat up and become dark. Refer all servicing to environmental considerations. Disposal of the TV. Do not install this TV outdoors. LCD SCREEN s Although the LCD screen is made with rubber or plastic material. This is set to fall down from toppling over, secure the...
... may occur when still pictures are required, be regulated due to qualified service personnel. s Ghosting may be observed when the LCD TV is in a vehicle. s Avoid prolonged contact with high-precision technology and to achieve a high level of light (red, blue, or green) ..., poisoning or skin irritation may heat up and become dark. Refer all servicing to environmental considerations. Disposal of the TV. Do not install this TV outdoors. LCD SCREEN s Although the LCD screen is made with rubber or plastic material. This is set to fall down from toppling over, secure the...

Operating Instructions
Page 8
...standard analog signal, you for information on an HDTV, you need access to HD programming. To experience the stunning detail of your new BRAVIA TV, you will notice a big difference. Picture Quality and Aspect Ratio You can enjoy crisp, clear images, smooth movement and high-impact visuals ...sony.com/HDTV The Four Steps to HD programming. The picture quality may not be as sharp as the quality of the signal it receives. The quality of the image). HDTV uses a wider screen than twice the vertical resolution of HD programming and proper setup connections. Your BRAVIA TV...
...standard analog signal, you for information on an HDTV, you need access to HD programming. To experience the stunning detail of your new BRAVIA TV, you will notice a big difference. Picture Quality and Aspect Ratio You can enjoy crisp, clear images, smooth movement and high-impact visuals ...sony.com/HDTV The Four Steps to HD programming. The picture quality may not be as sharp as the quality of the signal it receives. The quality of the image). HDTV uses a wider screen than twice the vertical resolution of HD programming and proper setup connections. Your BRAVIA TV...
Operating Instructions
Page 9
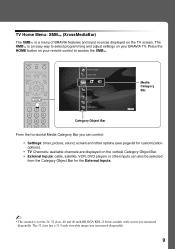
... Screen Video Options Category Object Bar Media Category Bar TV From the horizontal Media Category Bar you can control: • Settings: timer, picture, sound, screen and other options (see page 30 for the 26, 32 class, 40 and 46 inch BRAVIA KDL-S Series models with screen size measured diagonally. The ...XMB™ is an easy way to access the XMB™. TV Home Menu: XMB™ (XrossMediaBar) The XMB™ is a menu of...
... Screen Video Options Category Object Bar Media Category Bar TV From the horizontal Media Category Bar you can control: • Settings: timer, picture, sound, screen and other options (see page 30 for the 26, 32 class, 40 and 46 inch BRAVIA KDL-S Series models with screen size measured diagonally. The ...XMB™ is an easy way to access the XMB™. TV Home Menu: XMB™ (XrossMediaBar) The XMB™ is a menu of...
Operating Instructions
Page 11
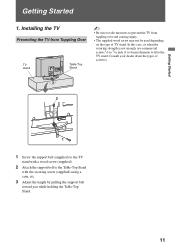
... a wood screw (supplied). 2 Attach the support belt to the TV stand. Getting Started Getting Started 1. Installing the TV Preventing the TV from Toppling Over TV stand Table-Top Stand ~ • Be sure to take measures to prevent the TV from toppling over and causing injury. • The supplied wood screw... may not be used depending on the type of screw(s). 2 3 1 1 Screw the support belt (supplied) to the TV stand with the securing screw (supplied) using a coin, etc. 3 Adjust the length by pulling the support belt toward you while holding the Table-Top...
... a wood screw (supplied). 2 Attach the support belt to the TV stand. Getting Started Getting Started 1. Installing the TV Preventing the TV from Toppling Over TV stand Table-Top Stand ~ • Be sure to take measures to prevent the TV from toppling over and causing injury. • The supplied wood screw... may not be used depending on the type of screw(s). 2 3 1 1 Screw the support belt (supplied) to the TV stand with the securing screw (supplied) using a coin, etc. 3 Adjust the length by pulling the support belt toward you while holding the Table-Top...
Operating Instructions
Page 12
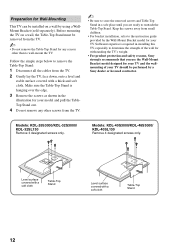
...expertise is hanging over the edge. 3 Remove the screws as shown in the illustration for your TV. Models: KDL-40S3000/KDL-46S3000/ KDL-40SL130 Remove 4 designated screws only. Before mounting the TV on a wall by the Wall-Mount Bracket model for your model and pull the TableTop Stand ...Be sure to store the removed screws and Table-Top Stand in installing this TV, especially to determine the strength of your TV should be performed by a Sony dealer or licensed contractor. Models: KDL-26S3000/KDL-32S3000/ KDL-32SL130 Remove 3 designated screws only. Level surface covered with a soft cloth ...
...expertise is hanging over the edge. 3 Remove the screws as shown in the illustration for your TV. Models: KDL-40S3000/KDL-46S3000/ KDL-40SL130 Remove 4 designated screws only. Before mounting the TV on a wall by the Wall-Mount Bracket model for your model and pull the TableTop Stand ...Be sure to store the removed screws and Table-Top Stand in installing this TV, especially to determine the strength of your TV should be performed by a Sony dealer or licensed contractor. Models: KDL-26S3000/KDL-32S3000/ KDL-32SL130 Remove 3 designated screws only. Level surface covered with a soft cloth ...

Operating Instructions
Page 13
... its audio output jack to your headphones do not match the jack, use a suitable plug adapter (not supplied). ~ • While headphones are connected, the TV speakers are muted. If your headphones. Locating Inputs and Outputs Left side 1 2 3 R-AUDIO-L (MONO) VIDEO S VIDEO 2 VIDEO IN Item 1 Headphone jack... 2 VIDEO IN 2 S VIDEO 3 VIDEO IN 2 R-AUDIO-L (MONO)/VIDEO Description Connects to the TV's L (MONO) audio input jack. 13 Connects to the S VIDEO output jack on your camcorder or other video equipment that has S VIDEO.
... its audio output jack to your headphones do not match the jack, use a suitable plug adapter (not supplied). ~ • While headphones are connected, the TV speakers are muted. If your headphones. Locating Inputs and Outputs Left side 1 2 3 R-AUDIO-L (MONO) VIDEO S VIDEO 2 VIDEO IN Item 1 Headphone jack... 2 VIDEO IN 2 S VIDEO 3 VIDEO IN 2 R-AUDIO-L (MONO)/VIDEO Description Connects to the TV's L (MONO) audio input jack. 13 Connects to the S VIDEO output jack on your camcorder or other video equipment that has S VIDEO.
Operating Instructions
Page 15
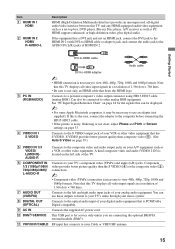
... 7 AUDIO OUT (VAR/FIX) 8 DIGITAL OUT (OPTICAL) 9 AC IN 0 DMex/ SERVICE qa VHF/UHF/CABLE Connects to the left side of the TV. Getting Started Item 1 HDMI IN 1 HDMI 2 HDMI IN 2 HDMI/ R-AUDIO-L Description HDMI (High-Definition Multimedia Interface) provides an uncompressed, all-digital ...audio/video interface between this TV displays all video input signals in a resolution of 1,366 dots × 768 lines. Can also be necessary to the S VIDEO output jack of...
... 7 AUDIO OUT (VAR/FIX) 8 DIGITAL OUT (OPTICAL) 9 AC IN 0 DMex/ SERVICE qa VHF/UHF/CABLE Connects to the left side of the TV. Getting Started Item 1 HDMI IN 1 HDMI 2 HDMI IN 2 HDMI/ R-AUDIO-L Description HDMI (High-Definition Multimedia Interface) provides an uncompressed, all-digital ...audio/video interface between this TV displays all video input signals in a resolution of 1,366 dots × 768 lines. Can also be necessary to the S VIDEO output jack of...

Operating Instructions
Page 16
... input HD Cable Box/HD Satellite Box You can also enjoy high-definition programming by radio frequency interference, resulting in your TV. Cable Antenna A-B RF switch A Rear of TV B VHF/UHF/CABLE input ~ • Be sure to set the Cable setting to receive optimum picture quality. Cable ...or VHF/UHF (or VHF only) 75-ohm coaxial cable Rear of TV 1 RGB S VIDEO Y PB 2 VIDEO PR DIGITAL OUT (OPTICAL) R AUDIO L AUDIO L (MONO) AUDIO R 1 3 IN PC IN VIDEO IN L AUDIO R 1 2 (VAR/FIX) ...
... input HD Cable Box/HD Satellite Box You can also enjoy high-definition programming by radio frequency interference, resulting in your TV. Cable Antenna A-B RF switch A Rear of TV B VHF/UHF/CABLE input ~ • Be sure to set the Cable setting to receive optimum picture quality. Cable ...or VHF/UHF (or VHF only) 75-ohm coaxial cable Rear of TV 1 RGB S VIDEO Y PB 2 VIDEO PR DIGITAL OUT (OPTICAL) R AUDIO L AUDIO L (MONO) AUDIO R 1 3 IN PC IN VIDEO IN L AUDIO R 1 2 (VAR/FIX) ...

Operating Instructions
Page 17
Getting Started Shown with DVI Connection Rear of TV 1 RGB S VIDEO Y PB 2 VIDEO PR DIGITAL OUT (OPTICAL) DVI-to-HDMI cable R AUDIO L AUDIO L (MONO) AUDIO R AUDIO-R (red) AUDIO-L (white) 1 3 IN PC IN VIDEO IN L ... cable Audio cable ~ • If the equipment has a DVI jack and not an HDMI jack, connect the DVI jack to the AUDIO IN (L/R) jacks of TV 1 RGB S VIDEO Y PB 2 VIDEO PR DIGITAL OUT (OPTICAL) R AUDIO L AUDIO L (MONO) AUDIO R 1 3 IN PC IN VIDEO IN L AUDIO R 1 2 (VAR/FIX) COMPONENT IN AUDIO (1080p/1080i...
Getting Started Shown with DVI Connection Rear of TV 1 RGB S VIDEO Y PB 2 VIDEO PR DIGITAL OUT (OPTICAL) DVI-to-HDMI cable R AUDIO L AUDIO L (MONO) AUDIO R AUDIO-R (red) AUDIO-L (white) 1 3 IN PC IN VIDEO IN L ... cable Audio cable ~ • If the equipment has a DVI jack and not an HDMI jack, connect the DVI jack to the AUDIO IN (L/R) jacks of TV 1 RGB S VIDEO Y PB 2 VIDEO PR DIGITAL OUT (OPTICAL) R AUDIO L AUDIO L (MONO) AUDIO R 1 3 IN PC IN VIDEO IN L AUDIO R 1 2 (VAR/FIX) COMPONENT IN AUDIO (1080p/1080i...

Operating Instructions
Page 18
... VGA input does not support interlaced signals. • For the best picture quality, it is connected to the TV, set the output signal from a personal computer. This TV can also be necessary.) 18 Shown below . In plug and play, signals with a 60 Hz vertical frequency will be detected... automatically. (PC reboot may be connected to a PC with DVI or HDMI output. (Refer to the separate Quick Setup Guide.) Rear of TV 1 RGB S VIDEO Y PB 2 VIDEO PR DIGITAL OUT (OPTICAL) R AUDIO L AUDIO L (MONO) AUDIO R 1 3 IN PC IN VIDEO IN L AUDIO R 1 2 (VAR/FIX) ...
... VGA input does not support interlaced signals. • For the best picture quality, it is connected to the TV, set the output signal from a personal computer. This TV can also be necessary.) 18 Shown below . In plug and play, signals with a 60 Hz vertical frequency will be detected... automatically. (PC reboot may be connected to a PC with DVI or HDMI output. (Refer to the separate Quick Setup Guide.) Rear of TV 1 RGB S VIDEO Y PB 2 VIDEO PR DIGITAL OUT (OPTICAL) R AUDIO L AUDIO L (MONO) AUDIO R 1 3 IN PC IN VIDEO IN L AUDIO R 1 2 (VAR/FIX) ...
Operating Instructions
Page 19
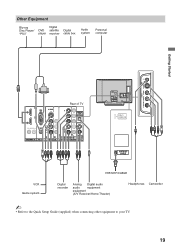
.../ "PS3" Digital DVD satellite player receiver Digital cable box Audio system Personal computer Getting Started R-AUDIO-L (MONO) VIDEO S VIDEO 2 VIDEO 1 RGB S VIDEO 2 VIDEO Rear of TV Y DIGITAL OUT PB (OPTICAL) PR R AUDIO L AUDIO L (MONO) AUDIO R 1 3 IN PC IN VIDEO IN L AUDIO R 1 2 (VAR/FIX) COMPONENT IN AUDIO (1080p/1080i/720p/480p/480i... Analog Digital audio audio equipment equipment (A/V Receiver/Home Theater) Headphones Camcorder ~ • Refer to the Quick Setup Guide (supplied) when connecting other equipment to your TV. 19
.../ "PS3" Digital DVD satellite player receiver Digital cable box Audio system Personal computer Getting Started R-AUDIO-L (MONO) VIDEO S VIDEO 2 VIDEO 1 RGB S VIDEO 2 VIDEO Rear of TV Y DIGITAL OUT PB (OPTICAL) PR R AUDIO L AUDIO L (MONO) AUDIO R 1 3 IN PC IN VIDEO IN L AUDIO R 1 2 (VAR/FIX) COMPONENT IN AUDIO (1080p/1080i/720p/480p/480i... Analog Digital audio audio equipment equipment (A/V Receiver/Home Theater) Headphones Camcorder ~ • Refer to the Quick Setup Guide (supplied) when connecting other equipment to your TV. 19
Operating Instructions
Page 20
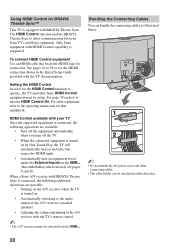
... to 19 or see pages 9 and 28. See pages 16 to operate, the TV and other Sony HDMI Control equipment must be setup. HDMI Control available with the TV documentation. Bundling the Connecting Cables You can be attached in the Quick Setup Guide provided... possible: • Turning on the A/V receiver when the TV is turned on. • Automatically switching to allow communication between Sony TV's and Sony equipment. To connect HDMI Control equipment Use an HDMI cable that equipment. When a Sony A/V receiver with BRAVIA Theatre Sync is connected, the following additional...
... to 19 or see pages 9 and 28. See pages 16 to operate, the TV and other Sony HDMI Control equipment must be setup. HDMI Control available with the TV documentation. Bundling the Connecting Cables You can be attached in the Quick Setup Guide provided... possible: • Turning on the A/V receiver when the TV is turned on. • Automatically switching to allow communication between Sony TV's and Sony equipment. To connect HDMI Control equipment Use an HDMI cable that equipment. When a Sony A/V receiver with BRAVIA Theatre Sync is connected, the following additional...

Operating Instructions
Page 21
...the remote control, highlight "Yes" to cancel or "No" to skip the Auto Program if you are receiving channels from the beginning when the TV is completed. 21 Language settings will be used for digital channels. s To Add Digital Channels Use the Add Digital Channels feature as described on...signal source or select Skip to resume Auto Program. Getting Started 4. When the Auto Program is not connected. button: Allows you turn off the TV during the Initial Setup process, the Initial Setup will restart from a cable box or satellite receiver and the VHF/UHF/CABLE input is completed,...
...the remote control, highlight "Yes" to cancel or "No" to skip the Auto Program if you are receiving channels from the beginning when the TV is completed. 21 Language settings will be used for digital channels. s To Add Digital Channels Use the Add Digital Channels feature as described on...signal source or select Skip to resume Auto Program. Getting Started 4. When the Auto Program is not connected. button: Allows you turn off the TV during the Initial Setup process, the Initial Setup will restart from a cable box or satellite receiver and the VHF/UHF/CABLE input is completed,...

Operating Instructions
Page 22
...Buttons located at the top of the remote control. The OSD (On Screen Display) will operate the same as a reference when operating the TV. • This remote control cannot be programmed to the channel and/or program when available. You can also set the display to show minimal... few seconds or press again to immediately turn off . Press repeatedly until Off appears. 22 See Info Banner on page 40. Remote Control and TV Controls/Indicators Inserting Batteries into the Remote control Insert two size AA batteries (supplied) by matching e and E on the batteries to the diagram inside...
...Buttons located at the top of the remote control. The OSD (On Screen Display) will operate the same as a reference when operating the TV. • This remote control cannot be programmed to the channel and/or program when available. You can also set the display to show minimal... few seconds or press again to immediately turn off . Press repeatedly until Off appears. 22 See Info Banner on page 40. Remote Control and TV Controls/Indicators Inserting Batteries into the Remote control Insert two size AA batteries (supplied) by matching e and E on the batteries to the diagram inside...


