Operating Instructions
Page 6
... and flammable objects s Do not use power-line operated sets near a swimming pool, etc. s Do not let this much as illustrated. Have it from overheating, these slots and openings must never be placed on the TV. s Hold the TV securely when carrying it may drop and serious injury may ... or other similar surface. Unless proper ventilation is provided. It may result in electric shock or damage to protect it checked immediately by placing the TV on a wall, allow this much space: 30 cm (117/8 inches) 5.7 cm (21/4 inches) 10 cm (4 inches) 10 cm (4 inches) 10 cm (4 inches...
... and flammable objects s Do not use power-line operated sets near a swimming pool, etc. s Do not let this much as illustrated. Have it from overheating, these slots and openings must never be placed on the TV. s Hold the TV securely when carrying it may drop and serious injury may ... or other similar surface. Unless proper ventilation is provided. It may result in electric shock or damage to protect it checked immediately by placing the TV on a wall, allow this much space: 30 cm (117/8 inches) 5.7 cm (21/4 inches) 10 cm (4 inches) 10 cm (4 inches) 10 cm (4 inches...
Operating Instructions
Page 9
... the Picture Settings 26 Using the Sound Settings 28 Using the Screen Settings 29 Using the Setup Settings 31 Using the PC Settings...36 Using the Analog Setup Settings 37 Using the Digital Setup Settings 38 Other Information Troubleshooting...41 Preparation for Wall Mounting the KDL-23S2010, KDL-26S2010 and KDL-32S2010.......43 Preparation for Wall Mounting the KDL-40S2010 and KDL-46S2010 44...
... the Picture Settings 26 Using the Sound Settings 28 Using the Screen Settings 29 Using the Setup Settings 31 Using the PC Settings...36 Using the Analog Setup Settings 37 Using the Digital Setup Settings 38 Other Information Troubleshooting...41 Preparation for Wall Mounting the KDL-23S2010, KDL-26S2010 and KDL-32S2010.......43 Preparation for Wall Mounting the KDL-40S2010 and KDL-46S2010 44...

Operating Instructions
Page 11
...section. Connecting the TV To display clear, crisp pictures, your new BRAVIA TV is also capable of receiving unscrambled digital programming for models KDL-23S2010, KDL-26S2010, KDL-32S2010, KDL40S2010 and KDL-46S2010. After you can view (see page 15). This TV is strongly recommended that are provided in this Sony LCD Digital Color Television.... done, you must be easily affected by radio frequency, resulting in signal deterioration. see page 18). To properly connect your TV will allow you should select the proper Wide Mode setting to receive optimum picture quality.
...section. Connecting the TV To display clear, crisp pictures, your new BRAVIA TV is also capable of receiving unscrambled digital programming for models KDL-23S2010, KDL-26S2010, KDL-32S2010, KDL40S2010 and KDL-46S2010. After you can view (see page 15). This TV is strongly recommended that are provided in this Sony LCD Digital Color Television.... done, you must be easily affected by radio frequency, resulting in signal deterioration. see page 18). To properly connect your TV will allow you should select the proper Wide Mode setting to receive optimum picture quality.
Operating Instructions
Page 12
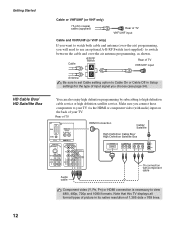
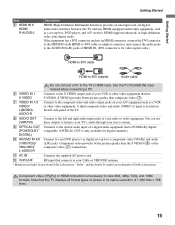
... enjoy high definition programming by subscribing to high definition cable service or high definition satellite service. Cable A/B RF Switch A Rear of TV VHF/UHF input B Antenna Be sure to set Cable setting option to Cable On or Cable Off in its native resolution of 1,366 dots × 768 lines. 12 Note that this... TV displays all format types of picture in Setup settings for the type of input signal you will need to use an optional A-B RF Switch (not supplied) to switch between the ...
... enjoy high definition programming by subscribing to high definition cable service or high definition satellite service. Cable A/B RF Switch A Rear of TV VHF/UHF input B Antenna Be sure to set Cable setting option to Cable On or Cable Off in its native resolution of 1,366 dots × 768 lines. 12 Note that this... TV displays all format types of picture in Setup settings for the type of input signal you will need to use an optional A-B RF Switch (not supplied) to switch between the ...
Operating Instructions
Page 13
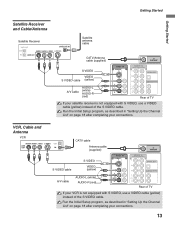
Run the Initial Setup program, as described in "Setting Up the Channel List" on page 18 after completing your connections. CATV...480p/480i) 4 5 Y OPTICAL OUT PB VIDEO L (MONO) AUDIO R PR L AUDIO R AUDIO OUT(VAR/FIX) Rear of TV If your VCR is not equipped with S VIDEO, use a VIDEO cable (yellow) instead of the S VIDEO cable. Getting Started ...480p/480i) 4 5 Y OPTICAL OUT PB VIDEO L (MONO) AUDIO R PR L AUDIO R AUDIO OUT(VAR/FIX) Rear of TV If your satellite receiver is not equipped with S VIDEO, use a VIDEO cable (yellow) instead of the S VIDEO cable. Run the ...
Run the Initial Setup program, as described in "Setting Up the Channel List" on page 18 after completing your connections. CATV...480p/480i) 4 5 Y OPTICAL OUT PB VIDEO L (MONO) AUDIO R PR L AUDIO R AUDIO OUT(VAR/FIX) Rear of TV If your VCR is not equipped with S VIDEO, use a VIDEO cable (yellow) instead of the S VIDEO cable. Getting Started ...480p/480i) 4 5 Y OPTICAL OUT PB VIDEO L (MONO) AUDIO R PR L AUDIO R AUDIO OUT(VAR/FIX) Rear of TV If your satellite receiver is not equipped with S VIDEO, use a VIDEO cable (yellow) instead of the S VIDEO cable. Run the ...
Operating Instructions
Page 14
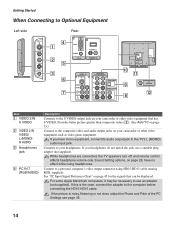
.... If your camcorder or other video equipment that can be necessary to use a suitable plug adapter (not supplied). Connect to the TV's L (MONO) audio input jack. Sound Setting options, on your headphones do not match the jack, use an adapter (not supplied). If this is noisy, flickering or not... clear, adjust the Phase and Pitch of the PC Settings see page 36. 14 If you have no effect while using HD15-HD15 cable (analog RGB, supplied). Provides better picture quality than composite video ...
.... If your camcorder or other video equipment that can be necessary to use a suitable plug adapter (not supplied). Connect to the TV's L (MONO) audio input jack. Sound Setting options, on your headphones do not match the jack, use an adapter (not supplied). If this is noisy, flickering or not... clear, adjust the Phase and Pitch of the PC Settings see page 36. 14 If you have no effect while using HD15-HD15 cable (analog RGB, supplied). Provides better picture quality than composite video ...
Operating Instructions
Page 15
...Connects to the optical audio input of a digital audio equipment that connects to the left and right audio input jacks of your A/V equipment such as a set -top box's component video (YPBPR) and audio (L/R) jacks. Note that has S VIDEO. Component video provides better picture quality than composite video (7). ... L(MONO)AUDIO-R Connect to the composite video and audio output jacks on the left side panel of the TV. 8 AUDIO OUT (VAR/FIX) Connect to your DVD player's or digital set -top box, DVD player, and A/V receiver. Component video (YPBPR) or HDMI connection is only available ...
...Connects to the optical audio input of a digital audio equipment that connects to the left and right audio input jacks of your A/V equipment such as a set -top box's component video (YPBPR) and audio (L/R) jacks. Note that has S VIDEO. Component video provides better picture quality than composite video (7). ... L(MONO)AUDIO-R Connect to the composite video and audio output jacks on the left side panel of the TV. 8 AUDIO OUT (VAR/FIX) Connect to your DVD player's or digital set -top box, DVD player, and A/V receiver. Component video (YPBPR) or HDMI connection is only available ...
Operating Instructions
Page 18
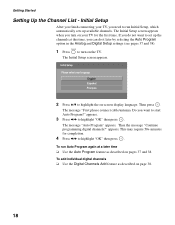
... Then press . To run Initial Setup, which automatically sets up the channels at a later time ❑ Use the Auto Program feature as described on -screen display language. POWER 1 Press to turn on your TV, you finish connecting your TV for completion. 4 Press B/b to highlight the on ...want to highlight "OK" then press . If you turn on pages 37 and 38. Getting Started Setting Up the Channel List - To add individual digital channels ❑ Use the Digital Channels Add feature as described on the TV. Then the message "Continue programming digital channels?"
... Then press . To run Initial Setup, which automatically sets up the channels at a later time ❑ Use the Auto Program feature as described on -screen display language. POWER 1 Press to turn on your TV, you finish connecting your TV for completion. 4 Press B/b to highlight the on ...want to highlight "OK" then press . If you turn on pages 37 and 38. Getting Started Setting Up the Channel List - To add individual digital channels ❑ Use the Digital Channels Add feature as described on the TV. Then the message "Continue programming digital channels?"
Operating Instructions
Page 19
...only) Using the Guide The Guide allows you to the program. The Guide also provides information about the current program being shown on setting up the video input labels, including the Skip function. Audio 19 With Freeze function active, some functions are watching digital (Digital ...channels (if it is available from a channel list. Time remaining: 1:26 TV-G CC 1 ABC 10 DISC 23.1 FAM 36 TLC Alternate Audio Audio 1 Englsih Audio 2 English 65 HIST 68 SHOW C23.1 FAM Alt. Press...
...only) Using the Guide The Guide allows you to the program. The Guide also provides information about the current program being shown on setting up the video input labels, including the Skip function. Audio 19 With Freeze function active, some functions are watching digital (Digital ...channels (if it is available from a channel list. Time remaining: 1:26 TV-G CC 1 ABC 10 DISC 23.1 FAM 36 TLC Alternate Audio Audio 1 Englsih Audio 2 English 65 HIST 68 SHOW C23.1 FAM Alt. Press...
Operating Instructions
Page 20
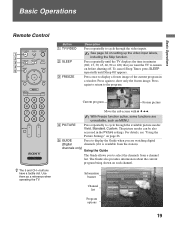
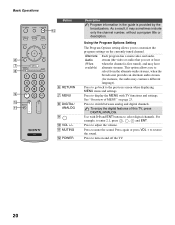
Using the Program Options Setting The Program Options setting allows you to turn on the currently tuned channel. To enjoy the digital features of MENU" on page 23. Press again or press VOL + to ... to display the MENU with 0-9 and ENT buttons to customize the program settings on and off the TV. 20 See "Overview of this TV, press DIGITAL/ANALOG. Use with TV functions and settings. Press to the previous screen when displaying MENU items and settings. Basic Operations 6 7 8 9 0 qa Button qs 6 RETURN 7 MENU 8 DIGITAL/ ANALOG 9 0 VOL +/- Press to...
Using the Program Options Setting The Program Options setting allows you to turn on the currently tuned channel. To enjoy the digital features of MENU" on page 23. Press again or press VOL + to ... to display the MENU with 0-9 and ENT buttons to customize the program settings on and off the TV. 20 See "Overview of this TV, press DIGITAL/ANALOG. Use with TV functions and settings. Press to the previous screen when displaying MENU items and settings. Basic Operations 6 7 8 9 0 qa Button qs 6 RETURN 7 MENU 8 DIGITAL/ ANALOG 9 0 VOL +/- Press to...

Operating Instructions
Page 21
... source High definition source m Wide Zoom Normal Full m Wide Zoom Normal This mode is associated with your current input: Analog TV, Digital TV, or External Inputs. (See page 26, 28, 31, 36 and 37.) Press to scan through channels, press and hold down either +/-. Press V/v/B/b to step ...through the Wide Mode settings: Wide Zoom, Normal, Full, Zoom. Press to immediately turn off the display. the channel changes after a few seconds...
... source High definition source m Wide Zoom Normal Full m Wide Zoom Normal This mode is associated with your current input: Analog TV, Digital TV, or External Inputs. (See page 26, 28, 31, 36 and 37.) Press to scan through channels, press and hold down either +/-. Press V/v/B/b to step ...through the Wide Mode settings: Wide Zoom, Normal, Full, Zoom. Press to immediately turn off the display. the channel changes after a few seconds...

Operating Instructions
Page 22
...is turned on may be affected. Lights up in green when the TV is set . Outputs audio signal. Press to malfunction. 22 If you set a certain input to Skip in green when the Picture Off feature is set , this LED will not appear. To scan quickly through the video ... turned off before unplugging the power cord. Lights up in red when your TV is turned on . In the MENU screen, these buttons serve as confirming the selection or setting. For details, see "Overview of MENU" on page 2). VOLUME + 4 - CHANNEL + 5 POWER 6 (IR) Infrared Receiver/ Light Sensor 7 PIC OFF...
...is turned on may be affected. Lights up in green when the TV is set . Outputs audio signal. Press to malfunction. 22 If you set a certain input to Skip in green when the Picture Off feature is set , this LED will not appear. To scan quickly through the video ... turned off before unplugging the power cord. Lights up in red when your TV is turned on . In the MENU screen, these buttons serve as confirming the selection or setting. For details, see "Overview of MENU" on page 2). VOLUME + 4 - CHANNEL + 5 POWER 6 (IR) Infrared Receiver/ Light Sensor 7 PIC OFF...

Operating Instructions
Page 23
...the item. 3 Press to select an option. 2, 3 Press MENU to perform a variety of MENU MENU provides one button access for controlling your TV settings. 1 Press MENU on the screen rather than a variety of remote control button presses. When you press the MENU button, you to exit. ...1 MENU External Inputs Analog Favorites Digital Favorites Analog Digital Settings Select from connected equipment Select: Set: Exit: MENU 23 It enables you can easily perform basic TV functions such as: switching between external inputs, viewing your favorite analog/digital stations,...
...the item. 3 Press to select an option. 2, 3 Press MENU to perform a variety of MENU MENU provides one button access for controlling your TV settings. 1 Press MENU on the screen rather than a variety of remote control button presses. When you press the MENU button, you to exit. ...1 MENU External Inputs Analog Favorites Digital Favorites Analog Digital Settings Select from connected equipment Select: Set: Exit: MENU 23 It enables you can easily perform basic TV functions such as: switching between external inputs, viewing your favorite analog/digital stations,...
Operating Instructions
Page 24
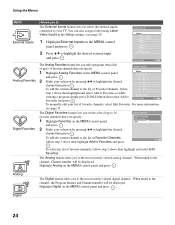
... Favorites and press . Return Add to Favorites 1 28 : ----2 60 : ----3 28 : ----4 65 : ----5 68 : ----6 28 : ----7 -- : ----8 -- : ----Edit Favorites Select: Set: Exit: MENU To manually edit your selection by pressing V/v to highlight the desired channel then press . To add the current channel to the list of...the channel, Channel number will be displayed. Digital 24 Highlight Analog on the MENU control panel and press . To edit your TV. Using the Menus MENU External Inputs Analog Favorites Digital Favorites Allows you to The External Inputs feature lets you select the external...
... Favorites and press . Return Add to Favorites 1 28 : ----2 60 : ----3 28 : ----4 65 : ----5 68 : ----6 28 : ----7 -- : ----8 -- : ----Edit Favorites Select: Set: Exit: MENU To manually edit your selection by pressing V/v to highlight the desired channel then press . To add the current channel to the list of...the channel, Channel number will be displayed. Digital 24 Highlight Analog on the MENU control panel and press . To edit your TV. Using the Menus MENU External Inputs Analog Favorites Digital Favorites Allows you to The External Inputs feature lets you select the external...
Operating Instructions
Page 25
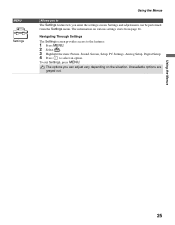
.... 2 Select . 3 Highlight the item: Picture, Sound, Screen, Setup, PC Settings, Analog Setup, Digital Setup. 4 Press to The Settings feature lets you can be performed from page 26. Using the Menus 25 The options you enter the settings screen. The information on the situation. MENU Settings Using the Menus Allows you to select an option. To...
.... 2 Select . 3 Highlight the item: Picture, Sound, Screen, Setup, PC Settings, Analog Setup, Digital Setup. 4 Press to The Settings feature lets you can be performed from page 26. Using the Menus 25 The options you enter the settings screen. The information on the situation. MENU Settings Using the Menus Allows you to select an option. To...
Operating Instructions
Page 26
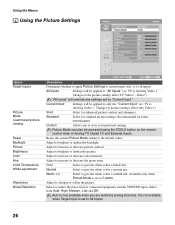
... is not available when Target Input is set to only the "Current Input" (ex: TV is showing Video 1. Custom Allows you are watching analog channels. Resets the current Picture Mode setting to increase or decrease the green tones. Video7) "All Inputs" will be applied to All Inputs. 26 Adjust to the default values. All...
... is not available when Target Input is set to only the "Current Input" (ex: TV is showing Video 1. Custom Allows you are watching analog channels. Resets the current Picture Mode setting to increase or decrease the green tones. Video7) "All Inputs" will be applied to All Inputs. 26 Adjust to the default values. All...
Operating Instructions
Page 27
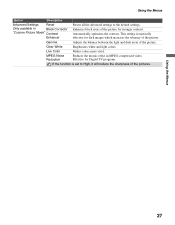
...optimizes the contrast. Using the Menus 27 Effective for Digital TV programs. If the function is especially effective for stronger contrast. Clear White Emphasizes white and light colors. This setting is set to the default settings. Gamma Adjusts the balance between the light and dark ... in Black Corrector "Custom Picture Mode" Contrast Enhancer Resets all the advanced settings to High, it will reduce the sharpness of the pictures. Using the Menus Option Description Advanced Settings Reset Only available in MPEG-compressed video. Live Color Makes colors more vivid...
...optimizes the contrast. Using the Menus 27 Effective for Digital TV programs. If the function is especially effective for stronger contrast. Clear White Emphasizes white and light colors. This setting is set to the default settings. Gamma Adjusts the balance between the light and dark ... in Black Corrector "Custom Picture Mode" Contrast Enhancer Resets all the advanced settings to High, it will reduce the sharpness of the pictures. Using the Menus Option Description Advanced Settings Reset Only available in MPEG-compressed video. Live Color Makes colors more vivid...
Operating Instructions
Page 28
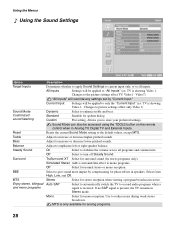
...Off Select for mono reception. Allows you to the default values, except MTS. Resets the current Sound Mode setting to store your preferred settings. Adjust to the picture settings affect TV, Video1 - Select from High, Low, and Off. Mono Select for normal stereo or mono reception. Changes... give sound more impact by "Current Input." Use to enhance treble and bass. All Inputs Settings will be applied to "All Inputs" (ex: TV is received. Changes to picture settings affect only Video 1) Dynamic Select to reduce noise during weak stereo broadcasts. On Select to ...
...Off Select for mono reception. Allows you to the default values, except MTS. Resets the current Sound Mode setting to store your preferred settings. Adjust to the picture settings affect TV, Video1 - Select from High, Low, and Off. Mono Select for normal stereo or mono reception. Changes... give sound more impact by "Current Input." Use to enhance treble and bass. All Inputs Settings will be applied to "All Inputs" (ex: TV is received. Changes to picture settings affect only Video 1) Dynamic Select to reduce noise during weak stereo broadcasts. On Select to ...
Operating Instructions
Page 29
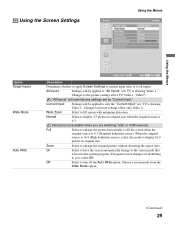
...the Auto Wide option. Choose a screen mode from the Wide Mode option. (Continued) 29 All Inputs Settings will be applied to only the "Current Input" (ex: TV is showing Video 1. Video7) "All Inputs" will be applied to the screen mode that is 4:3. Off...original source is best for the current program. Changes to picture settings affect only Video 1) Wide Zoom Select to the picture settings affect TV, Video1 - Normal is showing Video 1. Current Input Settings will override any settings set by "Current Input." Changes to fill screen with minimum distortion....
...the Auto Wide option. Choose a screen mode from the Wide Mode option. (Continued) 29 All Inputs Settings will be applied to only the "Current Input" (ex: TV is showing Video 1. Video7) "All Inputs" will be applied to the screen mode that is 4:3. Off...original source is best for the current program. Changes to picture settings affect only Video 1) Wide Zoom Select to the picture settings affect TV, Video1 - Normal is showing Video 1. Current Input Settings will override any settings set by "Current Input." Changes to fill screen with minimum distortion....
Operating Instructions
Page 30
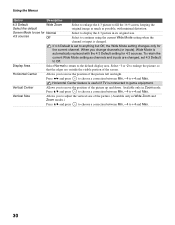
Horizontal Center feature is useful if TV is set to enlarge the picture so that the edges are changed . Select to game equipment. When you to adjust the vertical size of the picture. (Available ... to display the 4:3 picture in its original size. Select -1 or -2 to anything but Off, the Wide Mode setting changes only for 4:3 sources. Vertical Size Allows you change channels (or inputs), Wide Mode is changed , set 4:3 Default to + 4 and Max. Display Area Select Normal to return to + 4 and Max. 30 Available only in...
Horizontal Center feature is useful if TV is set to enlarge the picture so that the edges are changed . Select to game equipment. When you to adjust the vertical size of the picture. (Available ... to display the 4:3 picture in its original size. Select -1 or -2 to anything but Off, the Wide Mode setting changes only for 4:3 sources. Vertical Size Allows you change channels (or inputs), Wide Mode is changed , set 4:3 Default to + 4 and Max. Display Area Select Normal to return to + 4 and Max. 30 Available only in...


