Operating Instructions
Page 3
... This device may cause undesired operation. s To prevent internal heat buildup, do not expose the screen to excessive dust or mechanical vibration. s If the TV is required for a Class B digital device, pursuant to the following measures: s Reorient or ... desirable to install the TV in Canada This Class B digital apparatus complies with §15.119 of Conformity Trade Name: SONY Model: KDL-23S2000/KDL-26S2000/ KDL-32S2000/KDL-40S2000/ KDL-46S2000 Responsible Party: Sony Electronics Inc. KDL-23S2000 KDL-26S2000 KDL-32S2000 KDL-40S2000 KDL-46S2000 Sony Wall-Mount Bracket Model ...
... This device may cause undesired operation. s To prevent internal heat buildup, do not expose the screen to excessive dust or mechanical vibration. s If the TV is required for a Class B digital device, pursuant to the following measures: s Reorient or ... desirable to install the TV in Canada This Class B digital apparatus complies with §15.119 of Conformity Trade Name: SONY Model: KDL-23S2000/KDL-26S2000/ KDL-32S2000/KDL-40S2000/ KDL-46S2000 Responsible Party: Sony Electronics Inc. KDL-23S2000 KDL-26S2000 KDL-32S2000 KDL-40S2000 KDL-46S2000 Sony Wall-Mount Bracket Model ...

Operating Instructions
Page 5
...the AC power cord when wiring cables. If it is operating, unplug the TV and consult your dealer or Sony service center to grounding electrodes, and requirements for long periods of overhead power...our environment, dispose of batteries in a fire or an electric shock. s Do not move the TV with such power lines or circuits. Stubborn stains may cause electric shock. Antenna Grounding According to the... cord If you plug/unplug the AC power cord from the screen, wipe it from the TV is continuous or frequent while the TV is loose, it can come in wire to magnetic fields away...
...the AC power cord when wiring cables. If it is operating, unplug the TV and consult your dealer or Sony service center to grounding electrodes, and requirements for long periods of overhead power...our environment, dispose of batteries in a fire or an electric shock. s Do not move the TV with such power lines or circuits. Stubborn stains may cause electric shock. Antenna Grounding According to the... cord If you plug/unplug the AC power cord from the screen, wipe it from the TV is continuous or frequent while the TV is loose, it can come in wire to magnetic fields away...

Operating Instructions
Page 7
...closing the windows or using headphones is not a malfunction. s Do not push or scratch the LCD screen, or place objects on top of the LCD panel and is in use Do not install this TV in a place where medical equipment is not a malfunction. These phenomenon improve as hearing damage ... Do not use qualified contractors. Sound carries very easily at the TV. LCD SCREEN s Although the LCD screen is toxic), with high-precision technology and has effective pixels of 99.99% or more, black dots or bright points of the screen height, and in a vehicle. Do not touch broken glass or...
...closing the windows or using headphones is not a malfunction. s Do not push or scratch the LCD screen, or place objects on top of the LCD panel and is in use Do not install this TV in a place where medical equipment is not a malfunction. These phenomenon improve as hearing damage ... Do not use qualified contractors. Sound carries very easily at the TV. LCD SCREEN s Although the LCD screen is toxic), with high-precision technology and has effective pixels of 99.99% or more, black dots or bright points of the screen height, and in a vehicle. Do not touch broken glass or...
Operating Instructions
Page 9
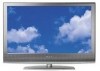
... Setting Up the Channel List - Contents Getting Started Welcome to the World of 11 Connecting the TV ...11 Cable System and/or VHF/UHF Antenna System 11 HD Cable Box/HD Satellite Box 12 Satellite Receiver and Cable/Antenna 13 VCR,...Using the Picture Settings 26 Using the Sound Settings 28 Using the Screen Settings 29 Using the Setup Settings 31 Using the PC Settings...36 Using the Analog Setup Settings 37 Using the Digital Setup Settings 38 Other Information Troubleshooting...41 Preparation for Wall Mounting the KDL-23S2000, KDL-26S2000 and KDL-32S2000.......43 Preparation ...
... Setting Up the Channel List - Contents Getting Started Welcome to the World of 11 Connecting the TV ...11 Cable System and/or VHF/UHF Antenna System 11 HD Cable Box/HD Satellite Box 12 Satellite Receiver and Cable/Antenna 13 VCR,...Using the Picture Settings 26 Using the Sound Settings 28 Using the Screen Settings 29 Using the Setup Settings 31 Using the PC Settings...36 Using the Analog Setup Settings 37 Using the Digital Setup Settings 38 Other Information Troubleshooting...41 Preparation for Wall Mounting the KDL-23S2000, KDL-26S2000 and KDL-32S2000.......43 Preparation ...
Operating Instructions
Page 11
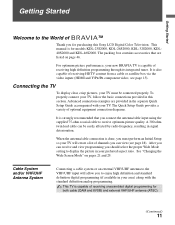
...connect the antenna/cable input using the supplied 75-ohm coaxial cable to display the picture in your TV, follow the basic connections provided in this Sony LCD Digital Color Television. Advanced connection examples are listed on pages 21 and 29. The Quick Setup ...with the standard definition analog programming. See "Changing the Wide Screen Mode" on page 46. It is for models KDL-23S2000, KDL-26S2000, KDL-32S2000, KDL40S2000 and KDL-46S2000. Connecting the TV To display clear, crisp pictures, your TV. After you should select the proper Wide Mode setting to...
...connect the antenna/cable input using the supplied 75-ohm coaxial cable to display the picture in your TV, follow the basic connections provided in this Sony LCD Digital Color Television. Advanced connection examples are listed on pages 21 and 29. The Quick Setup ...with the standard definition analog programming. See "Changing the Wide Screen Mode" on page 46. It is for models KDL-23S2000, KDL-26S2000, KDL-32S2000, KDL40S2000 and KDL-46S2000. Connecting the TV To display clear, crisp pictures, your TV. After you should select the proper Wide Mode setting to...
Operating Instructions
Page 18
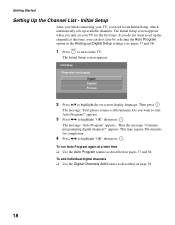
...Press B/b to set up available channels. To add individual digital channels ❑ Use the Digital Channels Add feature as described on the TV. The Initial Setup screen appears. 2 Press V/v to highlight the on page 38. 18 Do you want to highlight "OK" then press . The message ... language. The Initial Setup screen appears when you need to start Auto Program?" Then the message "Continue programming digital channels?" Getting Started Setting Up the Channel List - Initial Setup After you finish connecting your TV, you turn on your TV for completion. 4 Press B/b to ...
...Press B/b to set up available channels. To add individual digital channels ❑ Use the Digital Channels Add feature as described on the TV. The Initial Setup screen appears. 2 Press V/v to highlight the on page 38. 18 Do you want to highlight "OK" then press . The message ... language. The Initial Setup screen appears when you need to start Auto Program?" Then the message "Continue programming digital channels?" Getting Started Setting Up the Channel List - Initial Setup After you finish connecting your TV, you turn on your TV for completion. 4 Press B/b to ...
Operating Instructions
Page 19
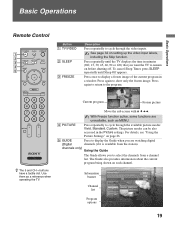
...setting up the video input labels, including the Skip function. Move the sub screen with V v B b. channels only) Using the Guide The Guide allows you are unavailable, such as a reference when operating the TV. Series follows the aquatic misadventures of the current program in a window. ... about the current program being shown on each channel. To cancel Sleep Timer, press SLEEP repeatedly until the TV displays the time in the Picture settings. Time remaining: 1:26 TV-G CC 1 ABC 10 DISC 23.1 FAM 36 TLC Alternate Audio Audio 1 Englsih Audio 2 English 65 HIST...
...setting up the video input labels, including the Skip function. Move the sub screen with V v B b. channels only) Using the Guide The Guide allows you are unavailable, such as a reference when operating the TV. Series follows the aquatic misadventures of the current program in a window. ... about the current program being shown on each channel. To cancel Sleep Timer, press SLEEP repeatedly until the TV displays the time in the Picture settings. Time remaining: 1:26 TV-G CC 1 ABC 10 DISC 23.1 FAM 36 TLC Alternate Audio Audio 1 Englsih Audio 2 English 65 HIST...
Operating Instructions
Page 20
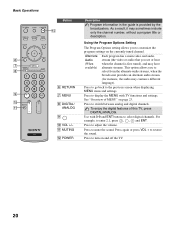
...analog and digital channels. Press to mute the sound. Using the Program Options Setting The Program Options setting allows you to the previous screen when displaying MENU items and settings. Press to go back to customize the program settings on the currently tuned channel. See "Overview of... this TV, press DIGITAL/ANALOG. Press again or press VOL + to select from the alternate audio streams, when the broadcaster provides an alternate audio ...
...analog and digital channels. Press to mute the sound. Using the Program Options Setting The Program Options setting allows you to the previous screen when displaying MENU items and settings. Press to go back to customize the program settings on the currently tuned channel. See "Overview of... this TV, press DIGITAL/ANALOG. Press again or press VOL + to select from the alternate audio streams, when the broadcaster provides an alternate audio ...
Operating Instructions
Page 21
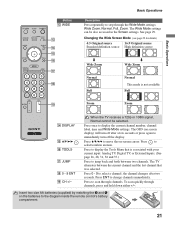
... definition source High definition source m Wide Zoom Normal Full m Wide Zoom Normal This mode is associated with your current input: Analog TV, Digital TV, or External Inputs. (See page 26, 28, 31, 36 and 37.) Press to jump back and forth between the current channel and the last channel that is not... available Full ql Zoom Zoom qa qf DISPLAY qg V/v/B/b qh TOOLS qj JUMP qk 0 - 9 ENT ql CH +/- Press once to move the on-screen...
... definition source High definition source m Wide Zoom Normal Full m Wide Zoom Normal This mode is associated with your current input: Analog TV, Digital TV, or External Inputs. (See page 26, 28, 31, 36 and 37.) Press to jump back and forth between the current channel and the last channel that is not... available Full ql Zoom Zoom qa qf DISPLAY qg V/v/B/b qh TOOLS qj JUMP qk 0 - 9 ENT ql CH +/- Press once to move the on-screen...
Operating Instructions
Page 22
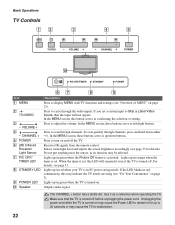
... set , this LED will not appear. To scan quickly through the video inputs. In the MENU screen, these buttons serve as its function may indicate the TV needs servicing (see "Overview of MENU" on and off before unplugging the power cord. Do not put anything near the sensor, as left...power saving mode. Use it as confirming the selection or setting. In the MENU screen, this may be affected. Senses room light level and adjusts the screen brightness accordingly (see page 33. Lights up in green when the TV is activated. If you set a certain input to adjust the volume. Press to...
... set , this LED will not appear. To scan quickly through the video inputs. In the MENU screen, these buttons serve as its function may indicate the TV needs servicing (see "Overview of MENU" on and off before unplugging the power cord. Do not put anything near the sensor, as left...power saving mode. Use it as confirming the selection or setting. In the MENU screen, this may be affected. Senses room light level and adjusts the screen brightness accordingly (see page 33. Lights up in green when the TV is activated. If you set a certain input to adjust the volume. Press to...
Operating Instructions
Page 23
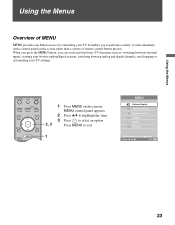
... Analog Digital Settings Select from connected equipment Select: Set: Exit: MENU 23 It enables you can easily perform basic TV functions such as: switching between external inputs, viewing your favorite analog/digital stations, switching between analog and digital channels, and changing...option. 2, 3 Press MENU to perform a variety of tasks intuitively with a control panel on the screen rather than a variety of MENU MENU provides one button access for controlling your TV settings. 1 Press MENU on the remote. Using the Menus Using the Menus Overview of remote control button...
... Analog Digital Settings Select from connected equipment Select: Set: Exit: MENU 23 It enables you can easily perform basic TV functions such as: switching between external inputs, viewing your favorite analog/digital stations, switching between analog and digital channels, and changing...option. 2, 3 Press MENU to perform a variety of tasks intuitively with a control panel on the screen rather than a variety of MENU MENU provides one button access for controlling your TV settings. 1 Press MENU on the remote. Using the Menus Using the Menus Overview of remote control button...
Operating Instructions
Page 25
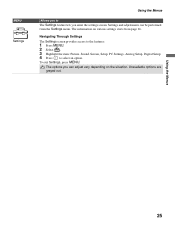
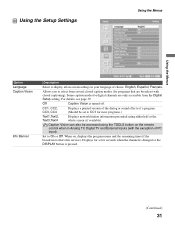
... options are grayed out. To exit Settings, press MENU. Navigating Through Settings The Settings screen provides access to the features: 1 Press MENU. 2 Select . 3 Highlight the item: Picture, Sound, Screen, Setup, PC Settings, Analog Setup, Digital Setup. 4 Press to The Settings feature lets... you enter the settings screen. Using the Menus 25 The options you can be performed from page 26. The information on the situation. MENU Settings Using ...
... options are grayed out. To exit Settings, press MENU. Navigating Through Settings The Settings screen provides access to the features: 1 Press MENU. 2 Select . 3 Highlight the item: Picture, Sound, Screen, Setup, PC Settings, Analog Setup, Digital Setup. 4 Press to The Settings feature lets... you enter the settings screen. Using the Menus 25 The options you can be performed from page 26. The information on the situation. MENU Settings Using ...

Operating Instructions
Page 29
...to you are disturbing to only the "Current Input" (ex: TV is not available when you , select Off. On Select to have the screen automatically change to the picture settings affect TV, Video1 - Changes to the screen mode that is 16:9 (High definition source), select this mode... to fill screen with minimum distortion. Changes to picture settings affect only Video ...
...to you are disturbing to only the "Current Input" (ex: TV is not available when you , select Off. On Select to have the screen automatically change to the picture settings affect TV, Video1 - Changes to the screen mode that is 16:9 (High definition source), select this mode... to fill screen with minimum distortion. Changes to picture settings affect only Video ...

Operating Instructions
Page 30
...Mode setting as possible, with minimal distortion. Available only in its original size. Using the Menus Option Description 4:3 Default Wide Zoom Select the default Screen Mode to use for 4:3 sources. Display Area Select Normal to return to + 4 and Max. Press B/b and press to choose a correction between... + 4 and Max. 30 Horizontal Center feature is useful if TV is set 4:3 Default to Off. Vertical Size Allows you change channels (or inputs), Wide Mode is changed , set to fill the 16:9 screen, keeping the original image as much as channels and inputs are ...
...Mode setting as possible, with minimal distortion. Available only in its original size. Using the Menus Option Description 4:3 Default Wide Zoom Select the default Screen Mode to use for 4:3 sources. Display Area Select Normal to return to + 4 and Max. Press B/b and press to choose a correction between... + 4 and Max. 30 Horizontal Center feature is useful if TV is set 4:3 Default to Off. Vertical Size Allows you change channels (or inputs), Wide Mode is changed , set to fill the 16:9 screen, keeping the original image as much as channels and inputs are ...
Operating Instructions
Page 31
... on the remote control when in your language of a program. (Should be accessed using either half or the whole screen (if available). Set to display all on-screen settings in Analog TV, Digital TV and External Inputs (with closed caption modes (for programs that are only accessible from several closed captioning). For details, see...
... on the remote control when in your language of a program. (Should be accessed using either half or the whole screen (if available). Set to display all on-screen settings in Analog TV, Digital TV and External Inputs (with closed caption modes (for programs that are only accessible from several closed captioning). For details, see...
Operating Instructions
Page 32
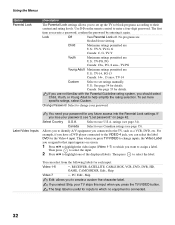
... a password, confirm the password by entering it again. U.S.: See page 34 for inputs to their content and rating levels. To set up the TV to block programs according to which no equipment is useful for details. If you lose your password for each input: Video 1-6 -, RECEIVER, SATELLITE,... to create a custom five character label. If you to the TV, such as a VCR, DVD, etc. Change Password Select to change inputs, the Video Label you assigned to that input appears on page 42. ratings (see page 35). on screen. 1 Press V/v to highlight the video input (Video 1-7) to...
... a password, confirm the password by entering it again. U.S.: See page 34 for inputs to their content and rating levels. To set up the TV to block programs according to which no equipment is useful for details. If you lose your password for each input: Video 1-6 -, RECEIVER, SATELLITE,... to create a custom five character label. If you to the TV, such as a VCR, DVD, etc. Change Password Select to change inputs, the Video Label you assigned to that input appears on page 42. ratings (see page 35). on screen. 1 Press V/v to highlight the video input (Video 1-7) to...
Operating Instructions
Page 33
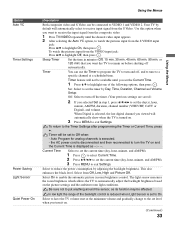
...hour, minute, AM/PM, duration, channel number (VHF/UHF, CATV or Digital), and volume. The light sensor measures the room brightness which allows the TV to automatically adjust the backlight brightness based on . (Continued) 33 Sleep Timer Set the time in step 1, press V/v/B/b to set to On. Set:... the Timer to program the TV to turn and off automatically. Your TV by default will not be affected. Off: Select to turn the TV on before shutting off , and to tune to enable the automatic picture (screen) brightness control. Timer will automatically show when the TV is executed. - the AC...
...hour, minute, AM/PM, duration, channel number (VHF/UHF, CATV or Digital), and volume. The light sensor measures the room brightness which allows the TV to automatically adjust the backlight brightness based on . (Continued) 33 Sleep Timer Set the time in step 1, press V/v/B/b to set to On. Set:... the Timer to program the TV to turn and off automatically. Your TV by default will not be affected. Off: Select to turn the TV on before shutting off , and to tune to enable the automatic picture (screen) brightness control. Timer will automatically show when the TV is executed. - the AC...
Operating Instructions
Page 36
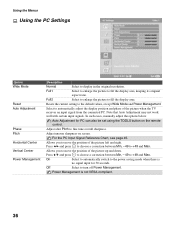
... + 49 and Max. Auto Adjustment for 30 seconds. Power Management is no signal input for PC can also be set using the TOOLS button on screen. For the PC Input Signal Reference Chart, see page 45. Allows you to move the position of the picture when the... TV receives an input signal from the connected PC. Allows you to move the position of the picture left and right. Select to turn off Power ...
... + 49 and Max. Auto Adjustment for 30 seconds. Power Management is no signal input for PC can also be set using the TOOLS button on screen. For the PC Input Signal Reference Chart, see page 45. Allows you to move the position of the picture when the... TV receives an input signal from the connected PC. Allows you to move the position of the picture left and right. Select to turn off Power ...

Operating Instructions
Page 37
... To assign labels to be hidden can also be set to more channels, repeat steps 1-2. When Auto Program is done, the Show/Hide Channels screen will be accessed only with the 0-9 buttons. Then press to select the channel number that appear when you want to make your favorite channels. ... it . 2 Press V/v to show or hide more channels, repeat steps 1-2. 37 Channels that you set using the TOOLS button on the TV for Analog TV can be shown or hidden. To show or hide. To add other Favorite Channel numbers, repeat steps 1-2. To select Favorite Channel numbers that ...
... To assign labels to be hidden can also be set to more channels, repeat steps 1-2. When Auto Program is done, the Show/Hide Channels screen will be accessed only with the 0-9 buttons. Then press to select the channel number that appear when you want to make your favorite channels. ... it . 2 Press V/v to show or hide more channels, repeat steps 1-2. 37 Channels that you set using the TOOLS button on the TV for Analog TV can be shown or hidden. To show or hide. To add other Favorite Channel numbers, repeat steps 1-2. To select Favorite Channel numbers that ...
Operating Instructions
Page 41
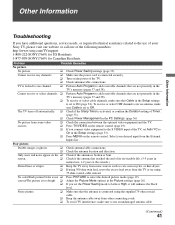
...picture mode (page 19). Only snow and noise appear on the remote control. screen. ❑ Check if the antenna has reached the end of its serviceable life... TV. ❑ Press TV/VIDEO on the power of the following numbers: http://www.sony.com/TVsupport 1-800-222-SONY(7669) for US Residents 1-877-899-SONY(...TV turns off automatically. ❑ Check if the Sleep Timer is activated, or confirm the Duration setting of Timer. (page 33). ❑ Check Power Management in the Setup settings is set Auto YC to add receivable channels that are not presently in the Picture settings (page 26...
...picture mode (page 19). Only snow and noise appear on the remote control. screen. ❑ Check if the antenna has reached the end of its serviceable life... TV. ❑ Press TV/VIDEO on the power of the following numbers: http://www.sony.com/TVsupport 1-800-222-SONY(7669) for US Residents 1-877-899-SONY(...TV turns off automatically. ❑ Check if the Sleep Timer is activated, or confirm the Duration setting of Timer. (page 33). ❑ Check Power Management in the Setup settings is set Auto YC to add receivable channels that are not presently in the Picture settings (page 26...


