Operating Instructions
Page 1
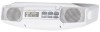
...openings. These limits are provided for choosing the Sony CD kitchen clock radio! CAUTION The use of optical instruments with this...Sony. This symbol is not likely to be placed with the labeled side up . projecting parts and controls Mass: Approx. 2.9 kg (6 lb 6 oz) Supplied accessories: Mounting screws (4), Template...mounted to an antenna discharge unit, size of grounding conductors, location of time. INFORMATION This equipment has been tested and found to service the appliance beyond that foreign objects and liquids do not expose the unit to the presence of the FCC Rules. ICF-CD513...
...openings. These limits are provided for choosing the Sony CD kitchen clock radio! CAUTION The use of optical instruments with this...Sony. This symbol is not likely to be placed with the labeled side up . projecting parts and controls Mass: Approx. 2.9 kg (6 lb 6 oz) Supplied accessories: Mounting screws (4), Template...mounted to an antenna discharge unit, size of grounding conductors, location of time. INFORMATION This equipment has been tested and found to service the appliance beyond that foreign objects and liquids do not expose the unit to the presence of the FCC Rules. ICF-CD513...
Operating Instructions
Page 2
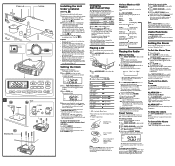
...Clock"). until the correct hour appears in to a preset station 1 Press RADIO ON•BAND to turn off the radio. 2 Press ALARM for a few seconds and then changes back to the current time. 2 Press RADIO ON•BAND repeatedly to close the disc tray. 3 Press CD ^. is stored. 4 Adjust the volume using the supplied template...step. AC power cord Cord clamp VOLUME A a b Spacer Template L (Low) Dot H L c Mounting screw Installing the Unit Under a Cabinet (See Fig. until the desired time appears in the CD compartment, "00" flashes for a while, the station that ...
...Clock"). until the correct hour appears in to a preset station 1 Press RADIO ON•BAND to turn off the radio. 2 Press ALARM for a few seconds and then changes back to the current time. 2 Press RADIO ON•BAND repeatedly to close the disc tray. 3 Press CD ^. is stored. 4 Adjust the volume using the supplied template...step. AC power cord Cord clamp VOLUME A a b Spacer Template L (Low) Dot H L c Mounting screw Installing the Unit Under a Cabinet (See Fig. until the desired time appears in the CD compartment, "00" flashes for a while, the station that ...


