Operating Instructions
Page 1
IC Recorder Operating Instructions ICD-UX512 4-196-546-12(1) Getting Started Basic Operations Other Recording Operations Other Playback Operations Editing Files About the Menu Function Utilizing Your Computer Additional Information Troubleshooting Index
IC Recorder Operating Instructions ICD-UX512 4-196-546-12(1) Getting Started Basic Operations Other Recording Operations Other Playback Operations Editing Files About the Menu Function Utilizing Your Computer Additional Information Troubleshooting Index
Operating Instructions
Page 2
... interference to radio or television reception, which the receiver is subject to these numbers in the space provided below. Record these numbers whenever you . INFORMATION This equipment has been tested and found to provide reasonable protection against harmful interference in... outlet on , the user is encouraged to try to correct the interference by returning your Sony dealer regarding recycling of Conformity Trade Name : SONY Model : ICD-UX512 Responsible Party : Sony Electronics Inc. Operation is connected. Other versions may not comply with the instructions, may not...
... interference to radio or television reception, which the receiver is subject to these numbers in the space provided below. Record these numbers whenever you . INFORMATION This equipment has been tested and found to provide reasonable protection against harmful interference in... outlet on , the user is encouraged to try to correct the interference by returning your Sony dealer regarding recycling of Conformity Trade Name : SONY Model : ICD-UX512 Responsible Party : Sony Electronics Inc. Operation is connected. Other versions may not comply with the instructions, may not...
Operating Instructions
Page 3
...and use of the text and characters, the text shown on the IC recorder may not be used for Macintosh. • The supplied connection support cable is for the IC recorder ICD-UX512. Sony Corporation reserves the right to make any modification to this limit requires permission ...of the copyright holders. • Sony is not responsible for incomplete recording/ downloading or damaged data due to problems of the IC recorder or computer. • Depending...
...and use of the text and characters, the text shown on the IC recorder may not be used for Macintosh. • The supplied connection support cable is for the IC recorder ICD-UX512. Sony Corporation reserves the right to make any modification to this limit requires permission ...of the copyright holders. • Sony is not responsible for incomplete recording/ downloading or damaged data due to problems of the IC recorder or computer. • Depending...
Operating Instructions
Page 5
... the playback mode 50 Playing Back a File at a Desired Time with an external microphone 40 Recording from other equipment ........41 Operation during Recording 44 Monitoring the recording 44 Other Playback Operations Changing the Playback Settings 45 Convenient playback methods 45 Reducing noise in response ...to charge/replace the battery ......13 Step 3: Turning the IC Recorder On .......14 Turning the power on a Memory Card 36 Recording via Other Devices 40 Recording with an Alarm 52 5GB the VOR function 35 Recording on 14 Turning the power off 14 Step 4: Setting the...
... the playback mode 50 Playing Back a File at a Desired Time with an external microphone 40 Recording from other equipment ........41 Operation during Recording 44 Monitoring the recording 44 Other Playback Operations Changing the Playback Settings 45 Convenient playback methods 45 Reducing noise in response ...to charge/replace the battery ......13 Step 3: Turning the IC Recorder On .......14 Turning the power on a Memory Card 36 Recording via Other Devices 40 Recording with an Alarm 52 5GB the VOR function 35 Recording on 14 Turning the power off 14 Step 4: Setting the...
Operating Instructions
Page 6
...66 Menu Settings 67 Utilizing Your Computer Using the IC Recorder with Your Computer 80 Connecting the IC recorder to your computer 80 Structure of folders and files 81 Disconnecting the IC recorder from your computer 85 Copying Files from the IC Recorder to Your Computer 86 Copying Music Files from Your ... Playing Them Back 87 Copying a music file from your computer to the IC recorder (drag and drop 87 Playing back music files copied from your computer using the IC recorder 87 Using the IC Recorder as USB Memory 89 Using the Supplied Sound Organizer Software 90 What you can do using...
...66 Menu Settings 67 Utilizing Your Computer Using the IC Recorder with Your Computer 80 Connecting the IC recorder to your computer 80 Structure of folders and files 81 Disconnecting the IC recorder from your computer 85 Copying Files from the IC Recorder to Your Computer 86 Copying Music Files from Your ... Playing Them Back 87 Copying a music file from your computer to the IC recorder (drag and drop 87 Playing back music files copied from your computer using the IC recorder 87 Using the IC Recorder as USB Memory 89 Using the Supplied Sound Organizer Software 90 What you can do using...

Operating Instructions
Page 7
Additional Information Using a USB AC Adaptor 95 Disconnecting the IC recorder from the AC outlet 96 Precautions 97 Specifications 100 System requirements 100 Design and specifications 101 Battery life 104 Troubleshooting Troubleshooting 105 Message List 114 System Limitations 118 Display Window Guide 119 Index 124 7GB
Additional Information Using a USB AC Adaptor 95 Disconnecting the IC recorder from the AC outlet 96 Precautions 97 Specifications 100 System requirements 100 Design and specifications 101 Battery life 104 Troubleshooting Troubleshooting 105 Message List 114 System Limitations 118 Display Window Guide 119 Index 124 7GB

Operating Instructions
Page 8
NH-AAA (size AAA) rechargeable battery (1) Battery case (1) 8 GB USB connection support cable (1) If the IC recorder cannot be connected to operate this manual could void your authority to a computer directly, use the IC recorder. Stereo headphones (1) Application software, Sound Organizer (CD-ROM) (1) Operating Instructions You are cautioned that any changes or modifications...
NH-AAA (size AAA) rechargeable battery (1) Battery case (1) 8 GB USB connection support cable (1) If the IC recorder cannot be connected to operate this manual could void your authority to a computer directly, use the IC recorder. Stereo headphones (1) Application software, Sound Organizer (CD-ROM) (1) Operating Instructions You are cautioned that any changes or modifications...
Operating Instructions
Page 9
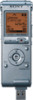
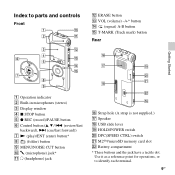
... L ERASE button M VOL (volume) -/+* button N (repeat) A-B button O T-MARK (Track mark) button Rear Getting Started A Operation indicator B Built-in microphones (stereo) C Display window D x STOP button E z REC (record)/PAUSE button F Control button (v, V / . (review/fast backward), > (cue/fast forward)) G N (play)/ENT (enter) button* H (folder) button I MENU/NOISE CUT button J m (microphone) jack* K i (headphone) jack P Strap...
... L ERASE button M VOL (volume) -/+* button N (repeat) A-B button O T-MARK (Track mark) button Rear Getting Started A Operation indicator B Built-in microphones (stereo) C Display window D x STOP button E z REC (record)/PAUSE button F Control button (v, V / . (review/fast backward), > (cue/fast forward)) G N (play)/ENT (enter) button* H (folder) button I MENU/NOISE CUT button J m (microphone) jack* K i (headphone) jack P Strap...
Operating Instructions
Page 10
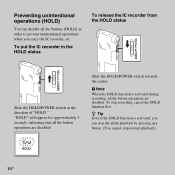
...You can stop the alarm playback by pressing any button. (You cannot stop recording, cancel the HOLD function first. Slide the HOLD/POWER switch towards the center. z Tip Even if the HOLD function is activated during recording, all the button operations are disabled. P Note When the HOLD function is ...activated, you can disable all the button operations are disabled. To put the IC recorder in the HOLD status To release the IC recorder from the HOLD status Slide the HOLD/POWER switch in order to prevent unintentional operations when you carry the IC...
...You can stop the alarm playback by pressing any button. (You cannot stop recording, cancel the HOLD function first. Slide the HOLD/POWER switch towards the center. z Tip Even if the HOLD function is activated during recording, all the button operations are disabled. P Note When the HOLD function is ...activated, you can disable all the button operations are disabled. To put the IC recorder in the HOLD status To release the IC recorder from the HOLD status Slide the HOLD/POWER switch in order to prevent unintentional operations when you carry the IC...

Operating Instructions
Page 11
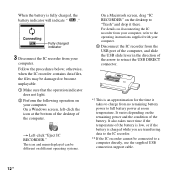
..., "Connecting" and the battery indicator are displayed in an animation. 2 Connect the IC recorder to your computer. Slide the USB slide lever on the display window before you use the IC recorder. Slide and lift the battery compartment lid, insert an NH-AAA rechargeable battery with correct ...polarity, and close the lid. It takes about 3 hours and 30 minutes to a running computer.*2 Computer IC recorder To USB port of the Battery indicator 11GB arrow, and insert the USB DIRECT connector into the USB port of a running computer, and charge...
..., "Connecting" and the battery indicator are displayed in an animation. 2 Connect the IC recorder to your computer. Slide the USB slide lever on the display window before you use the IC recorder. Slide and lift the battery compartment lid, insert an NH-AAA rechargeable battery with correct ...polarity, and close the lid. It takes about 3 hours and 30 minutes to a running computer.*2 Computer IC recorder To USB port of the Battery indicator 11GB arrow, and insert the USB DIRECT connector into the USB port of a running computer, and charge...
Operating Instructions
Page 12
... more time if the temperature of the battery is low, or if the battery is charged while you are transferring data to the IC recorder. *2 If the IC recorder cannot be connected to "Trash" and drop it takes to charge from no remaining battery power to full battery power at the bottom... of the desktop of the computer. On a Windows screen, left-click the icon at room temperature. It varies depending on disconnecting the IC recorder from the USB port of the computer, and slide the USB slide lever in the direction of the battery. Fully charged indicator 3 Disconnect the IC...
... more time if the temperature of the battery is low, or if the battery is charged while you are transferring data to the IC recorder. *2 If the IC recorder cannot be connected to "Trash" and drop it takes to charge from no remaining battery power to full battery power at the bottom... of the desktop of the computer. On a Windows screen, left-click the icon at room temperature. It varies depending on disconnecting the IC recorder from the USB port of the computer, and slide the USB slide lever in the direction of the battery. Fully charged indicator 3 Disconnect the IC...

Operating Instructions
Page 13
m : "Low Battery" appears and the IC recorder will stop operation. 13GB When using an AC-U501AD USB AC adaptor, etc. (not supplied) (page 95). Recharging the battery using a USB AC adaptor You ... Started P Note If the battery indicator is not displayed in an animation. z Tips • Do not use a manganese battery for this IC recorder. • When replacing the battery, files recorded or alarm settings are not erased even when you remove the battery. • When replacing the battery, the clock continues moving for...
m : "Low Battery" appears and the IC recorder will stop operation. 13GB When using an AC-U501AD USB AC adaptor, etc. (not supplied) (page 95). Recharging the battery using a USB AC adaptor You ... Started P Note If the battery indicator is not displayed in an animation. z Tips • Do not use a manganese battery for this IC recorder. • When replacing the battery, files recorded or alarm settings are not erased even when you remove the battery. • When replacing the battery, the clock continues moving for...
Operating Instructions
Page 14
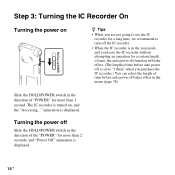
... is displayed. 14 GB Turning the power off takes effect in the menu (page 78). animation is set to "10min" when you purchase the IC recorder.) You can select the length of time before auto power off Slide the HOLD/POWER switch in the direction of the "POWER" for more than... turned on z Tips • When you are not going to use the IC recorder for a long time, we recommend to turn off the IC recorder. • When the IC recorder is in the stop mode, and you leave the IC recorder without attempting an operation for a certain length of time, the auto power off...
... is displayed. 14 GB Turning the power off takes effect in the menu (page 78). animation is set to "10min" when you purchase the IC recorder.) You can select the length of time before auto power off Slide the HOLD/POWER switch in the direction of the "POWER" for more than... turned on z Tips • When you are not going to use the IC recorder for a long time, we recommend to turn off the IC recorder. • When the IC recorder is in the stop mode, and you leave the IC recorder without attempting an operation for a certain length of time, the auto power off...
Operating Instructions
Page 15
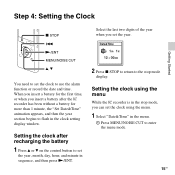
...using the menu. 1 Select "Date&Time" in the stop mode, you set the clock using the menu While the IC recorder is in the menu. 1 Press MENU/NOISE CUT to the stop mode display. Setting the clock after the IC... recorder has been without a battery for more than 1 minute, the "Set Date&Time" animation appears, and then the year section begins...ENT. Step 4: Setting the Clock Getting Started x STOP . N/ENT MENU/NOISE CUT v, V You need to use the alarm function or record the date and time.
...using the menu. 1 Select "Date&Time" in the stop mode, you set the clock using the menu While the IC recorder is in the menu. 1 Press MENU/NOISE CUT to the stop mode display. Setting the clock after the IC... recorder has been without a battery for more than 1 minute, the "Set Date&Time" animation appears, and then the year section begins...ENT. Step 4: Setting the Clock Getting Started x STOP . N/ENT MENU/NOISE CUT v, V You need to use the alarm function or record the date and time.
Operating Instructions
Page 16
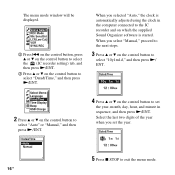
... 5 Press x STOP to select "Date&Time," and then press N/ENT. on the control button, press v or V on the control button to select the (IC recorder setting) tab, and then press N/ENT. 3 Press v or V on which the supplied Sound Organizer software is automatically adjusted using the clock in sequence, and then...ENT. 2 Press v or V on the control button to select "Auto" or "Manual," and then press N/ENT. 4 Press v or V on the control button to the IC recorder and on the control button to exit the menu mode. 16 GB When you selected "Auto," the clock is started. The menu mode window will...
... 5 Press x STOP to select "Date&Time," and then press N/ENT. on the control button, press v or V on the control button to select the (IC recorder setting) tab, and then press N/ENT. 3 Press v or V on which the supplied Sound Organizer software is automatically adjusted using the clock in sequence, and then...ENT. 2 Press v or V on the control button to select "Auto" or "Manual," and then press N/ENT. 4 Press v or V on the control button to the IC recorder and on the control button to exit the menu mode. 16 GB When you selected "Auto," the clock is started. The menu mode window will...
Operating Instructions
Page 17
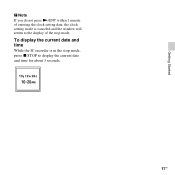
To display the current date and time While the IC recorder is canceled and the window will return to the display of entering the clock setting data, the clock setting mode is in the stop mode. Getting Started P Note If you do not press N/ENT within 1 minute of the stop mode, press x STOP to display the current date and time for about 3 seconds. 17GB
To display the current date and time While the IC recorder is canceled and the window will return to the display of entering the clock setting data, the clock setting mode is in the stop mode. Getting Started P Note If you do not press N/ENT within 1 minute of the stop mode, press x STOP to display the current date and time for about 3 seconds. 17GB
Operating Instructions
Page 18
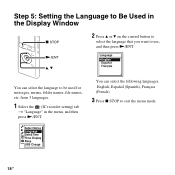
from 3 languages. 1 Select the (IC recorder setting) tab t "Language" in the Display Window x STOP 2 Press v or V on the control button to select the language that you want to use, and then press N/ENT. English, Español (Spanish), Français (French) 3 Press x STOP to be used for messages, menus, folder names, file names, etc. N/ENT v, V You can select the following languages. You can select the language to exit the menu mode. 18 GB Step 5: Setting the Language to Be Used in the menu, and then press N/ENT.
from 3 languages. 1 Select the (IC recorder setting) tab t "Language" in the Display Window x STOP 2 Press v or V on the control button to select the language that you want to use, and then press N/ENT. English, Español (Spanish), Français (French) 3 Press x STOP to be used for messages, menus, folder names, file names, etc. N/ENT v, V You can select the following languages. You can select the language to exit the menu mode. 18 GB Step 5: Setting the Language to Be Used in the menu, and then press N/ENT.

Operating Instructions
Page 19
Selecting a folder 1 Slide the HOLD/POWER switch towards the center to release the IC recorder from the HOLD status (page 10). 2 Press to check the battery indicator (page 13). • Noise may be sure to display the folder selection window. 19GB z Tip Before you start recording, we recommend you make a trial recording first, or monitor the recording (page 44). Basic Operations Basic Operations Recording P Notes • Before making a recording, be recorded if an object, such as your finger, etc., accidentally rubs or scratches the IC recorder during recording.
Selecting a folder 1 Slide the HOLD/POWER switch towards the center to release the IC recorder from the HOLD status (page 10). 2 Press to check the battery indicator (page 13). • Noise may be sure to display the folder selection window. 19GB z Tip Before you start recording, we recommend you make a trial recording first, or monitor the recording (page 44). Basic Operations Basic Operations Recording P Notes • Before making a recording, be recorded if an object, such as your finger, etc., accidentally rubs or scratches the IC recorder during recording.
Operating Instructions
Page 20
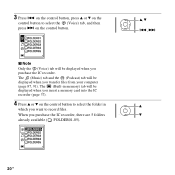
... files from your computer (page 87, 91). The (Music) tab and the (Podcast) tab will be displayed when you insert a memory card into the IC recorder (page 37). 4 Press v or V on the control button to select the (Voice) tab, and then press > on the control button to select the folder in... memory) tab will be displayed when you purchase the IC recorder, there are 5 folders already available ( FOLDER01-05). v, V ., > v V 20 GB P Note Only the (Voice) tab will be displayed when you want to...
... files from your computer (page 87, 91). The (Music) tab and the (Podcast) tab will be displayed when you insert a memory card into the IC recorder (page 37). 4 Press v or V on the control button to select the (Voice) tab, and then press > on the control button to select the folder in... memory) tab will be displayed when you purchase the IC recorder, there are 5 folders already available ( FOLDER01-05). v, V ., > v V 20 GB P Note Only the (Voice) tab will be displayed when you want to...
Operating Instructions
Page 21
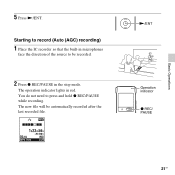
You do not need to be automatically recorded after the last recorded file. The operation indicator lights in microphones face the direction of the source to press and hold z REC/PAUSE while recording. The new file will be recorded. 2 Press z REC/PAUSE in the stop mode. N/ENT Operation indicator z REC/ PAUSE 21GB Basic Operations 5 Press N/ENT. Starting to record (Auto (AGC) recording) 1 Place the IC recorder so that the built-in red.
You do not need to be automatically recorded after the last recorded file. The operation indicator lights in microphones face the direction of the source to press and hold z REC/PAUSE while recording. The new file will be recorded. 2 Press z REC/PAUSE in the stop mode. N/ENT Operation indicator z REC/ PAUSE 21GB Basic Operations 5 Press N/ENT. Starting to record (Auto (AGC) recording) 1 Place the IC recorder so that the built-in red.


