Operating Instructions
Page 1
Flash 4-463-175-11(1) Operating Instructions GB Mode d'emploi FR © 2013 Sony Corporation Printed in China HVL-F43M
Flash 4-463-175-11(1) Operating Instructions GB Mode d'emploi FR © 2013 Sony Corporation Printed in China HVL-F43M

Operating Instructions
Page 4
... symbol on the product or on its packaging indicates that any service or guarantee matters, please refer to the authorized representative, Sony Deutschland GmbH, Hedelfinger Strasse 61, 70327 Stuttgart, Germany. Inquiries related to product compliance based on behalf of materials will help to... this product. For any changes or modifications not expressly approved in the U.S.A. Instead it may become hot when the flash fires. The recycling of Sony Corporation, 1-7-1 Konan Minato-ku Tokyo, 108-0075 Japan. By ensuring this product is disposed of electrical and electronic equipment...
... symbol on the product or on its packaging indicates that any service or guarantee matters, please refer to the authorized representative, Sony Deutschland GmbH, Hedelfinger Strasse 61, 70327 Stuttgart, Germany. Inquiries related to product compliance based on behalf of materials will help to... this product. For any changes or modifications not expressly approved in the U.S.A. Instead it may become hot when the flash fires. The recycling of Sony Corporation, 1-7-1 Konan Minato-ku Tokyo, 108-0075 Japan. By ensuring this product is disposed of electrical and electronic equipment...
Operating Instructions
Page 6
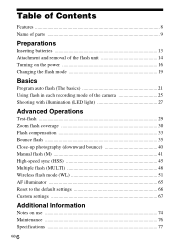
......8 Name of parts 9 Preparations Inserting batteries 13 Attachment and removal of the flash unit 14 Turning on the power 16 Changing the flash mode 19 Basics Program auto flash (The basics 21 Using flash in each recording mode of the camera 25 Shooting with illumination (LED light... 27 Advanced Operations Test-flash 29 Zoom flash coverage 30 Flash compensation 33 Bounce flash 35 Close-up photography (downward bounce 40 Manual flash (M 41 High-speed sync (HSS 45 Multiple flash (MULTI 46 Wireless flash mode (WL 51 AF illuminator 65 Reset to ...
......8 Name of parts 9 Preparations Inserting batteries 13 Attachment and removal of the flash unit 14 Turning on the power 16 Changing the flash mode 19 Basics Program auto flash (The basics 21 Using flash in each recording mode of the camera 25 Shooting with illumination (LED light... 27 Advanced Operations Test-flash 29 Zoom flash coverage 30 Flash compensation 33 Bounce flash 35 Close-up photography (downward bounce 40 Manual flash (M 41 High-speed sync (HSS 45 Multiple flash (MULTI 46 Wireless flash mode (WL 51 AF illuminator 65 Reset to ...

Operating Instructions
Page 7
... clouds occur, protect the unit from sand and dust. For details on compatible camera models of this flash unit, visit the Sony website in any of your camera. Although this flash unit is designed with excessive sand In locations such as on the model of the following locations. Do... not place this flash unit in the following locations Regardless of whether this flash unit is in use This flash unit can be used in mind, it in your area, or consult your Sony dealer or local authorized Sony service facility. See the operating instructions of ...
... clouds occur, protect the unit from sand and dust. For details on compatible camera models of this flash unit, visit the Sony website in any of your camera. Although this flash unit is designed with excessive sand In locations such as on the model of the following locations. Do... not place this flash unit in the following locations Regardless of whether this flash unit is in use This flash unit can be used in mind, it in your area, or consult your Sony dealer or local authorized Sony service facility. See the operating instructions of ...
Operating Instructions
Page 8
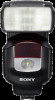
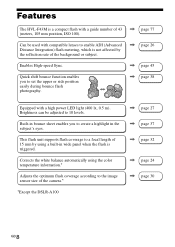
...page 27 , page 37 , page 32 , page 24 , page 30 GB 8 This flash unit supports flash coverage to a focal length of 43 , page 77 (meters, 105 mm position, ISO 100). Features The HVL-F43M is a compact flash with a high power LED light (400 lx, 0.5 m). Brightness can be used with ...compatible lenses to enable ADI (Advanced Distance Integration) flash metering, which is not affected by the reflection rate of the background ...
...page 27 , page 37 , page 32 , page 24 , page 30 GB 8 This flash unit supports flash coverage to a focal length of 43 , page 77 (meters, 105 mm position, ISO 100). Features The HVL-F43M is a compact flash with a high power LED light (400 lx, 0.5 m). Brightness can be used with ...compatible lenses to enable ADI (Advanced Distance Integration) flash metering, which is not affected by the reflection rate of the background ...

Operating Instructions
Page 11
...button (42, 46, 57, 61, 66) B MODE button (19) C TEST button (29) The status while the lamp is lit Amber: Flash ready Green: Proper exposure D Fn (function)/direction buttons (41, 46, 57, 58, 61, 67) E Power switch (16) F LCD illuminator... dark, you can be found. 11 GB This time is extended if the flash or camera is used by pressing the LCD illuminator button. • The LCD panel remains illuminated for about 8... seconds when the flash unit is used . • Press the LCD illuminator button again while the LCD panel is...
...button (42, 46, 57, 61, 66) B MODE button (19) C TEST button (29) The status while the lamp is lit Amber: Flash ready Green: Proper exposure D Fn (function)/direction buttons (41, 46, 57, 58, 61, 67) E Power switch (16) F LCD illuminator... dark, you can be found. 11 GB This time is extended if the flash or camera is used by pressing the LCD illuminator button. • The LCD panel remains illuminated for about 8... seconds when the flash unit is used . • Press the LCD illuminator button again while the LCD panel is...
Operating Instructions
Page 12
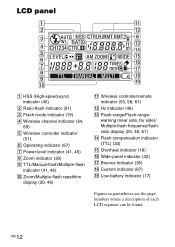
warning (near side, far side)/ Multiple-flash frequency/flashratio display (23, 46, 61) N Flash compensation indicator (TTL) (33) O Overheat indicator (18) P Wide-panel indicator (32) Q Bounce indicator (35) R Custom indicator (67) S Low-battery indicator (17)... the page numbers where a description of each LCD segment can be found. GB 12 LCD panel A HSS (High-speed-sync) indicator (45) B Ratio-flash indicator (61) C Flash mode indicator (19) D Wireless channel indicator (64, 69) E Wireless controller indicator (51) F Operating indicator (67) G Power-level indicator (41, 46) H Zoom ...
warning (near side, far side)/ Multiple-flash frequency/flashratio display (23, 46, 61) N Flash compensation indicator (TTL) (33) O Overheat indicator (18) P Wide-panel indicator (32) Q Bounce indicator (35) R Custom indicator (67) S Low-battery indicator (17)... the page numbers where a description of each LCD segment can be found. GB 12 LCD panel A HSS (High-speed-sync) indicator (45) B Ratio-flash indicator (61) C Flash mode indicator (19) D Wireless channel indicator (64, 69) E Wireless controller indicator (51) F Operating indicator (67) G Power-level indicator (41, 46) H Zoom ...

Operating Instructions
Page 14
...attaching to the camera, remove the protective cap from the terminal of the Multi Interface foot of the flash unit and remove the shoe cap from the camera. • When not using the flash unit, reattach the protective cap to the terminal of its Multi Interface foot. • If the built...-in flash in the camera is protruding, lower it before attaching the flash unit. 1 Turn off the power of the flash unit, and rotate the lock lever towards [RELEASE] while pressing the release button. 2 Firmly insert the...
...attaching to the camera, remove the protective cap from the terminal of the Multi Interface foot of the flash unit and remove the shoe cap from the camera. • When not using the flash unit, reattach the protective cap to the terminal of its Multi Interface foot. • If the built...-in flash in the camera is protruding, lower it before attaching the flash unit. 1 Turn off the power of the flash unit, and rotate the lock lever towards [RELEASE] while pressing the release button. 2 Firmly insert the...

Operating Instructions
Page 15
Preparations 1 2 3 Removing the flash unit from the camera 1 While pressing the release button 1, rotate the lock lever towards [RELEASE] 2. 2 With the lock lever in the [RELEASE] position, slide the flash unit forward. 15 GB
Preparations 1 2 3 Removing the flash unit from the camera 1 While pressing the release button 1, rotate the lock lever towards [RELEASE] 2. 2 With the lock lever in the [RELEASE] position, slide the flash unit forward. 15 GB

Operating Instructions
Page 16
The power of the flash unit turns on. • When the power of the flash unit is set to ON, check the orientation of the batteries. To turn the power off Set the POWER switch to OFF. GB 16 Turning on the LCD panel when the POWER switch is turned on, the LCD panel lights up. • If nothing appears on the power Set the POWER switch to ON.
The power of the flash unit turns on. • When the power of the flash unit is set to ON, check the orientation of the batteries. To turn the power off Set the POWER switch to OFF. GB 16 Turning on the LCD panel when the POWER switch is turned on, the LCD panel lights up. • If nothing appears on the power Set the POWER switch to ON.

Operating Instructions
Page 17
... the camera* is set to power save mode after 60 minutes. • You can still be used. blinking Changing the batteries is recommended. Only blinking Flash cannot be used by itself or connected to a camera that is in power save mode, it switches to power save mode to save the batteries... display are low. Checking Batteries The indicator on the data panel blinks when the batteries are not linked with the flash unit. Preparations Power save mode If the flash unit is not operated for 3 minutes when used when the TEST button lights up in power save mode, for example when the LCD...
... the camera* is set to power save mode after 60 minutes. • You can still be used. blinking Changing the batteries is recommended. Only blinking Flash cannot be used by itself or connected to a camera that is in power save mode, it switches to power save mode to save the batteries... display are low. Checking Batteries The indicator on the data panel blinks when the batteries are not linked with the flash unit. Preparations Power save mode If the flash unit is not operated for 3 minutes when used when the TEST button lights up in power save mode, for example when the LCD...

Operating Instructions
Page 18
GB 18 indicator When the temperature of this unit rises after continuous flash use or use in a high temperature environment, its internal safety circuit automatically suspends operation (overheating). • The indicator blinks when overheating is detected. • Flash operation is suspended until the temperature of the unit falls and the indicator turns off. • When overheating is detected, set the POWER switch to OFF and stop using the flash unit for about 10 minutes to allow it to cool down.
GB 18 indicator When the temperature of this unit rises after continuous flash use or use in a high temperature environment, its internal safety circuit automatically suspends operation (overheating). • The indicator blinks when overheating is detected. • Flash operation is suspended until the temperature of the unit falls and the indicator turns off. • When overheating is detected, set the POWER switch to OFF and stop using the flash unit for about 10 minutes to allow it to cool down.

Operating Instructions
Page 19
... is not connected to your camera (WL is not set up): ( AUTO) t t ( AUTO) t . . . • [ ] lights up when the camera is set to Fill-flash. [ AUTO] lights up when the camera is connected to Auto flash. 19 GB When your camera is turned on the LCD panel changes as follows. Preparations Changing the... flash mode Press the MODE button. • The indicator on and the flash unit is connected to your camera, or when the camera is in power save mode or the LCD monitor of the camera is...
... is not connected to your camera (WL is not set up): ( AUTO) t t ( AUTO) t . . . • [ ] lights up when the camera is set to Fill-flash. [ AUTO] lights up when the camera is connected to Auto flash. 19 GB When your camera is turned on the LCD panel changes as follows. Preparations Changing the... flash mode Press the MODE button. • The indicator on and the flash unit is connected to your camera, or when the camera is in power save mode or the LCD monitor of the camera is...

Operating Instructions
Page 20
GB 20 About flash mode • (Fill-flash mode) The flash unit always fires. • AUTO (Auto flash mode) The flash unit is set to this mode when the camera is set to auto flash. • WL (Wireless flash mode) This mode is used during wireless flash photography. • (Un-fill-flash mode) The flash unit does not fire.
GB 20 About flash mode • (Fill-flash mode) The flash unit always fires. • AUTO (Auto flash mode) The flash unit is set to this mode when the camera is set to auto flash. • WL (Wireless flash mode) This mode is used during wireless flash photography. • (Un-fill-flash mode) The flash unit does not fire.

Operating Instructions
Page 21
Basics Basics Program auto flash (The basics) • If your camera has an AUTO mode or Scene Selection mode, they are dealt with here as program auto. 1 Select the P mode on the camera. 2 Press the MODE button to display [ AUTO] or [ ] on the LCD panel. • [ ] lights up when the camera is set to Fill-flash. [ AUTO] lights up when the camera is set to Auto flash. 21 GB
Basics Basics Program auto flash (The basics) • If your camera has an AUTO mode or Scene Selection mode, they are dealt with here as program auto. 1 Select the P mode on the camera. 2 Press the MODE button to display [ AUTO] or [ ] on the LCD panel. • [ ] lights up when the camera is set to Fill-flash. [ AUTO] lights up when the camera is set to Auto flash. 21 GB

Operating Instructions
Page 22
...a lack of luminescence if taken before charging is complete. • Press the shutter button after making sure that the subject is within the flash range. • See page 23 for details on your camera. When the correct exposure has been obtained for the photo just taken, the... when the TEST button on the control panel is complete when using the flash unit with the self-timer. • The flash mode selected (auto flash ( AUTO), fill-flash ( ), or un-fill-flash ( )) depends on the flash range. 4 When the flash unit is charged, press the shutter button to the operating instructions of your...
...a lack of luminescence if taken before charging is complete. • Press the shutter button after making sure that the subject is within the flash range. • See page 23 for details on your camera. When the correct exposure has been obtained for the photo just taken, the... when the TEST button on the control panel is complete when using the flash unit with the self-timer. • The flash mode selected (auto flash ( AUTO), fill-flash ( ), or un-fill-flash ( )) depends on the flash range. 4 When the flash unit is charged, press the shutter button to the operating instructions of your...

Operating Instructions
Page 23
... become dark. Proper exposure is displayed on either side of the Flash range. see page 40). Proper exposure is lit on the LCD panel. Change the flash range to 28 m or more. • The flash ranges when using upward bounce flash or wireless flash are not shown. • When you take a photo closer than ...range, or is obtained from 1.0 m to 28 m (0.7 m to 28 m for the proper exposure is obtained at less than the lower limit of the flash range, the photo may be displayed on the LCD monitor of the camera may darken. When the distance is from 1.0 m to adjust the aperture and...
... become dark. Proper exposure is displayed on either side of the Flash range. see page 40). Proper exposure is lit on the LCD panel. Change the flash range to 28 m or more. • The flash ranges when using upward bounce flash or wireless flash are not shown. • When you take a photo closer than ...range, or is obtained from 1.0 m to 28 m (0.7 m to 28 m for the proper exposure is obtained at less than the lower limit of the flash range, the photo may be displayed on the LCD monitor of the camera may darken. When the distance is from 1.0 m to adjust the aperture and...

Operating Instructions
Page 24
Auto WB Adjustment with Color Temperature Info White balance is automatically adjusted by your camera (except the DSLR-A100) based on color temperature information when the flash unit fires. • Auto WB Adjustment functions when you attach the flash unit to your camera and use TTL flash mode on the flash unit. • This function does not work during manual flash photography. (page 41) GB 24
Auto WB Adjustment with Color Temperature Info White balance is automatically adjusted by your camera (except the DSLR-A100) based on color temperature information when the flash unit fires. • Auto WB Adjustment functions when you attach the flash unit to your camera and use TTL flash mode on the flash unit. • This function does not work during manual flash photography. (page 41) GB 24

Operating Instructions
Page 25
.... • The shutter speed is set to aperture priority (A mode), shutter speed priority (S mode) or manual exposure mode (M mode), TTL flash photography can be performed according to the mode. 1 Select A, S or M mode on the camera. 2 Press the MODE button to the mode you select, and then ...focus the subject. Basics 3 Set the aperture and/or shutter speed according to display [ ]. • Fill-flash is set automatically. Recording mode of the camera If the camera is selected. Set the shutter speed. 25 GB
.... • The shutter speed is set to aperture priority (A mode), shutter speed priority (S mode) or manual exposure mode (M mode), TTL flash photography can be performed according to the mode. 1 Select A, S or M mode on the camera. 2 Press the MODE button to the mode you select, and then ...focus the subject. Basics 3 Set the aperture and/or shutter speed according to display [ ]. • Fill-flash is set automatically. Recording mode of the camera If the camera is selected. Set the shutter speed. 25 GB

Operating Instructions
Page 26
...in distance encoder by referring to the P-TTL metering. TTL metering also has a P-TTL metering function, which adds a pre-flash to TTL metering, and an ADI metering function, which adds distance data to the specifications in distance encoder. reduce the f-stop )...ADI metering is reflected through the lens. stop ) to reduce the flash range, or open the aperture (i.e. TTL flash Manual flash provides a fixed flash intensity irrespective of the brightness of the camera Settings M (Manual exposure mode flash photography) Set the aperture and shutter speed. • Reduce the ...
...in distance encoder by referring to the P-TTL metering. TTL metering also has a P-TTL metering function, which adds a pre-flash to TTL metering, and an ADI metering function, which adds distance data to the specifications in distance encoder. reduce the f-stop )...ADI metering is reflected through the lens. stop ) to reduce the flash range, or open the aperture (i.e. TTL flash Manual flash provides a fixed flash intensity irrespective of the brightness of the camera Settings M (Manual exposure mode flash photography) Set the aperture and shutter speed. • Reduce the ...


