Operating Instructions
Page 6
... 30 Flash compensation 33 Bounce flash 35 Close-up photography (downward bounce 40 Manual flash (M 41 High-speed sync (HSS 45 Multiple flash (MULTI 46 Wireless flash mode (WL 51 AF illuminator 65 Reset to the default settings 66 Custom settings 67 Additional Information Notes on use 74 Maintenance 76 Specifications...
... 30 Flash compensation 33 Bounce flash 35 Close-up photography (downward bounce 40 Manual flash (M 41 High-speed sync (HSS 45 Multiple flash (MULTI 46 Wireless flash mode (WL 51 AF illuminator 65 Reset to the default settings 66 Custom settings 67 Additional Information Notes on use 74 Maintenance 76 Specifications...

Operating Instructions
Page 9
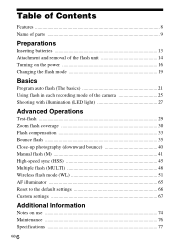
Name of parts A Built-in parentheses are the page numbers where a description of the AF illuminator before use. E Multi Interface foot (14) F LED LIGHT button (27) G LED light unit (27) H Bounce sheet (37) Figures in wide panel (32) B Flashtube C Wireless control signal receiver (52) D AF illuminator (65) Remove the protective sheet from the front of each LCD segment can be found. 9 GB
Name of parts A Built-in parentheses are the page numbers where a description of the AF illuminator before use. E Multi Interface foot (14) F LED LIGHT button (27) G LED light unit (27) H Bounce sheet (37) Figures in wide panel (32) B Flashtube C Wireless control signal receiver (52) D AF illuminator (65) Remove the protective sheet from the front of each LCD segment can be found. 9 GB
Operating Instructions
Page 12
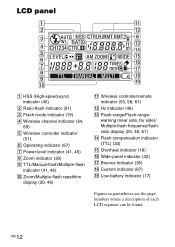
... segment can be found. GB 12 LCD panel A HSS (High-speed-sync) indicator (45) B Ratio-flash indicator (61) C Flash mode indicator (19) D Wireless channel indicator (64, 69) E Wireless controller indicator (51) F Operating indicator (67) G Power-level indicator (41, 46) H Zoom indicator (30) I TTL/Manual-flash/Multiple-flash indicator (41, 46) J Zoom...
... segment can be found. GB 12 LCD panel A HSS (High-speed-sync) indicator (45) B Ratio-flash indicator (61) C Flash mode indicator (19) D Wireless channel indicator (64, 69) E Wireless controller indicator (51) F Operating indicator (67) G Power-level indicator (41, 46) H Zoom indicator (30) I TTL/Manual-flash/Multiple-flash indicator (41, 46) J Zoom...

Operating Instructions
Page 17
... a camera that is in power save mode, it switches to power save mode to save the batteries and the LCD display goes out. • During wireless flash photography (pages 55, 61), the flash unit changes to power save mode after 60 minutes. • You can still be used when the TEST...
... a camera that is in power save mode, it switches to power save mode to save the batteries and the LCD display goes out. • During wireless flash photography (pages 55, 61), the flash unit changes to power save mode after 60 minutes. • You can still be used when the TEST...

Operating Instructions
Page 20
GB 20 About flash mode • (Fill-flash mode) The flash unit always fires. • AUTO (Auto flash mode) The flash unit is set to this mode when the camera is set to auto flash. • WL (Wireless flash mode) This mode is used during wireless flash photography. • (Un-fill-flash mode) The flash unit does not fire.
GB 20 About flash mode • (Fill-flash mode) The flash unit always fires. • AUTO (Auto flash mode) The flash unit is set to this mode when the camera is set to auto flash. • WL (Wireless flash mode) This mode is used during wireless flash photography. • (Un-fill-flash mode) The flash unit does not fire.

Operating Instructions
Page 23
... indicated flash range. 23 GB If the flash range is from 1.0 m to 28 m or more. • The flash ranges when using upward bounce flash or wireless flash are not shown. • When you take a photo within this range, or is obtained from 1.0 m to 28 m (0.7 m to adjust the aperture and ISO sensitivity...
... indicated flash range. 23 GB If the flash range is from 1.0 m to 28 m or more. • The flash ranges when using upward bounce flash or wireless flash are not shown. • When you take a photo within this range, or is obtained from 1.0 m to 28 m (0.7 m to adjust the aperture and ISO sensitivity...
Operating Instructions
Page 51
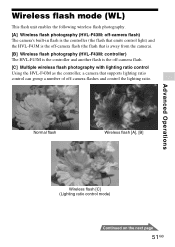
... the off-camera flash (the flash that is away from the camera). [B] Wireless flash photography (HVL-F43M: controller) The HVL-F43M is the controller and another flash is the off-camera flash. [C] Multiple wireless flash photography with lighting ratio control Using the HVL-F43M as the controller, a camera that supports lighting ratio control can group a number of off...
... the off-camera flash (the flash that is away from the camera). [B] Wireless flash photography (HVL-F43M: controller) The HVL-F43M is the controller and another flash is the off-camera flash. [C] Multiple wireless flash photography with lighting ratio control Using the HVL-F43M as the controller, a camera that supports lighting ratio control can group a number of off...

Operating Instructions
Page 52
... flash unit within the gray area in the above table assume the use of the subject Distance camera-HVL-F43M-subject Shutter speed Aperture 2.8 4 5.6 Distance camera-subject (Table 1) Distance HVL-F43M - GB 52 Units: m • The distances in the following diagram. If ISO 400 is... used the distances must be multiplied by a factor of two (assume a limit of 5 m). • The flash range is not displayed on the LCD panel when using wireless flash. Follow the...
... flash unit within the gray area in the above table assume the use of the subject Distance camera-HVL-F43M-subject Shutter speed Aperture 2.8 4 5.6 Distance camera-subject (Table 1) Distance HVL-F43M - GB 52 Units: m • The distances in the following diagram. If ISO 400 is... used the distances must be multiplied by a factor of two (assume a limit of 5 m). • The flash range is not displayed on the LCD panel when using wireless flash. Follow the...
Operating Instructions
Page 55
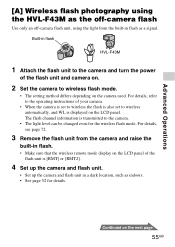
Built-in flash as a signal. Advanced Operations [A] Wireless flash photography using the HVL-F43M as the off-camera flash Use only an off-camera flash unit, using the light from the camera and raise the built-in flash. • Make sure that the wireless remote mode display on the LCD panel of your camera. ...For details, see page 72. 3 Remove the flash unit from the built-in flash HVL-F43M 1 Attach the flash unit to the camera and turn the power of the flash unit and camera on. 2 Set the camera to wireless flash mode. • The setting method differs depending on the LCD panel. For ...
Built-in flash as a signal. Advanced Operations [A] Wireless flash photography using the HVL-F43M as the off-camera flash Use only an off-camera flash unit, using the light from the camera and raise the built-in flash. • Make sure that the wireless remote mode display on the LCD panel of your camera. ...For details, see page 72. 3 Remove the flash unit from the built-in flash HVL-F43M 1 Attach the flash unit to the camera and turn the power of the flash unit and camera on. 2 Set the camera to wireless flash mode. • The setting method differs depending on the LCD panel. For ...

Operating Instructions
Page 56
... AF illuminator on the front blinks, and the TEST button is lit in amber. 6 Use test-flash to check the flash. • During wireless flash photography, the test-flash method differs depending on the camera. GB 56 For details, refer to the operating instructions of the camera, flash, and... subject, or point the wireless control-signal receiver towards the camera. 7 Check again that the built-in flash and flash unit are fully charged, and press the shutter button ...
... AF illuminator on the front blinks, and the TEST button is lit in amber. 6 Use test-flash to check the flash. • During wireless flash photography, the test-flash method differs depending on the camera. GB 56 For details, refer to the operating instructions of the camera, flash, and... subject, or point the wireless control-signal receiver towards the camera. 7 Check again that the built-in flash and flash unit are fully charged, and press the shutter button ...

Operating Instructions
Page 57
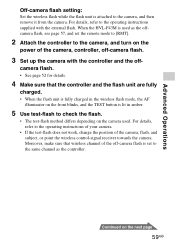
... setup in step [A], if you continue to use the same camera and flash combination without changing the wireless channel then you can also set to the same channel as the controller. Flash setting: 1 Press the TTL/M button to display or . • When selecting ...set. , the flash unit fires with your camera. Camera setting: Set the camera to wireless. For details, refer to the operating instructions supplied with the power level to be 2 Press the MODE button repeatedly to display [WL], and then press...
... setup in step [A], if you continue to use the same camera and flash combination without changing the wireless channel then you can also set to the same channel as the controller. Flash setting: 1 Press the TTL/M button to display or . • When selecting ...set. , the flash unit fires with your camera. Camera setting: Set the camera to wireless. For details, refer to the operating instructions supplied with the power level to be 2 Press the MODE button repeatedly to display [WL], and then press...

Operating Instructions
Page 58
... 1 Press the MODE button repeatedly to display [WL], and then press the Fn button. 2 Press the g or G button to wireless flash. HVL-F43M Off-camera flash If you can perform wireless flash photography by using the DSLR-A900, DSLR-A850, SLT-A99V, SLT-A77V, SLT-A65V, SLT-A57, SLTA37, NEX-7, NEX-6, DSC...-RX1 or DSC-RX1R, set the wireless controller mode of the HVL-F43M to the operating instructions supplied with your camera. For details, refer to [CTRL2] ([CTRL] on page 70. 1 Set the camera, flash (controller...
... 1 Press the MODE button repeatedly to display [WL], and then press the Fn button. 2 Press the g or G button to wireless flash. HVL-F43M Off-camera flash If you can perform wireless flash photography by using the DSLR-A900, DSLR-A850, SLT-A99V, SLT-A77V, SLT-A65V, SLT-A57, SLTA37, NEX-7, NEX-6, DSC...-RX1 or DSC-RX1R, set the wireless controller mode of the HVL-F43M to the operating instructions supplied with your camera. For details, refer to [CTRL2] ([CTRL] on page 70. 1 Set the camera, flash (controller...
Operating Instructions
Page 59
... the camera. Moreover, make sure that the controller and the flash unit are fully charged. • When the flash unit is fully charged in the wireless flash mode, the AF illuminator on the front blinks, and the TEST button is lit in amber. 5 Use test-flash to check the flash. •... operating instructions of your camera. • If the test-flash does not work, change the position of the off-camera flash is used . When the HVL-F43M is set to the camera, and turn on the camera used as the offcamera flash, see page 57, and set the remote mode to [RMT...
... the camera. Moreover, make sure that the controller and the flash unit are fully charged. • When the flash unit is fully charged in the wireless flash mode, the AF illuminator on the front blinks, and the TEST button is lit in amber. 5 Use test-flash to check the flash. •... operating instructions of your camera. • If the test-flash does not work, change the position of the off-camera flash is used . When the HVL-F43M is set to the camera, and turn on the camera used as the offcamera flash, see page 57, and set the remote mode to [RMT...
Operating Instructions
Page 61
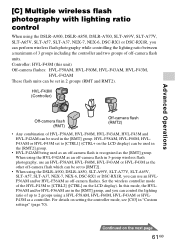
... perform wireless flash photography while controlling the lighting ratio between a maximum of 3 groups including the controller and two groups of up to 2 groups using a HVL-F58AM, HVL-F60M, HVL-F43AM or HVLF43M as a controller. In this unit) Off-camera flashes: HVL-F58AM, HVL-F60M, HVL-F43AM, HVL-F43M, HVL-F42AM These flash units can use an HVL-F58AM, HVL-F60M, HVL-F43AM or HVL-F43M...
... perform wireless flash photography while controlling the lighting ratio between a maximum of 3 groups including the controller and two groups of up to 2 groups using a HVL-F58AM, HVL-F60M, HVL-F43AM or HVLF43M as a controller. In this unit) Off-camera flashes: HVL-F58AM, HVL-F60M, HVL-F43AM, HVL-F43M, HVL-F42AM These flash units can use an HVL-F58AM, HVL-F60M, HVL-F43AM or HVL-F43M...

Operating Instructions
Page 62
... (off -camera flash units (RMT, RMT2), and then press the Fn button. • Set the power level ratio to [--] on the LCD panel for the wireless flash photography with the lighting ratio control. • The whole power level ratio is displayed using the flash-range/multiple-flash frequency/flash-ratio display... an offcamera flash (RMT/RMT2) you don't want to fire when you use the flash unit with the controller after setting the flash unit to wireless flash. GB 62 Camera Setting: Set the camera to the operating instructions supplied with your camera. For details, refer to...
... (off -camera flash units (RMT, RMT2), and then press the Fn button. • Set the power level ratio to [--] on the LCD panel for the wireless flash photography with the lighting ratio control. • The whole power level ratio is displayed using the flash-range/multiple-flash frequency/flash-ratio display... an offcamera flash (RMT/RMT2) you don't want to fire when you use the flash unit with the controller after setting the flash unit to wireless flash. GB 62 Camera Setting: Set the camera to the operating instructions supplied with your camera. For details, refer to...
Operating Instructions
Page 63
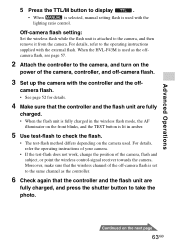
... fully charged, and press the shutter button to the camera, and turn on the power of the camera, flash and subject, or point the wireless control-signal receiver towards the camera. For details, refer to check the flash. • The test-flash method differs depending on the front blinks... then remove it from the camera. Off-camera flash setting: Set the wireless flash while the flash unit is attached to display . • When is selected, manual setting flash is used with the external flash. When the HVL-F43M is used as the controller. 6 Check again that the controller and the...
... fully charged, and press the shutter button to the camera, and turn on the power of the camera, flash and subject, or point the wireless control-signal receiver towards the camera. For details, refer to check the flash. • The test-flash method differs depending on the front blinks... then remove it from the camera. Off-camera flash setting: Set the wireless flash while the flash unit is attached to display . • When is selected, manual setting flash is used with the external flash. When the HVL-F43M is used as the controller. 6 Check again that the controller and the...
Operating Instructions
Page 64
...). • When photographing with the power level set to the position in the MANUAL mode. Flashes continue for the HVL-F43M is automatically set in each flash when the offcamera flash is in which the wireless flash was installed. due to 24 mm. One flash occurs with [TEST1] and three flashes with [TESTM].
...). • When photographing with the power level set to the position in the MANUAL mode. Flashes continue for the HVL-F43M is automatically set in each flash when the offcamera flash is in which the wireless flash was installed. due to 24 mm. One flash occurs with [TEST1] and three flashes with [TESTM].

Operating Instructions
Page 66
... Press the MODE and TTL/M buttons together for more than three seconds. Item Flash on/off Flash compensation Flash coverage (zoom) Flash mode (TTL/M/MULTI) Wireless flash (WL) Lighting ratio Power level in TTL/M (LEVEL) Power level in multiple flash (LEVEL) Frequency in multiple flash (Hz) Repetition in multiple flash (TIMES...
... Press the MODE and TTL/M buttons together for more than three seconds. Item Flash on/off Flash compensation Flash coverage (zoom) Flash mode (TTL/M/MULTI) Wireless flash (WL) Lighting ratio Power level in TTL/M (LEVEL) Power level in multiple flash (LEVEL) Frequency in multiple flash (Hz) Repetition in multiple flash (TIMES...

Operating Instructions
Page 67
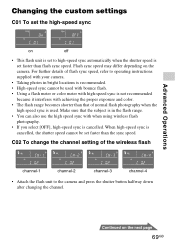
.../4 seconds) • C06 Time to power save (30 seconds/3 minutes/30 minutes/none) • C07 Time to power save when using wireless flash (60 minutes/none) • C08 Flash range units (meters/feet) • C09 Switch power level interval (0.3/0.5) Performing the custom settings... The custom settings are underlined.) • C01 HSS setting (on/off) • C02 Wireless channel setting (channels 1 to 4) • C03 Wireless controller mode setting (1/2) • C04 Recording mode in which manual flash or multiple-flash may be changed. (*Default ...
.../4 seconds) • C06 Time to power save (30 seconds/3 minutes/30 minutes/none) • C07 Time to power save when using wireless flash (60 minutes/none) • C08 Flash range units (meters/feet) • C09 Switch power level interval (0.3/0.5) Performing the custom settings... The custom settings are underlined.) • C01 HSS setting (on/off) • C02 Wireless channel setting (channels 1 to 4) • C03 Wireless controller mode setting (1/2) • C04 Recording mode in which manual flash or multiple-flash may be changed. (*Default ...
Operating Instructions
Page 69
... with bounce flash. • Using a flash meter or color meter with high-speed sync is not recommended because it interferes with when using wireless flash photography. • If you select [OFF], high-speed sync is cancelled, the shutter speed cannot be set faster than flash sync speed.... For further details of the wireless flash channel-1 channel-2 channel-3 channel-4 • Attach the flash unit to the camera and press the shutter button halfway down after changing the...
... with bounce flash. • Using a flash meter or color meter with high-speed sync is not recommended because it interferes with when using wireless flash photography. • If you select [OFF], high-speed sync is cancelled, the shutter speed cannot be set faster than flash sync speed.... For further details of the wireless flash channel-1 channel-2 channel-3 channel-4 • Attach the flash unit to the camera and press the shutter button halfway down after changing the...
