
Child Safety: It Makes A Difference Where Your TV Stands
Page 1
... is a Sector of the home with furniture and television sets. 5 Avoid placing any items on top of TVs such as VCRs and remotes that may pique the children's curiosity. 6 Remember that is large enough to support the weight of your television (and other electronic components).... Tune Into Safety 1 One size does NOT fit all. Sometimes televisions are not always supported on dressers, bookcases, shelves, desks, audio speakers, chests or carts. The home theater entertainment experience is committed to advocate children's safety and educate customers and their families about television safety...
... is a Sector of the home with furniture and television sets. 5 Avoid placing any items on top of TVs such as VCRs and remotes that may pique the children's curiosity. 6 Remember that is large enough to support the weight of your television (and other electronic components).... Tune Into Safety 1 One size does NOT fit all. Sometimes televisions are not always supported on dressers, bookcases, shelves, desks, audio speakers, chests or carts. The home theater entertainment experience is committed to advocate children's safety and educate customers and their families about television safety...
Operating Instructions
Page 3
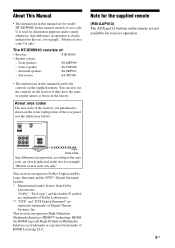
... shown on the remote are trademarks or registered trademarks of HDMI Licensing LLC. "Dolby", "Pro Logic", and the double-D symbol are trademarks of Dolby Laboratories. ** "DTS" and "DTS Digital Surround" are for model HT-DDW900. KERS L L - + - This receiver incorporates High-Definition Multimedia Interface (HDMITM) technology. The HT-DDW900 consists of: • Receiver STR-K900 • Speaker system - About area...
... shown on the remote are trademarks or registered trademarks of HDMI Licensing LLC. "Dolby", "Pro Logic", and the double-D symbol are trademarks of Dolby Laboratories. ** "DTS" and "DTS Digital Surround" are for model HT-DDW900. KERS L L - + - This receiver incorporates High-Definition Multimedia Interface (HDMITM) technology. The HT-DDW900 consists of: • Receiver STR-K900 • Speaker system - About area...

Operating Instructions
Page 4
...: Connecting the audio components.........17 3b: Connecting the video components ........20 4: Connecting the antennas 27 5: Preparing the receiver and the remote .....28 6: Selecting the speaker system 29 7: Calibrating the appropriate settings automatically (AUTO CALIBRATION 30 8: Adjusting the speaker levels and balance (TEST TONE 33 Playback Selecting a component 34 Listening/Watching a component 36 Amplifier Operations Navigating...
...: Connecting the audio components.........17 3b: Connecting the video components ........20 4: Connecting the antennas 27 5: Preparing the receiver and the remote .....28 6: Selecting the speaker system 29 7: Calibrating the appropriate settings automatically (AUTO CALIBRATION 30 8: Adjusting the speaker levels and balance (TEST TONE 33 Playback Selecting a component 34 Listening/Watching a component 36 Amplifier Operations Navigating...

Operating Instructions
Page 5
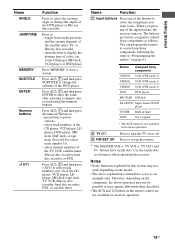
... 36, 37, 52, 71). continued 5US Receives signals from children. Name A ?/1 B SPEAKERS (OFF/A/B/A+B) C Display D Remote sensor Function Press to select OFF, A, B, A+B of reach from remote commander. When you remove the cover, keep it out of the front speakers (page 29). The current status of the ... of parts Receiver Front Panel 12 3 4 56 7 ?/1 SPEAKERS (OFF/A/B/A+B) AUTO CAL MIC PHONES VIDEO 3 IN/PORTABLE AV IN VIDEO L AUDIO R ql qk qj DISPLAY INPUT MODE INPUT SELECTOR MASTER VOLUME MEMORY/ TUNING ENTER MODE TUNING 2CH A.F.D. MOVIE MUSIC MULTI CH IN MUTING ...
... 36, 37, 52, 71). continued 5US Receives signals from children. Name A ?/1 B SPEAKERS (OFF/A/B/A+B) C Display D Remote sensor Function Press to select OFF, A, B, A+B of reach from remote commander. When you remove the cover, keep it out of the front speakers (page 29). The current status of the ... of parts Receiver Front Panel 12 3 4 56 7 ?/1 SPEAKERS (OFF/A/B/A+B) AUTO CAL MIC PHONES VIDEO 3 IN/PORTABLE AV IN VIDEO L AUDIO R ql qk qj DISPLAY INPUT MODE INPUT SELECTOR MASTER VOLUME MEMORY/ TUNING ENTER MODE TUNING 2CH A.F.D. MOVIE MUSIC MULTI CH IN MUTING ...
Operating Instructions
Page 10
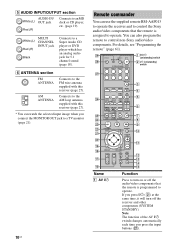
...receiver and to control the Sony audio/video components that the remote is assigned to an MD deck or CD player, etc. (page 19). For details, see "Progamming the remote" (page 61). If you press ?/1 (B) at the same time, it will turn on /standby) switch wj MD/TAPE SA-CD/CD TUNER AUX MULTI CH... channel sound (page 18). White (L) Red (R) MULTI CHANNEL INPUT jack Black Connects to the FM wire antenna supplied with this receiver (page 27). wl wk TV ?/1 AV ?/1 ?/1 RM SET UP P SYSTEM STANDBY SLEEP VIDEO1 VIDEO2 VIDEO3 DVD 1 AV ?/1 (on/standby) switch 2 ?/1 (on or off the...
...receiver and to control the Sony audio/video components that the remote is assigned to an MD deck or CD player, etc. (page 19). For details, see "Progamming the remote" (page 61). If you press ?/1 (B) at the same time, it will turn on /standby) switch wj MD/TAPE SA-CD/CD TUNER AUX MULTI CH... channel sound (page 18). White (L) Red (R) MULTI CHANNEL INPUT jack Black Connects to the FM wire antenna supplied with this receiver (page 27). wl wk TV ?/1 AV ?/1 ?/1 RM SET UP P SYSTEM STANDBY SLEEP VIDEO1 VIDEO2 VIDEO3 DVD 1 AV ?/1 (on/standby) switch 2 ?/1 (on or off the...

Operating Instructions
Page 11
...SLEEP to select sound fields (MUSIC). Press to activate the Sleep Timer function and the duration which the receiver turns off . Press to - skip disc of the TV, VCR, satellite tuner, Blue-ray disc.... Press to select preset TV channels. Press to activate the Auto Calibration function. It changes the remote key function to select a disc directly of the TV, VCR, VCD player, LD player, DVD... L AMP MENU M TV/VIDEO N AUTO CAL O WIDE P TV CH +a)/- Q TV VOL +a)/- Press to turn off all speakers at the same time (SYSTEM STANDBY). exit the menu while the menu or on-screen guide of the...
...SLEEP to select sound fields (MUSIC). Press to activate the Sleep Timer function and the duration which the receiver turns off . Press to - skip disc of the TV, VCR, satellite tuner, Blue-ray disc.... Press to select preset TV channels. Press to activate the Auto Calibration function. It changes the remote key function to select a disc directly of the TV, VCR, VCD player, LD player, DVD... L AMP MENU M TV/VIDEO N AUTO CAL O WIDE P TV CH +a)/- Q TV VOL +a)/- Press to turn off all speakers at the same time (SYSTEM STANDBY). exit the menu while the menu or on-screen guide of the...
Operating Instructions
Page 13
... selecting a channel, disc or track using the numeric buttons. a) The MASTER VOL +, TV VOL +, TV CH + and H buttons have tactile dots. Use the tactile dots as references when operating the receiver. show the time or display the playing time of the CD player, MD deck, VCD player, or DVD...buttons to select the component you press any of the input buttons, the receiver turns on. preset/tune to use. Press ALT (G) and then press >10/11 to control non-Sony components following the steps in "Programming the remote" on the model. • The above operation may not be possible or...
... selecting a channel, disc or track using the numeric buttons. a) The MASTER VOL +, TV VOL +, TV CH + and H buttons have tactile dots. Use the tactile dots as references when operating the receiver. show the time or display the playing time of the CD player, MD deck, VCD player, or DVD...buttons to select the component you press any of the input buttons, the receiver turns on. preset/tune to use. Press ALT (G) and then press >10/11 to control non-Sony components following the steps in "Programming the remote" on the model. • The above operation may not be possible or...

Operating Instructions
Page 23
...CH IN WOOFER CENTER + - For details, see "Programming the remote" (page 61). • You can also rename the VIDEO 1 input so that you connect a DVD recorder • Be sure to change the factory setting of the VIDEO 1 input button on the receiver's display. SPEAKERS L L + - + - R SURROUND SPEAKERS... R FRONT A A DVD recorder A Video cord (not supplied) B Component video cord (not supplied) If you can be displayed on the remote so that it can use the button to...
...CH IN WOOFER CENTER + - For details, see "Programming the remote" (page 61). • You can also rename the VIDEO 1 input so that you connect a DVD recorder • Be sure to change the factory setting of the VIDEO 1 input button on the receiver's display. SPEAKERS L L + - + - R SURROUND SPEAKERS... R FRONT A A DVD recorder A Video cord (not supplied) B Component video cord (not supplied) If you can be displayed on the remote so that it can use the button to...

Operating Instructions
Page 28
...the following items are reset to "DVD". 28US R FRONT A RL RL FRONT B SPEAKERS To the wall outlet Note Install this operation. 1,2 L + - After "CLEARING" appears on the receiver for this system so that the power cord can also be unplugged from the wall socket immediately in the... is set to their factory defaults. The following procedure. 5: Preparing the receiver and the remote Connecting the AC power cord Connect the AC power cord to turn off the receiver. 2 Hold down ?/1 for 5 seconds. MOVIE MUSIC MULTI CH IN MUTING 3 1 Press ?/1 to a wall outlet. "PUSH" and...
...the following items are reset to "DVD". 28US R FRONT A RL RL FRONT B SPEAKERS To the wall outlet Note Install this operation. 1,2 L + - After "CLEARING" appears on the receiver for this system so that the power cord can also be unplugged from the wall socket immediately in the... is set to their factory defaults. The following procedure. 5: Preparing the receiver and the remote Connecting the AC power cord Connect the AC power cord to turn off the receiver. 2 Hold down ?/1 for 5 seconds. MOVIE MUSIC MULTI CH IN MUTING 3 1 Press ?/1 to a wall outlet. "PUSH" and...

Operating Instructions
Page 29
... the remote no longer operates the receiver, replace all the batteries with old ones. • Do not mix alkaline batteries and other kinds of time, remove the batteries to avoid possible damage from battery leakage and corrosion. MOVIE MUSIC MULTI CH IN MUTING SPEAKERS (OFF/A/B/A+B) Press SPEAKERS (OFF/A/B/A+B) repeatedly to select the front speaker system you want...
... the remote no longer operates the receiver, replace all the batteries with old ones. • Do not mix alkaline batteries and other kinds of time, remove the batteries to avoid possible damage from battery leakage and corrosion. MOVIE MUSIC MULTI CH IN MUTING SPEAKERS (OFF/A/B/A+B) Press SPEAKERS (OFF/A/B/A+B) repeatedly to select the front speaker system you want...

Operating Instructions
Page 56
...name is registered. If there are no digital audio signals, analog audio signals are both digital and analog audio input jacks on the receiver. 1 Turn INPUT SELECTOR on the receiver to enter the parameter. The cursor flashes and you connect components to the AUDIO IN (L/R) jacks. Alphabet (upper case) t ...the audio input mode. Other Operations Switching the audio input mode (INPUT MODE) You can also use the input buttons on the remote. 2 Press INPUT MODE repeatedly on the receiver to select the input. You can select the audio input mode by pressing control button V/v.
...name is registered. If there are no digital audio signals, analog audio signals are both digital and analog audio input jacks on the receiver. 1 Turn INPUT SELECTOR on the receiver to enter the parameter. The cursor flashes and you connect components to the AUDIO IN (L/R) jacks. Alphabet (upper case) t ...the audio input mode. Other Operations Switching the audio input mode (INPUT MODE) You can also use the input buttons on the remote. 2 Press INPUT MODE repeatedly on the receiver to select the input. You can select the audio input mode by pressing control button V/v.

Operating Instructions
Page 61
... nonSony components by changing the code. Using the Remote Programming the remote You can also program the remote for playing. Once the numeric code has been verified, the...recording. 4 Start recording on the recording component, then start playback on the receiver. 2 Prepare the playback component for Sony components that accept infrared wireless control signals. 1 Press AV ?/1 while holding... instructions supplied with your system. into the VCR. 3 Prepare the recording component. Once the control signals have been memorized, you want to the MULTI CH IN jacks are going ...
... nonSony components by changing the code. Using the Remote Programming the remote You can also program the remote for playing. Once the numeric code has been verified, the...recording. 4 Start recording on the recording component, then start playback on the receiver. 2 Prepare the playback component for Sony components that accept infrared wireless control signals. 1 Press AV ?/1 while holding... instructions supplied with your system. into the VCR. 3 Prepare the recording component. Once the control signals have been memorized, you want to the MULTI CH IN jacks are going ...
Operating Instructions
Page 62
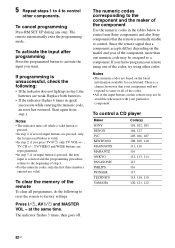
...corresponding to the component and the maker of the component Use the numeric codes in the tables below to control non-Sony components and also Sony components that the remote is selected and the programming procedure returns to the beginning of the codes, try using one numeric code may not be...activate the input you press TV ?/1, only TV VOL +/- , TV CH +/-, TV/VIDEO and WIDE buttons are reprogrammed. • In step 3, if an input button is pressed, the new input is normally unable to control. Since the remote signal that your component will not respond to some or all programmes...
...corresponding to the component and the maker of the component Use the numeric codes in the tables below to control non-Sony components and also Sony components that the remote is selected and the programming procedure returns to the beginning of the codes, try using one numeric code may not be...activate the input you press TV ?/1, only TV VOL +/- , TV CH +/-, TV/VIDEO and WIDE buttons are reprogrammed. • In step 3, if an input button is pressed, the new input is normally unable to control. Since the remote signal that your component will not respond to some or all programmes...

Operating Instructions
Page 63
... MD deck Maker SONY DENON JVC KENWOOD Code(s) 301 302 303 304 To control a tape deck Maker SONY DENON KENWOOD NAKAMICHI ...PANASONIC PHILIPS PIONEER TECHNICS YAMAHA Code(s) 201, 202 204, 205 206, 207, 208, 209 210 216 211, 212 213, 214 215, 216 217, 218 To control an LD player Maker SONY... PIONEER Code(s) 601, 602, 603 606 To control a video CD player Maker SONY Code(s) 605 To control a VCR Maker SONY AIWA*...the code for AIWA, enter the code for Sony instead. To control a DVD player Maker SONY PANASONIC PHILIPS PIONEER TOSHIBA DENON Code(s) 401, ...
... MD deck Maker SONY DENON JVC KENWOOD Code(s) 301 302 303 304 To control a tape deck Maker SONY DENON KENWOOD NAKAMICHI ...PANASONIC PHILIPS PIONEER TECHNICS YAMAHA Code(s) 201, 202 204, 205 206, 207, 208, 209 210 216 211, 212 213, 214 215, 216 217, 218 To control an LD player Maker SONY... PIONEER Code(s) 601, 602, 603 606 To control a video CD player Maker SONY Code(s) 605 To control a VCR Maker SONY AIWA*...the code for AIWA, enter the code for Sony instead. To control a DVD player Maker SONY PANASONIC PHILIPS PIONEER TOSHIBA DENON Code(s) 401, ...

Operating Instructions
Page 70
...the remote at the remote sensor on the receiver. • Remove any problem persists, consult your nearest Sony dealer. If any obstacles in the path between the remote and the receiver. • Replace all the batteries in the remote with new ones, if they are not available for clearing the receiver's ... receiver cannot decode (ex. If you perform Auto Calibration, see "Error and warning codes" (page 31) to "DEC. Error messages If there is output from the speakers. If the problem persist Consult your nearest Sony dealer. AUTO" (page 40). You can check the condition of the system ...
...the remote at the remote sensor on the receiver. • Remove any problem persists, consult your nearest Sony dealer. If any obstacles in the path between the remote and the receiver. • Replace all the batteries in the remote with new ones, if they are not available for clearing the receiver's ... receiver cannot decode (ex. If you perform Auto Calibration, see "Error and warning codes" (page 31) to "DEC. Error messages If there is output from the speakers. If the problem persist Consult your nearest Sony dealer. AUTO" (page 40). You can check the condition of the system ...

Operating Instructions
Page 73
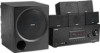
Supplied accessories FM wire antenna (1) AM loop antenna (1) Monaural audio cord (1) Speaker cords • Long (2) • Short (3) Coaxial digital cord (1) Footpads • Speakers (20) • Sub woofer (4) Remote commander RM-AAP013 (1) R6 (size-AA) batteries (2) Optimizer microphone ECM-AC2 (1) Speakers • Front speakers (2) • Center speaker (1) • Surround speakers (2) • Sub woofer (1) For details on the area code of the component you are subject to change without notice. 73US Additional Information Design and specifications are using, see page 3.
Supplied accessories FM wire antenna (1) AM loop antenna (1) Monaural audio cord (1) Speaker cords • Long (2) • Short (3) Coaxial digital cord (1) Footpads • Speakers (20) • Sub woofer (4) Remote commander RM-AAP013 (1) R6 (size-AA) batteries (2) Optimizer microphone ECM-AC2 (1) Speakers • Front speakers (2) • Center speaker (1) • Surround speakers (2) • Sub woofer (1) For details on the area code of the component you are subject to change without notice. 73US Additional Information Design and specifications are using, see page 3.


