Operating Instructions
Page 2
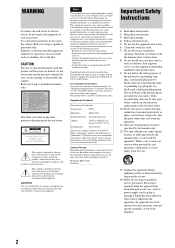
..., uses, and can be used in the U.S.A If you call "Home Entertainment Server" Customer Call Center at 1-877-531-SONY (7669) or visit our web site at the rear of the unit...install near water. 6) Clean only with Part15 of Conformity Trade Name: SONY Model No. : HES-V1000 Responsible Party : Sony Electronics Inc. Install in the space provided below is intended to alert the...to comply with the apparatus. Increase the separation between network hub and client in this manual could void your outlet, consult an electrician for a Class B digital device, pursuant to...
..., uses, and can be used in the U.S.A If you call "Home Entertainment Server" Customer Call Center at 1-877-531-SONY (7669) or visit our web site at the rear of the unit...install near water. 6) Clean only with Part15 of Conformity Trade Name: SONY Model No. : HES-V1000 Responsible Party : Sony Electronics Inc. Install in the space provided below is intended to alert the...to comply with the apparatus. Increase the separation between network hub and client in this manual could void your outlet, consult an electrician for a Class B digital device, pursuant to...

Operating Instructions
Page 3
...safety • Should any solid object or liquid fall over, causing damage or serious injury. • Do not allow children to climb on the server. Have it checked immediately by qualified personnel before operating it with no audio signals. If you do not operate the unit. Install in an upright.... • When moving the unit, detach the glass panels and grasp the handles on the unit. The unit should be damaged. • Do not manually open or apply pressure to a section with 120 V AC power source. • Check the polarity when inserting batteries. If place at least 12 inches ...
...safety • Should any solid object or liquid fall over, causing damage or serious injury. • Do not allow children to climb on the server. Have it checked immediately by qualified personnel before operating it with no audio signals. If you do not operate the unit. Install in an upright.... • When moving the unit, detach the glass panels and grasp the handles on the unit. The unit should be damaged. • Do not manually open or apply pressure to a section with 120 V AC power source. • Check the polarity when inserting batteries. If place at least 12 inches ...

Operating Instructions
Page 6
... Important Safety Instructions 2 Precautions 3 Notes On Disc Handling 4 Notes about discs 4 Notes About This Server 5 Table of Contents 6 Home Menu Overview 8 Main Features 10 About This Manual 11 Index to Parts and Controls 12 Top panel 12 Front panel 13 Top panel display/front panel display... Eco mode 29 Turning off the Power 30 Inserting/Removing Discs and Memory Cards Inserting Discs 32 Registering discs manually 33 Ejecting discs 33 Managing Server Content With the Disc Information Display 33 Displaying disc information 33 Labeling a disc 34 Protecting a disc 34 Locking...
... Important Safety Instructions 2 Precautions 3 Notes On Disc Handling 4 Notes about discs 4 Notes About This Server 5 Table of Contents 6 Home Menu Overview 8 Main Features 10 About This Manual 11 Index to Parts and Controls 12 Top panel 12 Front panel 13 Top panel display/front panel display... Eco mode 29 Turning off the Power 30 Inserting/Removing Discs and Memory Cards Inserting Discs 32 Registering discs manually 33 Ejecting discs 33 Managing Server Content With the Disc Information Display 33 Displaying disc information 33 Labeling a disc 34 Protecting a disc 34 Locking...

Operating Instructions
Page 11
... availability. About media icons The following media icons are trademarks or registered trademarks of respective companies or organizations. CF SD xD 11 About This Manual • In this manual, the internal hard disk drive is written as "HDD," and "disc" is used as those on the remote. • The on... the HDD, BDs, DVDs, or CDs unless otherwise specified by the text or illustrations. • Instructions in this document are used in this manual describe the controls using the displays or the remote. Disc Type HDD (internal hard disc drive) BD-ROM BD-RE BD-R DVD VIDEO DVD+...
... availability. About media icons The following media icons are trademarks or registered trademarks of respective companies or organizations. CF SD xD 11 About This Manual • In this manual, the internal hard disk drive is written as "HDD," and "disc" is used as those on the remote. • The on... the HDD, BDs, DVDs, or CDs unless otherwise specified by the text or illustrations. • Instructions in this document are used in this manual describe the controls using the displays or the remote. Disc Type HDD (internal hard disc drive) BD-ROM BD-RE BD-R DVD VIDEO DVD+...

Operating Instructions
Page 28
... Settings Follow the steps below to make the minimum number of basic adjustments for the first time The server automatically turns off after 70 seconds. AV "/1 SET RETURN HOME RETURN See "Server Settings" (page 108) to make other optional settings. The Easy Setup display appears after 110 seconds,... so turn it on for using the server. When turned on again. Note If you cancel the Easy Setup halfway,...
... Settings Follow the steps below to make the minimum number of basic adjustments for the first time The server automatically turns off after 70 seconds. AV "/1 SET RETURN HOME RETURN See "Server Settings" (page 108) to make other optional settings. The Easy Setup display appears after 110 seconds,... so turn it on for using the server. When turned on again. Note If you cancel the Easy Setup halfway,...

Operating Instructions
Page 29
...the client registration method. Home Entertainment Server, that shares music in [System Settings] was changed to [Standard]. k Select [Finish] and press ENTER. • To use the AMG database or the music server function, press HOME, select [Settings] - [Network Settings] - [Music Server Settings] and make ...registration is required to allow DLNA compatible network audio devices and "Music Transfer" to access the server's music content from other rooms. In this setting letter, select [Manual]. Close Getting Started • The [Standard] setting consumes more power than the [Eco] ...
...the client registration method. Home Entertainment Server, that shares music in [System Settings] was changed to [Standard]. k Select [Finish] and press ENTER. • To use the AMG database or the music server function, press HOME, select [Settings] - [Network Settings] - [Music Server Settings] and make ...registration is required to allow DLNA compatible network audio devices and "Music Transfer" to access the server's music content from other rooms. In this setting letter, select [Manual]. Close Getting Started • The [Standard] setting consumes more power than the [Eco] ...

Operating Instructions
Page 33
...when unlocked, "UNLOCKED" appears. b Select , , or . F Rec Date Most recent and the oldest dates. d Press OPTIONS to turn on the Home Menu. E Lock Shows if the disc is closed, touch x on the top panel for 10 seconds or more. However, the automatic registration does not occur...b Select to register and press ENTER. g Select a disc to display the icons. If the disc you want to register the disc manually. Normally the server recognizes and registers the inserted discs automatically. When the disc tray is locked, "LOCKED" appears on the top panel display; Displaying disc ...
...when unlocked, "UNLOCKED" appears. b Select , , or . F Rec Date Most recent and the oldest dates. d Press OPTIONS to turn on the Home Menu. E Lock Shows if the disc is closed, touch x on the top panel for 10 seconds or more. However, the automatic registration does not occur...b Select to register and press ENTER. g Select a disc to display the icons. If the disc you want to register the disc manually. Normally the server recognizes and registers the inserted discs automatically. When the disc tray is locked, "LOCKED" appears on the top panel display; Displaying disc ...
Operating Instructions
Page 39
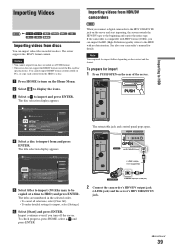
... title selection display appears. f Select [Start] and press ENTER. To check progress, press HOME, select and press ENTER. When you connect a digital camcorder to the HDV 1080i/DV IN jack on the Home Menu. You cannot import BDMV format content edited on the content and the format. If the... AC IN CAMCORDER to display the icons. The titles are numbered in AVCHD format. • The server does not support the BDMV format (one of the server. See also your camcorder's manual for import differs depending on PCs, or copy such content from and press ENTER. Note Time required ...
... title selection display appears. f Select [Start] and press ENTER. To check progress, press HOME, select and press ENTER. When you connect a digital camcorder to the HDV 1080i/DV IN jack on the Home Menu. You cannot import BDMV format content edited on the content and the format. If the... AC IN CAMCORDER to display the icons. The titles are numbered in AVCHD format. • The server does not support the BDMV format (one of the server. See also your camcorder's manual for import differs depending on PCs, or copy such content from and press ENTER. Note Time required ...

Operating Instructions
Page 40
...page 150 for DV signals ([XR], [SR], [LR], or [ER]). Playback operations such as rewind, etc., on the camcorder are unnecessary. 2 On the server's remote, press HOME to turn on the top panel (One-Touch Import) 1 Insert an HDV/DV format tape to playback mode when editing or recording on the...can use the remote's IMPORT button instead. The HDV/DV import display appears. To import using the Home Menu 1 Insert an HDV/DV format tape to playback mode when editing or recording on the server's side. S VIDEO VIDEO R AUDIO L(MONO) LINE IN 2 HDV 1080i/DV IN IMPORT SELECT IMPORT...
...page 150 for DV signals ([XR], [SR], [LR], or [ER]). Playback operations such as rewind, etc., on the camcorder are unnecessary. 2 On the server's remote, press HOME to turn on the top panel (One-Touch Import) 1 Insert an HDV/DV format tape to playback mode when editing or recording on the...can use the remote's IMPORT button instead. The HDV/DV import display appears. To import using the Home Menu 1 Insert an HDV/DV format tape to playback mode when editing or recording on the server's side. S VIDEO VIDEO R AUDIO L(MONO) LINE IN 2 HDV 1080i/DV IN IMPORT SELECT IMPORT...

Operating Instructions
Page 44
... displayed if more than 500 files and subfolders are grouped into folders and saved on their condition. Supported discs and photos • The server plays JPEG image files that do not turn off the power while: - Location of files and folders When directly under the folder can ... other than 30 minutes for Camera File system"; See [Video Output Aspect Ratio] (page 112) and change the viewing mode setting, see your TV's manual. When naming files and folders • Names of one time. Notes about ten seconds. photos (files). It may be imported). • If more...
... displayed if more than 500 files and subfolders are grouped into folders and saved on their condition. Supported discs and photos • The server plays JPEG image files that do not turn off the power while: - Location of files and folders When directly under the folder can ... other than 30 minutes for Camera File system"; See [Video Output Aspect Ratio] (page 112) and change the viewing mode setting, see your TV's manual. When naming files and folders • Names of one time. Notes about ten seconds. photos (files). It may be imported). • If more...

Operating Instructions
Page 49
... "To select the server" below . 1 On your server(s) either automatically or manually. When only one server on the network, the software registers it is found, the server's status will need to manually register the servers in the lower-left corner of the desktop, and point to proceed. You may need to the Sony Home Entertainment Server (hereafter "Server"). Automatic server registration If no...
... "To select the server" below . 1 On your server(s) either automatically or manually. When only one server on the network, the software registers it is found, the server's status will need to manually register the servers in the lower-left corner of the desktop, and point to proceed. You may need to the Sony Home Entertainment Server (hereafter "Server"). Automatic server registration If no...

Operating Instructions
Page 50
... file search settings such as the unique ID. Quits the software. * You can be unaffected. To register the server manually 1 On the File menu, click [Select Server]. Allows you to select a folder to register. The server's MAC address works as file formats. Sets a folder as the regular source and synchronizes the database with the...
... file search settings such as the unique ID. Quits the software. * You can be unaffected. To register the server manually 1 On the File menu, click [Select Server]. Allows you to select a folder to register. The server's MAC address works as file formats. Sets a folder as the regular source and synchronizes the database with the...

Operating Instructions
Page 59
...msec (long) (weak) -3 ~ 0 ~ 3 (strong) (dark) -3 ~ 0 ~ 3 (bright) (light) -3 ~ 0 ~ 3 (deep) (red) -3 ~ 0 ~ 3 (green) Repeat steps 3 and 4 to adjust any other items. z Hint The server is selected. *1 Manufactured under license from the DIGITAL OUT (OPTICAL/COAXIAL) jacks. Provides smooth and warm sound. Adjusting Pictures and Sound for Videos Adjusting the... range and spatial feeling. LINE 2 Level Adjust Adjusts audio input level for LINE IN 1 jacks. Manual adjustment of these settings to reduce mosaic-like block noises and minor noises around the picture outlines (mosquito...
...msec (long) (weak) -3 ~ 0 ~ 3 (strong) (dark) -3 ~ 0 ~ 3 (bright) (light) -3 ~ 0 ~ 3 (deep) (red) -3 ~ 0 ~ 3 (green) Repeat steps 3 and 4 to adjust any other items. z Hint The server is selected. *1 Manufactured under license from the DIGITAL OUT (OPTICAL/COAXIAL) jacks. Provides smooth and warm sound. Adjusting Pictures and Sound for Videos Adjusting the... range and spatial feeling. LINE 2 Level Adjust Adjusts audio input level for LINE IN 1 jacks. Manual adjustment of these settings to reduce mosaic-like block noises and minor noises around the picture outlines (mosquito...

Operating Instructions
Page 60
...press ENTER. d Select or adjust the settings and press ENTER. For changing the viewing mode setting, see your TV's manual. 60 Picture Adjustment Adjusts each of the photo. See page 64. Copy x-ScrapBook Create x-Pict Story HD Photo Memory ...Stick x-Pict Story HD x-ScrapBook Sample Album Album c Select an album on the Home Menu. Noisy scenes are available for external input a When viewing the external input, press OPTIONS. Items Details ... See [Video Output Aspect Ratio] (page 112) and change the server's output aspect ratio setting to display the icons.
...press ENTER. d Select or adjust the settings and press ENTER. For changing the viewing mode setting, see your TV's manual. 60 Picture Adjustment Adjusts each of the photo. See page 64. Copy x-ScrapBook Create x-Pict Story HD Photo Memory ...Stick x-Pict Story HD x-ScrapBook Sample Album Album c Select an album on the Home Menu. Noisy scenes are available for external input a When viewing the external input, press OPTIONS. Items Details ... See [Video Output Aspect Ratio] (page 112) and change the server's output aspect ratio setting to display the icons.

Operating Instructions
Page 64
...modes by pressing YELLOW on a page for browsing the entire album as if you can manually add the video title later even if you select [Yes], the album appears with ... are turning pages of a photo album. Using "x-ScrapBook" "x-ScrapBook" offers compelling slide show that the server automatically arranges to the album of the same shooting period. When a video title of photos and video ...titles on the remote. ◆Page mode Press The Cursor mode allows for adding home videos and "x-Pict Story" video titles, you are available: Page mode and Cursor mode. Since the...
...modes by pressing YELLOW on a page for browsing the entire album as if you can manually add the video title later even if you select [Yes], the album appears with ... are turning pages of a photo album. Using "x-ScrapBook" "x-ScrapBook" offers compelling slide show that the server automatically arranges to the album of the same shooting period. When a video title of photos and video ...titles on the remote. ◆Page mode Press The Cursor mode allows for adding home videos and "x-Pict Story" video titles, you are available: Page mode and Cursor mode. Since the...
Operating Instructions
Page 74
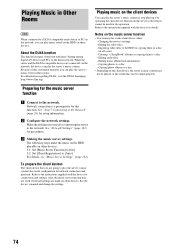
...network. Copying photo albums to a disc • Depending on the home network. Preparing for the music server function a Connect to the instructions supplied with the device for this convenient function, you can play the server's music even in other devices. Network connection is a prerequisite for connections... device for details. See "Network Settings" (page 121) for setup information. For details, see "Music Server Settings" (page 122). See the device's manual and change the settings. 74 To prepare the client devices The client device that you can play music stored...
...network. Copying photo albums to a disc • Depending on the home network. Preparing for the music server function a Connect to the instructions supplied with the device for this convenient function, you can play the server's music even in other devices. Network connection is a prerequisite for connections... device for details. See "Network Settings" (page 121) for setup information. For details, see "Music Server Settings" (page 122). See the device's manual and change the settings. 74 To prepare the client devices The client device that you can play music stored...

Operating Instructions
Page 81
d Select a title and press OPTIONS. Erase Chapter Select the chapter you want to erase, select [Set Point A] and press ENTER. The manual selection display appears. B -:--:-- :-- 0:00:20:03 OK Finish RETURN Finish 3 At the start of the section you have selected [Erase ...the same title, repeat steps 3 to the selected chapter. To erase by manual selection (A-B Erase) 1 Select [Edit] in the background. The display for procedures. a Press HOME to display the icons. b Select to turn on the Home Menu. The Options menu appears. Items Function/Edit Edit Details You can ...
d Select a title and press OPTIONS. Erase Chapter Select the chapter you want to erase, select [Set Point A] and press ENTER. The manual selection display appears. B -:--:-- :-- 0:00:20:03 OK Finish RETURN Finish 3 At the start of the section you have selected [Erase ...the same title, repeat steps 3 to the selected chapter. To erase by manual selection (A-B Erase) 1 Select [Edit] in the background. The display for procedures. a Press HOME to display the icons. b Select to turn on the Home Menu. The Options menu appears. Items Function/Edit Edit Details You can ...

Operating Instructions
Page 95
...is necessary A DVD Menu will be undone. If the disc type does not allow for DVD Menu, go to BD/DVD ◆ Manual finalizing is automatically created when you finalize DVD+RW/DVD-RW (Video mode)/DVD+R/DVD-R (Video mode), you can retain disc recordings ... d Select and press OPTIONS. The disc information display appears. a Press HOME to turn on other DVD devices. The Options menu appears. a Press HOME to turn on other DVD devices. Since a DVD Menu is unnecessary The server automatically finalizes DVD+RW and creates a DVD Menu before ejecting. Note You...
...is necessary A DVD Menu will be undone. If the disc type does not allow for DVD Menu, go to BD/DVD ◆ Manual finalizing is automatically created when you finalize DVD+RW/DVD-RW (Video mode)/DVD+R/DVD-R (Video mode), you can retain disc recordings ... d Select and press OPTIONS. The disc information display appears. a Press HOME to turn on other DVD devices. The Options menu appears. a Press HOME to turn on other DVD devices. Since a DVD Menu is unnecessary The server automatically finalizes DVD+RW and creates a DVD Menu before ejecting. Note You...

Operating Instructions
Page 112
... 4:4:4 video signals. Select this , or automatically fixed if the above [Output Resolution Priority] jack. Normally select this setting only The server outputs signals starting from the HDMI OUT jack. jack or the COMPONENT VIDEO OUT Video jacks. - HDMI Resolution Auto - Note that matches... unacceptable for the HDMI OUT - Outputs RGB video signals. Outputs YCbCr 4:2:2 video signals. 112 z Hint See also your TV manual for details about the wide mode function of external device, and switches to the matching color from the highest resolution acceptable to a ...
... 4:4:4 video signals. Select this , or automatically fixed if the above [Output Resolution Priority] jack. Normally select this setting only The server outputs signals starting from the HDMI OUT jack. jack or the COMPONENT VIDEO OUT Video jacks. - HDMI Resolution Auto - Note that matches... unacceptable for the HDMI OUT - Outputs RGB video signals. Outputs YCbCr 4:2:2 video signals. 112 z Hint See also your TV manual for details about the wide mode function of external device, and switches to the matching color from the highest resolution acceptable to a ...

Operating Instructions
Page 121
... Settings] will be set the [DNS Server (Primary)] and [DNS Server (Secondary)] addresses manually if you will need to [Use DHCP]. You can set correctly. For more information regarding network configuration, contact "Home Entertainment Server" Customer Call Center: 1-877-531-SONY (7669). These items are available from your ISP has a specific proxy server setting, select [Proxy Settings] and...
... Settings] will be set the [DNS Server (Primary)] and [DNS Server (Secondary)] addresses manually if you will need to [Use DHCP]. You can set correctly. For more information regarding network configuration, contact "Home Entertainment Server" Customer Call Center: 1-877-531-SONY (7669). These items are available from your ISP has a specific proxy server setting, select [Proxy Settings] and...


