Operating Guide
Page 6
...is mishandled, the battery pack can cause hearing loss. AC Adaptor Do not use with this camcorder only, and should not be used with the same or equivalent type recommended by returning your camcorder is turned off, AC power source (mains) is still supplied to it . ...Read this first Before operating the unit, please read this device must accept any interference received, including interference that can help preserve our environment by Sony. Dispose of used battery packs promptly as hammering, dropping or stepping on the power cord (mains lead) The power cord (mains...
...is mishandled, the battery pack can cause hearing loss. AC Adaptor Do not use with this camcorder only, and should not be used with the same or equivalent type recommended by returning your camcorder is turned off, AC power source (mains) is still supplied to it . ...Read this first Before operating the unit, please read this device must accept any interference received, including interference that can help preserve our environment by Sony. Dispose of used battery packs promptly as hammering, dropping or stepping on the power cord (mains lead) The power cord (mains...
Operating Guide
Page 8
... in each local language are used in accordance with the instructions, may be lost . Use the camcorder in very loud areas (HDR-PJ600/PJ600V/XR260V). When the camcorder is connected to other malfunctions could occur. ejecting the memory card when the access lamp (p. 25)... Television programs, films, video tapes, and other materials may be lost , or other devices through a USB connection and the power of the camcorder is turned on, do any of the following measures: Reorient or relocate the receiving antenna. Increase the separation between the ...
... in each local language are used in accordance with the instructions, may be lost . Use the camcorder in very loud areas (HDR-PJ600/PJ600V/XR260V). When the camcorder is connected to other malfunctions could occur. ejecting the memory card when the access lamp (p. 25)... Television programs, films, video tapes, and other materials may be lost , or other devices through a USB connection and the power of the camcorder is turned on, do any of the following measures: Reorient or relocate the receiving antenna. Increase the separation between the ...
Operating Guide
Page 9
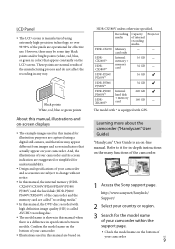
...58320; The example images used in this manual for the model name of your camcorder within the support page. Check the model name on the bottom of your camcorder. http://www.sony.net/SonyInfo/ Support/ 2 Select your country or region. 3 Search for illustration...internal memory (HDRCX260V/CX580V/PJ260/PJ260V/PJ580/ PJ580V) and the hard disk (HDR-PJ600/ PJ600V/XR260V) of your camcorder. Illustrations used in this manual are operational for in-depth instructions on HDR-CX580V unless otherwise specified. However, there may appear different from images and ...
...58320; The example images used in this manual for the model name of your camcorder within the support page. Check the model name on the bottom of your camcorder. http://www.sony.net/SonyInfo/ Support/ 2 Select your country or region. 3 Search for illustration...internal memory (HDRCX260V/CX580V/PJ260/PJ260V/PJ580/ PJ580V) and the hard disk (HDR-PJ600/ PJ600V/XR260V) of your camcorder. Illustrations used in this manual are operational for in-depth instructions on HDR-CX580V unless otherwise specified. However, there may appear different from images and ...
Operating Guide
Page 10
Table of contents IMPORTANT SAFETY INSTRUCTIONS 3 Read this first 6 Learning more about the camcorder ("Handycam" User Guide 9 Parts and controls 13 Getting started Supplied Items 18 Charging the battery pack 19 Charging the battery using your ...25 Recording/Playback Recording 27 Recording movies 27 Shooting photos 27 Zooming 30 Playback 32 Playing movies and photos from a map (HDR-CX260V/CX580V/PJ260V/ PJ580V/PJ600V/XR260V 33 Operating buttons while playing 35 Advanced operations Recording people clearly 37 Recording the selected subject clearly (Face Priority 37 Recording voices...
Table of contents IMPORTANT SAFETY INSTRUCTIONS 3 Read this first 6 Learning more about the camcorder ("Handycam" User Guide 9 Parts and controls 13 Getting started Supplied Items 18 Charging the battery pack 19 Charging the battery using your ...25 Recording/Playback Recording 27 Recording movies 27 Shooting photos 27 Zooming 30 Playback 32 Playing movies and photos from a map (HDR-CX260V/CX580V/PJ260V/ PJ580V/PJ600V/XR260V 33 Operating buttons while playing 35 Advanced operations Recording people clearly 37 Recording the selected subject clearly (Face Priority 37 Recording voices...
Operating Guide
Page 11
... quality (Highlight Movie 46 Playing images on a TV 47 Enjoying 5.1ch surround sound (HDR-CX580V/PJ260/PJ260V/PJ580/ PJ580V/PJ600/PJ600V/XR260V 48 Using the built-in projector (HDR-PJ260/PJ260V/PJ580/PJ580V/PJ600/PJ600V). . . . . 49 Editing Editing on your camcorder 51 Deleting movies and photos 51 Dividing a movie 51 Capturing a photo from a movie...
... quality (Highlight Movie 46 Playing images on a TV 47 Enjoying 5.1ch surround sound (HDR-CX580V/PJ260/PJ260V/PJ580/ PJ580V/PJ600/PJ600V/XR260V 48 Using the built-in projector (HDR-PJ260/PJ260V/PJ580/PJ580V/PJ600/PJ600V). . . . . 49 Editing Editing on your camcorder 51 Deleting movies and photos 51 Dividing a movie 51 Capturing a photo from a movie...
Operating Guide
Page 12
... a standard definition image quality (STD) disc with a recorder, etc 61 Saving images on an external media device 63 Customizing your camcorder Using menus 65 Menu lists 67 Others/Index Troubleshooting 71 Self-diagnosis display/Warning indicators 72 Recording time of movies/number of recordable photos... recording time of movies 75 Expected number of recordable photos 78 About handling of your camcorder 79 Specifications 84 END-USER LICENSE AGREEMENT FOR MAP DATA FOR VIDEO CAMERA RECORDER PRODUCTS (HDR-CX260V/CX580V/PJ260V/PJ580V/PJ600V/XR260V 88 Screen indicators 91 Index 93 US 12
... a standard definition image quality (STD) disc with a recorder, etc 61 Saving images on an external media device 63 Customizing your camcorder Using menus 65 Menu lists 67 Others/Index Troubleshooting 71 Self-diagnosis display/Warning indicators 72 Recording time of movies/number of recordable photos... recording time of movies 75 Expected number of recordable photos 78 About handling of your camcorder 79 Specifications 84 END-USER LICENSE AGREEMENT FOR MAP DATA FOR VIDEO CAMERA RECORDER PRODUCTS (HDR-CX260V/CX580V/PJ260V/PJ580V/PJ600V/XR260V 88 Screen indicators 91 Index 93 US 12
Operating Guide
Page 16
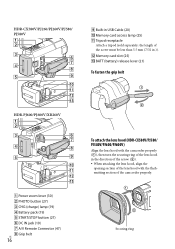
... screw must be less than 5.5 mm (7/32 in.)). Memory card slot (25) BATT (battery) release lever (21) To fasten the grip belt HDR-PJ600/PJ600V/XR260V Power zoom lever (30) PHOTO button (27) CHG (charge) lamp (19) Battery pack (19) START/STOP ...IN jack (19) A/V Remote Connector (47) Grip belt US 16 To attach the lens hood (HDR-CX580V/PJ580/ PJ580V/PJ600/PJ600V) Align the lens hood with the camcorder properly (), then turn the securing ring of the lens hood in the direction of the arrow (). ...
... screw must be less than 5.5 mm (7/32 in.)). Memory card slot (25) BATT (battery) release lever (21) To fasten the grip belt HDR-PJ600/PJ600V/XR260V Power zoom lever (30) PHOTO button (27) CHG (charge) lamp (19) Battery pack (19) START/STOP ...IN jack (19) A/V Remote Connector (47) Grip belt US 16 To attach the lens hood (HDR-CX580V/PJ580/ PJ580V/PJ600/PJ600V) Align the lens hood with the camcorder properly (), then turn the securing ring of the lens hood in the direction of the arrow (). ...
Operating Guide
Page 17
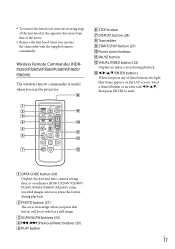
... of the arrow. Remove the lens hood when you operate the camcorder with then press ENTER to enter. DATA CODE button (69) Displays the date and time, camera setting data, or coordinates (HDR-CX260V/CX580V/ PJ260V/PJ580V/PJ600V/XR260V) of these buttons, the light blue frame appears on -screen image when...
... of the arrow. Remove the lens hood when you operate the camcorder with then press ENTER to enter. DATA CODE button (69) Displays the date and time, camera setting data, or coordinates (HDR-CX260V/CX580V/ PJ260V/PJ580V/PJ600V/XR260V) of these buttons, the light blue frame appears on -screen image when...
Operating Guide
Page 18
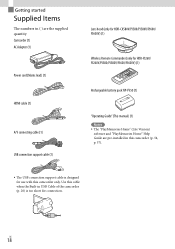
Camcorder (1) AC Adaptor (1) Power cord (Mains lead) (1) HDMI cable (1) A/V connecting cable (1) USB connection support cable (1) Lens hood (only for HDR-CX580V/PJ580/PJ580V/PJ600/ PJ600V) (1) Wireless Remote Commander (only for HDR-PJ260/ PJ260V/PJ580/PJ580V/PJ600/PJ600V) (1) Rechargeable battery pack NP-FV50 (1) "Operating Guide" (This manual) (1) Notes The "PlayMemories Home" (Lite Version) software...
Camcorder (1) AC Adaptor (1) Power cord (Mains lead) (1) HDMI cable (1) A/V connecting cable (1) USB connection support cable (1) Lens hood (only for HDR-CX580V/PJ580/PJ580V/PJ600/ PJ600V) (1) Wireless Remote Commander (only for HDR-PJ260/ PJ260V/PJ580/PJ580V/PJ600/PJ600V) (1) Rechargeable battery pack NP-FV50 (1) "Operating Guide" (This manual) (1) Notes The "PlayMemories Home" (Lite Version) software...

Operating Guide
Page 19
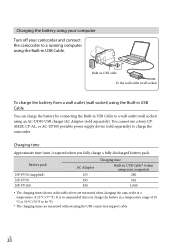
US 19 HDR-PJ600/ PJ600V/XR260V DC IN jack Align the mark on the DC plug with that on the DC IN jack CHG (charge) lamp DC plug To the wall outlet (wall socket) Notes You cannot attach any "InfoLITHIUM" battery pack other than the V series to your camcorder and... charged. Charging the battery pack 1 Close the LCD screen and attach the battery pack. Disconnect the AC Adaptor from the DC IN jack of your camcorder. Getting started Battery pack 2 Connect the AC Adaptor () and the power cord (mains lead) () to your...
US 19 HDR-PJ600/ PJ600V/XR260V DC IN jack Align the mark on the DC plug with that on the DC IN jack CHG (charge) lamp DC plug To the wall outlet (wall socket) Notes You cannot attach any "InfoLITHIUM" battery pack other than the V series to your camcorder and... charged. Charging the battery pack 1 Close the LCD screen and attach the battery pack. Disconnect the AC Adaptor from the DC IN jack of your camcorder. Getting started Battery pack 2 Connect the AC Adaptor () and the power cord (mains lead) () to your...
Operating Guide
Page 20
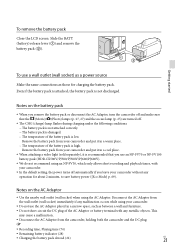
... outlet (wall socket) To charge the battery from a wall outlet (wall socket) using an AC-UD10 USB charger/AC Adaptor (sold separately) to charge the camcorder. Charging time Approximate time (min.) required when you charge the battery in USB Cable to a wall outlet (wall socket) using the Built-in USB Cable... You can charge the battery by connecting the Built-in a temperature range of 25 °C (77 °F). US 20 You cannot use a Sony CPAH2R, CP-AL, or AC-UP100 portable power supply device (sold separately).
... outlet (wall socket) To charge the battery from a wall outlet (wall socket) using an AC-UD10 USB charger/AC Adaptor (sold separately) to charge the camcorder. Charging time Approximate time (min.) required when you charge the battery in USB Cable to a wall outlet (wall socket) using the Built-in USB Cable... You can charge the battery by connecting the Built-in a temperature range of 25 °C (77 °F). US 20 You cannot use a Sony CPAH2R, CP-AL, or AC-UP100 portable power supply device (sold separately).
Operating Guide
Page 21
... pack. Remove the battery pack from the wall outlet (wall socket) immediately if any malfunction occurs while using your camcorder. Do not use an NP-FV70 or NP-FV100 battery pack (HDR-CX580V/PJ580/PJ580V/PJ600/PJ600V). We do not recommend using the AC Adaptor. Notes on the battery pack... When you remove the battery pack or disconnect the AC Adaptor, turn the camcorder off and make sure that you leave your...
... pack. Remove the battery pack from the wall outlet (wall socket) immediately if any malfunction occurs while using your camcorder. Do not use an NP-FV70 or NP-FV100 battery pack (HDR-CX580V/PJ580/PJ580V/PJ600/PJ600V). We do not recommend using the AC Adaptor. Notes on the battery pack... When you remove the battery pack or disconnect the AC Adaptor, turn the camcorder off and make sure that you leave your...

Operating Guide
Page 22
Do not use an electronic voltage transformer. US 22 Charging the battery pack abroad You can charge the battery pack in any countries/regions using the AC Adaptor supplied with your camcorder within the AC 100 V - 240 V, 50 Hz/60 Hz range.
Do not use an electronic voltage transformer. US 22 Charging the battery pack abroad You can charge the battery pack in any countries/regions using the AC Adaptor supplied with your camcorder within the AC 100 V - 240 V, 50 Hz/60 Hz range.
Operating Guide
Page 23
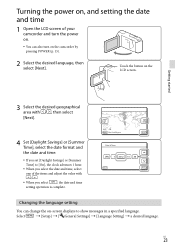
Touch the button on the camcorder by pressing POWER (p. 15). 2 Select the desired language, then select [Next]. US 23 Turning the power on, and setting the date and time 1 Open the ... You can change the on-screen displays to [On], the clock advances 1 hour. When you select the date and time, select one of your camcorder and turn the power on. You can also turn on the LCD screen. Getting started 3 Select the desired geographical area with /. When you...
Touch the button on the camcorder by pressing POWER (p. 15). 2 Select the desired language, then select [Next]. US 23 Turning the power on, and setting the date and time 1 Open the ... You can change the on-screen displays to [On], the clock advances 1 hour. When you select the date and time, select one of your camcorder and turn the power on. You can also turn on the LCD screen. Getting started 3 Select the desired geographical area with /. When you...
Operating Guide
Page 24
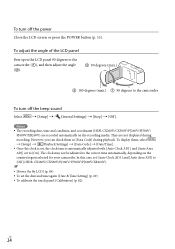
Notes The recording date, time and condition, and coordinates (HDR-CX260V/CX580V/PJ260V/PJ580V/ PJ600V/XR260V) are not displayed during playback. They are recorded automatically on the country/region selected for your camcorder. However, you can check them , select [Setup] [ Playback Settings... case, set [Auto Clock ADJ ] and [Auto Area ADJ] to [Off] (HDR-CX260V/CX580V/PJ260V/PJ580V/PJ600V/XR260V). [Power On By LCD] (p. 69) To set to the camcorder To turn off the beep sound Select [Setup] [ General Settings...
Notes The recording date, time and condition, and coordinates (HDR-CX260V/CX580V/PJ260V/PJ580V/ PJ600V/XR260V) are not displayed during playback. They are recorded automatically on the country/region selected for your camcorder. However, you can check them , select [Setup] [ Playback Settings... case, set [Auto Clock ADJ ] and [Auto Area ADJ] to [Off] (HDR-CX260V/CX580V/PJ260V/PJ580V/PJ600V/XR260V). [Power On By LCD] (p. 69) To set to the camcorder To turn off the beep sound Select [Setup] [ General Settings...
Operating Guide
Page 25
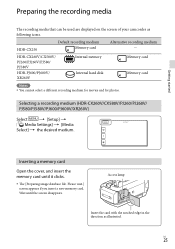
...be used are displayed on the screen of your camcorder as illustrated. Access lamp Insert the card with the notched edge in the direction as following icons. Selecting a recording medium (HDR-CX260V/CX580V/PJ260/PJ260V/ PJ580/PJ580V/PJ600/PJ600V/XR260V) Select [Setup] [ ...medium. Inserting a memory card Open the cover, and insert the memory card until the screen disappears. HDR-CX260V/CX580V/ PJ260/PJ260V/PJ580/ PJ580V HDR-PJ600/PJ600V/ XR260V Internal memory Internal hard disk Memory card Memory card Notes You cannot select a different recording ...
...be used are displayed on the screen of your camcorder as illustrated. Access lamp Insert the card with the notched edge in the direction as following icons. Selecting a recording medium (HDR-CX260V/CX580V/PJ260/PJ260V/ PJ580/PJ580V/PJ600/PJ600V/XR260V) Select [Setup] [ ...medium. Inserting a memory card Open the cover, and insert the memory card until the screen disappears. HDR-CX260V/CX580V/ PJ260/PJ260V/PJ580/ PJ580V HDR-PJ600/PJ600V/ XR260V Internal memory Internal hard disk Memory card Memory card Notes You cannot select a different recording ...

Operating Guide
Page 26
... is displayed, format the memory card (p. 69). Confirm the direction of memory card you can use (p. 69). Save your important data on your camcorder "Memory Stick PRO Duo" media (Mark2) "Memory Stick PRO-HG Duo" media SD memory card SDHC memory card SDXC memory card SD Speed Class Capacity... the format screen appears, do not perform the format. To eject the memory card Open the cover and lightly push the memory card in this camcorder. Movies recorded on SDXC memory cards cannot be imported to or played back on computers or AV devices not supporting the exFAT* file...
... is displayed, format the memory card (p. 69). Confirm the direction of memory card you can use (p. 69). Save your important data on your camcorder "Memory Stick PRO Duo" media (Mark2) "Memory Stick PRO-HG Duo" media SD memory card SDHC memory card SDXC memory card SD Speed Class Capacity... the format screen appears, do not perform the format. To eject the memory card Open the cover and lightly push the memory card in this camcorder. Movies recorded on SDXC memory cards cannot be imported to or played back on computers or AV devices not supporting the exFAT* file...
Operating Guide
Page 28
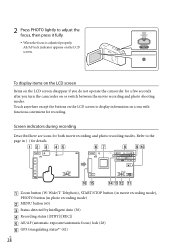
... or switch between the movie recording and photo shooting modes. Refer to the page in ( ) for a few seconds after you do not operate the camcorder for details. Zoom button (W: Wide/T: Telephoto), START/STOP button (in movie recording mode), PHOTO button (in photo recording mode) MENU button (65) ...
... or switch between the movie recording and photo shooting modes. Refer to the page in ( ) for a few seconds after you do not operate the camcorder for details. Zoom button (W: Wide/T: Telephoto), START/STOP button (in movie recording mode), PHOTO button (in photo recording mode) MENU button (65) ...
Operating Guide
Page 29
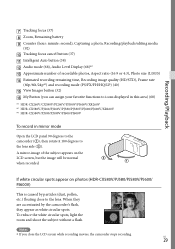
... screen while recording movies, the camcorder stops recording. Notes If you can assign your favorite functions to icons displayed in this area) (68) *1 HDR-CX260V/CX580V/PJ260V/PJ580V/PJ600V/XR260V *2 HDR-CX580V/PJ260/PJ260V/PJ580/PJ580V/PJ600/PJ600V/XR260V *3 HDR-CX580V/PJ580/PJ580V/PJ600/PJ600V To... record in mirror mode Open the LCD panel 90 degrees to the camcorder (), then rotate it 180 degrees...
... screen while recording movies, the camcorder stops recording. Notes If you can assign your favorite functions to icons displayed in this area) (68) *1 HDR-CX260V/CX580V/PJ260V/PJ580V/PJ600V/XR260V *2 HDR-CX580V/PJ260/PJ260V/PJ580/PJ580V/PJ600/PJ600V/XR260V *3 HDR-CX580V/PJ580/PJ580V/PJ600/PJ600V To... record in mirror mode Open the LCD panel 90 degrees to the camcorder (), then rotate it 180 degrees...
Operating Guide
Page 30
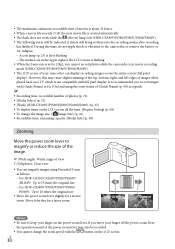
...power zoom lever to magnify or reduce the size of [Guide Frame] (p. 68) as follows. For HDR-CX250/CX260V/PJ260/PJ260V/ XR260V: Up to 55 times the original size For HDR-CX580V/PJ580/PJ580V/PJ600/ PJ600V: Up to 20 times the original size Move the power zoom lever ...slightly for a faster zoom. However, this time, do not apply shock or vibration to [24p], you move your camcorder can magnify...
...power zoom lever to magnify or reduce the size of [Guide Frame] (p. 68) as follows. For HDR-CX250/CX260V/PJ260/PJ260V/ XR260V: Up to 55 times the original size For HDR-CX580V/PJ580/PJ580V/PJ600/ PJ600V: Up to 20 times the original size Move the power zoom lever ...slightly for a faster zoom. However, this time, do not apply shock or vibration to [24p], you move your camcorder can magnify...


