
Operating Guide
Page 1
4-452-094-12(1) Digital HD Video Camera Recorder Operating Guide Please also refer to : http://www.sony.net/SonyInfo/Support/ Table of contents Getting started Recording/Playback Advanced operations Editing Saving movies and photos with a computer Saving images on an external media device Customizing your camcorder Others/Index HDR-PJ780E/PJ780VE/PJ790/PJ790E/PJ790V/PJ790VE
4-452-094-12(1) Digital HD Video Camera Recorder Operating Guide Please also refer to : http://www.sony.net/SonyInfo/Support/ Table of contents Getting started Recording/Playback Advanced operations Editing Saving movies and photos with a computer Saving images on an external media device Customizing your camcorder Others/Index HDR-PJ780E/PJ780VE/PJ790/PJ790E/PJ790V/PJ790VE

Operating Guide
Page 6
...batteries to the wall outlet (wall socket) via the AC Adaptor. Even if your camcorder is turned off, AC GB power source (mains) is subject to charge the battery pack using a genuine Sony battery charger or a device that may cause undesired operation. Excessive sound pressure from the...Rules. This Class B digital apparatus complies with the specified type only. Otherwise, fire or injury may not cause harmful interference, and (2) this camcorder only, and should not be used battery packs promptly as described in fire. Do not handle damaged or leaking lithium ion batteries. ...
...batteries to the wall outlet (wall socket) via the AC Adaptor. Even if your camcorder is turned off, AC GB power source (mains) is subject to charge the battery pack using a genuine Sony battery charger or a device that may cause undesired operation. Excessive sound pressure from the...Rules. This Class B digital apparatus complies with the specified type only. Otherwise, fire or injury may not cause harmful interference, and (2) this camcorder only, and should not be used battery packs promptly as described in fire. Do not handle damaged or leaking lithium ion batteries. ...

Operating Guide
Page 9
... your local Civic Office, your household waste disposal service or the shop where you should lose the fuse cover, please contact your nearest Sony service station. Hand the battery over to attach the fuse cover after you change the fuse. Should the fuse in the plug supplied need...the plug without any of the following page: Functions and equipment p.11 About language setting Change the screen language before using the camcorder if necessary (p. 22). On recording Before starting to record, test the recording function to make sure the image and sound are used ...
... your local Civic Office, your household waste disposal service or the shop where you should lose the fuse cover, please contact your nearest Sony service station. Hand the battery over to attach the fuse cover after you change the fuse. Should the fuse in the plug supplied need...the plug without any of the following page: Functions and equipment p.11 About language setting Change the screen language before using the camcorder if necessary (p. 22). On recording Before starting to record, test the recording function to make sure the image and sound are used ...

Operating Guide
Page 10
...this manual, the internal memory of the camcorder and the memory card are subject to change without notice. These points are operational for in-depth instructions on the LCD screen. Refer to it for effective use. http://www.sony.net/SonyInfo/ Support/ 2 Select your ...country or region. 3 Search for understandability. Design and specifications of your camcorder. LCD Panel , viewfinder The LCD screen and viewfinder are manufactured ...
...this manual, the internal memory of the camcorder and the memory card are subject to change without notice. These points are operational for in-depth instructions on the LCD screen. Refer to it for effective use. http://www.sony.net/SonyInfo/ Support/ 2 Select your ...country or region. 3 Search for understandability. Design and specifications of your camcorder. LCD Panel , viewfinder The LCD screen and viewfinder are manufactured ...

Operating Guide
Page 11
...58) GB 11 If you find the description "Models with ..." like below, confirm in this manual, the differences in functions Model name HDR-PJ780E HDR-PJ780VE HDR-PJ790 HDR-PJ790E HDR-PJ790V HDR-PJ790VE Capacity of internal memory Signal format USB connection GPS 32 GB PAL Output only 32 GB 96 GB 96 GB PAL...; For the following items, the descriptions are described together. How to use this manual In this chapter whether the description applies to your camcorder. (Models with GPS) (Models with the NTSC color system) To confirm the model name of your...
...58) GB 11 If you find the description "Models with ..." like below, confirm in this manual, the differences in functions Model name HDR-PJ780E HDR-PJ780VE HDR-PJ790 HDR-PJ790E HDR-PJ790V HDR-PJ790VE Capacity of internal memory Signal format USB connection GPS 32 GB PAL Output only 32 GB 96 GB 96 GB PAL...; For the following items, the descriptions are described together. How to use this manual In this chapter whether the description applies to your camcorder. (Models with GPS) (Models with the NTSC color system) To confirm the model name of your...

Operating Guide
Page 12
Table of contents Read this first 2 IMPORTANT SAFETY INSTRUCTIONS 3 Learning more about the camcorder ("Handycam" User Guide 10 How to use this manual 11 Differences in functions 11 Parts and controls 14 Getting started Supplied Items 18 Charging the ...
Table of contents Read this first 2 IMPORTANT SAFETY INSTRUCTIONS 3 Learning more about the camcorder ("Handycam" User Guide 10 How to use this manual 11 Differences in functions 11 Parts and controls 14 Getting started Supplied Items 18 Charging the ...

Operating Guide
Page 13
... (STD) disc with a recorder 46 Saving images on an external media device with high definition (HD) image quality 47 Customizing your camcorder Using menus 50 Menu lists 51 Others/Index Troubleshooting 55 Self-diagnosis display/Warning indicators 56 Recording time of movies/number of recordable photos ... playback with each battery pack 58 Expected recording time of movies 58 Expected number of recordable photos 60 About handling of your camcorder 61 Specifications 65 END-USER LICENSE AGREEMENT FOR MAP DATA FOR VIDEO CAMERA RECORDER PRODUCTS (Models with GPS 68 Screen indicators 72...
... (STD) disc with a recorder 46 Saving images on an external media device with high definition (HD) image quality 47 Customizing your camcorder Using menus 50 Menu lists 51 Others/Index Troubleshooting 55 Self-diagnosis display/Warning indicators 56 Recording time of movies/number of recordable photos ... playback with each battery pack 58 Expected recording time of movies 58 Expected number of recordable photos 60 About handling of your camcorder 61 Specifications 65 END-USER LICENSE AGREEMENT FOR MAP DATA FOR VIDEO CAMERA RECORDER PRODUCTS (Models with GPS 68 Screen indicators 72...

Operating Guide
Page 15
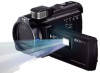
... LIGHT (Video Light) button NIGHTSHOT button POWER button Memory card access lamp (25) While the lamp is lit or flashing, the camcorder is reading or writing data. Memory card slot (25) (View Images) button PROJECTOR button (39) (Movie)/ (Photo) lamp MODE button...
... LIGHT (Video Light) button NIGHTSHOT button POWER button Memory card access lamp (25) While the lamp is lit or flashing, the camcorder is reading or writing data. Memory card slot (25) (View Images) button PROJECTOR button (39) (Movie)/ (Photo) lamp MODE button...

Operating Guide
Page 16
...movies using the NightShot function. Depending on the specifications of the tripod, your movies. Remove the lens hood when you operate the camcorder with the supplied remote commander. GB 16 Tripod receptacle Attach a tripod (sold separately: the length of the screw must be ...reflected and recorded in your camcorder may not attach in the proper direction. BATT (battery) release lever (21) To fasten the grip belt To remove the...
...movies using the NightShot function. Depending on the specifications of the tripod, your movies. Remove the lens hood when you operate the camcorder with the supplied remote commander. GB 16 Tripod receptacle Attach a tripod (sold separately: the length of the screw must be ...reflected and recorded in your camcorder may not attach in the proper direction. BATT (battery) release lever (21) To fasten the grip belt To remove the...

Operating Guide
Page 17
Wireless Remote Commander Using the wireless remote commander is helpful when projecting recorded images from your camcorder. DATA CODE button (53) Displays the date and time, camera setting data, or coordinates (models with then press ENTER to remove the wind screen. ...
Wireless Remote Commander Using the wireless remote commander is helpful when projecting recorded images from your camcorder. DATA CODE button (53) Displays the date and time, camera setting data, or coordinates (models with then press ENTER to remove the wind screen. ...

Operating Guide
Page 18
Camcorder (1) AC Adaptor (1) Step Down Ring (1) Wireless Remote Commander (1) Power cord (Mains lead) (1) Wind screen (1) HDMI cable (1) Rechargeable battery pack NP-FV50 (1) USB connection support cable (1) &#... this cable when the Built-in ( ) indicate the supplied quantity. Lens hood (1) GB 18 Getting started Supplied Items The numbers in USB Cable of the camcorder (p. 20) is designed for connection. "Operating Guide" (This manual) (1) Notes The "PlayMemories Home" software and "PlayMemories Home Help Guide" can be downloaded from the...
Camcorder (1) AC Adaptor (1) Step Down Ring (1) Wireless Remote Commander (1) Power cord (Mains lead) (1) Wind screen (1) HDMI cable (1) Rechargeable battery pack NP-FV50 (1) USB connection support cable (1) &#... this cable when the Built-in ( ) indicate the supplied quantity. Lens hood (1) GB 18 Getting started Supplied Items The numbers in USB Cable of the camcorder (p. 20) is designed for connection. "Operating Guide" (This manual) (1) Notes The "PlayMemories Home" software and "PlayMemories Home Help Guide" can be downloaded from the...

Operating Guide
Page 19
... is recommended that you use an NP-FV70 or NP-FV100 battery pack. You cannot use the NP-FV30 "InfoLITHIUM" battery pack with your camcorder. In the default setting, the power turns off when the battery pack is fully charged. Battery pack 2 Connect the AC Adaptor () ...and the power cord (mains lead) () to store the viewfinder first). Align the indentation on the camcorder and projection on the battery pack, then slide the battery pack upwards. GB 19 Disconnect the AC Adaptor from the DC IN jack of your...
... is recommended that you use an NP-FV70 or NP-FV100 battery pack. You cannot use the NP-FV30 "InfoLITHIUM" battery pack with your camcorder. In the default setting, the power turns off when the battery pack is fully charged. Battery pack 2 Connect the AC Adaptor () ...and the power cord (mains lead) () to store the viewfinder first). Align the indentation on the camcorder and projection on the battery pack, then slide the battery pack upwards. GB 19 Disconnect the AC Adaptor from the DC IN jack of your...

Operating Guide
Page 20
You cannot use a Sony CPAH2R, CP-AL, or AC-UP100 portable power supply device (sold separately) to a running computer using the Built-in...charge the battery by connecting the Built-in USB Cable*: 280 min. The charging times shown above are measured when charging the camcorder at a room temperature of 10 °C to 30 °C (50 °F to 86 °F). * The charging times are ...wall socket) To charge the battery using the USB connection support cable. GB 20 When using your camcorder and connect the camcorder to charge the camcorder. When using the AC Adaptor: 155 min.
You cannot use a Sony CPAH2R, CP-AL, or AC-UP100 portable power supply device (sold separately) to a running computer using the Built-in...charge the battery by connecting the Built-in USB Cable*: 280 min. The charging times shown above are measured when charging the camcorder at a room temperature of 10 °C to 30 °C (50 °F to 86 °F). * The charging times are ...wall socket) To charge the battery using the USB connection support cable. GB 20 When using your camcorder and connect the camcorder to charge the camcorder. When using the AC Adaptor: 155 min.

Operating Guide
Page 21
... on the AC Adaptor Do not short-circuit the DC plug of charge. Notes on how to connect the AC adaptor, refer to your camcorder within the AC 100 V - 240 V, 50 Hz/60 Hz range. GB 21 To use an electronic voltage transformer. This may cause a malfunction. ... Disconnect the AC Adaptor from the camcorder while holding both the camcorder and the DC plug. Recording time, Playing time (p. 58) Remaining battery indicator (p. 29) Charging the battery pack...
... on the AC Adaptor Do not short-circuit the DC plug of charge. Notes on how to connect the AC adaptor, refer to your camcorder within the AC 100 V - 240 V, 50 Hz/60 Hz range. GB 21 To use an electronic voltage transformer. This may cause a malfunction. ... Disconnect the AC Adaptor from the camcorder while holding both the camcorder and the DC plug. Recording time, Playing time (p. 58) Remaining battery indicator (p. 29) Charging the battery pack...
Operating Guide
Page 22
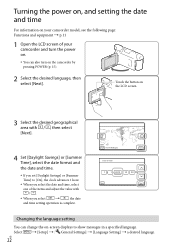
...change the on-screen displays to [On], the clock advances 1 hour. When you select the date and time, select one of your camcorder model, see the following page: Functions and equipment p.11 1 Open the LCD screen of the items and adjust the value with / ,... , the date and time setting operation is complete. Turning the power on, and setting the date and time For information on your camcorder and turn on the camcorder by pressing POWER (p. 15). 2 Select the desired language, then select [Next]. GB 22 Select [Setup] [ General Settings] ...
...change the on-screen displays to [On], the clock advances 1 hour. When you select the date and time, select one of your camcorder model, see the following page: Functions and equipment p.11 1 Open the LCD screen of the items and adjust the value with / ,... , the date and time setting operation is complete. Turning the power on, and setting the date and time For information on your camcorder and turn on the camcorder by pressing POWER (p. 15). 2 Select the desired language, then select [Next]. GB 22 Select [Setup] [ General Settings] ...

Operating Guide
Page 23
... the viewfinder. If the indicator on the viewfinder appears blurred, adjust the appearance using the LCD screen or the viewfinder The power of the camcorder is pulled out, retract the viewfinder as shown in the illustration on the above of the viewfinder. If the viewfinder is turned on or ...off . GB 23 Status LCD screen Viewfinder Power of the camcorder Open Retracted On Pulled out On Closed Retracted Off Pulled out On Notes Even if the LCD screen is closed, if the viewfinder ...
... the viewfinder. If the indicator on the viewfinder appears blurred, adjust the appearance using the LCD screen or the viewfinder The power of the camcorder is pulled out, retract the viewfinder as shown in the illustration on the above of the viewfinder. If the viewfinder is turned on or ...off . GB 23 Status LCD screen Viewfinder Power of the camcorder Open Retracted On Pulled out On Closed Retracted Off Pulled out On Notes Even if the LCD screen is closed, if the viewfinder ...

Operating Guide
Page 24
... [Date & Time Setting] (p. 54) To calibrate the touch panel: [Calibration] (p. 54) GB 24 The clock may not automatically adjust to the camcorder To turn off the beep sound Select [Setup] [ General Settings] [Beep] [Off]. To adjust the angle of the... LCD panel First open the LCD panel 90 degrees to the camcorder (), and then adjust the angle (). 90 degrees (max.) 180 degrees (max.) 90 degrees to the correct time,...
... [Date & Time Setting] (p. 54) To calibrate the touch panel: [Calibration] (p. 54) GB 24 The clock may not automatically adjust to the camcorder To turn off the beep sound Select [Setup] [ General Settings] [Beep] [Off]. To adjust the angle of the... LCD panel First open the LCD panel 90 degrees to the camcorder (), and then adjust the angle (). 90 degrees (max.) 180 degrees (max.) 90 degrees to the correct time,...

Operating Guide
Page 25
... Select] the desired medium. Getting started Preparing the recording media The recording media that can be used are displayed on the screen of your camcorder as illustrated. Please wait.] screen appears if you insert a new memory card.
... Select] the desired medium. Getting started Preparing the recording media The recording media that can be used are displayed on the screen of your camcorder as illustrated. Please wait.] screen appears if you insert a new memory card.
Operating Guide
Page 26
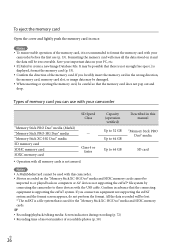
... create a new Image Database File. If you forcibly insert the memory card in advance that there is not enough free space.] is used with this camcorder. Movies recorded on the "Memory Stick XC-HG Duo" media and SDXC memory cards cannot be imported to or played back on computers or... AV devices not supporting the exFAT* file system by connecting the camcorder to format the memory card with your camcorder SD Speed Class "Memory Stick PRO Duo" media (Mark2) "Memory Stick PRO-HG Duo" media "Memory Stick XC-HG Duo" media...
... create a new Image Database File. If you forcibly insert the memory card in advance that there is not enough free space.] is used with this camcorder. Movies recorded on the "Memory Stick XC-HG Duo" media and SDXC memory cards cannot be imported to or played back on computers or... AV devices not supporting the exFAT* file system by connecting the camcorder to format the memory card with your camcorder SD Speed Class "Memory Stick PRO Duo" media (Mark2) "Memory Stick PRO-HG Duo" media "Memory Stick XC-HG Duo" media...
Operating Guide
Page 27
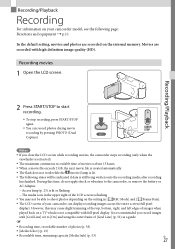
... recording images across the entire screen (full pixel display). Notes If you close the LCD screen while recording movies, the camcorder stops recording (only when the viewfinder is retracted). The maximum continuous recordable time of movies is about 13 hours. ... Select] (p. 25) Recordable time, remaining capacity [Media Info] (p. 53) GB 27 Recording/Playback Recording For information on your camcorder can record photos during movie recording by pressing PHOTO (Dual Capture). During this may cause slight trimming of the top, bottom, right, and...
... recording images across the entire screen (full pixel display). Notes If you close the LCD screen while recording movies, the camcorder stops recording (only when the viewfinder is retracted). The maximum continuous recordable time of movies is about 13 hours. ... Select] (p. 25) Recordable time, remaining capacity [Media Info] (p. 53) GB 27 Recording/Playback Recording For information on your camcorder can record photos during movie recording by pressing PHOTO (Dual Capture). During this may cause slight trimming of the top, bottom, right, and...


