Operating Instructions
Page 2
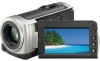
...Adobe Reader. You can search for an item by keyword using your camcorder connected to a computer will be found in this Handycam Handbook, the internal memory of your camcorder and accessories are captured using a digital still camera, and therefore may appear ...; Click here. You can print out the Handycam Handbook. Information on your camcorder. In this Handycam Handbook. About this Handycam Handbook The example images used in this manual. Design and specifications of your camcorder and "Memory Stick PRO Duo" media are called "recording...
...Adobe Reader. You can search for an item by keyword using your camcorder connected to a computer will be found in this Handycam Handbook, the internal memory of your camcorder and accessories are captured using a digital still camera, and therefore may appear ...; Click here. You can print out the Handycam Handbook. Information on your camcorder. In this Handycam Handbook. About this Handycam Handbook The example images used in this manual. Design and specifications of your camcorder and "Memory Stick PRO Duo" media are called "recording...
Operating Instructions
Page 3
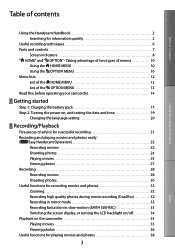
...for successful recording 21 Recording and playing movies and photos easily ( Easy Handycam Operation 22 Recording movies 22 Shooting photos 24 Playing movies 25 Viewing ... Shooting photos 30 Useful functions for recording movies and photos 32 Zooming 32 Recording high quality photos during movie recording (Dual Rec 32 Recording in mirror mode 33 Recording...SLW REC 33 Switching the screen display, or turning the LCD backlight on/off 34 Playback on the camcorder 35 Playing movies 35 Viewing photos 36 Useful functions for information quickly 2 Useful recording techniques 6 Parts and...
...for successful recording 21 Recording and playing movies and photos easily ( Easy Handycam Operation 22 Recording movies 22 Shooting photos 24 Playing movies 25 Viewing ... Shooting photos 30 Useful functions for recording movies and photos 32 Zooming 32 Recording high quality photos during movie recording (Dual Rec 32 Recording in mirror mode 33 Recording...SLW REC 33 Switching the screen display, or turning the LCD backlight on/off 34 Playback on the camcorder 35 Playing movies 35 Viewing photos 36 Useful functions for information quickly 2 Useful recording techniques 6 Parts and...

Operating Instructions
Page 4
...camcorder MOVIE SETTINGS (Items for recording movies 65 PHOTO SETTINGS (Items for desired images by date (Date Index 39 Using PB zoom with photos 40 Playing back a series of photos (Slide show 41 Playing images on a TV 42 Connecting a TV using [TV CONNECT Guide 42 Connecting to a high definition... TV 43 Connecting to a non-high-definition 16:9 (wide) or 4:3 TV 44 Using "BRAVIA" Sync 46 Editing Deleting movies and photos 47 Capturing a photo from a ...
...camcorder MOVIE SETTINGS (Items for recording movies 65 PHOTO SETTINGS (Items for desired images by date (Date Index 39 Using PB zoom with photos 40 Playing back a series of photos (Slide show 41 Playing images on a TV 42 Connecting a TV using [TV CONNECT Guide 42 Connecting to a high definition... TV 43 Connecting to a non-high-definition 16:9 (wide) or 4:3 TV 44 Using "BRAVIA" Sync 46 Editing Deleting movies and photos 47 Capturing a photo from a ...

Operating Instructions
Page 5
... Expected time of recording and playback with each battery pack 98 Expected recording time of movies 98 Expected number of recordable photos 99 Using your camcorder abroad 100 File/folder structure on the internal memory and "Memory Stick PRO Duo" media ...102 Maintenance and precautions 104 About the AVCHD format 104...
... Expected time of recording and playback with each battery pack 98 Expected recording time of movies 98 Expected number of recordable photos 99 Using your camcorder abroad 100 File/folder structure on the internal memory and "Memory Stick PRO Duo" media ...102 Maintenance and precautions 104 About the AVCHD format 104...

Operating Instructions
Page 7
...) (VIEW IMAGES) button (25, 35) Access lamp (Internal memory, "Memory Stick PRO Duo" media) (60) While the lamp is lit or flashing, the camcorder is reading or writing data. RESET button Press RESET to initialize all the settings including the clock setting. "Memory Stick Duo" media slot...
...) (VIEW IMAGES) button (25, 35) Access lamp (Internal memory, "Memory Stick PRO Duo" media) (60) While the lamp is lit or flashing, the camcorder is reading or writing data. RESET button Press RESET to initialize all the settings including the clock setting. "Memory Stick Duo" media slot...
Operating Instructions
Page 9
..., 36) Indicators and their positions are approximate and may differ from what you actually see. Some indicators may not appear, depending on your camcorder model.
..., 36) Indicators and their positions are approximate and may differ from what you actually see. Some indicators may not appear, depending on your camcorder model.
Operating Instructions
Page 10
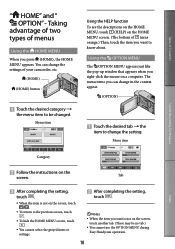
... not on the HOME MENU screen. (The bottom of turns orange.) Then, touch the item you press (HOME), the HOME MENU appears. Table of your camcorder, etc. (HOME) (HOME) button Touch the desired category the menu item to know about. Menu item Using the HELP function To see the... completing the setting, touch . Notes When the item you want to be no tab.) You cannot use the OPTION MENU during Easy Handycam operation. 10
... not on the HOME MENU screen. (The bottom of turns orange.) Then, touch the item you press (HOME), the HOME MENU appears. Table of your camcorder, etc. (HOME) (HOME) button Touch the desired category the menu item to know about. Menu item Using the HELP function To see the... completing the setting, touch . Notes When the item you want to be no tab.) You cannot use the OPTION MENU during Easy Handycam operation. 10

Operating Instructions
Page 11
Table of Contents Useful Recording Techniques The tabs and items that appear on the screen depend on the recording/playback status of your camcorder at the time. 11 Index
Table of Contents Useful Recording Techniques The tabs and items that appear on the screen depend on the recording/playback status of your camcorder at the time. 11 Index
Operating Instructions
Page 14
...Useful Recording Techniques Index Battery pack The camcorder is manufactured using extremely high-precision technology, so over 99.99% of the pixels are lit or flashing. See "About handling of your camcorder to malfunction. Pushing the plug forcibly into the terminal... (1) CD-ROM "Handycam Application Software" (1) "PMB" (software, including "PMB Guide") "Handycam Handbook" (PDF) "Operating Guide" (1) See page 60 for the "Memory Stick" media you can use . Table of Contents Read this camcorder. Doing so might cause your Black...
...Useful Recording Techniques Index Battery pack The camcorder is manufactured using extremely high-precision technology, so over 99.99% of the pixels are lit or flashing. See "About handling of your camcorder to malfunction. Pushing the plug forcibly into the terminal... (1) CD-ROM "Handycam Application Software" (1) "PMB" (software, including "PMB Guide") "Handycam Handbook" (PDF) "Operating Guide" (1) See page 60 for the "Memory Stick" media you can use . Table of Contents Read this camcorder. Doing so might cause your Black...
Operating Instructions
Page 15
...camcorder, it is connected to a computer Do not try to format the media of the camcorder using your camcorder... off the camcorder. MTF= Modulation...of the camcorder, you can...high definition image quality (HD) on a compatible Blu-ray Disc player/recorder or other devices Your camcorder is compatible with MPEG-4 AVC/H.264 High Profile for high definition...high definition) This camcorder captures high definition...camcorder. When you need a PAL...camcorder with the following devices; Other AVCHD format compatible devices which are not compatible with High...
...camcorder, it is connected to a computer Do not try to format the media of the camcorder using your camcorder... off the camcorder. MTF= Modulation...of the camcorder, you can...high definition image quality (HD) on a compatible Blu-ray Disc player/recorder or other devices Your camcorder is compatible with MPEG-4 AVC/H.264 High Profile for high definition...high definition) This camcorder captures high definition...camcorder. When you need a PAL...camcorder with the following devices; Other AVCHD format compatible devices which are not compatible with High...

Operating Instructions
Page 17
... socket) You can check the approximate amount of the arrow until it clicks. 3 Connect the AC Adaptor and the power cord (mains lead) to your camcorder is facing right. The CHG (charge) lamp lights up and charging starts. The CHG (charge) lamp turns off when the battery pack is fully charged.... 4 When the battery is charged, disconnect the AC Adaptor from the DC IN jack of your camcorder. See page 98 on recording and playing time. When your camcorder and the wall outlet (wall socket). Be sure that the mark on the DC plug is on...
... socket) You can check the approximate amount of the arrow until it clicks. 3 Connect the AC Adaptor and the power cord (mains lead) to your camcorder is facing right. The CHG (charge) lamp lights up and charging starts. The CHG (charge) lamp turns off when the battery pack is fully charged.... 4 When the battery is charged, disconnect the AC Adaptor from the DC IN jack of your camcorder. See page 98 on recording and playing time. When your camcorder and the wall outlet (wall socket). Be sure that the mark on the DC plug is on...

Operating Instructions
Page 18
... close the LCD screen and make sure that the (Movie) lamp/ (Photo) lamp (p. 19) are turned off automatically if you leave your camcorder without any operation for about 5 minutes, to 86 ˚F) is not discharged. This may cause a malfunction. 18 Index Useful Recording Techniques To... time Approximate time (min.) required when you fully charge a fully discharged battery pack. Table of the AC Adaptor or battery terminal with your camcorder. In the default setting, the power turns off . The CHG (charge) lamp flashes during charging under the following conditions...
... close the LCD screen and make sure that the (Movie) lamp/ (Photo) lamp (p. 19) are turned off automatically if you leave your camcorder without any operation for about 5 minutes, to 86 ˚F) is not discharged. This may cause a malfunction. 18 Index Useful Recording Techniques To... time Approximate time (min.) required when you fully charge a fully discharged battery pack. Table of the AC Adaptor or battery terminal with your camcorder. In the default setting, the power turns off . The CHG (charge) lamp flashes during charging under the following conditions...

Operating Instructions
Page 19
...; [CLOCK SET]. Table of Contents Useful Recording Techniques Step 2: Turning the power on, and setting the date and time 1 Open the LCD screen of your camcorder when the LCD screen is not on the screen, touch / until the item appears. 3 Set [SUMMERTIME], date and time, then touch . Your...
...; [CLOCK SET]. Table of Contents Useful Recording Techniques Step 2: Turning the power on, and setting the date and time 1 Open the LCD screen of your camcorder when the LCD screen is not on the screen, touch / until the item appears. 3 Set [SUMMERTIME], date and time, then touch . Your...

Operating Instructions
Page 20
...57732; [VIEW IMAGES SET] [DATA CODE] [DATE/TIME You can change the on the recording media, and can turn off your camcorder also by pressing POWER. When [POWER ON BY LCD] (p. 82) is turned POWER button You can be displayed during recording, but they ... You can turn off . (Movie) lamp flashes for a few seconds and the power is set to show messages in a specified language. To turn off your camcorder by touching (HOME) (SETTINGS) [SOUND/DISP SET] [BEEP] [OFF If the button you touch does not ...
...57732; [VIEW IMAGES SET] [DATA CODE] [DATE/TIME You can change the on the recording media, and can turn off your camcorder also by pressing POWER. When [POWER ON BY LCD] (p. 82) is turned POWER button You can be displayed during recording, but they ... You can turn off . (Movie) lamp flashes for a few seconds and the power is set to show messages in a specified language. To turn off your camcorder by touching (HOME) (SETTINGS) [SOUND/DISP SET] [BEEP] [OFF If the button you touch does not ...

Operating Instructions
Page 21
... movies. For example, using a tripod, you can continue recording without worrying about battery power shortages. 21 Index Stabilize yourself, move the camcorder. Aim for a balanced volume of voices, since the recording person is essential that may make a time-lapse recording or record subjects in...upper body slowly. Table of Contents Useful Recording Techniques Recording/Playback Five pieces of advice for successful recording Stabilizing your camcorder When you hold the camcorder, keep your upper body upright, and hold your arms close to make the scene look stable. The SteadyShot ...
... movies. For example, using a tripod, you can continue recording without worrying about battery power shortages. 21 Index Stabilize yourself, move the camcorder. Aim for a balanced volume of voices, since the recording person is essential that may make a time-lapse recording or record subjects in...upper body slowly. Table of Contents Useful Recording Techniques Recording/Playback Five pieces of advice for successful recording Stabilizing your camcorder When you hold the camcorder, keep your upper body upright, and hold your arms close to make the scene look stable. The SteadyShot ...
Operating Instructions
Page 22
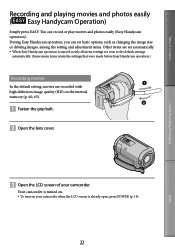
... or deleting images, among the setting and adjustment items. Other items are recorded with high definition image quality (HD) on your camcorder. You can set automatically. When Easy Handycam operation is already open, press POWER (p. 19). 22 Index Your camcorder is turned on. To turn on the internal memory (p. 60, 65). Fasten...
... or deleting images, among the setting and adjustment items. Other items are recorded with high definition image quality (HD) on your camcorder. You can set automatically. When Easy Handycam operation is already open, press POWER (p. 19). 22 Index Your camcorder is turned on. To turn on the internal memory (p. 60, 65). Fasten...

Operating Instructions
Page 24
Table of Contents Useful Recording Techniques Shooting photos Open the lens cover. Open the LCD screen of the screen becomes 4:3. 24 Index appears on the LCD screen. Press MODE to turn on the (Photo) lamp. The aspect ratio of your camcorder when the LCD screen is already open, press POWER (p. 19). Press EASY. Your camcorder is turned on. To turn on your camcorder.
Table of Contents Useful Recording Techniques Shooting photos Open the lens cover. Open the LCD screen of the screen becomes 4:3. 24 Index appears on the LCD screen. Press MODE to turn on the (Photo) lamp. The aspect ratio of your camcorder when the LCD screen is already open, press POWER (p. 19). Press EASY. Your camcorder is turned on. To turn on your camcorder.

Operating Instructions
Page 25
The VISUAL INDEX screen appears after some seconds. 25 Index Press PHOTO lightly to adjust the focus, then press it fully. Playing movies Open the LCD screen of Contents Useful Recording Techniques When Flashes Lights up disappears, the photo is turned on. To turn on the internal memory. Your camcorder is recorded on your camcorder. Table of your camcorder when the LCD screen is already open, press POWER (p. 19). Press (VIEW IMAGES).
The VISUAL INDEX screen appears after some seconds. 25 Index Press PHOTO lightly to adjust the focus, then press it fully. Playing movies Open the LCD screen of Contents Useful Recording Techniques When Flashes Lights up disappears, the photo is turned on. To turn on the internal memory. Your camcorder is recorded on your camcorder. Table of your camcorder when the LCD screen is already open, press POWER (p. 19). Press (VIEW IMAGES).

Operating Instructions
Page 26
Index 26 If you touch the movie or photo with , you select standard definition image quality (SD) movie is selected with [ / SET] (p. 65). ...58181; : Displays the Film Roll Index screen (p. 38). : Displays the Face Index screen (p. 38). : Displays high definition image quality (HD) movies.* : Displays photos. * appears when you can continue playback from the selected movie reaches the last ...To change the recording media, select the recording media on "Memory Stick PRO Duo" media.) Your camcorder starts playing the selected movie.
Index 26 If you touch the movie or photo with , you select standard definition image quality (SD) movie is selected with [ / SET] (p. 65). ...58181; : Displays the Film Roll Index screen (p. 38). : Displays the Face Index screen (p. 38). : Displays high definition image quality (HD) movies.* : Displays photos. * appears when you can continue playback from the selected movie reaches the last ...To change the recording media, select the recording media on "Memory Stick PRO Duo" media.) Your camcorder starts playing the selected movie.
Operating Instructions
Page 27
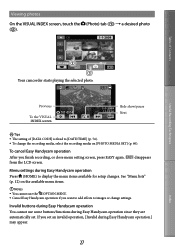
To cancel Easy Handycam operation After you set . Previous To the VISUAL INDEX screen Slide show/pause Next Tips The setting of Contents Useful Recording Techniques Your camcorder starts playing the selected photo. Viewing photos On the VISUAL ...INDEX screen, touch the (Photo) tab () a desired photo (). from the LCD screen. Table of [DATA CODE] is fixed to [DATE/TIME] (p. 74). To change settings. disappears Menu settings during Easy Handycam...
To cancel Easy Handycam operation After you set . Previous To the VISUAL INDEX screen Slide show/pause Next Tips The setting of Contents Useful Recording Techniques Your camcorder starts playing the selected photo. Viewing photos On the VISUAL ...INDEX screen, touch the (Photo) tab () a desired photo (). from the LCD screen. Table of [DATA CODE] is fixed to [DATE/TIME] (p. 74). To change settings. disappears Menu settings during Easy Handycam...


