
Operating Instructions
Page 5
... Parts and Controls 11 Guide to the Control Menu Display (Magic Pad 15 Getting Started 17 Quick Overview 17 Unpacking ...17 Inserting Batteries into the Remote 18 Step 1: Speaker System Hookup 18 Step 2: Antenna Hookups 21 Step 3: TV and Video Component Hookups 23 Speaker Setup 25 Presetting Radio Stations...32 Playing Discs 32 Resuming Playback from the Point Where You Stopped the Disc (Resume Play 34 Using the DVD's Menu 35 Playing VIDEO CDs with PBC Functions (PBC Playback 36 Selecting the Disc Mode (One Disc or All Discs 37 Creating Your Own Programme (Programme Play 37 Playing...
... Parts and Controls 11 Guide to the Control Menu Display (Magic Pad 15 Getting Started 17 Quick Overview 17 Unpacking ...17 Inserting Batteries into the Remote 18 Step 1: Speaker System Hookup 18 Step 2: Antenna Hookups 21 Step 3: TV and Video Component Hookups 23 Speaker Setup 25 Presetting Radio Stations...32 Playing Discs 32 Resuming Playback from the Point Where You Stopped the Disc (Resume Play 34 Using the DVD's Menu 35 Playing VIDEO CDs with PBC Functions (PBC Playback 36 Selecting the Disc Mode (One Disc or All Discs 37 Creating Your Own Programme (Programme Play 37 Playing...
Operating Instructions
Page 6
... Information (ADVANCED 54 Using Various Additional Functions 55 Locking Discs (CUSTOM PARENTAL CONTROL, PARENTAL CONTROL) ... 55 Other Operations 60 Controlling the TV with the Supplied Remote 60 Watching the Video or other Unit 61 Listening to the Radio 62 Using the Radio Data System (RDS) (Only for the European models 63...
... Information (ADVANCED 54 Using Various Additional Functions 55 Locking Discs (CUSTOM PARENTAL CONTROL, PARENTAL CONTROL) ... 55 Other Operations 60 Controlling the TV with the Supplied Remote 60 Watching the Video or other Unit 61 Listening to the Radio 62 Using the Radio Data System (RDS) (Only for the European models 63...
Operating Instructions
Page 7
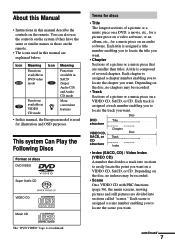
... assigned a scene number enabling you to locate the title you want on an audio software. continued 7 Depending on the remote. About this Manual • Instructions in SACD (Super Audio CD) and Audio CD mode More convenient features • In this manual describe the controls on the disc, no chapters may be recorded. •...
... assigned a scene number enabling you to locate the title you want on an audio software. continued 7 Depending on the remote. About this Manual • Instructions in SACD (Super Audio CD) and Audio CD mode More convenient features • In this manual describe the controls on the disc, no chapters may be recorded. •...

Operating Instructions
Page 11
Front Panel 1 POWER switch/indicator (32) 2 DISC 1 (play) / A (open/close)-DISC 5 (play) / A (open/close) (32) 3 Front panel display (12) 4 ./> PREV/NEXT, PRESET +/- (30, 33) 5 H (play) (32) 6 X (pause) (33) 7 x (stop) (32) 8 PHONES jack (32) 9 VOLUME control (32) q; SOUND FIELD +/- (49) qa DISPLAY (49, 62) qs BAND (30) qd FUNCTION (61) qf (remote sensor) (18) qg Disc tray (32) continued 11 Index to Parts and Controls For more information, refer to the pages indicated in parentheses.
Front Panel 1 POWER switch/indicator (32) 2 DISC 1 (play) / A (open/close)-DISC 5 (play) / A (open/close) (32) 3 Front panel display (12) 4 ./> PREV/NEXT, PRESET +/- (30, 33) 5 H (play) (32) 6 X (pause) (33) 7 x (stop) (32) 8 PHONES jack (32) 9 VOLUME control (32) q; SOUND FIELD +/- (49) qa DISPLAY (49, 62) qs BAND (30) qd FUNCTION (61) qf (remote sensor) (18) qg Disc tray (32) continued 11 Index to Parts and Controls For more information, refer to the pages indicated in parentheses.

Operating Instructions
Page 14
...) wf FUNCTION (61) wg BAND (30) wh Number buttons (35) wj SOUND FIELD (49) wk DISPLAY (49, 62) wl ENTER (60) e; However, before glowing, the remote must be exposed to light for awhile. 1 TV [/1 (on/standby) (60) 2 OPEN/CLOSE (32) 3 NAME (63) 4 STEREO/MONO (62) 5 MEMORY (30) 6 CLEAR (37) 7 PLAY MODE...) qd H PLAY/SELECT (32) qf TITLE (35) qg DVD DISPLAY (37) qh C/X/x/c/ENTER (26) qj DVD SETUP (56) qk 1 (standby) (32) ql DISC SKIP (32) w; Remote 1 23 4 56 7 89 >10 10/0 Note This...
...) wf FUNCTION (61) wg BAND (30) wh Number buttons (35) wj SOUND FIELD (49) wk DISPLAY (49, 62) wl ENTER (60) e; However, before glowing, the remote must be exposed to light for awhile. 1 TV [/1 (on/standby) (60) 2 OPEN/CLOSE (32) 3 NAME (63) 4 STEREO/MONO (62) 5 MEMORY (30) 6 CLEAR (37) 7 PLAY MODE...) qd H PLAY/SELECT (32) qf TITLE (35) qg DVD DISPLAY (37) qh C/X/x/c/ENTER (26) qj DVD SETUP (56) qk 1 (standby) (32) ql DISC SKIP (32) w; Remote 1 23 4 56 7 89 >10 10/0 Note This...
Operating Instructions
Page 17
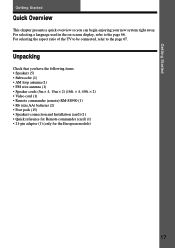
... (1) • FM wire antenna (1) • Speaker cords (5m × 4, 15m × 2) (16ft. × 4, 49ft. × 2) • Video cord (1) • Remote commander (remote) RM-SS900 (1) • R6 (size AA) batteries (2) • Foot pads (15) • Speakers-connection and Installation (card) (1) • Quick reference for... Remote commander (card) (1) • 21-pin adaptor (1) (only for the European models) 17 For selecting the aspect ratio of the TV ...
... (1) • FM wire antenna (1) • Speaker cords (5m × 4, 15m × 2) (16ft. × 4, 49ft. × 2) • Video cord (1) • Remote commander (remote) RM-SS900 (1) • R6 (size AA) batteries (2) • Foot pads (15) • Speakers-connection and Installation (card) (1) • Quick reference for... Remote commander (card) (1) • 21-pin adaptor (1) (only for the European models) 17 For selecting the aspect ratio of the TV ...
Operating Instructions
Page 18
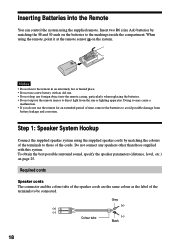
... specify the speaker parameters (distance, level, etc.) on the system. Grey (+) (+) (-) Colour tube (-) Black 18 When using the remote, point it at the remote sensor on page 25. Doing so may cause a malfunction. • If you do not use a new battery with this system. Inserting... Batteries into the remote casing, particularly when replacing the batteries. • Do not expose the remote sensor to be connected. Do not connect any foreign object into the Remote You can control the system using the supplied speaker cords by...
... specify the speaker parameters (distance, level, etc.) on the system. Grey (+) (+) (-) Colour tube (-) Black 18 When using the remote, point it at the remote sensor on page 25. Doing so may cause a malfunction. • If you do not use a new battery with this system. Inserting... Batteries into the remote casing, particularly when replacing the batteries. • Do not expose the remote sensor to be connected. Do not connect any foreign object into the Remote You can control the system using the supplied speaker cords by...
Operating Instructions
Page 24
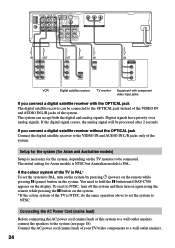
You need to hold the X button until DAV-C700 appears on the system. Connecting the AC Power Cord... NTSC, turn off the system and then turn on the system by pressing 1 (power) on the remote while pressing X (pause) button on the display. If you connect a digital satellite receiver with component ...OUT A U D I O I N A U D I O I N SVIDEO (DVD ONLY) COAXIAL FM 75Ω L R VIDEO 1 L OPTICAL DIGITAL DIGITAL (CD ONLY) R IN DIGITAL OUT VIDEO MONITOR OUT FRONT R CENTER FRONT L Y PB/B-Y PR/R-Y COMPONENT VIDEO OUT REAR R WOOFER REAR L SPEAKER IN OUT VIDEO VIDEO IN ...
You need to hold the X button until DAV-C700 appears on the system. Connecting the AC Power Cord... NTSC, turn off the system and then turn on the system by pressing 1 (power) on the remote while pressing X (pause) button on the display. If you connect a digital satellite receiver with component ...OUT A U D I O I N A U D I O I N SVIDEO (DVD ONLY) COAXIAL FM 75Ω L R VIDEO 1 L OPTICAL DIGITAL DIGITAL (CD ONLY) R IN DIGITAL OUT VIDEO MONITOR OUT FRONT R CENTER FRONT L Y PB/B-Y PR/R-Y COMPONENT VIDEO OUT REAR R WOOFER REAR L SPEAKER IN OUT VIDEO VIDEO IN ...
Operating Instructions
Page 26
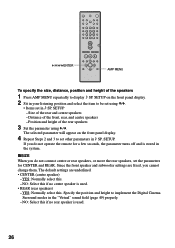
... centre speakers - Since the front speaker and subwoofer settings are underlined. • CENTER (centre speaker) - The default settings are fixed, you do not operate the remote for CENTER and REAR. The selected parameter will appear on the front panel display. 2 Sit in your listening position and select the item to implement...
... centre speakers - Since the front speaker and subwoofer settings are underlined. • CENTER (centre speaker) - The default settings are fixed, you do not operate the remote for CENTER and REAR. The selected parameter will appear on the front panel display. 2 Sit in your listening position and select the item to implement...
Operating Instructions
Page 28
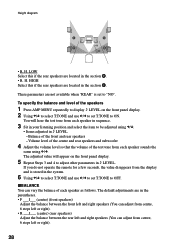
... speakers are in the section D. • R. Balance of each speaker sounds the same using X/x. • Items adjusted in 9 LEVEL. If you do not operate the remote for a few seconds, the value disappears from centre, 6 steps left or right). • R ___I___ (centre) (rear speakers) Adjust the balance between the front left and...
... speakers are in the section D. • R. Balance of each speaker sounds the same using X/x. • Items adjusted in 9 LEVEL. If you do not operate the remote for a few seconds, the value disappears from centre, 6 steps left or right). • R ___I___ (centre) (rear speakers) Adjust the balance between the front left and...
Operating Instructions
Page 31
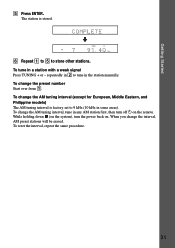
... H TUNED M MONO ST S dB REPEAT 1 k H z PROGRAM M H z SHUFFLE 6 Repeat 1 to 5 to 9 kHz (10 kHz in any AM station first, then turn the power back on the remote. To change the AM tuning interval (except for European, Middle Eastern, and Philippine models) The AM tuning interval is stored. The station is factory set...
... H TUNED M MONO ST S dB REPEAT 1 k H z PROGRAM M H z SHUFFLE 6 Repeat 1 to 5 to 9 kHz (10 kHz in any AM station first, then turn the power back on the remote. To change the AM tuning interval (except for European, Middle Eastern, and Philippine models) The AM tuning interval is stored. The station is factory set...
Operating Instructions
Page 32
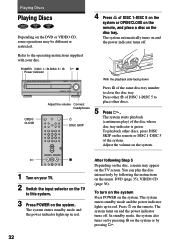
... / A-DISC 5 / A H x Power indicator With the playback side facing down OPEN/ CLOSE Press A of DISC 1-DISC 5 on the system or OPEN/CLOSE on the remote, and place a disc on the disc tray. The system automatically turns on and the power indicator turns off . Playing Discs Playing Discs Depending on the... DVD or VIDEO CD, some operations may appear on the TV screen. The system enters standby mode and the power indicator lights up in red. DVD (page...
... / A-DISC 5 / A H x Power indicator With the playback side facing down OPEN/ CLOSE Press A of DISC 1-DISC 5 on the system or OPEN/CLOSE on the remote, and place a disc on the disc tray. The system automatically turns on and the power indicator turns off . Playing Discs Playing Discs Depending on the... DVD or VIDEO CD, some operations may appear on the TV screen. The system enters standby mode and the power indicator lights up in red. DVD (page...
Operating Instructions
Page 33
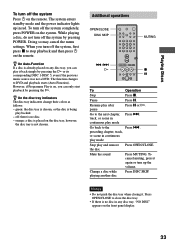
...10 10/0 ./> H MUTING x X To Operation Stop Press x. Playing Discs To turn off the system, first press x to stop playback and then press 1 on the remote. When you can only start playback by pressing the H. However, if Programme Play is already placed on any disc tray, "NO DISC" appears on the... remote. off the system Press 1 on the front panel display. 33 Resume play mode Press >. green: the disc tray is chosen, or the disc...
...10 10/0 ./> H MUTING x X To Operation Stop Press x. Playing Discs To turn off the system, first press x to stop playback and then press 1 on the remote. When you can only start playback by pressing the H. However, if Programme Play is already placed on any disc tray, "NO DISC" appears on the... remote. off the system Press 1 on the front panel display. 33 Resume play mode Press >. green: the disc tray is chosen, or the disc...
Operating Instructions
Page 40
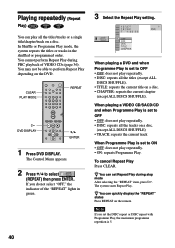
CLEAR PLAY MODE 1 23 4 56 7 89 >10 10/0 REPEAT H DVD DISPLAY X/x ENTER 1 Press DVD DISPLAY. When playing a VIDEO CD/SACD/CD and when Programme Play is set to OFF • OFF: does not play repeatedly. • DISC: repeats all the tracks on a disc. (.... • ON: repeats Programme Play. The system starts Repeat Play. Playing repeatedly (Repeat Play) You can quickly display the "REPEAT" status Press REPEAT on the remote. In Shuffle or Programme Play mode, the system repeats the titles or tracks in green. 3 Select the Repeat Play setting. 1 2 ( 2 7 ) 1 8 ( 3 4 ) DVD T 1:32:...
CLEAR PLAY MODE 1 23 4 56 7 89 >10 10/0 REPEAT H DVD DISPLAY X/x ENTER 1 Press DVD DISPLAY. When playing a VIDEO CD/SACD/CD and when Programme Play is set to OFF • OFF: does not play repeatedly. • DISC: repeats all the tracks on a disc. (.... • ON: repeats Programme Play. The system starts Repeat Play. Playing repeatedly (Repeat Play) You can quickly display the "REPEAT" status Press REPEAT on the remote. In Shuffle or Programme Play mode, the system repeats the titles or tracks in green. 3 Select the Repeat Play setting. 1 2 ( 2 7 ) 1 8 ( 3 4 ) DVD T 1:32:...
Operating Instructions
Page 51
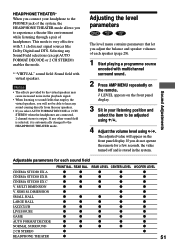
... to sound fields that let you adjust the balance and speaker volumes of the system, the HEADPHONE THEATER mode allows you do not operate the remote for each speaker (page 28). 1 Start playing a programme source encoded with multichannel surround sound. 2 Press AMP MENU repeatedly on the... remote. 9 LEVEL appears on the front panel display. If you to experience a theater like Dolby Digital and DTS. Notes • The effects provided by the virtual ...
... to sound fields that let you adjust the balance and speaker volumes of the system, the HEADPHONE THEATER mode allows you do not operate the remote for each speaker (page 28). 1 Start playing a programme source encoded with multichannel surround sound. 2 Press AMP MENU repeatedly on the... remote. 9 LEVEL appears on the front panel display. If you to experience a theater like Dolby Digital and DTS. Notes • The effects provided by the virtual ...
Operating Instructions
Page 60
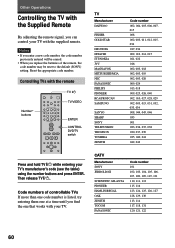
... Controlling TVs with the remote Number* buttons 1 23 4 56 7 89 >10 10/0 TV ?/1 TV/VIDEO ENTER CONTROL DVD/TV switch TV Manufacturer DAEWOO FISHER GOLDSTAR DRUNDIG HITACHI ITT/NOKIA JVC MAGNAVOX MITSUBISHI/MGA NEC PANASONIC PHILIPS PIONEER RCA/PROSCAN SAMSUNG SANYO SHARP SONY TELEFUNKEN THOMSON TOSHIBA ZENITH ..., 040, 041 042, 043 Press and hold TV [/1 while entering your TV with your TV. Then release TV [/1. Code numbers of the remote, the code number may be erased. • When you replace the batteries of controllable TVs If more than one code number is listed, try...
... Controlling TVs with the remote Number* buttons 1 23 4 56 7 89 >10 10/0 TV ?/1 TV/VIDEO ENTER CONTROL DVD/TV switch TV Manufacturer DAEWOO FISHER GOLDSTAR DRUNDIG HITACHI ITT/NOKIA JVC MAGNAVOX MITSUBISHI/MGA NEC PANASONIC PHILIPS PIONEER RCA/PROSCAN SAMSUNG SANYO SHARP SONY TELEFUNKEN THOMSON TOSHIBA ZENITH ..., 040, 041 042, 043 Press and hold TV [/1 while entering your TV with your TV. Then release TV [/1. Code numbers of the remote, the code number may be erased. • When you replace the batteries of controllable TVs If more than one code number is listed, try...
Operating Instructions
Page 61
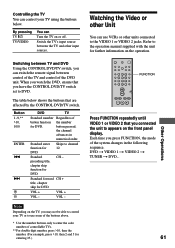
... buttons that are affected by the CONTROL DVD/TV switch. Controlling the TV You can control your TV or to DVD. DVD t VIDEO 1 t VIDEO 2 t TUNER t DVD... Other Operations 61 Skips to the operation manual supplied with the unit for entering 25.) 1 23 4 56 7 89 >10 10/0 FUNCTION Press FUNCTION... 1 or VIDEO 2 that you can Turn the TV on the front panel display. VOL - By pressing TV [/1 TV/VIDEO You can switch the remote signal between the TV and other units connected to appears on or off. Switching between TV and DVD Using the CONTROL DVD/TV switch, you...
... buttons that are affected by the CONTROL DVD/TV switch. Controlling the TV You can control your TV or to DVD. DVD t VIDEO 1 t VIDEO 2 t TUNER t DVD... Other Operations 61 Skips to the operation manual supplied with the unit for entering 25.) 1 23 4 56 7 89 >10 10/0 FUNCTION Press FUNCTION... 1 or VIDEO 2 that you can Turn the TV on the front panel display. VOL - By pressing TV [/1 TV/VIDEO You can switch the remote signal between the TV and other units connected to appears on or off. Switching between TV and DVD Using the CONTROL DVD/TV switch, you...

Operating Instructions
Page 62
...name of the station To turn off the radio Press 1. 62 For automatic tuning, press and hold m or M (TUNING + or -) on the remote repeatedly. Press the button again to non-preset radio stations Use manual or automatic tuning in . z To improve reception Reorient the supplied antennas. The ...repeatedly. For manual tuning, press m or M (TUNING + or -) on the remote. To listen to restore the stereo effect. z If an FM programme is tuned in Step 2. TUNING +/- 1 Press FUNCTION repeatedly until TUNER appears on page 30). Each time you press the button, the system tunes in the...
...name of the station To turn off the radio Press 1. 62 For automatic tuning, press and hold m or M (TUNING + or -) on the remote repeatedly. Press the button again to non-preset radio stations Use manual or automatic tuning in . z To improve reception Reorient the supplied antennas. The ...repeatedly. For manual tuning, press m or M (TUNING + or -) on the remote. To listen to restore the stereo effect. z If an FM programme is tuned in Step 2. TUNING +/- 1 Press FUNCTION repeatedly until TUNER appears on page 30). Each time you press the button, the system tunes in the...
Operating Instructions
Page 73
... securely. , Adjust the front balance parameter in the NTSC colour system. Additional Information Troubleshooting If you experience any problem persist, consult your nearest Sony dealer. The picture is heard. , Check that the speakers and components are connected securely. , Check that you can view pictures from the ...system. Severe hum or noise is black and white. , Depending on the TV, the picture on the remote if "MUTING ON" is dirty or flawed. , If the picture output from the audio components. , The plugs and jacks are away from a ...
... securely. , Adjust the front balance parameter in the NTSC colour system. Additional Information Troubleshooting If you experience any problem persist, consult your nearest Sony dealer. The picture is heard. , Check that the speakers and components are connected securely. , Check that you can view pictures from the ...system. Severe hum or noise is black and white. , Depending on the TV, the picture on the remote if "MUTING ON" is dirty or flawed. , If the picture output from the audio components. , The plugs and jacks are away from a ...

Operating Instructions
Page 74
...1 to close the disc tray. If the indicator is still on, press A of the stations is recorded in . , Check that the frequency appears in the remote are weak. The sound loses stereo effect when you play . , There is no disc inside . , The disc is difficult to turn off . The surround ...or MPEG audio sound track. , Check the speaker connections and setting (pages 25, 69). , Depending on the disc tray. The disc does not play a VIDEO CD, or a CD. , Set "AUDIO" to hear when you are playing a Dolby Digital sound track. , Make sure the sound field function is on (page 49). , Check ...
...1 to close the disc tray. If the indicator is still on, press A of the stations is recorded in . , Check that the frequency appears in the remote are weak. The sound loses stereo effect when you play . , There is no disc inside . , The disc is difficult to turn off . The surround ...or MPEG audio sound track. , Check the speaker connections and setting (pages 25, 69). , Depending on the disc tray. The disc does not play a VIDEO CD, or a CD. , Set "AUDIO" to hear when you are playing a Dolby Digital sound track. , Make sure the sound field function is on (page 49). , Check ...


