User Manual
Page 6
... and storage locations Avoid operating or storing the product in the following locations. • Extremely hot or cold places • In direct sunlight for long periods, or close to heating equipment • Damp or dusty places • Where it is very dirty, use a cloth ...speaker system continuously with an input exceeding the maximum input power of the shutter adaptor. If it is transported or shipped, repack it as alcohol, benzene, and thinners. This may damage the surface finish, or impair the operation of this speaker system. • Before connecting, turn off the display...
... and storage locations Avoid operating or storing the product in the following locations. • Extremely hot or cold places • In direct sunlight for long periods, or close to heating equipment • Damp or dusty places • Where it is very dirty, use a cloth ...speaker system continuously with an input exceeding the maximum input power of the shutter adaptor. If it is transported or shipped, repack it as alcohol, benzene, and thinners. This may damage the surface finish, or impair the operation of this speaker system. • Before connecting, turn off the display...

User Manual
Page 13
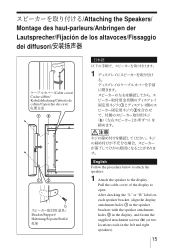
Attach the left ("L") speaker to the front left speakers. Before Attaching the Speakers/Avant de raccorder les haut-parleurs/ Vor dem Anbringen der Lautsprecher/Antes de montar los altavoces/Prima di fissare i diffusori/ -ϥϕϧ /L label/Indication L/ L-Aufkleber/Etiqueta L/ Indicazione L/ 3ϥϕϧ /R label/Indication R/ R-Aufkleber/Etiqueta R/ Indicazione R/ 3 3 English Check the right and left side and the right ("R") speaker to the front right side of the display. 13 Check the label indicating left ("L") or right ("R") on each speaker bracket.
Attach the left ("L") speaker to the front left speakers. Before Attaching the Speakers/Avant de raccorder les haut-parleurs/ Vor dem Anbringen der Lautsprecher/Antes de montar los altavoces/Prima di fissare i diffusori/ -ϥϕϧ /L label/Indication L/ L-Aufkleber/Etiqueta L/ Indicazione L/ 3ϥϕϧ /R label/Indication R/ R-Aufkleber/Etiqueta R/ Indicazione R/ 3 3 English Check the right and left side and the right ("R") speaker to the front right side of the display. 13 Check the label indicating left ("L") or right ("R") on each speaker bracket.
User Manual
Page 15
... 1 1 2 b 12 b Bracket/Support/ Halterung/Soporte/Staffa/ English Follow the procedure below to attach the speakers: 1 Attach the speaker to open. Pull the cable cover of the display to the display. After checking the "L" or "R" label on each speaker bracket, align the display attachment holes 1 in the speaker brackets with the speaker attachment holes 2 in the display, and fasten the supplied attachment screws (b) (at two locations each in...
... 1 1 2 b 12 b Bracket/Support/ Halterung/Soporte/Staffa/ English Follow the procedure below to attach the speakers: 1 Attach the speaker to open. Pull the cable cover of the display to the display. After checking the "L" or "R" label on each speaker bracket, align the display attachment holes 1 in the speaker brackets with the speaker attachment holes 2 in the display, and fasten the supplied attachment screws (b) (at two locations each in...

User Manual
Page 18
Connect the speaker cords to the speaker terminals located at the bottom on the rear of the display, and to the display and speakers. The speaker cords can be connected by inserting the cord while pressing button 1 and then releasing button 1 after 1 3 2 2 1 1 2 3 3 18 English 2 Connect the speaker cords to the speaker terminals on the middle of the speakers.
Connect the speaker cords to the speaker terminals located at the bottom on the rear of the display, and to the display and speakers. The speaker cords can be connected by inserting the cord while pressing button 1 and then releasing button 1 after 1 3 2 2 1 1 2 3 3 18 English 2 Connect the speaker cords to the speaker terminals on the middle of the speakers.
User Manual
Page 21
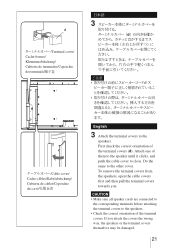
... covers. CAUTION • Make sure all speaker cords are connected to the corresponding terminals before attaching the terminal covers to the speakers. • Check the correct orientation of them to the speaker until it clicks, and push the cable cover to close. To remove the terminal covers from the speakers, open the cable covers first and then pull the terminal...
... covers. CAUTION • Make sure all speaker cords are connected to the corresponding terminals before attaching the terminal covers to the speakers. • Check the correct orientation of them to the speaker until it clicks, and push the cable cover to close. To remove the terminal covers from the speakers, open the cable covers first and then pull the terminal...
User Manual
Page 24
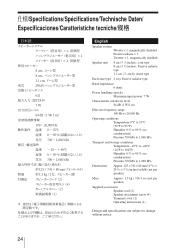
...1, magnetically shielded Speaker unit 8 cm (3 1/4 inches), corn type 8 cm (3 1/4 inches), Passive radiator type 1.1 cm (7/16 inch), dome type Enclosure type 2 way Passive radiator type Rated impedance 6 ohms Power handling capacity Maximum input power: 7 W ...Dimensions Approx. 125 × 741 × 80 mm (4 29/32 × 29 3/16 × 3 5/32 inches) (w/h/d) (net per speaker) Mass Approx. 1.5 kg ( 3 lb 5 oz) (net per speaker) Supplied accessories Speaker cord (2) Speaker attachment screw (4) Terminal cover (2) Operating instructions (1) Design and specifications are subject to change...
...1, magnetically shielded Speaker unit 8 cm (3 1/4 inches), corn type 8 cm (3 1/4 inches), Passive radiator type 1.1 cm (7/16 inch), dome type Enclosure type 2 way Passive radiator type Rated impedance 6 ohms Power handling capacity Maximum input power: 7 W ...Dimensions Approx. 125 × 741 × 80 mm (4 29/32 × 29 3/16 × 3 5/32 inches) (w/h/d) (net per speaker) Mass Approx. 1.5 kg ( 3 lb 5 oz) (net per speaker) Supplied accessories Speaker cord (2) Speaker attachment screw (4) Terminal cover (2) Operating instructions (1) Design and specifications are subject to change...
Brochure
Page 1
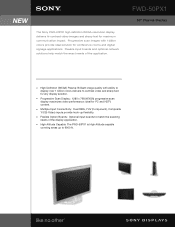
... Option Boards: Optional input boards to match the exacting needs of the application. The Sony FWD-50PX1 high definition WXGA resolution display delivers hi-contrast video images and sharp text for PC and HDTV content. Progressive scan images with ability to 9000 ft. s Multiple Input Connectivity: Dual RBG, YUV (Component), Composite Y/C(S-Video) inputs provide hook-up to display over 1 billion colors delivers hi-contrast video and sharp text for conference rooms and digital...
... Option Boards: Optional input boards to match the exacting needs of the application. The Sony FWD-50PX1 high definition WXGA resolution display delivers hi-contrast video images and sharp text for PC and HDTV content. Progressive scan images with ability to 9000 ft. s Multiple Input Connectivity: Dual RBG, YUV (Component), Composite Y/C(S-Video) inputs provide hook-up to display over 1 billion colors delivers hi-contrast video and sharp text for conference rooms and digital...
Brochure
Page 2
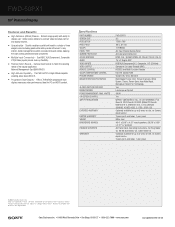
.... ideal for any interior. Network Management Card (BKM-FW31) s High Altitude Capability - Sony Electronics Inc. • 16450 West Bernardo Drive • San Diego, CA 92127 • 1-800-222-7669 • www.sony.com ® Last Updated 2005-02-25 s Upscale style - Specifications PART NUMBER SCREEN SIZE RESOLUTION PIXEL PITCH COLOR PANEL TYPE SCREEN PROTECTOR COLOR SYSTEMS AUDIO VIDEO INPUTS VIDEO OUTPUT REMOTE CONTROL COLOR TEMPERATURE CONTROL PICTURE MODES IMAGE RETENTION PROTECTION CLOSED CAPTION DECODER MOUNT DESIGN POWER MANAGEMENT: MAX. All other...
.... ideal for any interior. Network Management Card (BKM-FW31) s High Altitude Capability - Sony Electronics Inc. • 16450 West Bernardo Drive • San Diego, CA 92127 • 1-800-222-7669 • www.sony.com ® Last Updated 2005-02-25 s Upscale style - Specifications PART NUMBER SCREEN SIZE RESOLUTION PIXEL PITCH COLOR PANEL TYPE SCREEN PROTECTOR COLOR SYSTEMS AUDIO VIDEO INPUTS VIDEO OUTPUT REMOTE CONTROL COLOR TEMPERATURE CONTROL PICTURE MODES IMAGE RETENTION PROTECTION CLOSED CAPTION DECODER MOUNT DESIGN POWER MANAGEMENT: MAX. All other...


