Operating Instructions
Page 2
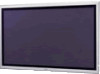
... about this equipment. If this product. If you have any changes or modifications not expressly approved in this manual could void your Sony dealer regarding this equipment does cause harmful interference to radio or television reception, which the receiver is encouraged to...or an experienced radio/TV technician for a Class B digital device, pursuant to Part 15 of Conformity Trade Name: SONY Model: FWD-42PV1/42PV1P/42PV1A Responsible Party: Sony Electronics Inc. WARNING Owner's Record The model and serial numbers are located on a circuit different from that to which...
... about this equipment. If this product. If you have any changes or modifications not expressly approved in this manual could void your Sony dealer regarding this equipment does cause harmful interference to radio or television reception, which the receiver is encouraged to...or an experienced radio/TV technician for a Class B digital device, pursuant to Part 15 of Conformity Trade Name: SONY Model: FWD-42PV1/42PV1P/42PV1A Responsible Party: Sony Electronics Inc. WARNING Owner's Record The model and serial numbers are located on a circuit different from that to which...
Operating Instructions
Page 4
... level gradually 42 (GB) Setting an IP address and communication speed 42 (GB) Obtaining an IP address automatically (DHCP) .... 42 (GB) Setting an IP address manually (Manual 42 (GB) Setting a communication speed 43 (GB) Self-diagnosis Function 43 (GB) Operating a Specific Display With the Remote Commander 44 (GB) Specifications 45 (GB) 4 (GB...
... level gradually 42 (GB) Setting an IP address and communication speed 42 (GB) Obtaining an IP address automatically (DHCP) .... 42 (GB) Setting an IP address manually (Manual 42 (GB) Setting a communication speed 43 (GB) Self-diagnosis Function 43 (GB) Operating a Specific Display With the Remote Commander 44 (GB) Specifications 45 (GB) 4 (GB...
Operating Instructions
Page 15
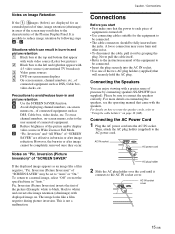
... menus, refer to "Auto" or "On." Pic. The image looks like a film negative, "Pic. A loose connection may be set to the user manual of presence by connecting speakers SS-SP42FW (not supplied). Connecting the Speakers You can result in burn-in Wide Zoom or Full Mode. For details...; First make sure that appear with a greater sense of connected equipment. D "Pic. D. For more details on connecting the speakers, see the operating manual that will securely hold the AC plug. Connecting the AC Power Cord 1 Plug the AC power cord into the jacks. AC IN socket cover 15...
... menus, refer to "Auto" or "On." Pic. The image looks like a film negative, "Pic. A loose connection may be set to the user manual of presence by connecting speakers SS-SP42FW (not supplied). Connecting the Speakers You can result in burn-in Wide Zoom or Full Mode. For details...; First make sure that appear with a greater sense of connected equipment. D "Pic. D. For more details on connecting the speakers, see the operating manual that will securely hold the AC plug. Connecting the AC Power Cord 1 Plug the AC power cord into the jacks. AC IN socket cover 15...
Operating Instructions
Page 21
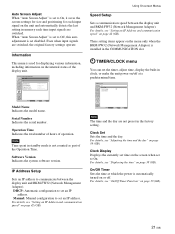
... which the power is set to On. Select Set ENTER Exit MENU Note The time and the day are switched, the original factory settings operate. Manual: Manual configuration to set an IP address. On/Off Timer Sets the time at a predetermined time. When "Auto Screen Adjust" is set to Off, this auto...
... which the power is set to On. Select Set ENTER Exit MENU Note The time and the day are switched, the original factory settings operate. Manual: Manual configuration to set an IP address. On/Off Timer Sets the time at a predetermined time. When "Auto Screen Adjust" is set to Off, this auto...
Operating Instructions
Page 31
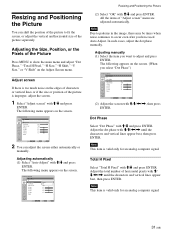
... the picture separately. The following menu appears on the Adjust Screen menu. Resizing and Positioning the Picture You can adjust the screen either automatically or manually. SCREEN CONTROL Adjust Screen Auto Adjust Dot Phase: Total H Pixel: H Size: H Shift: V Size: V Shift: Reset 28 1344 30...screen, or adjust the vertical and horizontal size of the Picture Press MENU to adjust and press ENTER. In such cases, adjust the dot phase manually. The following menu appears on the screen. (When you select "Dot Phase") SCREEN CONTROL Adjust Screen Auto Adjust Dot Phase: Total H Pixel:...
... the picture separately. The following menu appears on the Adjust Screen menu. Resizing and Positioning the Picture You can adjust the screen either automatically or manually. SCREEN CONTROL Adjust Screen Auto Adjust Dot Phase: Total H Pixel: H Size: H Shift: V Size: V Shift: Reset 28 1344 30...screen, or adjust the vertical and horizontal size of the Picture Press MENU to adjust and press ENTER. In such cases, adjust the dot phase manually. The following menu appears on the screen. (When you select "Dot Phase") SCREEN CONTROL Adjust Screen Auto Adjust Dot Phase: Total H Pixel:...
Operating Instructions
Page 42
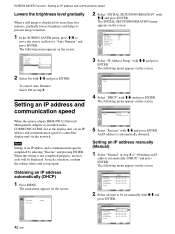
... (GB) Set ENTER Exit MENU Select Set ENTER Exit MENU 5 Select "Execute" with M/m and press ENTER. Setting an IP address manually (Manual) 1 Select "Manual" in step 2. SCREEN SAVER Function / Setting an IP address and communication speed Lowers the brightness level gradually When a still image is ...Auto Dimmer Select Off in step 4 of an IP address and a communication speed is not completed properly, an error code will be set manually with M/m and press ENTER. When the setting is completed by selecting "Execute" and pressing ENTER. Orbit All White: Off Background: Gray...
... (GB) Set ENTER Exit MENU Select Set ENTER Exit MENU 5 Select "Execute" with M/m and press ENTER. Setting an IP address manually (Manual) 1 Select "Manual" in step 2. SCREEN SAVER Function / Setting an IP address and communication speed Lowers the brightness level gradually When a still image is ...Auto Dimmer Select Off in step 4 of an IP address and a communication speed is not completed properly, an error code will be set manually with M/m and press ENTER. When the setting is completed by selecting "Execute" and pressing ENTER. Orbit All White: Off Background: Gray...

Operating Instructions
Page 43
...Speed Setup" with no image showing on the screen. 2 Press ENTER and select a communication speed with M/m, then press ENTER. Inform your authorized Sony dealer of the number of three seconds (with M/m and press ENTER. A communication speed has been set properly, the following menu appears on the... three seconds. Note When an IP address is already used for other device. In this pattern repeats. The flashing pattern informs you want to set manually. The cursor moves to the next box. Error 1 Error 2 Error 3 Error 4 Error 5 Error 6 Error 7 Communication error between the display...
...Speed Setup" with no image showing on the screen. 2 Press ENTER and select a communication speed with M/m, then press ENTER. Inform your authorized Sony dealer of the number of three seconds (with M/m and press ENTER. A communication speed has been set properly, the following menu appears on the... three seconds. Note When an IP address is already used for other device. In this pattern repeats. The flashing pattern informs you want to set manually. The cursor moves to the next box. Error 1 Error 2 Error 3 Error 4 Error 5 Error 6 Error 7 Communication error between the display...

Protocol Manual
Page 1
MODEL FWD-42PV PROTOCOL MANUAL (User Control) Preliminary as of February 22, 2005 SONY Corporation Home Electronics Network Company
MODEL FWD-42PV PROTOCOL MANUAL (User Control) Preliminary as of February 22, 2005 SONY Corporation Home Electronics Network Company
Protocol Manual
Page 6
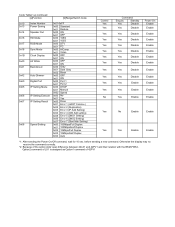
... OFF 0x01 ON 0x00 OFF 0x01 ON 0x00 Gray 0x01 Dark Gray 0x02 Black 0x00 OFF 0x01 ON 0x00 Port 1 0x01 Port 2 0x00 DHCP 0x01 Manual 0X02 Speed 0x00 No 0x01 Yes 0x00 Done 0x01 Error 1 (UART Commu.) 0x02 Error 2 (Duplication) 0x03 Error 3 (IP Add Setting) 0x04 Error 4 (GW Add setting...
... OFF 0x01 ON 0x00 OFF 0x01 ON 0x00 Gray 0x01 Dark Gray 0x02 Black 0x00 OFF 0x01 ON 0x00 Port 1 0x01 Port 2 0x00 DHCP 0x01 Manual 0X02 Speed 0x00 No 0x01 Yes 0x00 Done 0x01 Error 1 (UART Commu.) 0x02 Error 2 (Duplication) 0x03 Error 3 (IP Add Setting) 0x04 Error 4 (GW Add setting...
