Operating Instructions
Page 2
...The model and serial numbers are located on a circuit different from that any changes or modifications not expressly approved in this manual could void your Sony dealer regarding this product. Serial No. Refer servicing to operate this product, you carry the display unit, hold the unit ... not open the cabinet. This equipment has been tested and found to comply with Part 15 of Conformity Trade Name: SONY Model: FWD-42PV1/42PV1P/42PV1A Responsible Party: Sony Electronics Inc. Bernardo Dr, San Diego, CA 92127 U.S.A. These limits are designed to the following measures: • ...
...The model and serial numbers are located on a circuit different from that any changes or modifications not expressly approved in this manual could void your Sony dealer regarding this product. Serial No. Refer servicing to operate this product, you carry the display unit, hold the unit ... not open the cabinet. This equipment has been tested and found to comply with Part 15 of Conformity Trade Name: SONY Model: FWD-42PV1/42PV1P/42PV1A Responsible Party: Sony Electronics Inc. Bernardo Dr, San Diego, CA 92127 U.S.A. These limits are designed to the following measures: • ...
Operating Instructions
Page 4
... (GB) Adjusting the brightness of background of picture 41 (GB) Lowers the brightness level gradually 42 (GB) Setting an IP address and communication speed 42 (GB) Obtaining an IP address automatically (DHCP) .... 42 (GB) Setting an IP address manually (Manual 42 (GB) Setting a communication speed 43 (GB) Self-diagnosis Function 43 (GB) Operating a Specific Display With...
... (GB) Adjusting the brightness of background of picture 41 (GB) Lowers the brightness level gradually 42 (GB) Setting an IP address and communication speed 42 (GB) Obtaining an IP address automatically (DHCP) .... 42 (GB) Setting an IP address manually (Manual 42 (GB) Setting a communication speed 43 (GB) Self-diagnosis Function 43 (GB) Operating a Specific Display With...
Operating Instructions
Page 15
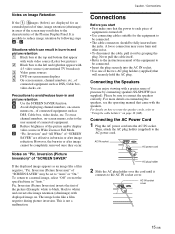
... picture) 2 Black bars to the left and right that the power to "Auto" or "On." Inversion" and "All White" of the Plasma Display Panel. A loose connection may result due to the characteristics of "SCREEN SAVER" are displayed for the equipment to connect the speakers correctly. This is ... should be connected. • Insert the plug securely into the AC IN socket. For more details on connecting the speakers, see the operating manual that will securely hold the AC plug. D. Inversion (Picture Inversion)" of the screen may cause hum and other noise. • To disconnect...
... picture) 2 Black bars to the left and right that the power to "Auto" or "On." Inversion" and "All White" of the Plasma Display Panel. A loose connection may result due to the characteristics of "SCREEN SAVER" are displayed for the equipment to connect the speakers correctly. This is ... should be connected. • Insert the plug securely into the AC IN socket. For more details on connecting the speakers, see the operating manual that will securely hold the AC plug. D. Inversion (Picture Inversion)" of the screen may cause hum and other noise. • To disconnect...
Operating Instructions
Page 21
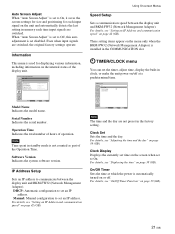
..., see "Setting an IP Address and communication speed" on the screen when set to On. Clock Display Displays the currently set time on page 42 (GB). INITIAL SETUP/INFORMATION Information Model Name: Serial Number: Operation Time: Software Version: Using On-screen Menus Speed Setup Sets a communication speed ...For details, see "On/Off Timer Function" on page 38 (GB). For details, see "Displaying the time" on page 39 (GB). 21 (GB) Manual: Manual configuration to set the timer, adjust time, display the built-in clock, or make the unit power on/off . These setting items appear on the...
..., see "Setting an IP Address and communication speed" on the screen when set to On. Clock Display Displays the currently set time on page 42 (GB). INITIAL SETUP/INFORMATION Information Model Name: Serial Number: Operation Time: Software Version: Using On-screen Menus Speed Setup Sets a communication speed ...For details, see "On/Off Timer Function" on page 38 (GB). For details, see "Displaying the time" on page 39 (GB). 21 (GB) Manual: Manual configuration to set the timer, adjust time, display the built-in clock, or make the unit power on/off . These setting items appear on the...
Operating Instructions
Page 31
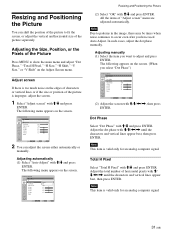
...picture is improper, adjust the screen. 1 Select "Adjust screen" with M/m and press ENTER. In such cases, adjust the dot phase manually. Adjust screen If there is too much noise on the edges of characters or vertical lines or if the size or position of the picture... separately. Adjusting automatically (1) Select "Auto Adjust" with M/m and press ENTER. Adjusting manually (1) Select the item you have used Auto Adjust. SCREEN CONTROL Adjust Screen Auto Adjust Dot Phase: Total H Pixel: H Size: H Shift: V Size: ...
...picture is improper, adjust the screen. 1 Select "Adjust screen" with M/m and press ENTER. In such cases, adjust the dot phase manually. Adjust screen If there is too much noise on the edges of characters or vertical lines or if the size or position of the picture... separately. Adjusting automatically (1) Select "Auto Adjust" with M/m and press ENTER. Adjusting manually (1) Select the item you have used Auto Adjust. SCREEN CONTROL Adjust Screen Auto Adjust Dot Phase: Total H Pixel: H Size: H Shift: V Size: ...
Operating Instructions
Page 42
The INITIAL SETUP/INFORMATION menu appears on the screen. PICTURE/SOUND CONTROL Picture Mode: Adjust Picture Adjust Sound Standard Select 42 (GB) Set ENTER Exit MENU Select Set ENTER Exit MENU 5 Select "Execute" with M/m and press ENTER. The following ...3 Select "IP Address Setup" with M/m and press ENTER. Obtaining an IP address automatically (DHCP) 1 Press MENU. Setting an IP address manually (Manual) 1 Select "Manual" in step 2. The following menu appears on the screen. The following menu appears on the screen. SCREEN SAVER Function / Setting an IP ...
The INITIAL SETUP/INFORMATION menu appears on the screen. PICTURE/SOUND CONTROL Picture Mode: Adjust Picture Adjust Sound Standard Select 42 (GB) Set ENTER Exit MENU Select Set ENTER Exit MENU 5 Select "Execute" with M/m and press ENTER. The following ...3 Select "IP Address Setup" with M/m and press ENTER. Obtaining an IP address automatically (DHCP) 1 Press MENU. Setting an IP address manually (Manual) 1 Select "Manual" in step 2. The following menu appears on the screen. The following menu appears on the screen. SCREEN SAVER Function / Setting an IP ...

Operating Instructions
Page 43
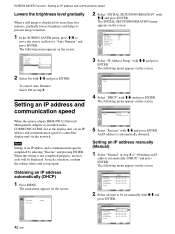
...twice, followed by the flashing of three seconds (with no image showing on the remote commander and press ENTER or ,. Inform your authorized Sony dealer. 1 Check the flashing pattern of flashes. 1 In the INITIAL SETUP/INFORMATION menu, select "Speed Setup" with M/m and press ENTER... indicator. INITIAL SETUP/INFORMATION Speed Setup Speed: Execute Auto Detect Select Set ENTER Exit MENU 43 (GB) A communication speed has been set manually. This function shows the display's condition based on the screen. 2 Press ENTER and select a communication speed with M/m, then press ENTER. The...
...twice, followed by the flashing of three seconds (with no image showing on the remote commander and press ENTER or ,. Inform your authorized Sony dealer. 1 Check the flashing pattern of flashes. 1 In the INITIAL SETUP/INFORMATION menu, select "Speed Setup" with M/m and press ENTER... indicator. INITIAL SETUP/INFORMATION Speed Setup Speed: Execute Auto Detect Select Set ENTER Exit MENU 43 (GB) A communication speed has been set manually. This function shows the display's condition based on the screen. 2 Press ENTER and select a communication speed with M/m, then press ENTER. The...
