
Instruction Manual
Page 1
Printed on a computer Printing images Digital Single Lens Reflex Camera Instruction Manual DSLR-A330/A380 Preparing the camera Before your operation Shooting images Using the shooting function Using the viewing function Changing your setup Viewing images on 70% or more recycled paper using VOC (Volatile Organic Compound)-free vegetable oil based ink. Additional information on this product and answers to frequently asked questions can be found at our Customer Support Website.
Printed on a computer Printing images Digital Single Lens Reflex Camera Instruction Manual DSLR-A330/A380 Preparing the camera Before your operation Shooting images Using the shooting function Using the viewing function Changing your setup Viewing images on 70% or more recycled paper using VOC (Volatile Organic Compound)-free vegetable oil based ink. Additional information on this product and answers to frequently asked questions can be found at our Customer Support Website.
Instruction Manual
Page 2
DSLR-A330/A380 Serial No WARNING To reduce fire or shock hazard, do not expose the unit to these numbers whenever you call upon your Sony dealer regarding this product. DANGER - Observe the following cautions. • Do not disassemble. • Do not crush and do not expose the battery...and do not allow metal objects to come into contact with the battery terminals. • Do not expose to charge the battery pack using a genuine Sony battery charger or a device that can burst, cause a fire or even chemical burns. Model No. Refer to rain or moisture. 2 IMPORTANT SAFETY ...
DSLR-A330/A380 Serial No WARNING To reduce fire or shock hazard, do not expose the unit to these numbers whenever you call upon your Sony dealer regarding this product. DANGER - Observe the following cautions. • Do not disassemble. • Do not crush and do not expose the battery...and do not allow metal objects to come into contact with the battery terminals. • Do not expose to charge the battery pack using a genuine Sony battery charger or a device that can burst, cause a fire or even chemical burns. Model No. Refer to rain or moisture. 2 IMPORTANT SAFETY ...
Instruction Manual
Page 3
...reach of small children. • Keep the battery pack dry. • Replace only with the same or equivalent type recommended by Sony. • Dispose of used rechargeable batteries to the collection and recycling location nearest you may cause undesired operation. This product has received... UL Listing. For Customers in the U.S.A. This Class B digital apparatus complies with Part 15 of rechargeable batteries, call : Sony Customer Information Services Center 1-800-222-SONY (7669) The number below is for the FCC related matters only. 3 If you have...
...reach of small children. • Keep the battery pack dry. • Replace only with the same or equivalent type recommended by Sony. • Dispose of used rechargeable batteries to the collection and recycling location nearest you may cause undesired operation. This product has received... UL Listing. For Customers in the U.S.A. This Class B digital apparatus complies with Part 15 of rechargeable batteries, call : Sony Customer Information Services Center 1-800-222-SONY (7669) The number below is for the FCC related matters only. 3 If you have...
Instruction Manual
Page 4
Declaration of Conformity Trade Name: SONY Model No.: DSLR-A330 Responsible Party: Sony Electronics Inc. Note: This equipment has been tested and found to comply with Part 15 of the FCC Rules. If this equipment. Connect the ... harmful interference in order to the following two conditions: (1) This device may cause undesired operation. Consult the dealer or an experienced radio/TV technician for a digital device pursuant to the following measures: - Operation is connected. - Operation is no guarantee that may not cause harmful interference, and (2) this device must accept...
Declaration of Conformity Trade Name: SONY Model No.: DSLR-A330 Responsible Party: Sony Electronics Inc. Note: This equipment has been tested and found to comply with Part 15 of the FCC Rules. If this equipment. Connect the ... harmful interference in order to the following two conditions: (1) This device may cause undesired operation. Consult the dealer or an experienced radio/TV technician for a digital device pursuant to the following measures: - Operation is connected. - Operation is no guarantee that may not cause harmful interference, and (2) this device must accept...
Instruction Manual
Page 5
By ensuring this product is Sony Corporation, 1-7-1 Konan Minato-ku Tokyo, 108-0075 Japan. Attention The electromagnetic fields at the specific frequencies may influence the picture and sound of this product, ... refer to the applicable collection point for the recycling of Old Electrical & Electronic Equipment (Applicable in the EMC Directive for EMC and product safety is Sony Deutschland GmbH, Hedelfinger Strasse 61, 70327 Stuttgart, Germany. This product has been tested and found compliant with the limits set out in the European Union...
By ensuring this product is Sony Corporation, 1-7-1 Konan Minato-ku Tokyo, 108-0075 Japan. Attention The electromagnetic fields at the specific frequencies may influence the picture and sound of this product, ... refer to the applicable collection point for the recycling of Old Electrical & Electronic Equipment (Applicable in the EMC Directive for EMC and product safety is Sony Deutschland GmbH, Hedelfinger Strasse 61, 70327 Stuttgart, Germany. This product has been tested and found compliant with the limits set out in the European Union...
Instruction Manual
Page 6
... replaced by qualified service staff only. For more detailed information about recycling of this product or battery, please contact your local Civic Office, your nearest Sony service station. 6 Never use the plug without the fuse cover. If you should be treated properly, hand over to attach the fuse cover after you...
... replaced by qualified service staff only. For more detailed information about recycling of this product or battery, please contact your local Civic Office, your nearest Sony service station. 6 Never use the plug without the fuse cover. If you should be treated properly, hand over to attach the fuse cover after you...

Instruction Manual
Page 7
No compensation for contents of the recording The contents of the recording cannot be different from the image you monitored with such issues that may cause a malfunction. Notes on the LCD monitor and lens • The LCD monitor is manufactured using extremely high-precision technology so over 99.99% of the copyright laws. When you may reduce the effect by taking hold of the LCD monitor. • Do not expose the camera to the provisions of the pixels are not actual images shot using this camera. 7 When turning on the camera in a cold location. When the camera warms up ) ...
No compensation for contents of the recording The contents of the recording cannot be different from the image you monitored with such issues that may cause a malfunction. Notes on the LCD monitor and lens • The LCD monitor is manufactured using extremely high-precision technology so over 99.99% of the copyright laws. When you may reduce the effect by taking hold of the LCD monitor. • Do not expose the camera to the provisions of the pixels are not actual images shot using this camera. 7 When turning on the camera in a cold location. When the camera warms up ) ...

Instruction Manual
Page 8
On the data specifications described in this Instruction Manual The data on performance and specifications is defined under the following conditions, except as described in this Instruction Manual: at an ordinary ambient temperature of 25ºC (77°F), and using a fully charged battery pack. 8
On the data specifications described in this Instruction Manual The data on performance and specifications is defined under the following conditions, except as described in this Instruction Manual: at an ordinary ambient temperature of 25ºC (77°F), and using a fully charged battery pack. 8
Instruction Manual
Page 9
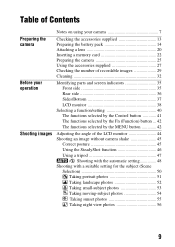
Table of Contents Preparing the camera Before your operation Shooting images Notes on using your camera 7 Checking the accessories supplied 13 Preparing the battery pack 14 Attaching a lens 20 Inserting a memory card 22 Preparing the camera 25 Using the accessories supplied 27 Checking the number of recordable images 29 Cleaning 32 Identifying parts and screen indicators 35 Front side 35 Rear side 36 Sides/Bottom 37 LCD monitor 38 Selecting a function/setting 40 The functions selected by the Control button 41 The functions selected by the Fn (Function) button ... 42 The ...
Table of Contents Preparing the camera Before your operation Shooting images Notes on using your camera 7 Checking the accessories supplied 13 Preparing the battery pack 14 Attaching a lens 20 Inserting a memory card 22 Preparing the camera 25 Using the accessories supplied 27 Checking the number of recordable images 29 Cleaning 32 Identifying parts and screen indicators 35 Front side 35 Rear side 36 Sides/Bottom 37 LCD monitor 38 Selecting a function/setting 40 The functions selected by the Control button 41 The functions selected by the Fn (Function) button ... 42 The ...

Instruction Manual
Page 10
Shooting an image the way you want it (Exposure mode 57 Shooting with program auto 59 Shooting by controlling the blur of the background (Aperture priority 60 Shooting a moving subject with various expressions (Shutter speed priority 62 Shooting with the exposure adjusted manually (Manual exposure 64 Shooting trails with long exposure (BULB 66 Shooting with the viewfinder (OVF 68 Switching to the viewfinder 68 Adjusting the focus of the finder (diopter adjustment) 69 Switching the recording information display (DISP) 70 LCD monitor (Graphic Display 71 LCD monitor (...
Shooting an image the way you want it (Exposure mode 57 Shooting with program auto 59 Shooting by controlling the blur of the background (Aperture priority 60 Shooting a moving subject with various expressions (Shutter speed priority 62 Shooting with the exposure adjusted manually (Manual exposure 64 Shooting trails with long exposure (BULB 66 Shooting with the viewfinder (OVF 68 Switching to the viewfinder 68 Adjusting the focus of the finder (diopter adjustment) 69 Switching the recording information display (DISP) 70 LCD monitor (Graphic Display 71 LCD monitor (...
Instruction Manual
Page 11
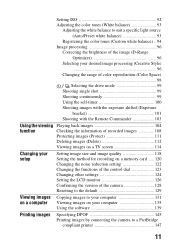
Setting ISO 92 Adjusting the color tones (White balance 93 Adjusting the white balance to suit a specific light source (Auto/Preset white balance 93 Registering the color tones (Custom white balance) .. 94 Image processing 96 Correcting the brightness of the image (D-Range Optimizer 96 Selecting your desired image processing (Creative Style) 96 Changing the range of color reproduction (Color Space) 98 Selecting the drive mode 99 Shooting single shot 99 Shooting continuously 99 Using the self-timer 100 Shooting images with the exposure shifted (Exposure bracket 101 ...
Setting ISO 92 Adjusting the color tones (White balance 93 Adjusting the white balance to suit a specific light source (Auto/Preset white balance 93 Registering the color tones (Custom white balance) .. 94 Image processing 96 Correcting the brightness of the image (D-Range Optimizer 96 Selecting your desired image processing (Creative Style) 96 Changing the range of color reproduction (Color Space) 98 Selecting the drive mode 99 Shooting single shot 99 Shooting continuously 99 Using the self-timer 100 Shooting images with the exposure shifted (Exposure bracket 101 ...

Instruction Manual
Page 12
Others Specifications 150 Troubleshooting 154 Warning messages 164 Precautions 167 Index 169 12
Others Specifications 150 Troubleshooting 154 Warning messages 164 Precautions 167 Index 169 12
Instruction Manual
Page 13
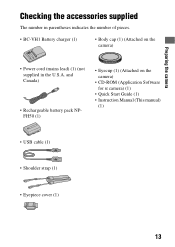
Preparing the camera Preparing the camera Checking the accessories supplied The number in the U.S.A. and Canada) • Rechargeable battery pack NPFH50 (1) • Eyecup (1) (Attached on the camera) • Power cord (mains lead) (1) (not supplied in parentheses indicates the number of pieces. • BC-VH1 Battery charger (1) • Body cap (1) (Attached on the camera) • CD-ROM (Application Software for α camera) (1) • Quick Start Guide (1) • Instruction Manual (This manual) (1) • USB cable (1) • Shoulder strap (1) • Eyepiece cover ...
Preparing the camera Preparing the camera Checking the accessories supplied The number in the U.S.A. and Canada) • Rechargeable battery pack NPFH50 (1) • Eyecup (1) (Attached on the camera) • Power cord (mains lead) (1) (not supplied in parentheses indicates the number of pieces. • BC-VH1 Battery charger (1) • Body cap (1) (Attached on the camera) • CD-ROM (Application Software for α camera) (1) • Quick Start Guide (1) • Instruction Manual (This manual) (1) • USB cable (1) • Shoulder strap (1) • Eyepiece cover ...
Instruction Manual
Page 14
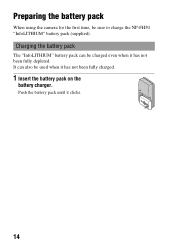
Push the battery pack until it has not been fully depleted. Preparing the battery pack When using the camera for the first time, be used when it has not been fully charged. 1 Insert the battery pack on the battery charger. It can be charged even when it clicks. 14 Charging the battery pack The "InfoLITHIUM" battery pack can also be sure to charge the NP-FH50 "InfoLITHIUM" battery pack (supplied).
Push the battery pack until it has not been fully depleted. Preparing the battery pack When using the camera for the first time, be used when it has not been fully charged. 1 Insert the battery pack on the battery charger. It can be charged even when it clicks. 14 Charging the battery pack The "InfoLITHIUM" battery pack can also be sure to charge the NP-FH50 "InfoLITHIUM" battery pack (supplied).
Instruction Manual
Page 15
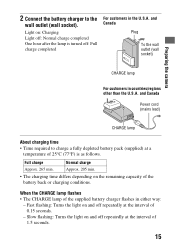
and Canada Power cord (mains lead) CHARGE lamp About charging time • Time required to the wall outlet (wall socket). Slow flashing: Turns the light on : Charging Light off: Normal charge completed One hour after the lamp is as follows. Light on and off repeatedly at the interval of 0.15 seconds. - Full charge Normal charge Approx. 265 min. and Canada Plug To the wall outlet (wall socket) Preparing the camera CHARGE lamp For customers in either way: - Approx. 205 min. • The charging time differs depending on and off repeatedly at the interval of 1.5 seconds. 15...
and Canada Power cord (mains lead) CHARGE lamp About charging time • Time required to the wall outlet (wall socket). Slow flashing: Turns the light on : Charging Light off: Normal charge completed One hour after the lamp is as follows. Light on and off repeatedly at the interval of 0.15 seconds. - Full charge Normal charge Approx. 265 min. and Canada Plug To the wall outlet (wall socket) Preparing the camera CHARGE lamp For customers in either way: - Approx. 205 min. • The charging time differs depending on and off repeatedly at the interval of 1.5 seconds. 15...
Instruction Manual
Page 16
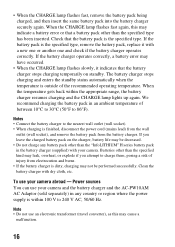
When the temperature gets back within 100 V to charge them, posing a risk of injury from electrocution and burns. • If the battery charger is finished, disconnect the power cord (mains lead) from the wall outlet (wall socket), and remove the battery pack from the battery charger. If you attempt to 240 V AC, 50/60 Hz. Note • Do not use an electronic transformer (travel converter), as this may indicate a battery error or that a battery pack other than the "InfoLITHIUM" H series battery pack in an ambient temperature of the recommended operating temperature. To use...
When the temperature gets back within 100 V to charge them, posing a risk of injury from electrocution and burns. • If the battery charger is finished, disconnect the power cord (mains lead) from the wall outlet (wall socket), and remove the battery pack from the battery charger. If you attempt to 240 V AC, 50/60 Hz. Note • Do not use an electronic transformer (travel converter), as this may indicate a battery error or that a battery pack other than the "InfoLITHIUM" H series battery pack in an ambient temperature of the recommended operating temperature. To use...
Instruction Manual
Page 17
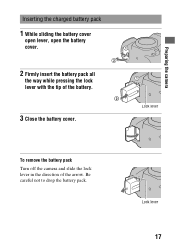
To remove the battery pack Turn off the camera and slide the lock lever in the direction of the battery. 3 Close the battery cover. Be careful not to drop the battery pack. Lock lever Lock lever 17 Preparing the camera Inserting the charged battery pack 1 While sliding the battery cover open lever, open the battery cover. 2 Firmly insert the battery pack all the way while pressing the lock lever with the tip of the arrow.
To remove the battery pack Turn off the camera and slide the lock lever in the direction of the battery. 3 Close the battery cover. Be careful not to drop the battery pack. Lock lever Lock lever 17 Preparing the camera Inserting the charged battery pack 1 While sliding the battery cover open lever, open the battery cover. 2 Firmly insert the battery pack all the way while pressing the lock lever with the tip of the arrow.
Instruction Manual
Page 18
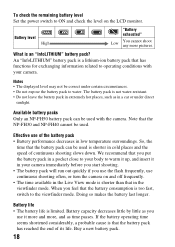
Buy a new battery pack. 18 The battery pack is not water-resistant. • Do not leave the battery pack in extremely hot places, such as in the viewfinder mode. Battery life • The battery life is an "InfoLITHIUM" battery pack? An "InfoLITHIUM" battery pack is shorter in cold places and the speed of the battery pack • Battery performance decreases in a pocket close to your body to operating conditions with the camera. So, the time that the battery pack has reached the end of its life. When you put the battery pack in low temperature surroundings...
Buy a new battery pack. 18 The battery pack is not water-resistant. • Do not leave the battery pack in extremely hot places, such as in the viewfinder mode. Battery life • The battery life is an "InfoLITHIUM" battery pack? An "InfoLITHIUM" battery pack is shorter in cold places and the speed of the battery pack • Battery performance decreases in a pocket close to your body to operating conditions with the camera. So, the time that the battery pack has reached the end of its life. When you put the battery pack in low temperature surroundings...
Instruction Manual
Page 19
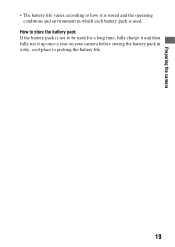
How to store the battery pack If the battery pack is not to prolong the battery life. 19 Preparing the camera • The battery life varies according to how it up once a year on your camera before storing the battery pack in a dry, cool place to be used for a long time, fully charge it and then fully use it is stored and the operating conditions and environment in which each battery pack is used.
How to store the battery pack If the battery pack is not to prolong the battery life. 19 Preparing the camera • The battery life varies according to how it up once a year on your camera before storing the battery pack in a dry, cool place to be used for a long time, fully charge it and then fully use it is stored and the operating conditions and environment in which each battery pack is used.
Instruction Manual
Page 20
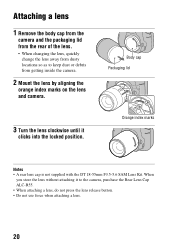
When you store the lens without attaching it clicks into the locked position. Body cap Packaging lid Orange index marks Notes • A rear lens cap is not supplied with the DT 18-55mm F3.5-5.6 SAM Lens Kit. Attaching a lens 1 Remove the body cap from the camera and the packaging lid from the rear of the lens. • When changing the lens, quickly change the lens away from dusty locations so as to keep dust or debris from getting inside the camera. 2 Mount the lens by aligning the orange index marks on the lens and camera. 3 Turn the lens clockwise until it to the camera, purchase ...
When you store the lens without attaching it clicks into the locked position. Body cap Packaging lid Orange index marks Notes • A rear lens cap is not supplied with the DT 18-55mm F3.5-5.6 SAM Lens Kit. Attaching a lens 1 Remove the body cap from the camera and the packaging lid from the rear of the lens. • When changing the lens, quickly change the lens away from dusty locations so as to keep dust or debris from getting inside the camera. 2 Mount the lens by aligning the orange index marks on the lens and camera. 3 Turn the lens clockwise until it to the camera, purchase ...
