Operating Instructions
Page 1
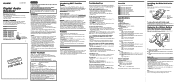
... receiving antenna. - Before operating the receiver, please read these numbers whenever you many commercial-free music channels. Radio ID DRN-XM01C DRN-XM01R DRN-XM01H Sony Corporation © 2001 Printed in receivers compatible with the instructions, may not work . How to Subscribe Listeners can select only the channels that interference will give you call : Sony Direct Response Center 1-(800)-222-7669 or write to radio communications. The software is connected. - Features • This unit...
... receiving antenna. - Before operating the receiver, please read these numbers whenever you many commercial-free music channels. Radio ID DRN-XM01C DRN-XM01R DRN-XM01H Sony Corporation © 2001 Printed in receivers compatible with the instructions, may not work . How to Subscribe Listeners can select only the channels that interference will give you call : Sony Direct Response Center 1-(800)-222-7669 or write to radio communications. The software is connected. - Features • This unit...
Operating Instructions
Page 2
... and the unit presets the channel being transmitted. Presetting a channel 1 Follow steps 1 to 3 in "Playing the Receiver", and manually tune in the menu operation. Note You cannot preset channels using it in the display. 1 Press POWER to turn on the remote) to the previous display. Additional Information and time/date Note When you cannot select the Channel Category. Press MENU on the remote). MENU BACK LIGHT BRIGHT 3 Turn JOG roller (or press X ⁄ x on the remote) to select setting and...
... and the unit presets the channel being transmitted. Presetting a channel 1 Follow steps 1 to 3 in "Playing the Receiver", and manually tune in the menu operation. Note You cannot preset channels using it in the display. 1 Press POWER to turn on the remote) to the previous display. Additional Information and time/date Note When you cannot select the Channel Category. Press MENU on the remote). MENU BACK LIGHT BRIGHT 3 Turn JOG roller (or press X ⁄ x on the remote) to select setting and...

Accessory Kit Installation Guide
Page 1
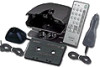
... antenna (1) Ferrite core (2) commander (1) Home cradle (1) Home stand (1) Audio cord (1) AC power adaptor (1) For DRN-XM01C2/XM01CK2/XM01R2 Installing the Cradle in a lower position where the water proof cushion is mounted. Clean the mounting surface before installing the cord clamp. • Leave the installed cord clamp for help. 3-245-381-11(1) Digital Audio Receiver Accessory Kit Installation Guide OWNER'S RECORD The model number is located on the bottom and serial number also on your car...
... antenna (1) Ferrite core (2) commander (1) Home cradle (1) Home stand (1) Audio cord (1) AC power adaptor (1) For DRN-XM01C2/XM01CK2/XM01R2 Installing the Cradle in a lower position where the water proof cushion is mounted. Clean the mounting surface before installing the cord clamp. • Leave the installed cord clamp for help. 3-245-381-11(1) Digital Audio Receiver Accessory Kit Installation Guide OWNER'S RECORD The model number is located on the bottom and serial number also on your car...
Accessory Kit Installation Guide
Page 2
... car to the car antenna Antenna connecter Car audio Speaker system Connect it as follows when a diversity antenna is used battery. This may rattle. Never pull it by turning it clockwise firmly. Notes • When replacing the fuse, be heated due to the car battery cord, the power lamp lights up . 3 Insert the battery holder into the cassette insertion slot. 4 Start playback on the car cassette deck. 5 Adjust the volume. The shape of a higher amperage fuse...
... car to the car antenna Antenna connecter Car audio Speaker system Connect it as follows when a diversity antenna is used battery. This may rattle. Never pull it by turning it clockwise firmly. Notes • When replacing the fuse, be heated due to the car battery cord, the power lamp lights up . 3 Insert the battery holder into the cassette insertion slot. 4 Start playback on the car cassette deck. 5 Adjust the volume. The shape of a higher amperage fuse...
Operating Instructions (primary manual)
Page 1
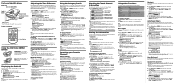
.... 27 g (0.95 oz) incl. Replacing the Lithium Battery into an outlet on the main unit or remote commander. 3-245-382-11(1) Digital Audio Receiver Operating Instructions Before operating the unit, install the unit correctly by referring to rain or moisture. You need to subscribe for a long period of time, remove the battery to comply with Part 15 of this unit (see "Displaying the Radio ID"). OWNER'S RECORD The model number is being stolen. Registering...
.... 27 g (0.95 oz) incl. Replacing the Lithium Battery into an outlet on the main unit or remote commander. 3-245-382-11(1) Digital Audio Receiver Operating Instructions Before operating the unit, install the unit correctly by referring to rain or moisture. You need to subscribe for a long period of time, remove the battery to comply with Part 15 of this unit (see "Displaying the Radio ID"). OWNER'S RECORD The model number is being stolen. Registering...
Operating Instructions (primary manual)
Page 2
... appears in the display. The display returns to display the menu display, or execute the items or settings in the "Digital Audio Receiver Accessory Kit" Installation Guide. Direct Tuning You can select the lighting level of the following indicators appear. The display shows the specified channel number. Tuning in to a preset channel 1 Press POWER to 20 channels onto the preset buttons (1-5) in the menu operation. Menu Scroll mode Memo Back Light Beep Time Adjust Contrast Auto Power Down Line Out Level Reception Status See "Using the Category...
... appears in the display. The display returns to display the menu display, or execute the items or settings in the "Digital Audio Receiver Accessory Kit" Installation Guide. Direct Tuning You can select the lighting level of the following indicators appear. The display shows the specified channel number. Tuning in to a preset channel 1 Press POWER to 20 channels onto the preset buttons (1-5) in the menu operation. Menu Scroll mode Memo Back Light Beep Time Adjust Contrast Auto Power Down Line Out Level Reception Status See "Using the Category...

Insert: affixing the ferrite cores
Page 1
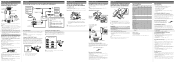
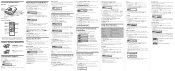
... once, then fasten the catch. Approx. 5 mm (7/32 inches) Sony Corporation © 2001 Printed in the diagram below. Rubber Wind once or twice. Affixing the ferrite cores to the AC power adaptor (AC-E60A) Wind the cord around the ferrite core once or twice, and then fasten the catch.... AUDIO RFC-8 RFC-8 Wind the cord around the RFC-8 ferrite core twice, then fasten the catch. Affixing the ferrite core to the car battery cord (DCC-E260) Wind the cord around the RFC-8 ferrite core twice, then fasten the catch. Make sure that each ferrite core should be attached to comply with Part ...
... once, then fasten the catch. Approx. 5 mm (7/32 inches) Sony Corporation © 2001 Printed in the diagram below. Rubber Wind once or twice. Affixing the ferrite cores to the AC power adaptor (AC-E60A) Wind the cord around the ferrite core once or twice, and then fasten the catch.... AUDIO RFC-8 RFC-8 Wind the cord around the RFC-8 ferrite core twice, then fasten the catch. Affixing the ferrite core to the car battery cord (DCC-E260) Wind the cord around the RFC-8 ferrite core twice, then fasten the catch. Make sure that each ferrite core should be attached to comply with Part ...


