
Instruction Manual
Page 2
...DIR-TC1" printed on the rear panel. The nameplate is a Wireless Surround Kit for some illustrations. Precautions On power sources • Install this system so that may block the ventilation slots. • Do not install the system near heat sources such as alcohol or benzene. About this manual The WAHT-SD1...operated in a horizontal position only. 2GB • Position the Sony DVD Home Theatre System (DAV) and surround amplifier away from each...AC Power Cords (Mains Leads 8 Adjusting the Wireless System 8 Installing the IR Transmitter and the IR Receiver on a Wall 11 Troubleshooting...
...DIR-TC1" printed on the rear panel. The nameplate is a Wireless Surround Kit for some illustrations. Precautions On power sources • Install this system so that may block the ventilation slots. • Do not install the system near heat sources such as alcohol or benzene. About this manual The WAHT-SD1...operated in a horizontal position only. 2GB • Position the Sony DVD Home Theatre System (DAV) and surround amplifier away from each...AC Power Cords (Mains Leads 8 Adjusting the Wireless System 8 Installing the IR Transmitter and the IR Receiver on a Wall 11 Troubleshooting...
Instruction Manual
Page 4
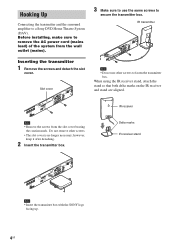
.... Hooking Up Connecting the transmitter and the surround amplifier to remove the AC power cord (mains lead) of the system from the slot cover bearing the caution mark. Before installing, make sure to a Sony DVD Home Theatre System (DAV). FRONT R SPEAKESRUR R FRONT L SUR L D-LIGHT SYNC OUT Slot cover CFOMA7X5IAL AM DIR-TC1 (DVDOUOTNLY) DMPROARUTDIO IN L VITDVE...
.... Hooking Up Connecting the transmitter and the surround amplifier to remove the AC power cord (mains lead) of the system from the slot cover bearing the caution mark. Before installing, make sure to a Sony DVD Home Theatre System (DAV). FRONT R SPEAKESRUR R FRONT L SUR L D-LIGHT SYNC OUT Slot cover CFOMA7X5IAL AM DIR-TC1 (DVDOUOTNLY) DMPROARUTDIO IN L VITDVE...
Instruction Manual
Page 6
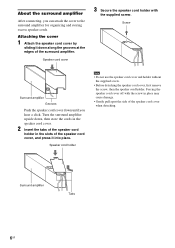
... the surround amplifier upside down, then store the cords in the speaker cord cover. 2 Insert the tabs of the speaker cord holder in place may cause damage. • Gently pull apart the side of the speaker cord cover, and press it down until you can attach the ... supplied screw. • Before detaching the speaker cord cover, first remove the screw, then the speaker cord holder. Attaching the cover 1 Attach the speaker cord cover by sliding it into place. Speaker cord cover 3 Secure the speaker cord holder with the screw in the slots of the speaker cord cover when detaching.
... the surround amplifier upside down, then store the cords in the speaker cord cover. 2 Insert the tabs of the speaker cord holder in place may cause damage. • Gently pull apart the side of the speaker cord cover, and press it down until you can attach the ... supplied screw. • Before detaching the speaker cord cover, first remove the screw, then the speaker cord holder. Attaching the cover 1 Attach the speaker cord cover by sliding it into place. Speaker cord cover 3 Secure the speaker cord holder with the screw in the slots of the speaker cord cover when detaching.