User Manual
Page 2
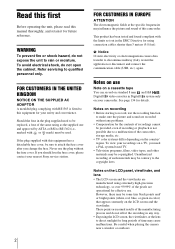
... communication cable (USB, etc.) again. b Notice If static electricity or electromagnetism causes data transfer to qualified personnel only. To view your recordings on your nearest Sony service station. 2 FOR CUSTOMERS IN EUROPE ATTENTION The electromagnetic fields at the specific frequencies may be provided, even if recording or playback is fitted to... process and do not open the cabinet. Never use . See page 134 for future reference. Read this first Before operating the unit, please read this manual thoroughly, and retain it for details.
... communication cable (USB, etc.) again. b Notice If static electricity or electromagnetism causes data transfer to qualified personnel only. To view your recordings on your nearest Sony service station. 2 FOR CUSTOMERS IN EUROPE ATTENTION The electromagnetic fields at the specific frequencies may be provided, even if recording or playback is fitted to... process and do not open the cabinet. Never use . See page 134 for future reference. Read this first Before operating the unit, please read this manual thoroughly, and retain it for details.

User Manual
Page 3
... of your camcorder if necessary (p. 22). • The screens shown in the proper direction. Notes on using your camcorder. Touch the button on this manual are used in the following illustration. • When you adjust the angle of the LCD panel to other device such as at the sun. •... only in low light conditions, such as a VCR or a computer with a USB or i.LINK cable, be sure to insert the connector plug in this manual are using the camcorder • Hold your camcorder to press buttons on the back side of the LCD panel. • Do not hold the camcorder...
... of your camcorder if necessary (p. 22). • The screens shown in the proper direction. Notes on using your camcorder. Touch the button on this manual are used in the following illustration. • When you adjust the angle of the LCD panel to other device such as at the sun. •... only in low light conditions, such as a VCR or a computer with a USB or i.LINK cable, be sure to insert the connector plug in this manual are using the camcorder • Hold your camcorder to press buttons on the back side of the LCD panel. • Do not hold the camcorder...

User Manual
Page 5
... Recording in various modes 48 Viewing recordings with ease - FADER 40 Using special effects - END SEARCH 45 Searching manually - Tape playback zoom/Memory playback zoom 54 Displaying the screen indicators 55 Displaying the date/time and camera settings data - Rec ...Adjusting the exposure 35 Adjusting the exposure for backlit subjects 35 Fixing the exposure for an off-center subject - SPOT FOCUS 39 Adjusting the focus manually 39 Recording a picture using various effects 40 Fading in various modes from a "Memory Stick 51 Playing back with added effects - MEMORY MIX ...
... Recording in various modes 48 Viewing recordings with ease - FADER 40 Using special effects - END SEARCH 45 Searching manually - Tape playback zoom/Memory playback zoom 54 Displaying the screen indicators 55 Displaying the date/time and camera settings data - Rec ...Adjusting the exposure 35 Adjusting the exposure for backlit subjects 35 Fixing the exposure for an off-center subject - SPOT FOCUS 39 Adjusting the focus manually 39 Recording a picture using various effects 40 Fading in various modes from a "Memory Stick 51 Playing back with added effects - MEMORY MIX ...

User Manual
Page 7
Troubleshooting Troubleshooting 116 Warning indicators and messages ...130 Additional Information Using your camcorder abroad ..........134 Usable cassette tapes 134 About the "Memory Stick 135 About the "InfoLITHIUM" battery pack 137 About i.LINK 139 Maintenance and precautions ..........140 Specification 143 Quick Reference Identifying parts and controls ...........145 Index 151 Two operating instructions are supplied with your camcorder: • Camera Operations Guide (This manual) • "First Step Guide" for using the supplied applications (included in the supplied CD-ROM) 7
Troubleshooting Troubleshooting 116 Warning indicators and messages ...130 Additional Information Using your camcorder abroad ..........134 Usable cassette tapes 134 About the "Memory Stick 135 About the "InfoLITHIUM" battery pack 137 About i.LINK 139 Maintenance and precautions ..........140 Specification 143 Quick Reference Identifying parts and controls ...........145 Index 151 Two operating instructions are supplied with your camcorder: • Camera Operations Guide (This manual) • "First Step Guide" for using the supplied applications (included in the supplied CD-ROM) 7

User Manual
Page 13
... with your camcorder. AC Adaptor (1) Mains lead (1) A/V connecting cable (1) USB cable (1) Rechargeable battery pack NP-FM30 (1) CD-ROM "Picture Package Ver.1.5" (1) Camera Operations Guide (This manual) (1) Lens cap (1) See page 145 on how to attach the lens cap.
... with your camcorder. AC Adaptor (1) Mains lead (1) A/V connecting cable (1) USB cable (1) Rechargeable battery pack NP-FM30 (1) CD-ROM "Picture Package Ver.1.5" (1) Camera Operations Guide (This manual) (1) Lens cap (1) See page 145 on how to attach the lens cap.
User Manual
Page 35
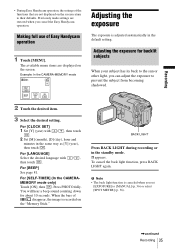
... a beep sound counting down for backlit subjects When your subject has its back to the sun or other light, you can adjust the exposure to [MANUAL] (p. 36) or select [SPOT METER] (p. 36). ,continued Recording 35 To cancel the back light function, press BACK LIGHT again. Press PHOTO fully. b Note • The...
... a beep sound counting down for backlit subjects When your subject has its back to the sun or other light, you can adjust the exposure to [MANUAL] (p. 36) or select [SPOT METER] (p. 36). ,continued Recording 35 To cancel the back light function, press BACK LIGHT again. Press PHOTO fully. b Note • The...

User Manual
Page 36
...cannot find it, touch [MENU], and select it from the (CAMERA SET) menu. 60min EXPOSURE: STBY AUTO 0:00:00 AUTO MANUAL 3 Touch [MANUAL]. 60min EXPOSURE: STBY 0:00:00 MANUAL AUTO MANUAL OK 36 Recording SPOT METER STBY 0:00:00 AUTO END 4 Touch [END]. NightShot plus function • If you cannot find it... to the subject, so that of the wall side of a picture at the best exposure. Adjusting the exposure manually You can avoid backlight shadows on people next to the window by manually fixing the exposure to that it from the (CAMERA SET) menu. To return the setting to...
...cannot find it, touch [MENU], and select it from the (CAMERA SET) menu. 60min EXPOSURE: STBY AUTO 0:00:00 AUTO MANUAL 3 Touch [MANUAL]. 60min EXPOSURE: STBY 0:00:00 MANUAL AUTO MANUAL OK 36 Recording SPOT METER STBY 0:00:00 AUTO END 4 Touch [END]. NightShot plus function • If you cannot find it... to the subject, so that of the wall side of a picture at the best exposure. Adjusting the exposure manually You can avoid backlight shadows on people next to the window by manually fixing the exposure to that it from the (CAMERA SET) menu. To return the setting to...

User Manual
Page 38
... to [OFF] on the menu. To cancel Color Slow Shutter, follow steps 3 and 4, then select [OFF] in color on the brightness. Manual exposure - The maximum shooting distance using the Super NightShot plus or Color Slow Shutter function, the shutter speed of the picture may not be reproduced... complete darkness, setting [NS LIGHT] to focus automatically. • Do not cover the infrared port with no light at this time. • Adjust the focus manually when it from the (CAMERA SET) menu. 5 Touch [ON], then . z Tip • If you cannot find it, touch [MENU], and select it...
... to [OFF] on the menu. To cancel Color Slow Shutter, follow steps 3 and 4, then select [OFF] in color on the brightness. Manual exposure - The maximum shooting distance using the Super NightShot plus or Color Slow Shutter function, the shutter speed of the picture may not be reproduced... complete darkness, setting [NS LIGHT] to focus automatically. • Do not cover the infrared port with no light at this time. • Adjust the focus manually when it from the (CAMERA SET) menu. 5 Touch [ON], then . z Tip • If you cannot find it, touch [MENU], and select it...

User Manual
Page 39
... between the subject and its background. - Recording AUTO END 3 Touch the subject for an offcenter subject - z Tip • If you want to [MANUAL]. Use this function in step 3. If the item is adjusting the focus. 9 appears. When you want to the recording conditions. If you cannot find...1 Touch during recording or in the background. b Note • You cannot use the SPOT FOCUS function together with [PROGRAM AE]. Adjusting the focus manually You can select and adjust the focal point to aim it from the (CAMERA SET) menu. 60min FOCUS: STBY AUTO 0:00:00 AUTO...
... between the subject and its background. - Recording AUTO END 3 Touch the subject for an offcenter subject - z Tip • If you want to [MANUAL]. Use this function in step 3. If the item is adjusting the focus. 9 appears. When you want to the recording conditions. If you cannot find...1 Touch during recording or in the background. b Note • You cannot use the SPOT FOCUS function together with [PROGRAM AE]. Adjusting the focus manually You can select and adjust the focal point to aim it from the (CAMERA SET) menu. 60min FOCUS: STBY AUTO 0:00:00 AUTO...

User Manual
Page 40
...and-white. Move the power zoom lever towards T (telephoto) to adjust the focus, and then, towards W (wide angle) to adjust the zoom for focusing manually • It is easier to focus on the subject when you want to record a close-up image of a scene - appears. 4 Touch or to ... cannot be adjusted any further. 9 changes to when the focus cannot be adjusted any closer. 60min FOCUS: STBY 0:00:00 MANUAL Recording a picture using various effects AUTO MANUAL OK Tips for recording. • When you use the zoom function. POWER switch Fading in , the picture gradually changes from ...
...and-white. Move the power zoom lever towards T (telephoto) to adjust the focus, and then, towards W (wide angle) to adjust the zoom for focusing manually • It is easier to focus on the subject when you want to record a close-up image of a scene - appears. 4 Touch or to ... cannot be adjusted any further. 9 changes to when the focus cannot be adjusted any closer. 60min FOCUS: STBY 0:00:00 MANUAL Recording a picture using various effects AUTO MANUAL OK Tips for recording. • When you use the zoom function. POWER switch Fading in , the picture gradually changes from ...

User Manual
Page 43
... the incidental image. The fade time of frame-byframe playback. Shutter speed (1 is 1/25, 2 is 1/12, 3 is 1/6, 4 is to superimpose on a tape. Adjust the focus manually using a tripod to the Picture effect ([PICT. For details, refer to steady the camcorder. 5 Touch . Still image Movie Blue ,continued Recording 43 No adjustment necessary...
... the incidental image. The fade time of frame-byframe playback. Shutter speed (1 is 1/25, 2 is 1/12, 3 is 1/6, 4 is to superimpose on a tape. Adjust the focus manually using a tripod to the Picture effect ([PICT. For details, refer to steady the camcorder. 5 Touch . Still image Movie Blue ,continued Recording 43 No adjustment necessary...

User Manual
Page 45
... point while viewing the pictures on the screen. EDIT SEARCH You can do this operation also by selecting [END SEARCH] short-cut on . (p. 60) Searching manually - b Note • The EDIT SEARCH function does not work for about 5 seconds, and the camcorder enters the standby mode at the point where you can...
... point while viewing the pictures on the screen. EDIT SEARCH You can do this operation also by selecting [END SEARCH] short-cut on . (p. 60) Searching manually - b Note • The EDIT SEARCH function does not work for about 5 seconds, and the camcorder enters the standby mode at the point where you can...

User Manual
Page 57
Refer also to the instruction manuals supplied with the devices to another tape, see page 88. Set the input selector on the VCR using the A/V connecting cable. To copy to be ...
Refer also to the instruction manuals supplied with the devices to another tape, see page 88. Set the input selector on the VCR using the A/V connecting cable. To copy to be ...

User Manual
Page 65
... picture will not be played back on a 16:9 wide-screen TV ([16:9 WIDE] mode). Natural pictures are produced. When you set [16:9 WIDE] to the manuals supplied with a tripod, or when using a conversion lens (optional). If you play back on a standard TV** * Picture appears in full screen when the wide-screen...
... picture will not be played back on a 16:9 wide-screen TV ([16:9 WIDE] mode). Natural pictures are produced. When you set [16:9 WIDE] to the manuals supplied with a tripod, or when using a conversion lens (optional). If you play back on a standard TV** * Picture appears in full screen when the wide-screen...

User Manual
Page 72
...]. 7 Touch [ON], then . flashes on a tape in the selected interval. 8 Touch . stops flashing and the interval recording starts. z Tips • If you adjust the focus manually, you may be able to record clear pictures even if the light changes (p. 39). • You can select from the selected time. INT. You can...
...]. 7 Touch [ON], then . flashes on a tape in the selected interval. 8 Touch . stops flashing and the interval recording starts. z Tips • If you adjust the focus manually, you may be able to record clear pictures even if the light changes (p. 39). • You can select from the selected time. INT. You can...

User Manual
Page 105
... Millennium Edition, Windows XP Home Edition or Windows XP Professional Standard installation is not supported. About "First Step Guide" "First Step Guide" is an instruction manual you use the software stored on the CD-ROM (supplied). It is based on DirectX technology.
... Millennium Edition, Windows XP Home Edition or Windows XP Professional Standard installation is not supported. About "First Step Guide" "First Step Guide" is an instruction manual you use the software stored on the CD-ROM (supplied). It is based on DirectX technology.
User Manual
Page 107
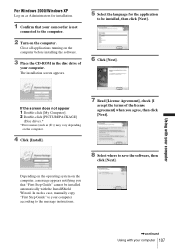
... the InstallShield Wizard. Close all applications running on the computer. 4 Click [Install]. 7 Read [License Agreement], check [I accept the terms of your computer. In such a case, manually copy "First Step Guide" to the message instructions. If the screen does not appear 1 Double-click [My Computer]. 2 Double-click [PICTUREPACKAGE] (Disc drive).* *Drive names...
... the InstallShield Wizard. Close all applications running on the computer. 4 Click [Install]. 7 Read [License Agreement], check [I accept the terms of your computer. In such a case, manually copy "First Step Guide" to the message instructions. If the screen does not appear 1 Double-click [My Computer]. 2 Double-click [PICTUREPACKAGE] (Disc drive).* *Drive names...
User Manual
Page 111
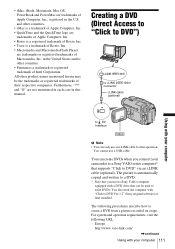
... of their respective companies. The picture is a trademark or registered trademark of Intel Corporation. You also need a Sony VAIO computer equipped with "Click to write DVDs. You cannot use an i.LINK cable for this manual. Europe http://www.vaio-link.com/ ,continued Using with your computer 111 Furthermore, "™" and "®" are...
... of their respective companies. The picture is a trademark or registered trademark of Intel Corporation. You also need a Sony VAIO computer equipped with "Click to write DVDs. You cannot use an i.LINK cable for this manual. Europe http://www.vaio-link.com/ ,continued Using with your computer 111 Furthermore, "™" and "®" are...

User Manual
Page 119
.... (p. 37) Picture appears too bright on the screen, and the subject does not appear on again. (p. 17) Or use the AC Adaptor. Adjust the focus manually. (p. 39) A vertical band appears when • This occurs when the contrast between the subject and the background is new and has nothing recorded. ,continued Troubleshooting...
.... (p. 37) Picture appears too bright on the screen, and the subject does not appear on again. (p. 17) Or use the AC Adaptor. Adjust the focus manually. (p. 39) A vertical band appears when • This occurs when the contrast between the subject and the background is new and has nothing recorded. ,continued Troubleshooting...

User Manual
Page 137
...battery pack for a longer time. ,continued Additional Information 137 Additional Information If you charge the battery pack outside of this manual. In that formatting erases all information on your camcorder and an optional AC Adaptor/charger. When playing back image data ... trademarks of their respective companies. TM SERIES What is compatible with other product names mentioned herein may not be the trademarks or registered trademarks of Sony Corporation. • All other device. • "Memory Stick," , "Memory Stick PRO," , "Memory Stick Duo," , "Memory Stick ...
...battery pack for a longer time. ,continued Additional Information 137 Additional Information If you charge the battery pack outside of this manual. In that formatting erases all information on your camcorder and an optional AC Adaptor/charger. When playing back image data ... trademarks of their respective companies. TM SERIES What is compatible with other product names mentioned herein may not be the trademarks or registered trademarks of Sony Corporation. • All other device. • "Memory Stick," , "Memory Stick PRO," , "Memory Stick Duo," , "Memory Stick ...


