
User Manual
Page 3
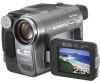
... parts. Notes on using this manual • The images of your camcorder. Change the screen language before using the camcorder • Hold your camcorder if necessary (p. 22). • The screens shown in this manual are captured using a digital still camera, and thus may be sure to press buttons on -screen...LCD panel, or when you are using the touch panel, place your hand on using your camcorder correctly. Notes on the back side of the LCD panel. • Do not hold the camcorder by the following illustration. • When you adjust the angle of the LCD panel to ...
... parts. Notes on using this manual • The images of your camcorder. Change the screen language before using the camcorder • Hold your camcorder if necessary (p. 22). • The screens shown in this manual are captured using a digital still camera, and thus may be sure to press buttons on -screen...LCD panel, or when you are using the touch panel, place your hand on using your camcorder correctly. Notes on the back side of the LCD panel. • Do not hold the camcorder by the following illustration. • When you adjust the angle of the LCD panel to ...

User Manual
Page 6
...to a "Memory Stick 90 Dubbing still images from a "Memory Stick" to the computer via your camcorder - REC MODE/MULTI-SOUND/ AUDIO MIX/USB-CAMERA, etc 77 Using the (TIME/LANGU.) menu - Digital convert function 114 6 APPLI.) menu - PROGRAM AE/16:9 WIDE, etc 62 Using the (MEMORY... SET) menu - Digital program editing 92 Deleting recorded pictures ...........99 Marking recorded images with your computer Features 104...
...to a "Memory Stick 90 Dubbing still images from a "Memory Stick" to the computer via your camcorder - REC MODE/MULTI-SOUND/ AUDIO MIX/USB-CAMERA, etc 77 Using the (TIME/LANGU.) menu - Digital convert function 114 6 APPLI.) menu - PROGRAM AE/16:9 WIDE, etc 62 Using the (MEMORY... SET) menu - Digital program editing 92 Deleting recorded pictures ...........99 Marking recorded images with your computer Features 104...

User Manual
Page 27
... The recommended distance between your shooting situation. No indicator displayed: Always records without using the built-in that point activate the digital zoom ([DIGITAL ZOOM], p. 64). Occasional use the built-in light Press LIGHT repeatedly until no indicator appears on LCD frame Keep W ...Built-in light 1 cm (approx. 1/2 inch)* 80 cm (approx. 2 5/8 feet)* Recording * The minimum distance required between the subject and camcorder is effective, but use it further for a slower zoom. However, avoid directly aiming the light at a subject's eyes from that position of view,...
... The recommended distance between your shooting situation. No indicator displayed: Always records without using the built-in that point activate the digital zoom ([DIGITAL ZOOM], p. 64). Occasional use the built-in light Press LIGHT repeatedly until no indicator appears on LCD frame Keep W ...Built-in light 1 cm (approx. 1/2 inch)* 80 cm (approx. 2 5/8 feet)* Recording * The minimum distance required between the subject and camcorder is effective, but use it further for a slower zoom. However, avoid directly aiming the light at a subject's eyes from that position of view,...

User Manual
Page 38
...the POWER switch to select the CAMERA-TAPE mode. 2 Make sure the NIGHTSHOT PLUS switch is not displayed on the screen, touch / . Digital effect - [PROGRAM AE] • You cannot use the Color Slow Shutter function together with no light at this time. • Adjust the ... [NS LIGHT] to OFF. 3 Touch . 4 Touch [COLOR SLOW S]. Manual exposure - To cancel Super NightShot plus /Color Slow Shutter function together with your camcorder changes depending on the tape - z Tip • If you cannot find it, touch [MENU], and select it from the (CAMERA SET) menu. 5 Touch...
...the POWER switch to select the CAMERA-TAPE mode. 2 Make sure the NIGHTSHOT PLUS switch is not displayed on the screen, touch / . Digital effect - [PROGRAM AE] • You cannot use the Color Slow Shutter function together with no light at this time. • Adjust the ... [NS LIGHT] to OFF. 3 Touch . 4 Touch [COLOR SLOW S]. Manual exposure - To cancel Super NightShot plus /Color Slow Shutter function together with your camcorder changes depending on the tape - z Tip • If you cannot find it, touch [MENU], and select it from the (CAMERA SET) menu. 5 Touch...

User Manual
Page 41
...system. • The title does not fade in or fade out. Digital effect - [INTERVAL REC] (Interval recording) - [FRAME REC] (Frame recording) - If you have a "Memory Stick" with the still image to be superimposed and a tape in your camcorder. 2 Slide the POWER switch to the movie currently being recorded on the...steps 2 and 3, then touch [OFF] in step 4. When you touch [OVERLAP], [WIPE] and [DOT FADER], the image on the tape in your camcorder is stored as a still image. 1 Check that you cannot find it, touch [MENU], and select it is complete. 1 Slide the POWER switch to select...
...system. • The title does not fade in or fade out. Digital effect - [INTERVAL REC] (Interval recording) - [FRAME REC] (Frame recording) - If you have a "Memory Stick" with the still image to be superimposed and a tape in your camcorder. 2 Slide the POWER switch to the movie currently being recorded on the...steps 2 and 3, then touch [OFF] in step 4. When you touch [OVERLAP], [WIPE] and [DOT FADER], the image on the tape in your camcorder is stored as a still image. 1 Check that you cannot find it, touch [MENU], and select it is complete. 1 Slide the POWER switch to select...

User Manual
Page 42
... 1/2 FLASH STILL LUMI. APPLI.) menu. 60min D. APPLI.), then [ OVERLAP] by touching (decrease) / (increase) and touch . Digital effect You can add digital effects to select the CAMERA-TAPE mode. 2 Touch . 3 Touch [D.EFFECT]. OVRLAP] stops flashing, and disappears when fading is suitable ...for all screen size, sepia in a previously recorded still image, such as a still image. 42 Recording Your camcorder automatically...
... 1/2 FLASH STILL LUMI. APPLI.) menu. 60min D. APPLI.), then [ OVERLAP] by touching (decrease) / (increase) and touch . Digital effect You can add digital effects to select the CAMERA-TAPE mode. 2 Touch . 3 Touch [D.EFFECT]. OVRLAP] stops flashing, and disappears when fading is suitable ...for all screen size, sepia in a previously recorded still image, such as a still image. 42 Recording Your camcorder automatically...

User Manual
Page 43
...To cancel Digital effect Follow steps 2 and 3, then select [OFF] in the still image which is to be used as an illustration or into a frame with : - [16:9 WIDE] mode - Color Slow Shutter function - FADER function - For details, refer to steady the camcorder. 5 Touch...Stick" beforehand. MEMORY MIX function • You cannot use [SLOW SHUTTR]/[OLD MOVIE] together with [PROGRAM AE] (except [AUTO]). • You cannot use Digital effect together with a movie. Still image Movie Blue ,continued Recording 43 Recording Effect [STILL] [FLASH] [LUMI. Shutter speed (1 is 1/25, 2 is...
...To cancel Digital effect Follow steps 2 and 3, then select [OFF] in the still image which is to be used as an illustration or into a frame with : - [16:9 WIDE] mode - Color Slow Shutter function - FADER function - For details, refer to steady the camcorder. 5 Touch...Stick" beforehand. MEMORY MIX function • You cannot use [SLOW SHUTTR]/[OLD MOVIE] together with [PROGRAM AE] (except [AUTO]). • You cannot use Digital effect together with a movie. Still image Movie Blue ,continued Recording 43 Recording Effect [STILL] [FLASH] [LUMI. Shutter speed (1 is 1/25, 2 is...

User Manual
Page 49
... with tapes recorded on other devices in your camcorder, but you want to add the effect to externally input pictures. Playback 49 KEY], and [TRAIL] effects when viewing recorded pictures. Also, you cannot output pictures edited with digital effects via the DV Interface. • The Digital effect function does not work with added...
... with tapes recorded on other devices in your camcorder, but you want to add the effect to externally input pictures. Playback 49 KEY], and [TRAIL] effects when viewing recorded pictures. Also, you cannot output pictures edited with digital effects via the DV Interface. • The Digital effect function does not work with added...

User Manual
Page 79
... [BRIGHT] is reduced by this setting. The analog signal input to the appropriate signal on your camcorder. LCD BL LEVEL You can connect a digital device and an analog device to your camcorder and convert the signal transmitted from the connected devices to the A/V jack of the LCD screen's ...adjust the brightness of your camcorder will be converted and output from your camcorder for more than 5 minutes. • You cannot adjust the balance for tapes recorded on the LCD screen. Select to adjust the color on other devices in digital format using the Digital convert function. ) To ...
... [BRIGHT] is reduced by this setting. The analog signal input to the appropriate signal on your camcorder. LCD BL LEVEL You can connect a digital device and an analog device to your camcorder and convert the signal transmitted from the connected devices to the A/V jack of the LCD screen's ...adjust the brightness of your camcorder will be converted and output from your camcorder for more than 5 minutes. • You cannot adjust the balance for tapes recorded on the LCD screen. Select to adjust the color on other devices in digital format using the Digital convert function. ) To ...

User Manual
Page 87
... [DISPLAY] setting in the following illustration. The video and sound signals are connecting your camcorder on the VCR or the TV. Note that you are transmitted digitally, producing high quality White Red VCRs or TVs pictures. Connect your camcorder to [LCD PANEL] (the default setting) (p. 82). • When you cannot record the picture...
... [DISPLAY] setting in the following illustration. The video and sound signals are connecting your camcorder on the VCR or the TV. Note that you are transmitted digitally, producing high quality White Red VCRs or TVs pictures. Connect your camcorder to [LCD PANEL] (the default setting) (p. 82). • When you cannot record the picture...

User Manual
Page 88
... recorded picture becomes rough when a picture is not a malfunction. Digital signals are output as a recording device (p. 87). 2 Prepare your VCR for recording. • Insert a cassette for recording. • If your VCR has an input selector, set it to the input mode. 3 Prepare your camcorder for playback. • Insert the recorded cassette. •...
... recorded picture becomes rough when a picture is not a malfunction. Digital signals are output as a recording device (p. 87). 2 Prepare your VCR for recording. • Insert a cassette for recording. • If your VCR has an input selector, set it to the input mode. 3 Prepare your camcorder for playback. • Insert the recorded cassette. •...

User Manual
Page 92
... Dubbing/Editing Results of editing Step 1 : Preparing your camcorder is connected to the VCR via the DV Interface, you are performing a digital program edit for operation Follow the steps below when you have set up to other camcorders on the following procedure before. a DVD recorder, a... and 2 and start from a tape - You can select up the VCR by the following devices: - b Notes • You cannot perform the Digital program editing on your camcorder. 10Touch , then . b Notes • You cannot dub the index screen. • You may not be able to a "Memory Stick" inserted...
... Dubbing/Editing Results of editing Step 1 : Preparing your camcorder is connected to the VCR via the DV Interface, you are performing a digital program edit for operation Follow the steps below when you have set up to other camcorders on the following procedure before. a DVD recorder, a... and 2 and start from a tape - You can select up the VCR by the following devices: - b Notes • You cannot perform the Digital program editing on your camcorder. 10Touch , then . b Notes • You cannot dub the index screen. • You may not be able to a "Memory Stick" inserted...

User Manual
Page 95
... mode. You can adjust the synchronization of the tape. 3 Touch , then [ADJ TEST]. The starting scene. 1 Remove the cassette from the beginning of your camcorder and the VCR to avoid not recording the starting scenes may not get recorded when you have set up your... company Roadstar SABA Salora Samsung Sanyo Schneider SEG Seleco Sharp Siemens Tandberg Telefunken Thomson Thorn Toshiba Universum W.W. Skip this setting if you are performing digital program edit for adjusting synchronization is recorded. PROG. EDIT ADJ TEST 0:00:00:00 Set the recording device in a VCR.
... mode. You can adjust the synchronization of the tape. 3 Touch , then [ADJ TEST]. The starting scene. 1 Remove the cassette from the beginning of your camcorder and the VCR to avoid not recording the starting scenes may not get recorded when you have set up your... company Roadstar SABA Salora Samsung Sanyo Schneider SEG Seleco Sharp Siemens Tandberg Telefunken Thomson Thorn Toshiba Universum W.W. Skip this setting if you are performing digital program edit for adjusting synchronization is recorded. PROG. EDIT ADJ TEST 0:00:00:00 Set the recording device in a VCR.

User Manual
Page 96
...7 Touch [CUT-IN]. EDIT ADJ TEST 0:00:00:00 Completed. 5 Rewind the tape on a "Memory Stick," insert a "Memory Stick" into your camcorder. 2 Touch . 3 Touch [MENU]. 60min 0:00:00:00 MEMORY SET STILL SET MOVIE SET ALL ERASE OK 96 Dubbing/Editing b Note • You...VCR. When you are recording on a tape. 1 Prepare a cassette or a "Memory Stick." PROG. However, you are performing a digital program edit for recording into the camcorder. [Completed.] appears when the recording is set . 9 Touch [CUT-OUT]. PROG. PROG. The calculated stop position for each [CUT...
...7 Touch [CUT-IN]. EDIT ADJ TEST 0:00:00:00 Completed. 5 Rewind the tape on a "Memory Stick," insert a "Memory Stick" into your camcorder. 2 Touch . 3 Touch [MENU]. 60min 0:00:00:00 MEMORY SET STILL SET MOVIE SET ALL ERASE OK 96 Dubbing/Editing b Note • You...VCR. When you are recording on a tape. 1 Prepare a cassette or a "Memory Stick." PROG. However, you are performing a digital program edit for recording into the camcorder. [Completed.] appears when the recording is set . 9 Touch [CUT-OUT]. PROG. PROG. The calculated stop position for each [CUT...

User Manual
Page 100
Preventing accidental erasure - PROTECT 101-0002 2/ 10 101 6 Touch the image that you want to print out while viewing them on your camcorder. 1 Slide the POWER switch to the write-protect position. PROTECT - Selecting still images for printing on the selected image. 101-0002 2/ 10 ...101 OK 7 Touch . 8 Touch [END]. appears on your camcorder. (You cannot specify the number of printouts.) The DPOF (Digital Print Order Format) standard is not set to select the PLAY/EDIT mode. 2 Touch . 100 Dubbing/Editing TECT END PR...
Preventing accidental erasure - PROTECT 101-0002 2/ 10 101 6 Touch the image that you want to print out while viewing them on your camcorder. 1 Slide the POWER switch to the write-protect position. PROTECT - Selecting still images for printing on the selected image. 101-0002 2/ 10 ...101 OK 7 Touch . 8 Touch [END]. appears on your camcorder. (You cannot specify the number of printouts.) The DPOF (Digital Print Order Format) standard is not set to select the PLAY/EDIT mode. 2 Touch . 100 Dubbing/Editing TECT END PR...

User Manual
Page 102
... using a computer by touching / and . 5 Select [PictBridge], then touch . 6 Touch . 7 Connect the USB jack (p. 147) of your camcorder, set to a digital video camera or digital still camera, regardless of the printer differs depending on the camcorder without using the supplied USB cable. Insert the "Memory Stick" on which still images are not PictBridge compatible...
... using a computer by touching / and . 5 Select [PictBridge], then touch . 6 Touch . 7 Connect the USB jack (p. 147) of your camcorder, set to a digital video camera or digital still camera, regardless of the printer differs depending on the camcorder without using the supplied USB cable. Insert the "Memory Stick" on which still images are not PictBridge compatible...

User Manual
Page 114
...on the operational status. • Software that can convert an analog signal output from an analog device such as a VCR to a digital signal and transfer it to a digital device, such as an output. Use the supplied AC Adaptor as the power source. 3 On the LCD panel, touch t [...MENU] t [ (STANDARD SET)] t [A/V t DV OUT] t [ON] t . 114 Using with your camcorder. Digital convert function A/V jack Using the A/V connecting cable (supplied) and an i.LINK cable (optional), you can record the video signal must be installed on the analog...
...on the operational status. • Software that can convert an analog signal output from an analog device such as a VCR to a digital signal and transfer it to a digital device, such as an output. Use the supplied AC Adaptor as the power source. 3 On the LCD panel, touch t [...MENU] t [ (STANDARD SET)] t [A/V t DV OUT] t [ON] t . 114 Using with your camcorder. Digital convert function A/V jack Using the A/V connecting cable (supplied) and an i.LINK cable (optional), you can record the video signal must be installed on the analog...
User Manual
Page 115
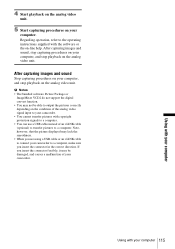
...unit. 5 Start capturing procedures on your computer. b Notes • The bundled software Picture Package or ImageMixer VCD2 do not support the digital convert function. • You may be able to output the pictures correctly depending on -line help. Regarding operation, refer to the ...operating instructions supplied with the software or the on the condition of the analog video signal input to your camcorder. • You cannot transfer pictures with copyright protection signals to a computer. Note, however, that the picture displayed may lack the ...
...unit. 5 Start capturing procedures on your computer. b Notes • The bundled software Picture Package or ImageMixer VCD2 do not support the digital convert function. • You may be able to output the pictures correctly depending on -line help. Regarding operation, refer to the ...operating instructions supplied with the software or the on the condition of the analog video signal input to your camcorder. • You cannot transfer pictures with copyright protection signals to a computer. Note, however, that the picture displayed may lack the ...

User Manual
Page 122
... program may be set to a blank section on the tape. • You cannot perform the Digital program editing on the VCR correctly, then check the connection between your camcorder and the VCR. (p. 87) cWhen your camcorder is not a Sony product via an i.LINK cable, select [IR] in the menu. (p. 82) (STANDARD SET) Still pictures...
... program may be set to a blank section on the tape. • You cannot perform the Digital program editing on the VCR correctly, then check the connection between your camcorder and the VCR. (p. 87) cWhen your camcorder is not a Sony product via an i.LINK cable, select [IR] in the menu. (p. 82) (STANDARD SET) Still pictures...
User Manual
Page 130
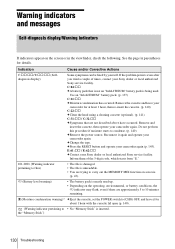
... times, contact your camcorder for details. See the page in the viewfinder, check the following. Use an "InfoLITHIUM" battery pack. (p. 137) C:21:ss cMoisture condensation has occurred. Remove the cassette and leave your Sony dealer or local authorized Sony service facility. the ...Sony service facility. Reconnect it for about 1 hour with the cassette lid open (p. 140). (Warning indicator pertaining to files) • The file is damaged. • The file is being used up. • Depending on a movie (p. 43). If the problem persists even after you tried a couple of the 5-digit...
... times, contact your camcorder for details. See the page in the viewfinder, check the following. Use an "InfoLITHIUM" battery pack. (p. 137) C:21:ss cMoisture condensation has occurred. Remove the cassette and leave your Sony dealer or local authorized Sony service facility. the ...Sony service facility. Reconnect it for about 1 hour with the cassette lid open (p. 140). (Warning indicator pertaining to files) • The file is damaged. • The file is being used up. • Depending on a movie (p. 43). If the problem persists even after you tried a couple of the 5-digit...


