
User Manual
Page 1
Camera Operations Guide [GB] 2-515-263-12(1) Camera Operations Guide Read this first Digital Video Camera Recorder DCR-TRV480E TM SERIES © 2005 Sony Corporation
Camera Operations Guide [GB] 2-515-263-12(1) Camera Operations Guide Read this first Digital Video Camera Recorder DCR-TRV480E TM SERIES © 2005 Sony Corporation
User Manual
Page 2
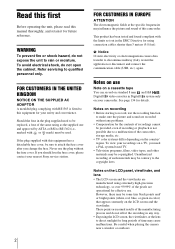
... electromagnetism causes data transfer to the copyright laws. Notes on a TV, you should lose the fuse cover, please contact your nearest Sony service station. 2 FOR CUSTOMERS IN EUROPE ATTENTION The electromagnetic fields at the specific frequencies may cause malfunctions. FOR CUSTOMERS IN THE UNITED...on the LCD screen and the viewfinder. Unauthorized recording of the pixels are operational for your camcorder. Be careful when placing the camera near a window or outdoors. This product has been tested and found compliant with BS1363 is not possible due to direct sunlight for...
... electromagnetism causes data transfer to the copyright laws. Notes on a TV, you should lose the fuse cover, please contact your nearest Sony service station. 2 FOR CUSTOMERS IN EUROPE ATTENTION The electromagnetic fields at the specific frequencies may cause malfunctions. FOR CUSTOMERS IN THE UNITED...on the LCD screen and the viewfinder. Unauthorized recording of the pixels are operational for your camcorder. Be careful when placing the camera near a window or outdoors. This product has been tested and found compliant with BS1363 is not possible due to direct sunlight for...

User Manual
Page 3
... you open or close the LCD panel, or when you see. • The on-screen displays in each local language are captured using a digital still camera, and thus may vary depending on using this manual are used on connecting other device Before connecting your camcorder correctly. The screens may appear different...
... you open or close the LCD panel, or when you see. • The on-screen displays in each local language are captured using a digital still camera, and thus may vary depending on using this manual are used on connecting other device Before connecting your camcorder correctly. The screens may appear different...

User Manual
Page 5
... a "Memory Stick 51 Playing back with added effects - Tape playback zoom/Memory playback zoom 54 Displaying the screen indicators 55 Displaying the date/time and camera settings data - Digital effect 42 Overlaying still images on movies on a "Memory Stick 50 Playing back in and out of Easy Handycam operation 53 Various...
... a "Memory Stick 51 Playing back with added effects - Tape playback zoom/Memory playback zoom 54 Displaying the screen indicators 55 Displaying the date/time and camera settings data - Digital effect 42 Overlaying still images on movies on a "Memory Stick 50 Playing back in and out of Easy Handycam operation 53 Various...

User Manual
Page 6
... to a tape 91 Dubbing selected scenes from a tape - PICT. REC MODE/MULTI-SOUND/ AUDIO MIX/USB-CAMERA, etc 77 Using the (TIME/LANGU.) menu - Advanced operations Using the Menu Selecting menu items 60 Using the (CAMERA SET) menu - CLOCK SET/WORLD TIME, etc 83 Customizing Personal Menu 84 Dubbing/Editing Connecting to...
... to a tape 91 Dubbing selected scenes from a tape - PICT. REC MODE/MULTI-SOUND/ AUDIO MIX/USB-CAMERA, etc 77 Using the (TIME/LANGU.) menu - Advanced operations Using the Menu Selecting menu items 60 Using the (CAMERA SET) menu - CLOCK SET/WORLD TIME, etc 83 Customizing Personal Menu 84 Dubbing/Editing Connecting to...

User Manual
Page 7
Troubleshooting Troubleshooting 116 Warning indicators and messages ...130 Additional Information Using your camcorder abroad ..........134 Usable cassette tapes 134 About the "Memory Stick 135 About the "InfoLITHIUM" battery pack 137 About i.LINK 139 Maintenance and precautions ..........140 Specification 143 Quick Reference Identifying parts and controls ...........145 Index 151 Two operating instructions are supplied with your camcorder: • Camera Operations Guide (This manual) • "First Step Guide" for using the supplied applications (included in the supplied CD-ROM) 7
Troubleshooting Troubleshooting 116 Warning indicators and messages ...130 Additional Information Using your camcorder abroad ..........134 Usable cassette tapes 134 About the "Memory Stick 135 About the "InfoLITHIUM" battery pack 137 About i.LINK 139 Maintenance and precautions ..........140 Specification 143 Quick Reference Identifying parts and controls ...........145 Index 151 Two operating instructions are supplied with your camcorder: • Camera Operations Guide (This manual) • "First Step Guide" for using the supplied applications (included in the supplied CD-ROM) 7

User Manual
Page 9
b Press OPEN and open the LCD panel. Recording starts. c Touch (play) to (CHG) OFF. To turn off the power, slide the POWER switch up the CAMERA-TAPE lamp. a Remove the lens cap. START/STOP 4 View the recorded picture on the LCD screen. Quick Start Guide 9 Lens cap is not set the ...
b Press OPEN and open the LCD panel. Recording starts. c Touch (play) to (CHG) OFF. To turn off the power, slide the POWER switch up the CAMERA-TAPE lamp. a Remove the lens cap. START/STOP 4 View the recorded picture on the LCD screen. Quick Start Guide 9 Lens cap is not set the ...

User Manual
Page 11
.... A shutter sound is heard and the still image is recorded. 4 View the recorded picture on the LCD screen. a Slide the POWER switch repeatedly until the CAMERA-MEMORY lamp lights up . c Touch (next) or (previous) to (CHG) OFF. Quick Start Guide 3 Start recording while checking the subject on the LCD screen. a Remove...
.... A shutter sound is heard and the still image is recorded. 4 View the recorded picture on the LCD screen. a Slide the POWER switch repeatedly until the CAMERA-MEMORY lamp lights up . c Touch (next) or (previous) to (CHG) OFF. Quick Start Guide 3 Start recording while checking the subject on the LCD screen. a Remove...

User Manual
Page 13
... have following items supplied with your camcorder. AC Adaptor (1) Mains lead (1) A/V connecting cable (1) USB cable (1) Rechargeable battery pack NP-FM30 (1) CD-ROM "Picture Package Ver.1.5" (1) Camera Operations Guide (This manual) (1) Lens cap (1) See page 145 on how to attach the lens cap. Getting started Getting started 13 Shoulder strap (1) See page...
... have following items supplied with your camcorder. AC Adaptor (1) Mains lead (1) A/V connecting cable (1) USB cable (1) Rechargeable battery pack NP-FM30 (1) CD-ROM "Picture Package Ver.1.5" (1) Camera Operations Guide (This manual) (1) Lens cap (1) See page 145 on how to attach the lens cap. Getting started Getting started 13 Shoulder strap (1) See page...

User Manual
Page 17
... want the battery to run out. PRECAUTION Even if your camcorder is turned off the power Slide the POWER switch up . • CAMERA-TAPE mode: To record on a tape. • CAMERA-MEMORY mode: To record on a "Memory Stick." • PLAY/EDIT mode: To play . To enter the recording or playing mode, slide...
... want the battery to run out. PRECAUTION Even if your camcorder is turned off the power Slide the POWER switch up . • CAMERA-TAPE mode: To record on a tape. • CAMERA-MEMORY mode: To record on a "Memory Stick." • PLAY/EDIT mode: To play . To enter the recording or playing mode, slide...

User Manual
Page 19
Getting started 19 Have the LCD panel rotated 180 degrees and closed with the screen facing out. 1 Set the power mode to CAMERA-TAPE or CAMERA-MEMORY (p. 17). 2 Close the LCD panel with / and touch . • [FADER]: Touch it up . The LCD screen is turned off ?] appears on the screen. 4...large-capacity battery pack (NP-QM71D/QM91D) on the screen. 3 Touch . [Set LCD off . 5 Touch the LCD screen while checking the display in the CAMERA- If you set the date and time again. To hide the buttons on your camcorder, extend the viewfinder and pull it repeatedly to the optimal...
Getting started 19 Have the LCD panel rotated 180 degrees and closed with the screen facing out. 1 Set the power mode to CAMERA-TAPE or CAMERA-MEMORY (p. 17). 2 Close the LCD panel with / and touch . • [FADER]: Touch it up . The LCD screen is turned off ?] appears on the screen. 4...large-capacity battery pack (NP-QM71D/QM91D) on the screen. 3 Touch . [Set LCD off . 5 Touch the LCD screen while checking the display in the CAMERA- If you set the date and time again. To hide the buttons on your camcorder, extend the viewfinder and pull it repeatedly to the optimal...

User Manual
Page 20
... Getting started This may cause a malfunction of your camcorder is the indicated time on Hi8 tape. 1 Slide the OPEN/EJECT lever in step 7, then touch . CAMERA SET PROGRAM AE SPOT METER EXPOSURE OK 5 Select (TIME/LANGU.) with / , then touch . DATE 2005Y 1M 1D 0: 00 OK 7 Set [Y] (year) with / , then touch . 60min...
... Getting started This may cause a malfunction of your camcorder is the indicated time on Hi8 tape. 1 Slide the OPEN/EJECT lever in step 7, then touch . CAMERA SET PROGRAM AE SPOT METER EXPOSURE OK 5 Select (TIME/LANGU.) with / , then touch . DATE 2005Y 1M 1D 0: 00 OK 7 Set [Y] (year) with / , then touch . 60min...

User Manual
Page 24
... details,see page 33. 1 Remove the lens cap. Press REC START/STOP again to the standby mode. Review Touch . Playback starts automatically. Camera recording lamp 3 Select the recording mode. To check the most recently recorded MPEG movie - To delete the movie, touch after playback is set to... POWER switch z Tip • Performing Easy Handycam operation, even first time users can record movies on a tape Slide the POWER switch until the CAMERA-MEMORY lamp lights up . Slide the POWER switch while pressing the green button. 4 Press REC START/STOP. Touch again to return to (CHG)...
... details,see page 33. 1 Remove the lens cap. Press REC START/STOP again to the standby mode. Review Touch . Playback starts automatically. Camera recording lamp 3 Select the recording mode. To check the most recently recorded MPEG movie - To delete the movie, touch after playback is set to... POWER switch z Tip • Performing Easy Handycam operation, even first time users can record movies on a tape Slide the POWER switch until the CAMERA-MEMORY lamp lights up . Slide the POWER switch while pressing the green button. 4 Press REC START/STOP. Touch again to return to (CHG)...

User Manual
Page 25
Date/time and the camera settings data (p. 55) will not be correct depending on the environment of the tape Displayed after you opened or closed the LCD panel, it takes ... operate the camcorder for about 5 minutes, the power will not be displayed during recording. Date/time (p. 55) will automatically turn off to select CAMERATAPE or CAMERA-MEMORY, and then press REC START/STOP. ,continued Recording 25
Date/time and the camera settings data (p. 55) will not be correct depending on the environment of the tape Displayed after you opened or closed the LCD panel, it takes ... operate the camcorder for about 5 minutes, the power will not be displayed during recording. Date/time (p. 55) will automatically turn off to select CAMERATAPE or CAMERA-MEMORY, and then press REC START/STOP. ,continued Recording 25

User Manual
Page 26
...:25:20 02:50:40 05:41:20 11:22:40 22:45:20 26 Recording The length of time you can record movies on a Sony "Memory Stick" formatted on your hand. • To ensure smooth transition on LCD frame to record moving pictures. Do not record pictures in SP mode.... • See "To record for a longer time on a "Memory Stick"" (p. 26) for the approximate length of different capacities. • The recording time, date, and the camera settings data (for a longer time on this information during playback by yourself in the mirror mode. • To press REC START/STOP on LCD frame...
...:25:20 02:50:40 05:41:20 11:22:40 22:45:20 26 Recording The length of time you can record movies on a Sony "Memory Stick" formatted on your hand. • To ensure smooth transition on LCD frame to record moving pictures. Do not record pictures in SP mode.... • See "To record for a longer time on a "Memory Stick"" (p. 26) for the approximate length of different capacities. • The recording time, date, and the camera settings data (for a longer time on this information during playback by yourself in the mirror mode. • To press REC START/STOP on LCD frame...

User Manual
Page 27
... light. LIGHT Press LIGHT repeatedly to suit your camcorder and the subject to get a sharp focus in light to select a setting. Using zoom When the CAMERA-TAPE mode is selected, you can use it further for a slower zoom. Built-in light 1 cm (approx. 1/2 inch)* 80 cm (approx. 2 5/8 feet)* Recording * The minimum...
... light. LIGHT Press LIGHT repeatedly to suit your camcorder and the subject to get a sharp focus in light to select a setting. Using zoom When the CAMERA-TAPE mode is selected, you can use it further for a slower zoom. Built-in light 1 cm (approx. 1/2 inch)* 80 cm (approx. 2 5/8 feet)* Recording * The minimum...

User Manual
Page 28
... out. • When you and your camcorder, turn the LCD panel towards the subject. in the following cases: - Open the LCD panel 90 degrees to CAMERA-MEMORY. - When it on for more than 5 minutes with the POWER switch set to the camcorder, then rotate it on for more than 5 minutes. - A mirror...
... out. • When you and your camcorder, turn the LCD panel towards the subject. in the following cases: - Open the LCD panel 90 degrees to CAMERA-MEMORY. - When it on for more than 5 minutes with the POWER switch set to the camcorder, then rotate it on for more than 5 minutes. - A mirror...

User Manual
Page 29
... down Touch [RESET] or press REC START/STOP. appears. 60min STBY 0:00:00 P-MENU Recording 29 To cancel the count down indication begins from the (CAMERA SET) menu. 60min STBY SELF-TIMER: OFF 0:00:00 OFF ON 3 Touch [ON], then . If the item is not displayed on the screen, touch...
... down Touch [RESET] or press REC START/STOP. appears. 60min STBY 0:00:00 P-MENU Recording 29 To cancel the count down indication begins from the (CAMERA SET) menu. 60min STBY SELF-TIMER: OFF 0:00:00 OFF ON 3 Touch [ON], then . If the item is not displayed on the screen, touch...
User Manual
Page 30
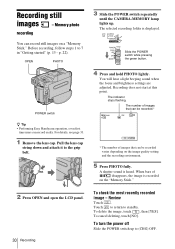
... the image, touch , then [YES]. Pull the lens cap string down and attach it to the grip belt. 3 Slide the POWER switch repeatedly until the CAMERA-MEMORY lamp lights up to (CHG) OFF. Slide the POWER switch while pressing the green button. 4 Press and hold PHOTO lightly. When bars of images...
... the image, touch , then [YES]. Pull the lens cap string down and attach it to the grip belt. 3 Slide the POWER switch repeatedly until the CAMERA-MEMORY lamp lights up to (CHG) OFF. Slide the POWER switch while pressing the green button. 4 Press and hold PHOTO lightly. When bars of images...

User Manual
Page 31
... the [FRAME] mode, the recorded image appears blurry. • When recording in the menu setting (p. 55). You can be recorded on a Sony "Memory Stick" formatted on the screen. Selecting image quality Select the (MEMORY SET) menu, [STILL SET], then [ QUALITY] (p. 66). We... recommend that of the image and the recording environment. Refer to the following list for camera-shake when recording moving subjects correcting jitter - Recording To record moving subjects in the [FRAME] mode (p. 66). Your camcorder compensates for the...
... the [FRAME] mode, the recorded image appears blurry. • When recording in the menu setting (p. 55). You can be recorded on a Sony "Memory Stick" formatted on the screen. Selecting image quality Select the (MEMORY SET) menu, [STILL SET], then [ QUALITY] (p. 66). We... recommend that of the image and the recording environment. Refer to the following list for camera-shake when recording moving subjects correcting jitter - Recording To record moving subjects in the [FRAME] mode (p. 66). Your camcorder compensates for the...


