
Operating Guide
Page 6
... to Part 15 of manuals - special handling may cause harmful interference to provide reasonable protection against harmful interference in your camcorder You can use Your camcorder is supplied with two kinds of the FCC Rules. Types of California, USA only Perchlorate Material - "Memory Stick Duo...and found to comply with the limits for help. Connect the equipment into the Memory Stick Duo Adaptor. Your camcorder is connected. - Notes on use mini DV cassettes marked with . This equipment generates, uses, and can radiate radio frequency energy and, if not installed ...
... to Part 15 of manuals - special handling may cause harmful interference to provide reasonable protection against harmful interference in your camcorder You can use Your camcorder is supplied with two kinds of the FCC Rules. Types of California, USA only Perchlorate Material - "Memory Stick Duo...and found to comply with the limits for help. Connect the equipment into the Memory Stick Duo Adaptor. Your camcorder is connected. - Notes on use mini DV cassettes marked with . This equipment generates, uses, and can radiate radio frequency energy and, if not installed ...
Operating Guide
Page 18
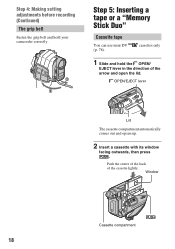
Step 4: Making setting adjustments before recording (Continued) The grip belt Fasten the grip belt and hold the OPEN/ EJECT lever in the direction of the cassette lightly. Push the center of the back of the arrow and open the lid. Window Cassette compartment 18 OPEN/EJECT lever Lid The cassette compartment automatically comes out and opens up. 2 Insert a cassette with its window facing outwards, then press . cassettes only 1 Slide and hold your camcorder correctly. 4 1 2 3 Step 5: Inserting a tape or a "Memory Stick Duo" Cassette tape You can use mini DV (p. 78).
Step 4: Making setting adjustments before recording (Continued) The grip belt Fasten the grip belt and hold the OPEN/ EJECT lever in the direction of the cassette lightly. Push the center of the back of the arrow and open the lid. Window Cassette compartment 18 OPEN/EJECT lever Lid The cassette compartment automatically comes out and opens up. 2 Insert a cassette with its window facing outwards, then press . cassettes only 1 Slide and hold your camcorder correctly. 4 1 2 3 Step 5: Inserting a tape or a "Memory Stick Duo" Cassette tape You can use mini DV (p. 78).
Operating Guide
Page 48
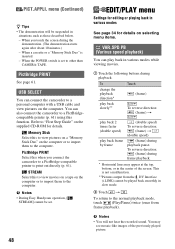
... a PictBridge-compatible printer to print out directly (p. 61). USB SELECT You can connect the camcorder to the normal playback mode, touch (Play/Pause) twice (once from the DV Interface (i.LINK) cannot be suspended in situations such as those described below. - PictBridge PRINT Select this to view movies...a "Memory Stick Duo" on the computer or to import them to the computer. Memory Stick Select this function. b Notes • During Easy Handycam operation, [ STREAM] cannot be set to "First Step Guide" on the supplied CD-ROM for details on the computer. To reverse direction: (...
... a PictBridge-compatible printer to print out directly (p. 61). USB SELECT You can connect the camcorder to the normal playback mode, touch (Play/Pause) twice (once from the DV Interface (i.LINK) cannot be suspended in situations such as those described below. - PictBridge PRINT Select this to view movies...a "Memory Stick Duo" on the computer or to import them to the computer. Memory Stick Select this function. b Notes • During Easy Handycam operation, [ STREAM] cannot be set to "First Step Guide" on the supplied CD-ROM for details on the computer. To reverse direction: (...

Operating Guide
Page 55
... A/V OUT jack (White) (Red) (White) (Red) (Yellow) A/V OUT 2 DV To DV Interface (i.LINK) 3 To i.LINK jack VCRs or DVD/HDD recorders : Signal flow A A/V connecting cable (supplied) The Handycam Station and your camcorder are transmitted digitally, producing high quality pictures and sound. Dubbing/Editing Dubbing to VCR or...devices, such as VCRs or DVD/HDD recorders. Connect the A/V connecting cable either to the Handycam Station or to your camcorder, depending on your camcorder to be reproduced more faithfully than with an i.LINK jack. In this operation (p. 12). Continued , ...
... A/V OUT jack (White) (Red) (White) (Red) (Yellow) A/V OUT 2 DV To DV Interface (i.LINK) 3 To i.LINK jack VCRs or DVD/HDD recorders : Signal flow A A/V connecting cable (supplied) The Handycam Station and your camcorder are transmitted digitally, producing high quality pictures and sound. Dubbing/Editing Dubbing to VCR or...devices, such as VCRs or DVD/HDD recorders. Connect the A/V connecting cable either to the Handycam Station or to your camcorder, depending on your camcorder to be reproduced more faithfully than with an i.LINK jack. In this operation (p. 12). Continued , ...

Operating Guide
Page 56
... (p. 28). • When connected using an i.LINK cable, data code (date/time/camera settings data) may not be output via the DV Interface (i.LINK): - Slide the POWER switch repeatedly to turn on the PLAY/EDIT lamp. 2 Insert the recording media in the recording device....HDD recorder) with the A/V connecting cable (supplied) 1, an A/V connecting cable with your recording device for details. 5 When dubbing is paused on your camcorder for playback. Indicators - Refer to the operating instructions supplied with S VIDEO (optional) 2 or an i.LINK cable (optional) 3. Dubbing to VCR or ...
... (p. 28). • When connected using an i.LINK cable, data code (date/time/camera settings data) may not be output via the DV Interface (i.LINK): - Slide the POWER switch repeatedly to turn on the PLAY/EDIT lamp. 2 Insert the recording media in the recording device....HDD recorder) with the A/V connecting cable (supplied) 1, an A/V connecting cable with your recording device for details. 5 When dubbing is paused on your camcorder for playback. Indicators - Refer to the operating instructions supplied with S VIDEO (optional) 2 or an i.LINK cable (optional) 3. Dubbing to VCR or ...

Operating Guide
Page 57
...from a TV or VCR etc. Recording movies 1 Connect your TV or VCR to your camcorder to insert a cassette or a "Memory Stick Duo" for this operation (p. 12). Dubbing/Editing DV To i.LINK jack To DV Interface (i.LINK) TV or VCR etc. : Signal flow i.LINK cable (optional) When... connecting your camcorder from a TV or VCR etc., onto a tape, you are transmitted digitally, producing high...
...from a TV or VCR etc. Recording movies 1 Connect your TV or VCR to your camcorder to insert a cassette or a "Memory Stick Duo" for this operation (p. 12). Dubbing/Editing DV To i.LINK jack To DV Interface (i.LINK) TV or VCR etc. : Signal flow i.LINK cable (optional) When... connecting your camcorder from a TV or VCR etc., onto a tape, you are transmitted digitally, producing high...
Operating Guide
Page 64
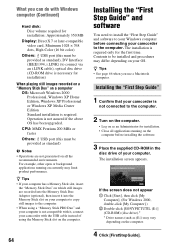
...compatible video card, Minimum 1024 × 768 dots, High Color (16 bit color) Others: USB port (this must be provided as standard), DV Interface (IEEE1394, i.LINK) (to connect via an i.LINK cable), optical disc drive (CD-ROM drive is not compatible with the USB cable instead...is not connected to the computer. • When using the Memory Stick slot on the computer. 4 Click [FirstStepGuide]. z Tips • If your camcorder is required only for installation. • Close all the recommended environments. If the screen does not appear 1 Click [Start], then click [My Computer...
...compatible video card, Minimum 1024 × 768 dots, High Color (16 bit color) Others: USB port (this must be provided as standard), DV Interface (IEEE1394, i.LINK) (to connect via an i.LINK cable), optical disc drive (CD-ROM drive is not compatible with the USB cable instead...is not connected to the computer. • When using the Memory Stick slot on the computer. 4 Click [FirstStepGuide]. z Tips • If your camcorder is required only for installation. • Close all the recommended environments. If the screen does not appear 1 Click [Start], then click [My Computer...

Operating Guide
Page 70
...still images cannot be recorded on the "Memory Stick Duo." • The "Memory Stick Duo" is a blank section between recorded sections of your camcorder. Use a cleaning cassette (optional) (p. 84). • Try again from the last recorded scene to turn the power off.) • Do ...(p. 22). • The tape has reached the end. You cannot record a smooth transition on a tape from the beginning. • Use a Sony mini DV cassette. Smooth interval recording stops/ [Smooth interval rec discontinued due to [AUTO] (p. 39). • The recording conditions are not suitable for at least...
...still images cannot be recorded on the "Memory Stick Duo." • The "Memory Stick Duo" is a blank section between recorded sections of your camcorder. Use a cleaning cassette (optional) (p. 84). • Try again from the last recorded scene to turn the power off.) • Do ...(p. 22). • The tape has reached the end. You cannot record a smooth transition on a tape from the beginning. • Use a Sony mini DV cassette. Smooth interval recording stops/ [Smooth interval rec discontinued due to [AUTO] (p. 39). • The recording conditions are not suitable for at least...
Operating Guide
Page 78
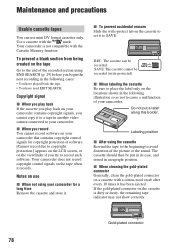
...Slide the write-protect tab on the cassette is not compatible with the mark. REC: The cassette can use x When not using your camcorder. Copyright signal x When you play back If the cassette you cannot copy it to a tape in the following illustration so as not to... copyright protection.] appears on the LCD screen, or on use mini DV format cassettes only. Your camcorder does not record copyright control signals on your camcorder. REC SAVE SAVE: The cassette cannot be recorded (write-protected). x When labeling the cassette Be sure ...
...Slide the write-protect tab on the cassette is not compatible with the mark. REC: The cassette can use x When not using your camcorder. Copyright signal x When you play back If the cassette you cannot copy it to a tape in the following illustration so as not to... copyright protection.] appears on the LCD screen, or on use mini DV format cassettes only. Your camcorder does not record copyright control signals on your camcorder. REC SAVE SAVE: The cassette cannot be recorded (write-protected). x When labeling the cassette Be sure ...

Operating Guide
Page 81
...; To discharge the battery pack on your camcorder once a year to OFF (CHG) when not recording or playing back on your camcorder or remove the battery pack. About i.LINK The DV Interface on the (STANDARD SET) menu and leave your camcorder and put it up , and insert it...When two or more i.LINK-compatible devices are operations and data transactions with the unit, operation becomes possible from any device in your camcorder is an i.LINKcompliant DV Interface. Use a large capacity battery pack: NP-FH70/ FH100 (optional). • Frequent use of the connected devices. The battery ...
...; To discharge the battery pack on your camcorder once a year to OFF (CHG) when not recording or playing back on your camcorder or remove the battery pack. About i.LINK The DV Interface on the (STANDARD SET) menu and leave your camcorder and put it up , and insert it...When two or more i.LINK-compatible devices are operations and data transactions with the unit, operation becomes possible from any device in your camcorder is an i.LINKcompliant DV Interface. Use a large capacity battery pack: NP-FH70/ FH100 (optional). • Frequent use of the connected devices. The battery ...

Operating Guide
Page 82
... deformed. - There are not compatible with a DV device or not. Some i.LINK compatible video devices, such as Digital Televisions, DVD, MICROMV or HDV recorders/players are 3 types. About the required i.LINK cable Use the Sony i.LINK 4-pin-to be connected. The camcorder may occur. - If your camcorder on some devices. For details on how...
... deformed. - There are not compatible with a DV device or not. Some i.LINK compatible video devices, such as Digital Televisions, DVD, MICROMV or HDV recorders/players are 3 types. About the required i.LINK cable Use the Sony i.LINK 4-pin-to be connected. The camcorder may occur. - If your camcorder on some devices. For details on how...

Operating Guide
Page 86
...86 However, even if the pre-installed rechargeable battery is not charged, the camcorder operation will not be affected as long as you are not recording the date. x Procedures Connect your camcorder after charging the pre-installed rechargeable battery. Do not recharge, disassemble or ...16 bits (Fs 48 kHz, stereo) Video signal NTSC color, EIA standards Usable cassette Mini DV cassette with the POWER switch set to pull out the battery case. 2 Place a new battery with a Sony CR2025 lithium battery. To change the battery of fire or explosion. Maintenance and precautions (Continued...
...86 However, even if the pre-installed rechargeable battery is not charged, the camcorder operation will not be affected as long as you are not recording the date. x Procedures Connect your camcorder after charging the pre-installed rechargeable battery. Do not recharge, disassemble or ...16 bits (Fs 48 kHz, stereo) Video signal NTSC color, EIA standards Usable cassette Mini DV cassette with the POWER switch set to pull out the battery case. 2 Place a new battery with a Sony CR2025 lithium battery. To change the battery of fire or explosion. Maintenance and precautions (Continued...

Operating Guide
Page 93
... as Battery Info) on -screen image when you press this button will be recorded onto the "Memory Stick Duo" as a still image. Handycam Station 1 A Interface connector B (USB) jack (61) C DV interface (55, 57) D DC IN jack (12) E A/V OUT jack (32, 55) Quick Reference 23 4 5 Remote Commander 7 1 8 2 3 9 4 5 6 q; Insulation... using the Remote Commander. • Aim the Remote Commander towards the remote sensor to CAMERATAPE. ** Not available during Easy Handycam operation with the POWER switch set to operate your camcorder (p. 90). • To change the battery, see page 86.
... as Battery Info) on -screen image when you press this button will be recorded onto the "Memory Stick Duo" as a still image. Handycam Station 1 A Interface connector B (USB) jack (61) C DV interface (55, 57) D DC IN jack (12) E A/V OUT jack (32, 55) Quick Reference 23 4 5 Remote Commander 7 1 8 2 3 9 4 5 6 q; Insulation... using the Remote Commander. • Aim the Remote Commander towards the remote sensor to CAMERATAPE. ** Not available during Easy Handycam operation with the POWER switch set to operate your camcorder (p. 90). • To change the battery, see page 86.


