User Manual
Page 4
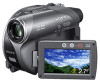
...DVD-Rs, 8cm DVD-RWs and 8cm DVD+RWs only. On the discs you can use in your camcorder (For DCRDVD304E/DVD305E/DVD755E) There are two sizes of "Memory Stick." See page 14 for using your camcorder with the computer connected (stored on the supplied CD-ROM)* * The DCR-DVD105E/DVD205E/DVD304E/ DVD605E/DVD705E... do not include "First Step Guide" because they do the following parts. When using the camcorder • Do not hold the camcorder by the following when either of the respective lamps of ...
...DVD-Rs, 8cm DVD-RWs and 8cm DVD+RWs only. On the discs you can use in your camcorder (For DCRDVD304E/DVD305E/DVD755E) There are two sizes of "Memory Stick." See page 14 for using your camcorder with the computer connected (stored on the supplied CD-ROM)* * The DCR-DVD105E/DVD205E/DVD304E/ DVD605E/DVD705E... do not include "First Step Guide" because they do the following parts. When using the camcorder • Do not hold the camcorder by the following when either of the respective lamps of ...
User Manual
Page 5
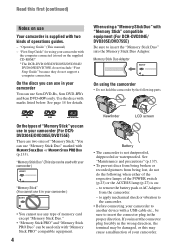
...to make sure the picture and sound are recorded without notice. • The illustrations used on this manual are based on the model DCR-DVD305E. • Disc in low light conditions, such as at the sun. Change the screen language before using extremely highprecision technology, so...programs, films, video tapes, and other materials may be contrary to the copyright laws. You cannot dub copyright protected software on your camcorder if necessary (p.82). 5 DVD +RW • The on-screen displays in color) that is grayed out is not possible due to malfunction. However, there may ...
...to make sure the picture and sound are recorded without notice. • The illustrations used on this manual are based on the model DCR-DVD305E. • Disc in low light conditions, such as at the sun. Change the screen language before using extremely highprecision technology, so...programs, films, video tapes, and other materials may be contrary to the copyright laws. You cannot dub copyright protected software on your camcorder if necessary (p.82). 5 DVD +RW • The on-screen displays in color) that is grayed out is not possible due to malfunction. However, there may ...
User Manual
Page 8
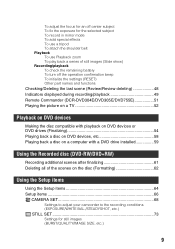
... a "Memory Stick Duo 27 Step 8: Selecting the aspect ratio (16:9 or 4:3) of the recording picture (DCR-DVD205E/DVD304E/DVD305E/DVD705E/DVD755E 30 Easy Handycam - using your camcorder with automatic settings Using Easy Handycam operation 32 Recording with ease 34 Playing back with ease 36 Preparation for playing ...40 Playback 42 Functions used for recording/playback, etc 44 Recording To use zoom To record sound with your DVD Handycam 12 Choosing a disc 14 Using your DVD Handycam 16 Getting Started Step 1: Checking supplied items 18 Step 2: Charging the battery pack 19 Step 3: Turning...
... a "Memory Stick Duo 27 Step 8: Selecting the aspect ratio (16:9 or 4:3) of the recording picture (DCR-DVD205E/DVD304E/DVD305E/DVD705E/DVD755E 30 Easy Handycam - using your camcorder with automatic settings Using Easy Handycam operation 32 Recording with ease 34 Playing back with ease 36 Preparation for playing ...40 Playback 42 Functions used for recording/playback, etc 44 Recording To use zoom To record sound with your DVD Handycam 12 Choosing a disc 14 Using your DVD Handycam 16 Getting Started Step 1: Checking supplied items 18 Step 2: Charging the battery pack 19 Step 3: Turning...
User Manual
Page 9
...48 Indicators displayed during recording/playback 49 Remote Commander (DCR-DVD304E/DVD305E/DVD755E 51 Playing the picture on a TV 52 Playback on DVD devices Making the disc compatible with playback on DVD devices or DVD drives (Finalizing 54 Playing back a disc on DVD devices, etc 58 Playing back a disc on a ...Using the Recorded disc (DVD-RW/DVD+RW) Recording additional scenes after finalizing 61 Deleting all of the scenes on the disc (Formatting 62 Using the Setup items Using the Setup items 64 Setup items 66 CAMERA SET 68 Settings to adjust your camcorder to the recording conditions ...
...48 Indicators displayed during recording/playback 49 Remote Commander (DCR-DVD304E/DVD305E/DVD755E 51 Playing the picture on a TV 52 Playback on DVD devices Making the disc compatible with playback on DVD devices or DVD drives (Finalizing 54 Playing back a disc on DVD devices, etc 58 Playing back a disc on a ...Using the Recorded disc (DVD-RW/DVD+RW) Recording additional scenes after finalizing 61 Deleting all of the scenes on the disc (Formatting 62 Using the Setup items Using the Setup items 64 Setup items 66 CAMERA SET 68 Settings to adjust your camcorder to the recording conditions ...
User Manual
Page 14
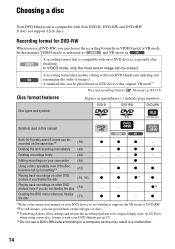
... disc*2 (30) Deleting the last recording immediately (48) z z z - - In VIDEO mode, only the most DVD devices, especially after finalizing. In this manual, VIDEO mode is compatible with your camcorder (88) - A recording format that support VR mode*1. DVD-R DVD-RW DVD+RW Symbols used in this may result in parentheses ( ) indicate page numbers. z z z Deleting recordings freely...
... disc*2 (30) Deleting the last recording immediately (48) z z z - - In VIDEO mode, only the most DVD devices, especially after finalizing. In this manual, VIDEO mode is compatible with your camcorder (88) - A recording format that support VR mode*1. DVD-R DVD-RW DVD+RW Symbols used in this may result in parentheses ( ) indicate page numbers. z z z Deleting recordings freely...
User Manual
Page 18
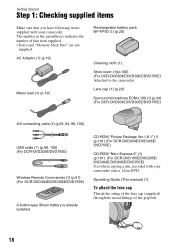
CD-ROM "Picture Package Ver.1.8.1" (1) (p.101) (For DCR-DVD304E/DVD305E/ DVD755E) CD-ROM "Nero Express 6" (1) (p.101) (For DCR-DVD105E/DVD205E/ DVD304E/DVD605E/DVD705E) Use when copying a disc recorded with your camcorder onto a 12cm DVD. Operating Guide (This manual) (1) To attach the lens cap Thread the string of the lens cap (supplied) through the metal fittings of...
CD-ROM "Picture Package Ver.1.8.1" (1) (p.101) (For DCR-DVD304E/DVD305E/ DVD755E) CD-ROM "Nero Express 6" (1) (p.101) (For DCR-DVD105E/DVD205E/ DVD304E/DVD605E/DVD705E) Use when copying a disc recorded with your camcorder onto a 12cm DVD. Operating Guide (This manual) (1) To attach the lens cap Thread the string of the lens cap (supplied) through the metal fittings of...
User Manual
Page 27
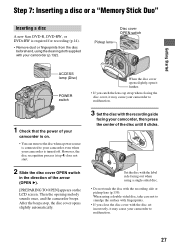
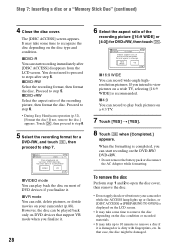
... disc recognition process (step 4) does not start. 2 Slide the disc cover OPEN switch in the direction of your camcorder to your camcorder even when your camcorder is required for recording (p.14). • Remove dust or fingerprints from the disc beforehand, using the cleaning cloth supplied... with the disc set incorrectly, it may cause your camcorder is on the LCD screen. Getting Started Step 7: Inserting a disc or a "Memory Stick Duo" Inserting a disc A new 8cm DVD-R, DVD-RW, or DVD+RW is turned off.
... disc recognition process (step 4) does not start. 2 Slide the disc cover OPEN switch in the direction of your camcorder to your camcorder even when your camcorder is required for recording (p.14). • Remove dust or fingerprints from the disc beforehand, using the cleaning cloth supplied... with the disc set incorrectly, it may cause your camcorder is on the LCD screen. Getting Started Step 7: Inserting a disc or a "Memory Stick Duo" Inserting a disc A new 8cm DVD-R, DVD-RW, or DVD+RW is turned off.
User Manual
Page 28
... selecting [16:9 WIDE] is completed, you can play back pictures on the DVD-RW/ DVD+RW. • Do not remove the battery pack or disconnect the AC Adaptor while formatting. Cannot edit in Camcorder VIDEO VR OK xVIDEO mode You can start recording immediately after step 5. When the... take some time to recognize the disc depending on the disc condition or recorded materials. • It may take up to 10 minutes to your camcorder (p.88). FORMAT : 16:9 WIDE Select aspect ratio of the recording picture, then format the disc. Step 7: Inserting a disc or a "Memory ...
... selecting [16:9 WIDE] is completed, you can play back pictures on the DVD-RW/ DVD+RW. • Do not remove the battery pack or disconnect the AC Adaptor while formatting. Cannot edit in Camcorder VIDEO VR OK xVIDEO mode You can start recording immediately after step 5. When the... take some time to recognize the disc depending on the disc condition or recorded materials. • It may take up to 10 minutes to your camcorder (p.88). FORMAT : 16:9 WIDE Select aspect ratio of the recording picture, then format the disc. Step 7: Inserting a disc or a "Memory ...
User Manual
Page 29
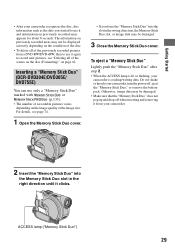
... Lightly push the "Memory Stick Duo" after step 2. • When the ACCESS lamp is lit or flashing, your camcorder, turn the power off when inserting and removing it from a DVD-RW/DVD+RW, then to use it again to record new pictures, see page 74. 1 Open the Memory Stick Duo cover....133). • The number of the scenes on the disc (Formatting)" on page 62. Do not shake or knock your camcorder is reading/writing data. Inserting a "Memory Stick Duo" (DCR-DVD304E/DVD305E/ DVD755E) You can use it clicks. For details, see "Deleting all of recordable pictures varies depending on the...
... Lightly push the "Memory Stick Duo" after step 2. • When the ACCESS lamp is lit or flashing, your camcorder, turn the power off when inserting and removing it from a DVD-RW/DVD+RW, then to use it again to record new pictures, see page 74. 1 Open the Memory Stick Duo cover....133). • The number of the scenes on the disc (Formatting)" on page 62. Do not shake or knock your camcorder is reading/writing data. Inserting a "Memory Stick Duo" (DCR-DVD304E/DVD305E/ DVD755E) You can use it clicks. For details, see "Deleting all of recordable pictures varies depending on the...
User Manual
Page 30
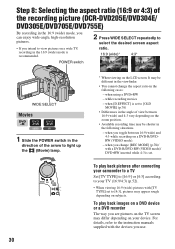
Step 8: Selecting the aspect ratio (16:9 or 4:3) of the recording picture (DCR-DVD205E/DVD304E/ DVD305E/DVD705E/DVD755E) By recording in the 16:9 (wide) mode, you can enjoy wide-angle, high-resolution pictures. • If you intend to view pictures on a wide ... the POWER switch in the direction of view between 16:9 (wide) and 4:3 while recording on a DVD-R/DVDRW (VIDEO mode). - when using a DVD+RW - when [D.EFFECT] is set to your device. To play back pictures after connecting your camcorder to a TV Set [TV TYPE] to [16:9] or [4:3] according to [4:3], pictures may be shorter in...
Step 8: Selecting the aspect ratio (16:9 or 4:3) of the recording picture (DCR-DVD205E/DVD304E/ DVD305E/DVD705E/DVD755E) By recording in the 16:9 (wide) mode, you can enjoy wide-angle, high-resolution pictures. • If you intend to view pictures on a wide ... the POWER switch in the direction of view between 16:9 (wide) and 4:3 while recording on a DVD-R/DVDRW (VIDEO mode). - when using a DVD+RW - when [D.EFFECT] is set to your device. To play back pictures after connecting your camcorder to a TV Set [TV TYPE] to [16:9] or [4:3] according to [4:3], pictures may be shorter in...
User Manual
Page 32
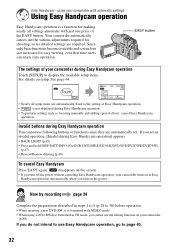
...operation, [Invalid during Easy Handycam operation] appears. • BACK LIGHT (p.45) • Press and hold DISP BATT/INFO (For DCR-DVD205E/DVD304E/DVD305E/DVD705E/DVD755E) (p.47) • Review/Review deleting (p.48) To cancel Easy Handycam Press EASY again. Now try recording page 34 Complete ... Handycam operation, go to 30) before operation. • When inserting a new DVD-RW, it is a function for making nearly all setup items are required. disappears on the power. Your camcorder automatically carries out the various adjustments required for easy viewing, even first time users...
...operation, [Invalid during Easy Handycam operation] appears. • BACK LIGHT (p.45) • Press and hold DISP BATT/INFO (For DCR-DVD205E/DVD304E/DVD305E/DVD705E/DVD755E) (p.47) • Review/Review deleting (p.48) To cancel Easy Handycam Press EASY again. Now try recording page 34 Complete ... Handycam operation, go to 30) before operation. • When inserting a new DVD-RW, it is a function for making nearly all setup items are required. disappears on the power. Your camcorder automatically carries out the various adjustments required for easy viewing, even first time users...
User Manual
Page 38
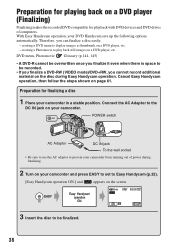
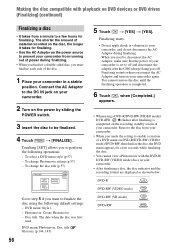
...it even when there is space to play back still images on your camcorder. Preparation for playing back on page 61. With Easy Handycam operation, your camcorder in a stable position. Preparation for playback with DVD devices and DVD drives of power during Easy Handycam operation. POWER switch AC Adaptor DC ...IN jack To the wall socket • Be sure to use the AC adaptor to prevent your camcorder and press EASY to set to be recorded. • If you finalize a DVD-RW (VIDEO mode)/DVD+RW, you can finalize a disc easily. - Cancel Easy Handycam operation, then follow the steps ...
...it even when there is space to play back still images on your camcorder. Preparation for playing back on page 61. With Easy Handycam operation, your camcorder in a stable position. Preparation for playback with DVD devices and DVD drives of power during Easy Handycam operation. POWER switch AC Adaptor DC ...IN jack To the wall socket • Be sure to use the AC adaptor to prevent your camcorder and press EASY to set to be recorded. • If you finalize a DVD-RW (VIDEO mode)/DVD+RW, you can finalize a disc easily. - Cancel Easy Handycam operation, then follow the steps ...
User Manual
Page 39
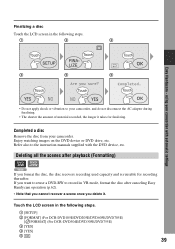
... If you delete it takes for recording thereafter. If you want to reuse a DVD-RW to your camcorder. using your camcorder with the DVD device, etc. Completed a disc Remove the disc from your camcorder, and do not disconnect the AC adaptor during finalizing. • The shorter the amount of material recorded, the longer ...Touch the LCD screen in the following steps. 1 2 3 Easy Handycam - Finalizing a disc Touch the LCD screen in the following steps. 1 [SETUP] 2 [FORMAT] (For DCR-DVD105E/DVD205E/DVD605E/DVD705E) [ FORMAT] (For DCR-DVD304E/DVD305E/DVD755E) 3 [YES] 4 [YES] 5 39
... If you delete it takes for recording thereafter. If you want to reuse a DVD-RW to your camcorder. using your camcorder with the DVD device, etc. Completed a disc Remove the disc from your camcorder, and do not disconnect the AC adaptor during finalizing. • The shorter the amount of material recorded, the longer ...Touch the LCD screen in the following steps. 1 2 3 Easy Handycam - Finalizing a disc Touch the LCD screen in the following steps. 1 [SETUP] 2 [FORMAT] (For DCR-DVD105E/DVD205E/DVD605E/DVD705E) [ FORMAT] (For DCR-DVD304E/DVD305E/DVD755E) 3 [YES] 4 [YES] 5 39
User Manual
Page 42
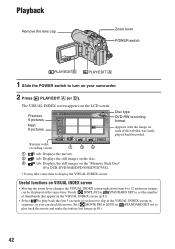
Previous 6 pictures Next 6 pictures Disc type DVD-RW recording format Appears with the image on each movie clip in the VISUAL INDEX screen in STANDARD SET to turn on the LCD screen. Useful functions on the "Memory Stick Duo" (For DCR-DVD304E/DVD305E/DVD755E). • It may take some ...INDEX screen indication from 6 to play back the first 5 seconds of thumbnails that was lastly played back/recorded. The VISUAL INDEX screen appears on your camcorder. 2 Press PLAY/EDIT A (or B). Zoom lever POWER switch PLAY/EDITB PLAY/EDIT A 1 Slide the POWER switch to set the number of ...
Previous 6 pictures Next 6 pictures Disc type DVD-RW recording format Appears with the image on each movie clip in the VISUAL INDEX screen in STANDARD SET to turn on the LCD screen. Useful functions on the "Memory Stick Duo" (For DCR-DVD304E/DVD305E/DVD755E). • It may take some ...INDEX screen indication from 6 to play back the first 5 seconds of thumbnails that was lastly played back/recorded. The VISUAL INDEX screen appears on your camcorder. 2 Press PLAY/EDIT A (or B). Zoom lever POWER switch PLAY/EDITB PLAY/EDIT A 1 Slide the POWER switch to set the number of ...
User Manual
Page 56
...POWER switch. 3 Insert the disc to prevent your camcorder from running out of a DVD menu on DVD-R/DVD-RW (VIDEO mode)/DVD+RW, then finalize the disc, the DVD menu appears for a few hours for finalizing. Making the disc compatible with the DVD-R/ DVD-RW (VIDEO mode) discs in a stable position...during finalizing. • When you finalize a double-sided disc, you must finalize each side of your camcorder again. When you to finalize the disc using a DVD-R/DVD-RW (VIDEO mode)/ DVD+RW, Z flashes after the CHG (charge) lamp goes off and disconnect the adaptor after finalizing is ...
...POWER switch. 3 Insert the disc to prevent your camcorder from running out of a DVD menu on DVD-R/DVD-RW (VIDEO mode)/DVD+RW, then finalize the disc, the DVD menu appears for a few hours for finalizing. Making the disc compatible with the DVD-R/ DVD-RW (VIDEO mode) discs in a stable position...during finalizing. • When you finalize a double-sided disc, you must finalize each side of your camcorder again. When you to finalize the disc using a DVD-R/DVD-RW (VIDEO mode)/ DVD+RW, Z flashes after the CHG (charge) lamp goes off and disconnect the adaptor after finalizing is ...
User Manual
Page 58
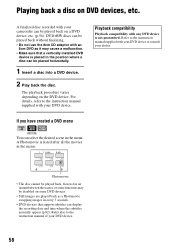
... instruction manual supplied with your dealer. If you have created a DVD menu DVD +RW You can display the recording date and time where the subtitles normally appear (p.82). For details, refer to the instruction manual of your camcorder can be played back on some functions may cause a malfunction. ...• Make sure that support subtitles can select the desired scene in the menu. A Photomovie is listed after all the movies in the menu. DVD+RW discs can be played ...
... instruction manual supplied with your dealer. If you have created a DVD menu DVD +RW You can display the recording date and time where the subtitles normally appear (p.82). For details, refer to the instruction manual of your camcorder can be played back on some functions may cause a malfunction. ...• Make sure that support subtitles can select the desired scene in the menu. A Photomovie is listed after all the movies in the menu. DVD+RW discs can be played ...
User Manual
Page 61
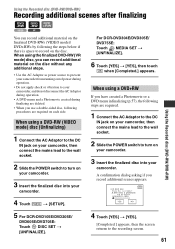
... the finalized disc into your camcorder. 4 Touch t [SETUP]. 5 For DCR-DVD105E/DVD205E/ DVD605E/DVD705E: Touch DISC SET t [UNFINALIZE]. A confirmation dialog asking if you record additional scenes appears. 4 Touch [YES] t [YES]. [Completed.] appears, then the screen returns to record on each side. When using a DVD-RW (VIDEO mode) disc (Unfinalizing) 1 Connect the AC Adaptor to...
... the finalized disc into your camcorder. 4 Touch t [SETUP]. 5 For DCR-DVD105E/DVD205E/ DVD605E/DVD705E: Touch DISC SET t [UNFINALIZE]. A confirmation dialog asking if you record additional scenes appears. 4 Touch [YES] t [YES]. [Completed.] appears, then the screen returns to record on each side. When using a DVD-RW (VIDEO mode) disc (Unfinalizing) 1 Connect the AC Adaptor to...
User Manual
Page 62
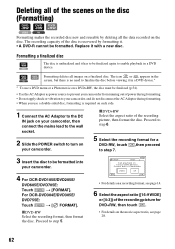
... page 28. 62 Formatting a finalized disc The disc is unfinalized and it . • A DVD-R cannot be formatted into your camcorder. 4 For DCR-DVD105E/DVD205E/ DVD605E/DVD705E: Touch t [FORMAT]. The icon or appears in a DVD device. FORMAT : VIDEO Can playback on various DVD devices. Formatting deletes all the data recorded on the disc. xDVD+RW Select the...
... page 28. 62 Formatting a finalized disc The disc is unfinalized and it . • A DVD-R cannot be formatted into your camcorder. 4 For DCR-DVD105E/DVD205E/ DVD605E/DVD705E: Touch t [FORMAT]. The icon or appears in a DVD device. FORMAT : VIDEO Can playback on various DVD devices. Formatting deletes all the data recorded on the disc. xDVD+RW Select the...
User Manual
Page 63
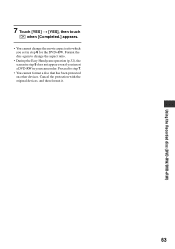
Cancel the protection with the original devices, and then format it. 63 Proceed to change the movie aspect ratio which you insert a DVD-RW in step 6 for the DVD+RW. Format the disc again to step 7. • You cannot format a disc that has been protected on other devices. Using the Recorded disc (DVD-RW/DVD+RW) 7 Touch [YES] t [YES], then touch when [Completed.] appears. • You cannot change the aspect ratio. • During the Easy Handycam operation (p.32), the screen in step 5 does not appear even if you set in your camcorder.
Cancel the protection with the original devices, and then format it. 63 Proceed to change the movie aspect ratio which you insert a DVD-RW in step 6 for the DVD+RW. Format the disc again to step 7. • You cannot format a disc that has been protected on other devices. Using the Recorded disc (DVD-RW/DVD+RW) 7 Touch [YES] t [YES], then touch when [Completed.] appears. • You cannot change the aspect ratio. • During the Easy Handycam operation (p.32), the screen in step 5 does not appear even if you set in your camcorder.
User Manual
Page 77
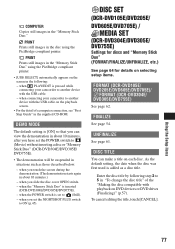
...54. Enter the disc title by following : - when PLAY/EDIT is pressed while connecting your camcorder to 5 in "To change the disc title" of a computer connection, see "First Step Guide...you can make a title on DVD devices or DVD drives (Finalizing)" (p.57). As the default setting, the date when the disc was first used is inserted (DCR-DVD304E/DVD305E/DVD755E). - DEMO...FINALIZE/UNFINALIZE, etc.) See page 64 for details on selecting setup items. FORMAT (DCR-DVD105E/ DVD205E/DVD605E/DVD705E)/ FORMAT (DCR-DVD304E/ DVD305E/DVD755E) See page 62. PRINT Prints still images in about 10 ...
...54. Enter the disc title by following : - when PLAY/EDIT is pressed while connecting your camcorder to 5 in "To change the disc title" of a computer connection, see "First Step Guide...you can make a title on DVD devices or DVD drives (Finalizing)" (p.57). As the default setting, the date when the disc was first used is inserted (DCR-DVD304E/DVD305E/DVD755E). - DEMO...FINALIZE/UNFINALIZE, etc.) See page 64 for details on selecting setup items. FORMAT (DCR-DVD105E/ DVD205E/DVD605E/DVD705E)/ FORMAT (DCR-DVD304E/ DVD305E/DVD755E) See page 62. PRINT Prints still images in about 10 ...


