Operating Guide
Page 1
Operating Guide DCR-DVD105/DVD205/DVD305/ DVD605/DVD705/DVD755 2-661-370-11(1) Enjoying with your DVD Handycam 14 Getting Started 20 Easy Handycam 34 Recording /Playback 42 Playback on DVD devices 56 Using the Recorded disc 63 Using the Setup items 66 Editing on DVD Handycam 87 Dubbing, Printing 96 Using a Computer 103 Troubleshooting 109 Additional Information 132 Glossary, Index 146 © 2006 Sony Corporation
Operating Guide DCR-DVD105/DVD205/DVD305/ DVD605/DVD705/DVD755 2-661-370-11(1) Enjoying with your DVD Handycam 14 Getting Started 20 Easy Handycam 34 Recording /Playback 42 Playback on DVD devices 56 Using the Recorded disc 63 Using the Setup items 66 Editing on DVD Handycam 87 Dubbing, Printing 96 Using a Computer 103 Troubleshooting 109 Additional Information 132 Glossary, Index 146 © 2006 Sony Corporation
Operating Guide
Page 10
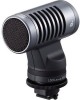
... 44 Functions used for recording/playback, etc 46 Recording To use zoom To record sound with more presence (5.1ch surround recording) (For DCR-DVD305/DVD755) To record in dark places (NightShot plus) To adjust the exposure for backlit subjects (BACK LIGHT) 10 Table of the recording picture (DCR-DVD205/DVD305/DVD705/DVD755 32 Easy Handycam -
... 44 Functions used for recording/playback, etc 46 Recording To use zoom To record sound with more presence (5.1ch surround recording) (For DCR-DVD305/DVD755) To record in dark places (NightShot plus) To adjust the exposure for backlit subjects (BACK LIGHT) 10 Table of the recording picture (DCR-DVD205/DVD305/DVD705/DVD755 32 Easy Handycam -
Operating Guide
Page 12
... SPEED, etc.) TIME/LANGU 84 (CLOCK SET/AREA SET/LANGUAGE, etc.) Customizing Personal Menu 85 Editing on DVD Handycam Copying the still images (DCR-DVD305/DVD755 87 Deleting still images from the "Memory Stick Duo" (DCR-DVD305/DVD755 89 Editing the original data 90 Creating the Playlist 91 Playing the Playlist 94 Dubbing, Printing Dubbing...
... SPEED, etc.) TIME/LANGU 84 (CLOCK SET/AREA SET/LANGUAGE, etc.) Customizing Personal Menu 85 Editing on DVD Handycam Copying the still images (DCR-DVD305/DVD755 87 Deleting still images from the "Memory Stick Duo" (DCR-DVD305/DVD755 89 Editing the original data 90 Creating the Playlist 91 Playing the Playlist 94 Dubbing, Printing Dubbing...
Operating Guide
Page 14
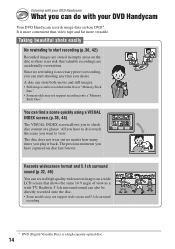
... recording, you can find a scene quickly using a VISUAL INDEX screen.(p.38, 44) The VISUAL INDEX screen allows you have to do with your DVD Handycam Your DVD Handycam records image data on 8cm DVD*. Taking beautiful shots easily No rewinding to start shooting any time you play it back. Realistic 5.1ch surround... onto the disc. • Some models may not support recording onto a"Memory Stick Duo." It is a high-capacity optical disc. 14 Enjoying with your DVD Handycam What you want to view.
... recording, you can find a scene quickly using a VISUAL INDEX screen.(p.38, 44) The VISUAL INDEX screen allows you have to do with your DVD Handycam Your DVD Handycam records image data on 8cm DVD*. Taking beautiful shots easily No rewinding to start shooting any time you play it back. Realistic 5.1ch surround... onto the disc. • Some models may not support recording onto a"Memory Stick Duo." It is a high-capacity optical disc. 14 Enjoying with your DVD Handycam What you want to view.
Operating Guide
Page 15
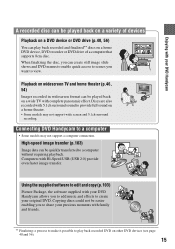
...add music and effects to a computer • Some models may not support wide screen and 5.1ch surround recording. Connecting DVD Handycam to create your original DVD. Enjoying with your DVD Handycam A recorded disc can be played back on a variety of a computer that supports 8cm disc. Using the supplied software to... (see page 40 and 56). 15 Copying discs could not be easier enabling you to share your precious moments with your DVD Handycam allows you can be quickly transferred to view. Discs are also recorded with Hi-Speed USB (USB 2.0) provide even faster image transfer.
...add music and effects to a computer • Some models may not support wide screen and 5.1ch surround recording. Connecting DVD Handycam to create your original DVD. Enjoying with your DVD Handycam A recorded disc can be played back on a variety of a computer that supports 8cm disc. Using the supplied software to... (see page 40 and 56). 15 Copying discs could not be easier enabling you to share your precious moments with your DVD Handycam allows you can be quickly transferred to view. Discs are also recorded with Hi-Speed USB (USB 2.0) provide even faster image transfer.
Operating Guide
Page 16
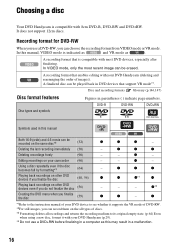
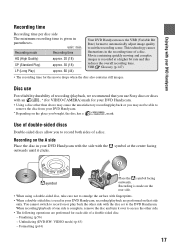
...deletes all recordings and returns the recording medium to its original empty state. (p.64) Even when using a new disc, format it with your DVD Handycam (deleting and rearranging the order of images). z *1Refer to the instruction manual of DVD-RW. *2For still images, you finalize the disc (59...) and 4:3 movie can be erased. Using a disc repeatedly even if the disc becomes full by formatting*3 (64) - Choosing a disc Your DVD Handycam is compatible with most recent image can be recorded on the same disc*2 (32) Deleting the last recording immediately (50) z z z - - In...
...deletes all recordings and returns the recording medium to its original empty state. (p.64) Even when using a new disc, format it with your DVD Handycam (deleting and rearranging the order of images). z *1Refer to the instruction manual of DVD-RW. *2For still images, you finalize the disc (59...) and 4:3 movie can be erased. Using a disc repeatedly even if the disc becomes full by formatting*3 (64) - Choosing a disc Your DVD Handycam is compatible with most recent image can be recorded on the same disc*2 (32) Deleting the last recording immediately (50) z z z - - In...
Operating Guide
Page 17
...) approx. 30 (18) LP (Long Play) approx. 60 (44) Your DVD Handycam uses the VBR (Variable Bit Rate) format to automatically adjust image quality to remove the disc from your DVD Handycam. * Depending on that you use Sony discs or discs with an * (for VIDEO CAMERA) mark for each side of... one side is used in your DVD Handycam, recording/playback are performed for your DVD Handycam. • Using a disc other side with ...
...) approx. 30 (18) LP (Long Play) approx. 60 (44) Your DVD Handycam uses the VBR (Variable Bit Rate) format to automatically adjust image quality to remove the disc from your DVD Handycam. * Depending on that you use Sony discs or discs with an * (for VIDEO CAMERA) mark for each side of... one side is used in your DVD Handycam, recording/playback are performed for your DVD Handycam. • Using a disc other side with ...

Operating Guide
Page 18
... 36, 42, 50 delete a and 90.) recorded image. The disc can be played back on various DVD devices * Select the mode on your DVD Handycam (See pages 38 and 44) You can only delete the a recorded image images you like to do after recording? recorded (p.50). 3Viewing on your needs.... Continued on the right page 18 Using your DVD Handycam 1Preparing (See page 20 to 32.) Select the disc that best suits your DVD Handycam and format (p.29). You can delete or edit You can also connect it to a TV for viewing (p....
... 36, 42, 50 delete a and 90.) recorded image. The disc can be played back on various DVD devices * Select the mode on your DVD Handycam (See pages 38 and 44) You can only delete the a recorded image images you like to do after recording? recorded (p.50). 3Viewing on your needs.... Continued on the right page 18 Using your DVD Handycam 1Preparing (See page 20 to 32.) Select the disc that best suits your DVD Handycam and format (p.29). You can delete or edit You can also connect it to a TV for viewing (p....
Operating Guide
Page 19
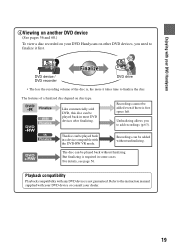
... disc can be played back in a device compatible with the DVD-RW VR mode. For details, see page 56. Enjoying with your DVD Handycam 4Viewing on another DVD device (See pages 56 and 60.) To view a disc recorded on your dealer. 19 Recordings cannot be played back without...if there is not guaranteed. Finalize The disc can be added without finalizing. Playback compatibility Playback compatibility with your DVD device or consult your DVD Handycam on disc type. DVD device / DVD recorder Finalize DVD drive • The less the recording volume of a finalized disc depend on other ...
... disc can be played back in a device compatible with the DVD-RW VR mode. For details, see page 56. Enjoying with your DVD Handycam 4Viewing on another DVD device (See pages 56 and 60.) To view a disc recorded on your dealer. 19 Recordings cannot be played back without...if there is not guaranteed. Finalize The disc can be added without finalizing. Playback compatibility Playback compatibility with your DVD device or consult your DVD Handycam on disc type. DVD device / DVD recorder Finalize DVD drive • The less the recording volume of a finalized disc depend on other ...
Operating Guide
Page 30
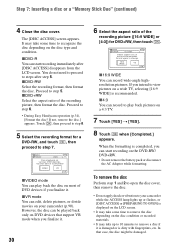
... lamp lights up or flashes, or [DISC ACCESS] or [PREPARING TO OPEN] is completed, you intend to step 7. Format again to step 6. • During Easy Handycam operation (p.34), [Format the disc? To remove the disc Perform step 1 and 2 to open the disc cover, then remove the disc. • Do not apply...
... lamp lights up or flashes, or [DISC ACCESS] or [PREPARING TO OPEN] is completed, you intend to step 7. Format again to step 6. • During Easy Handycam operation (p.34), [Format the disc? To remove the disc Perform step 1 and 2 to open the disc cover, then remove the disc. • Do not apply...
Operating Guide
Page 34
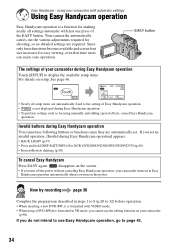
...a new DVD-RW, it is not displayed during Easy Handycam operation] appears. • BACK LIGHT (p.47) • Press and hold DISP BATT/INFO (For DCR-DVD205/DVD305/DVD705/DVD755)(p.49) • Review/Review deleting (p.50) To cancel Easy Handycam Press EASY again. disappears on the screen. • If... you turn off the power without canceling Easy Handycam operation, your camcorder turns on in VR mode...
...a new DVD-RW, it is not displayed during Easy Handycam operation] appears. • BACK LIGHT (p.47) • Press and hold DISP BATT/INFO (For DCR-DVD205/DVD305/DVD705/DVD755)(p.49) • Review/Review deleting (p.50) To cancel Easy Handycam Press EASY again. disappears on the screen. • If... you turn off the power without canceling Easy Handycam operation, your camcorder turns on in VR mode...

Operating Guide
Page 35
Easy Handycam - using your camcorder with automatic settings 35
Easy Handycam - using your camcorder with automatic settings 35

Operating Guide
Page 37
... the recording destination for still images (For DCR-DVD305/DVD755). 1 Touch [SETUP] t [STILL MEDIA]. 2 Select the media for recording still images, then touch . When disappears, the image has been recorded. 37 Easy Handycam - using your camcorder and press EASY to set to Easy Handycam operation (p.34). [Easy Handycam operation ON.] appears, then appears on your...
... the recording destination for still images (For DCR-DVD305/DVD755). 1 Touch [SETUP] t [STILL MEDIA]. 2 Select the media for recording still images, then touch . When disappears, the image has been recorded. 37 Easy Handycam - using your camcorder and press EASY to set to Easy Handycam operation (p.34). [Easy Handycam operation ON.] appears, then appears on your...
Operating Guide
Page 39
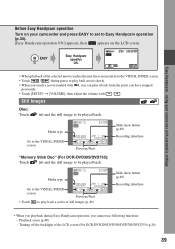
Media type Go to the VISUAL INDEX screen Previous/Next "Memory Stick Duo" (For DCR-DVD305/DVD755): Touch tab and the still image to the VISUAL INDEX screen. • Touch / during Easy Handycam operation, you have stopped previously. • Touch [SETUP] t [VOLUME], then adjust the volume ...a series of the LCD screen (For DCR-DVD205/DVD305/DVD705/DVD755) (p.26) 39 Still Images Disc: Touch tab and the still image to play it back from the point you cannot use following functions: - Playback zoom (p.48) - Easy Handycam - Slide show button (p.49) Recording date...
Media type Go to the VISUAL INDEX screen Previous/Next "Memory Stick Duo" (For DCR-DVD305/DVD755): Touch tab and the still image to the VISUAL INDEX screen. • Touch / during Easy Handycam operation, you have stopped previously. • Touch [SETUP] t [VOLUME], then adjust the volume ...a series of the LCD screen (For DCR-DVD205/DVD305/DVD705/DVD755) (p.26) 39 Still Images Disc: Touch tab and the still image to play it back from the point you cannot use following functions: - Playback zoom (p.48) - Easy Handycam - Slide show button (p.49) Recording date...
Operating Guide
Page 40
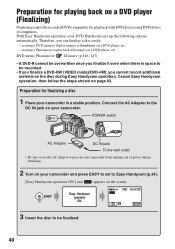
..., etc. Therefore, you cannot record additional material on the disc during finalizing. 2 Turn on your camcorder and press EASY to set to Easy Handycam (p.34). [Easy Handycam operation ON.] and appears on the screen. 3 Insert the disc to be recorded. • If you finalize a DVD-RW (VIDEO mode)/... the wall outlet • Be sure to use the AC adaptor to display images as thumbnails on a DVD player, etc. - Cancel Easy Handycam operation, then follow the steps shown on page 63. Preparation for playing back on a DVD player (Finalizing) Finalizing makes the recorded DVD compatible ...
..., etc. Therefore, you cannot record additional material on the disc during finalizing. 2 Turn on your camcorder and press EASY to set to Easy Handycam (p.34). [Easy Handycam operation ON.] and appears on the screen. 3 Insert the disc to be recorded. • If you finalize a DVD-RW (VIDEO mode)/... the wall outlet • Be sure to use the AC adaptor to display images as thumbnails on a DVD player, etc. - Cancel Easy Handycam operation, then follow the steps shown on page 63. Preparation for playing back on a DVD player (Finalizing) Finalizing makes the recorded DVD compatible ...
Operating Guide
Page 41
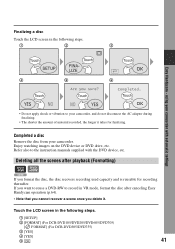
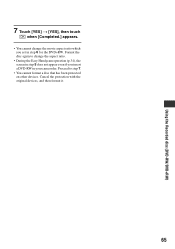
... DVD-RW to your camcorder. Touch the LCD screen in the following steps. 1 [SETUP] 2 [FORMAT] (For DCR-DVD105/DVD205/DVD605/DVD705) [ FORMAT] (For DCR-DVD305/DVD755) 3 [YES] 4 [YES] 5 41 using your camcorder with the DVD device, etc. Completed a disc ...Remove the disc from your camcorder, and do not disconnect the AC adaptor during finalizing. • The shorter the amount of material recorded, the longer it . Deleting all the scenes after canceling Easy Handycam...
... DVD-RW to your camcorder. Touch the LCD screen in the following steps. 1 [SETUP] 2 [FORMAT] (For DCR-DVD105/DVD205/DVD605/DVD705) [ FORMAT] (For DCR-DVD305/DVD755) 3 [YES] 4 [YES] 5 41 using your camcorder with the DVD device, etc. Completed a disc ...Remove the disc from your camcorder, and do not disconnect the AC adaptor during finalizing. • The shorter the amount of material recorded, the longer it . Deleting all the scenes after canceling Easy Handycam...
Operating Guide
Page 65
Format the disc again to step 7. • You cannot format a disc that has been protected on other devices. Proceed to change the movie aspect ratio which you insert a DVD-RW in step 6 for the DVD+RW. Cancel the protection with the original devices, and then format it. 65 Using the Recorded disc (DVD-RW/DVD+RW) 7 Touch [YES] t [YES], then touch when [Completed.] appears. • You cannot change the aspect ratio. • During the Easy Handycam operation (p.34), the screen in step 5 does not appear even if you set in your camcorder.
Format the disc again to step 7. • You cannot format a disc that has been protected on other devices. Proceed to change the movie aspect ratio which you insert a DVD-RW in step 6 for the DVD+RW. Cancel the protection with the original devices, and then format it. 65 Using the Recorded disc (DVD-RW/DVD+RW) 7 Touch [YES] t [YES], then touch when [Completed.] appears. • You cannot change the aspect ratio. • During the Easy Handycam operation (p.34), the screen in step 5 does not appear even if you set in your camcorder.
Operating Guide
Page 67
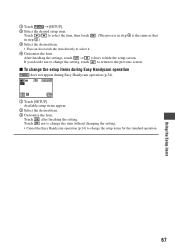
... the item. x To change the setup items for the standard operation. Touch not to change the item without changing the setting. • Cancel the Easy Handycam operation (p.34) to select it. 4 Customize the item. If you decide not to change the setting, touch to return to hide the setup screen. Using... the same as that in step 2.) 3 Select the desired item. • You can also touch the item directly to change the setup items during Easy Handycam operation does not appear during Easy Handycam operation (p.34). 1 Touch [SETUP].
... the item. x To change the setup items for the standard operation. Touch not to change the item without changing the setting. • Cancel the Easy Handycam operation (p.34) to select it. 4 Customize the item. If you decide not to change the setting, touch to return to hide the setup screen. Using... the same as that in step 2.) 3 Select the desired item. • You can also touch the item directly to change the setup items during Easy Handycam operation does not appear during Easy Handycam operation (p.34). 1 Touch [SETUP].
Operating Guide
Page 68
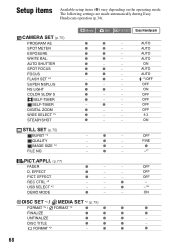
... SLOW S SELF-TIMER SELF-TIMER DIGITAL ZOOM WIDE SELECT *3 STEADYSHOT Movie Still z z z z z z z z z - STILL SET (p.75) BURST *4 QUALITY IMAGE SIZE *4 FILE NO. - z - z 68 PLAY/EDIT Easy Handycam - OFF - OFF - OFF - z - AUTO - AUTO - AUTO - *1/OFF - ON - ON z z z z z - z - DISC SET *5 / MEDIA SET *2 (p.79) FORMAT *5 / FORMAT *2 z z FINALIZE z z UNFINALIZE z z DISC TITLE z z FORMAT *2 - AUTO - AUTO - OFF - z - *6 - Setup...
... SLOW S SELF-TIMER SELF-TIMER DIGITAL ZOOM WIDE SELECT *3 STEADYSHOT Movie Still z z z z z z z z z - STILL SET (p.75) BURST *4 QUALITY IMAGE SIZE *4 FILE NO. - z - z 68 PLAY/EDIT Easy Handycam - OFF - OFF - OFF - z - AUTO - AUTO - AUTO - *1/OFF - ON - ON z z z z z - z - DISC SET *5 / MEDIA SET *2 (p.79) FORMAT *5 / FORMAT *2 z z FINALIZE z z UNFINALIZE z z DISC TITLE z z FORMAT *2 - AUTO - AUTO - OFF - z - *6 - Setup...
Operating Guide
Page 69
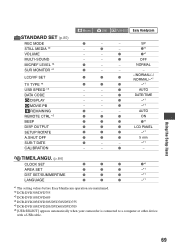
... SETUP ROTATE A.SHUT OFF SUB-T DATE CALIBRATION Movie Still PLAY/EDIT Easy Handycam z - - NORMAL z - - - z AUTO - - TIME/LANGU. (p.84) CLOCK SET z z z z*1 AREA SET z z z -*1 DST SET/SUMMERTIME z z z -*1 LANGUAGE z z z -*1 *1 The setting values before Easy Handycam operation are maintained. *2 DCR-DVD305/DVD755 *3 DCR-DVD105/DVD605 *4 DCR-DVD205/DVD305/DVD705/DVD755 *5 DCR-DVD105/DVD205/DVD605/DVD705 *6 [USB SELECT] appears automatically when your camcorder...
... SETUP ROTATE A.SHUT OFF SUB-T DATE CALIBRATION Movie Still PLAY/EDIT Easy Handycam z - - NORMAL z - - - z AUTO - - TIME/LANGU. (p.84) CLOCK SET z z z z*1 AREA SET z z z -*1 DST SET/SUMMERTIME z z z -*1 LANGUAGE z z z -*1 *1 The setting values before Easy Handycam operation are maintained. *2 DCR-DVD305/DVD755 *3 DCR-DVD105/DVD605 *4 DCR-DVD205/DVD305/DVD705/DVD755 *5 DCR-DVD105/DVD205/DVD605/DVD705 *6 [USB SELECT] appears automatically when your camcorder...

