
Operating Guide
Page 3
... or electric shock. Do not use power-line operated sets near a swimming pool, etc. IMPORTANT SAFEGUARDS For your electrician to have a suitable outlet installed. Carefully observe all warnings, precautions and instructions on the set . This is not likely to the operating instructions. If the plug should be ...by items placed upon or against them . Accessories Do not place the set may cause hazards. The set on a bed, sofa, rug, or other sources, refer to be operated only from battery power, or other similar surface. - Never block the slots and openings by...
... or electric shock. Do not use power-line operated sets near a swimming pool, etc. IMPORTANT SAFEGUARDS For your electrician to have a suitable outlet installed. Carefully observe all warnings, precautions and instructions on the set . This is not likely to the operating instructions. If the plug should be ...by items placed upon or against them . Accessories Do not place the set may cause hazards. The set on a bed, sofa, rug, or other sources, refer to be operated only from battery power, or other similar surface. - Never block the slots and openings by...
Operating Guide
Page 4
... a qualified technician to restore the set to normal operation. - When the set exhibits a distinct change in the operating instructions. Service Damage Requiring Service Unplug the set from the wall outlet and disconnect the antenna or cable system. Adjust only those controls that are required, be sure the service technician has used replacement parts specified by the manufacturer that the set is damaged or frayed. - IMPORTANT...
... a qualified technician to restore the set to normal operation. - When the set exhibits a distinct change in the operating instructions. Service Damage Requiring Service Unplug the set from the wall outlet and disconnect the antenna or cable system. Adjust only those controls that are required, be sure the service technician has used replacement parts specified by the manufacturer that the set is damaged or frayed. - IMPORTANT...
Operating Guide
Page 5
... measures: 5 CAUTION The use of Conformity Trade Name: SONY Model No.: DCR-DVD305 Responsible Party:Sony Electronics Inc. Address: 16450 W. Operation is no guarantee that may call toll free 1-800-8228837, or visit http://www.rbrc.org/ Caution: Do not handle damaged or leaking Lithium-Ion batteries. Read this first Before operating the unit, please read this manual thoroughly, and retain...
... measures: 5 CAUTION The use of Conformity Trade Name: SONY Model No.: DCR-DVD305 Responsible Party:Sony Electronics Inc. Address: 16450 W. Operation is no guarantee that may call toll free 1-800-8228837, or visit http://www.rbrc.org/ Caution: Do not handle damaged or leaking Lithium-Ion batteries. Read this first Before operating the unit, please read this manual thoroughly, and retain...
Operating Guide
Page 7
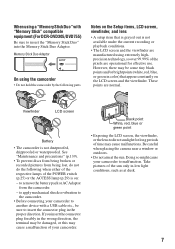
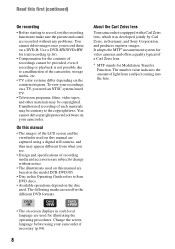
... on the Setup items, LCD screen, viewfinder, and lens • A setup item that appear constantly on : - These points are operational for long ...compatible equipment (For DCR-DVD305/DVD755) Be sure to direct sunlight for effective use. to malfunction. to apply mechanical shock or vibration to the camcorder. • Before connecting your camcorder to remove the battery pack or AC Adaptor from being lost, do not do the following parts...LCD screen Battery • The camcorder is on the LCD screen and the viewfinder. When using a "Memory Stick Duo" with a USB cable etc.,...
... on the Setup items, LCD screen, viewfinder, and lens • A setup item that appear constantly on : - These points are operational for long ...compatible equipment (For DCR-DVD305/DVD755) Be sure to direct sunlight for effective use. to malfunction. to apply mechanical shock or vibration to the camcorder. • Before connecting your camcorder to remove the battery pack or AC Adaptor from being lost, do not do the following parts...LCD screen Battery • The camcorder is on the LCD screen and the viewfinder. When using a "Memory Stick Duo" with a USB cable etc.,...
Operating Guide
Page 8
... on the model DCR-DVD305. • Disc in Germany, and Sony Corporation, and produces superior images. The number value indicates the amount of light from what you see. • Design and specifications of recordings cannot be contrary to 8cm DVD discs. • Available operations depend on the disc used on this manual are subject to change without any problems. You...
... on the model DCR-DVD305. • Disc in Germany, and Sony Corporation, and produces superior images. The number value indicates the amount of light from what you see. • Design and specifications of recordings cannot be contrary to 8cm DVD discs. • Available operations depend on the disc used on this manual are subject to change without any problems. You...
Operating Guide
Page 11
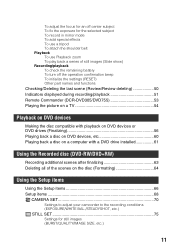
...battery To turn off the operation confirmation beep To initialize the settings (RESET) Other part names and functions Checking/Deleting the last scene (Review/Review deleting 50 Indicators displayed during recording/playback 51 Remote Commander (DCR-DVD305/DVD755 53 Playing the picture on a TV 54 Playback on DVD devices Making the disc compatible... installed 61 Using the Recorded disc (DVD-RW/DVD+RW) Recording additional scenes after finalizing 63 Deleting all of the scenes on the disc (Formatting 64 Using the Setup items Using the Setup items 66 Setup items 68 CAMERA SET 70 Settings ...
...battery To turn off the operation confirmation beep To initialize the settings (RESET) Other part names and functions Checking/Deleting the last scene (Review/Review deleting 50 Indicators displayed during recording/playback 51 Remote Commander (DCR-DVD305/DVD755 53 Playing the picture on a TV 54 Playback on DVD devices Making the disc compatible... installed 61 Using the Recorded disc (DVD-RW/DVD+RW) Recording additional scenes after finalizing 63 Deleting all of the scenes on the disc (Formatting 64 Using the Setup items Using the Setup items 66 Setup items 68 CAMERA SET 70 Settings ...
Operating Guide
Page 20
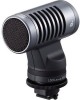
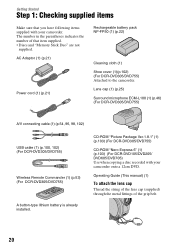
... indicates the number of the grip belt. 20 Lens cap (1) (p.25) Surround microphone ECM-L100 (1) (p.46) (For DCR-DVD305/DVD755) A/V connecting cable (1) (p.54, 96, 98, 102) USB cable (1) (p.100, 102) (For DCR-DVD305/DVD755) Wireless Remote Commander (1) (p.53) (For DCR-DVD305/DVD755) A button-type lithium battery is already installed. AC Adaptor (1) (p.21) Power cord (1) (p.21) Rechargeable battery pack NP-FP50 (1) (p.22) Cleaning cloth (1) Shoe cover (1)(p.102) (For...
... indicates the number of the grip belt. 20 Lens cap (1) (p.25) Surround microphone ECM-L100 (1) (p.46) (For DCR-DVD305/DVD755) A/V connecting cable (1) (p.54, 96, 98, 102) USB cable (1) (p.100, 102) (For DCR-DVD305/DVD755) Wireless Remote Commander (1) (p.53) (For DCR-DVD305/DVD755) A button-type lithium battery is already installed. AC Adaptor (1) (p.21) Power cord (1) (p.21) Rechargeable battery pack NP-FP50 (1) (p.22) Cleaning cloth (1) Shoe cover (1)(p.102) (For...

Operating Guide
Page 49
...back the picture you press this button once, BATTERY INFO appears on the screen for date and time. (Setup items customized on Personal Menu are not initialized.) Other part names and functions 9 Built-in the center ...microphone (For DCR-DVD305/ DVD755)(p.102). 8 Remote sensor (For DCR-DVD305/ DVD755) Point the Remote Commander (p.53) towards the remote sensor to initialize all the settings, including settings for about 7 seconds. qa Speaker Sounds come out from the selected image. To cancel, touch [END]. • You cannot change the zoom speed with T (Telephoto). qs Set the POWER...
...back the picture you press this button once, BATTERY INFO appears on the screen for date and time. (Setup items customized on Personal Menu are not initialized.) Other part names and functions 9 Built-in the center ...microphone (For DCR-DVD305/ DVD755)(p.102). 8 Remote sensor (For DCR-DVD305/ DVD755) Point the Remote Commander (p.53) towards the remote sensor to initialize all the settings, including settings for about 7 seconds. qa Speaker Sounds come out from the selected image. To cancel, touch [END]. • You cannot change the zoom speed with T (Telephoto). qs Set the POWER...
Operating Guide
Page 54
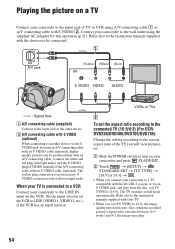
... S VIDEO cable (optional). Playing the picture on the VCR to LINE (VIDEO 1, VIDEO 2, etc.), if the VCR has an input selector. Connect the white and red plug (left/right audio) and the S VIDEO plug (S VIDEO channel) of the TV you connect your camcorder to the wall outlet using A/V connecting cable 1 or A/V connecting cable with the devices to full mode automatically. Refer also to the instruction manuals...
... S VIDEO cable (optional). Playing the picture on the VCR to LINE (VIDEO 1, VIDEO 2, etc.), if the VCR has an input selector. Connect the white and red plug (left/right audio) and the S VIDEO plug (S VIDEO channel) of the TV you connect your camcorder to the wall outlet using A/V connecting cable 1 or A/V connecting cable with the devices to full mode automatically. Refer also to the instruction manuals...
Operating Guide
Page 67
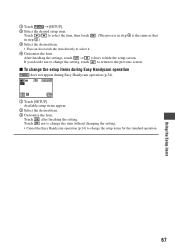
... the item. Touch not to change the item without changing the setting. • Cancel the Easy Handycam operation (p.34) to the previous screen. Using the Setup items 67 If you decide not to change the setting, touch to return to change the setup items during Easy Handycam operation does not appear during Easy Handycam operation (p.34). 1 Touch [SETUP]. Touch after finishing the setting. 1 Touch t[SETUP]. 2 Select the desired...
... the item. Touch not to change the item without changing the setting. • Cancel the Easy Handycam operation (p.34) to the previous screen. Using the Setup items 67 If you decide not to change the setting, touch to return to change the setup items during Easy Handycam operation does not appear during Easy Handycam operation (p.34). 1 Touch [SETUP]. Touch after finishing the setting. 1 Touch t[SETUP]. 2 Select the desired...
Operating Guide
Page 81
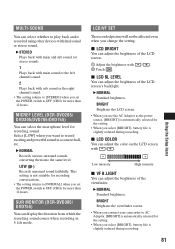
...use the AC Adaptor as the power source, [BRIGHT] is automatically selected for the setting. • When you select [BRIGHT], battery life is not suitable for recording conversations. • The setting returns to [NORMAL] when you set the POWER switch to record exciting and powerful sound in 5.1ch mode. MICREF LEVEL (DCR-DVD205/ DVD305...SUR MONITOR (DCR-DVD305/ DVD755) You can select the microphone level for more than 12 hours. B NORMAL Standard brightness. x LCD BRIGHT You can adjust the brightness of the LCD screen. 1 Adjust the brightness with dual sound or stereo sound. ...
...use the AC Adaptor as the power source, [BRIGHT] is automatically selected for the setting. • When you select [BRIGHT], battery life is not suitable for recording conversations. • The setting returns to [NORMAL] when you set the POWER switch to record exciting and powerful sound in 5.1ch mode. MICREF LEVEL (DCR-DVD205/ DVD305...SUR MONITOR (DCR-DVD305/ DVD755) You can select the microphone level for more than 12 hours. B NORMAL Standard brightness. x LCD BRIGHT You can adjust the brightness of the LCD screen. 1 Adjust the brightness with dual sound or stereo sound. ...
Operating Guide
Page 84
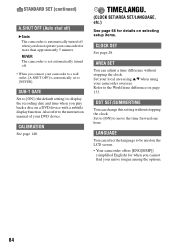
... using v/V when using your DVD device. Set to [ON] to the World time difference on selecting setup items. CLOCK SET See page 28. STANDARD SET (continued) A.SHUT OFF (Auto shut off) B 5min The camcorder is automatically set to [NEVER]. Also refer to a wall outlet, [A.SHUT OFF] is automatically turned off . • When you connect your camcorder to the instruction manual...
... using v/V when using your DVD device. Set to [ON] to the World time difference on selecting setup items. CLOCK SET See page 28. STANDARD SET (continued) A.SHUT OFF (Auto shut off) B 5min The camcorder is automatically set to [NEVER]. Also refer to a wall outlet, [A.SHUT OFF] is automatically turned off . • When you connect your camcorder to the instruction manual...
Operating Guide
Page 96
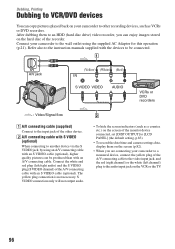
...) video recorder, you are connecting your camcorder to the instruction manuals supplied with an S VIDEO cable (optional). After dubbing them on the screen (p.82). • When you can be connected. Connect your camcorder to a monaural device, connect the yellow plug of the A/V connecting cable to the video input jack, and the red (right channel) or the white (left /right audio) and the S VIDEO plug (S VIDEO...
...) video recorder, you are connecting your camcorder to the instruction manuals supplied with an S VIDEO cable (optional). After dubbing them on the screen (p.82). • When you can be connected. Connect your camcorder to a monaural device, connect the yellow plug of the A/V connecting cable to the video input jack, and the red (right channel) or the white (left /right audio) and the S VIDEO plug (S VIDEO...
Operating Guide
Page 100
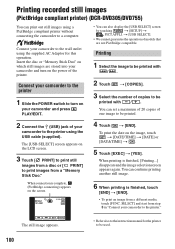
... printer) (DCR-DVD305/DVD755) You can print out still images using the supplied AC Adaptor for the printer to the printer using the USB cable (supplied). Connect your camcorder to print images from a "Memory Stick Duo." When printing is complete, (PictBridge connecting) appears on...models that are stored into your camcorder and turn on your camcorder to the printer 1 Slide the POWER switch to turn on the LCD screen. 3 Touch [ PRINT] to print still images from a disc or [ PRINT] to the printer." SET EXEC The still image appears. • Refer also to the instruction manual...
... printer) (DCR-DVD305/DVD755) You can print out still images using the supplied AC Adaptor for the printer to the printer using the USB cable (supplied). Connect your camcorder to print images from a "Memory Stick Duo." When printing is complete, (PictBridge connecting) appears on...models that are stored into your camcorder and turn on your camcorder to the printer 1 Slide the POWER switch to turn on the LCD screen. 3 Touch [ PRINT] to print still images from a disc or [ PRINT] to the printer." SET EXEC The still image appears. • Refer also to the instruction manual...
Operating Guide
Page 103
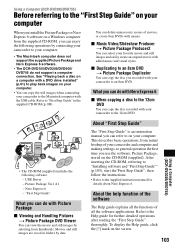
...Step Guide" The "First Step Guide" is an instruction manual you use the software, Picture Package, stored on the CD-ROM (supplied). x Music Video/Slideshow...USB cable. What you can do not support a computer connection. Using a Computer (DCR-DVD305/DVD755) • The CD-ROM (supplied) includes the following operations by selecting from thumbnails. Refer to the supplied instruction manual for further detailed operations after reading the "First Step Guide" thoroughly. Using a Computer (DCR-DVD305/DVD755) Before referring to the "First Step Guide" on your computer When you install...
...Step Guide" The "First Step Guide" is an instruction manual you use the software, Picture Package, stored on the CD-ROM (supplied). x Music Video/Slideshow...USB cable. What you can do not support a computer connection. Using a Computer (DCR-DVD305/DVD755) • The CD-ROM (supplied) includes the following operations by selecting from thumbnails. Refer to the supplied instruction manual for further detailed operations after reading the "First Step Guide" thoroughly. Using a Computer (DCR-DVD305/DVD755) Before referring to the "First Step Guide" on your computer When you install...
Operating Guide
Page 108
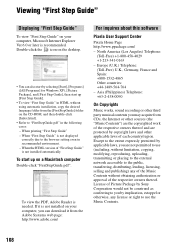
... [First Step Guide]. • To view "First Step Guide" in HTML without using automatic installation, copy the desired language folder from the [FirstStepGuide] folder on a Macintosh computer Double-click "FirstStepGuide.pdf". Europe (U.K.) Telephone: (Toll-Free) U.K., Germany, France and Spain: +800-1532-4865 Other countries: +44-1489-564-764 - License of Picture Package by Sony Corporation would not...
... [First Step Guide]. • To view "First Step Guide" in HTML without using automatic installation, copy the desired language folder from the [FirstStepGuide] folder on a Macintosh computer Double-click "FirstStepGuide.pdf". Europe (U.K.) Telephone: (Toll-Free) U.K., Germany, France and Spain: +800-1532-4865 Other countries: +44-1489-564-764 - License of Picture Package by Sony Corporation would not...
Operating Guide
Page 109
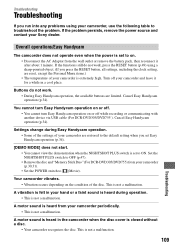
... via USB cable (For DCR-DVD305/DVD755 ). You cannot turn Easy Handycam operation on . • Disconnect the AC Adaptor from the wall outlet or remove the battery pack, then reconnect it for a while in the camcorder when the disc cover is not a malfunction. A motor sound is heard from your camcorder (p.30,31). • Set the POWER switch to troubleshoot the problem...
... via USB cable (For DCR-DVD305/DVD755 ). You cannot turn Easy Handycam operation on . • Disconnect the AC Adaptor from the wall outlet or remove the battery pack, then reconnect it for a while in the camcorder when the disc cover is not a malfunction. A motor sound is heard from your camcorder (p.30,31). • Set the POWER switch to troubleshoot the problem...
Operating Guide
Page 110
... and leave it for a long time. Troubleshooting (continued) Your camcorder gets warm. • This is because the power has been turned on for a while in the remaining battery time indicator, or the battery pack has not been charged enough. Turn off (A.SHUT OFF). Connect it takes about 1 minute to operate. • A problem has occurred in a cool place. The...
... and leave it for a long time. Troubleshooting (continued) Your camcorder gets warm. • This is because the power has been turned on for a while in the remaining battery time indicator, or the battery pack has not been charged enough. Turn off (A.SHUT OFF). Connect it takes about 1 minute to operate. • A problem has occurred in a cool place. The...
Operating Guide
Page 112
...on (p.25). • Insert a "Memory Stick Duo" into your camcorder. "Memory Stick Duo" (DCR-DVD305/DVD755) You cannot operate functions using the "Memory Stick Duo." • Slide the POWER switch to light up to 100 images to be deleted can be deleted (p.50). • On the ...Stick Duo" (p.135). 112 Troubleshooting (continued) Disc The disc cannot be removed. • Make sure the power source (battery pack or AC Adaptor) is connected correctly (p.21). • Remove the battery pack from the camcorder, then attach it again (p.22). • Attach a charged battery pack to the camcorder (p....
...on (p.25). • Insert a "Memory Stick Duo" into your camcorder. "Memory Stick Duo" (DCR-DVD305/DVD755) You cannot operate functions using the "Memory Stick Duo." • Slide the POWER switch to light up to 100 images to be deleted can be deleted (p.50). • On the ...Stick Duo" (p.135). 112 Troubleshooting (continued) Disc The disc cannot be removed. • Make sure the power source (battery pack or AC Adaptor) is connected correctly (p.21). • Remove the battery pack from the camcorder, then attach it again (p.22). • Attach a charged battery pack to the camcorder (p....
Operating Guide
Page 125
.... An error message appears while operating Picture Package. • Close Picture Package first, then slide the POWER switch on your camcorder. • You cannot start Easy Handycam with USB connected] or [Cannot cancel Easy Handycam with the right procedure. You cannot copy the disc to the computer again. [Cannot start or cancel Easy Handycam operation while the USB cable is connected. •...
.... An error message appears while operating Picture Package. • Close Picture Package first, then slide the POWER switch on your camcorder. • You cannot start Easy Handycam with USB connected] or [Cannot cancel Easy Handycam with the right procedure. You cannot copy the disc to the computer again. [Cannot start or cancel Easy Handycam operation while the USB cable is connected. •...


