Operating Instructions
Page 14
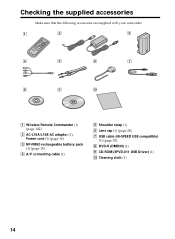
Checking the supplied accessories Make sure that the following accessories are supplied with your camcorder. 1 2 3 4 5 6 7 8 9 0 1 Wireless Remote Commander (1) (page 142) 2 AC-L15A/L15B AC adaptor (1), Power cord (1) (page 16) 3 NP-FM50 rechargeable battery pack (1) (page 15) 4 A/V connecting cable (1) 5 Shoulder strap (1) 6 Lens cap (1) (page 28) 7 USB cable (Hi-SPEED USB compatible) (1) (page 92) 8 DVD-R (DMR30) (1) 9 CD-ROM (SPVD-011 USB Driver) (1) q; Cleaning cloth (1) 14
Checking the supplied accessories Make sure that the following accessories are supplied with your camcorder. 1 2 3 4 5 6 7 8 9 0 1 Wireless Remote Commander (1) (page 142) 2 AC-L15A/L15B AC adaptor (1), Power cord (1) (page 16) 3 NP-FM50 rechargeable battery pack (1) (page 15) 4 A/V connecting cable (1) 5 Shoulder strap (1) 6 Lens cap (1) (page 28) 7 USB cable (Hi-SPEED USB compatible) (1) (page 92) 8 DVD-R (DMR30) (1) 9 CD-ROM (SPVD-011 USB Driver) (1) q; Cleaning cloth (1) 14
Operating Instructions
Page 28
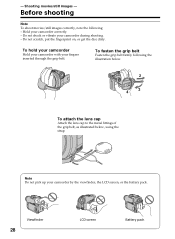
... camcorder with your camcorder during shooting. - - Before shooting Note To shoot movies/still images correctly, note the following the illustration below. 1 2 4 3 To attach the lens cap Attach the lens cap to the metal fittings of the grip belt, as illustrated below, using the strap. Shooting movies/still images - Do not shock or vibrate your...
... camcorder with your camcorder during shooting. - - Before shooting Note To shoot movies/still images correctly, note the following the illustration below. 1 2 4 3 To attach the lens cap Attach the lens cap to the metal fittings of the grip belt, as illustrated below, using the strap. Shooting movies/still images - Do not shock or vibrate your...
Operating Instructions
Page 29
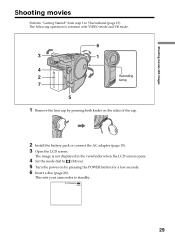
... and VR mode. 6 3 1 4 2 Recording lamp 7 5 1 Remove the lens cap by pressing both knobs on by pressing the POWER button for a few seconds. 6 Insert a disc (page 26). STBY0:00:00 -R VIDEO 29 This sets your camcorder to (Movie). 5 Turn the power on the sides of the cap. 2 Install the battery pack or connect the...
... and VR mode. 6 3 1 4 2 Recording lamp 7 5 1 Remove the lens cap by pressing both knobs on by pressing the POWER button for a few seconds. 6 Insert a disc (page 26). STBY0:00:00 -R VIDEO 29 This sets your camcorder to (Movie). 5 Turn the power on the sides of the cap. 2 Install the battery pack or connect the...
Operating Instructions
Page 30
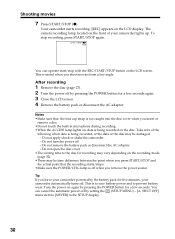
... off by pressing the POWER button for five minutes, your camcorder automatically turns off when you press START/STOP and the actual point that the lens cap strap is not caught into the disc cover when you insert or remove a disc. •Do not touch the built-in the SETUP display. 30...
... off by pressing the POWER button for five minutes, your camcorder automatically turns off when you press START/STOP and the actual point that the lens cap strap is not caught into the disc cover when you insert or remove a disc. •Do not touch the built-in the SETUP display. 30...
Operating Instructions
Page 35
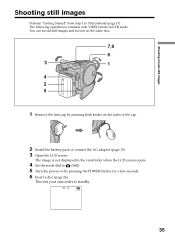
... movies/still images Shooting still images Perform "Getting Started" from step 1 to standby. You can record still images and movies on the sides of the cap. 2 Install the battery pack or connect the AC adaptor (page 15). 3 Open the LCD screen. FINE 0 -R VIDEO 35 This sets your camcorder to 5 beforehand (page... when the LCD screen opens. 4 Set the mode dial to (Still). 5 Turn the power on by pressing both knobs on the same disc. 7 8 6 3 1 4 2 5 1 Remove the lens cap by pressing the POWER button for a few seconds. 6 Insert a disc (page 26).
... movies/still images Shooting still images Perform "Getting Started" from step 1 to standby. You can record still images and movies on the sides of the cap. 2 Install the battery pack or connect the AC adaptor (page 15). 3 Open the LCD screen. FINE 0 -R VIDEO 35 This sets your camcorder to 5 beforehand (page... when the LCD screen opens. 4 Set the mode dial to (Still). 5 Turn the power on by pressing both knobs on the same disc. 7 8 6 3 1 4 2 5 1 Remove the lens cap by pressing the POWER button for a few seconds. 6 Insert a disc (page 26).
Operating Instructions
Page 135
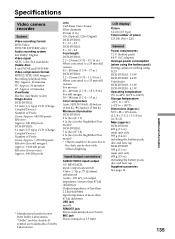
...176;F) Dimensions (Approx.) 50.5 × 88 × 135.4 mm (2 1/4 × 3 1/2 × 5 3/8 in.) (w/h/d) Mass (approx.) DCR-DVD101 490 g (11 oz) main unit only 595 g (14 oz) including the battery pack, disc and lens cap DCR-DVD201 500 g (11 oz) main unit only 605 g (15 oz) including the battery pack, disc and... lens cap Supplied accessories See page 14. Input/Output connectors AUDIO/VIDEO input/output AV MINI JACK, input/...
...176;F) Dimensions (Approx.) 50.5 × 88 × 135.4 mm (2 1/4 × 3 1/2 × 5 3/8 in.) (w/h/d) Mass (approx.) DCR-DVD101 490 g (11 oz) main unit only 595 g (14 oz) including the battery pack, disc and lens cap DCR-DVD201 500 g (11 oz) main unit only 605 g (15 oz) including the battery pack, disc and... lens cap Supplied accessories See page 14. Input/Output connectors AUDIO/VIDEO input/output AV MINI JACK, input/...

Operating Instructions
Page 138
Identifying parts and controls q; qd Viewfinder lens adjustment dial (page 22) qf POWER button (page 19) qg BATT (battery) release button (page 15) qh DC IN jack (page 16) qj Lens cap (page 28) qk Tripod receptacle Make sure that the length of the tripod screw is less than 5.5 mm (7/32 inch). qh qa qs qj qd qf qg qk q; Otherwise, you cannot attach the tripod securely, and the screw may damage your camcorder. 138 Mode dial (page 19) qa POWER/CHG lamp (page 16) qs REMOTE jack Use to connect to optional accessories.
Identifying parts and controls q; qd Viewfinder lens adjustment dial (page 22) qf POWER button (page 19) qg BATT (battery) release button (page 15) qh DC IN jack (page 16) qj Lens cap (page 28) qk Tripod receptacle Make sure that the length of the tripod screw is less than 5.5 mm (7/32 inch). qh qa qs qj qd qf qg qk q; Otherwise, you cannot attach the tripod securely, and the screw may damage your camcorder. 138 Mode dial (page 19) qa POWER/CHG lamp (page 16) qs REMOTE jack Use to connect to optional accessories.


